

Owners Guide
Page 2
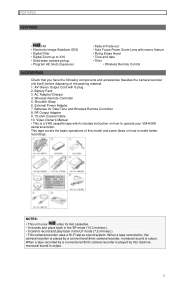
... CAMERA RECORDING 17 IDENTIFICATION AND OPERATION OF CONTROLS 19 DATE/TIME SETTING ...22 AUTO FOCUS...24 EXPOSURE CORRECTION...25 POWER ZOOM ...26 DIGITAL ZOOM...27 FADE-IN/FADE-OUT ...28 DIGITAL FILTER...29 ELECTRONIC IMAGE STABILIZER (EIS 30 MACRO ...31 SECOND CLOCK SETTING...32 DISPLAY BUTTON ...33 LINEAR TIME COUNTER...33 MEMORY ...34 INSTANT REVIEW...35 QUICK EDIT...35 EYEPIECE ADJUSTMENT...36 TITLE RECORDING ...36 WIRELESS REMOTE CONTROLLER ...39 AUDIO/VIDEO DUBBING ...40 RECORDING TV PROGRAMS ...41 VIEWING THE PICTURE PLAYED BACK...
... CAMERA RECORDING 17 IDENTIFICATION AND OPERATION OF CONTROLS 19 DATE/TIME SETTING ...22 AUTO FOCUS...24 EXPOSURE CORRECTION...25 POWER ZOOM ...26 DIGITAL ZOOM...27 FADE-IN/FADE-OUT ...28 DIGITAL FILTER...29 ELECTRONIC IMAGE STABILIZER (EIS 30 MACRO ...31 SECOND CLOCK SETTING...32 DISPLAY BUTTON ...33 LINEAR TIME COUNTER...33 MEMORY ...34 INSTANT REVIEW...35 QUICK EDIT...35 EYEPIECE ADJUSTMENT...36 TITLE RECORDING ...36 WIRELESS REMOTE CONTROLLER ...39 AUDIO/VIDEO DUBBING ...40 RECORDING TV PROGRAMS ...41 VIEWING THE PICTURE PLAYED BACK...

Owners Guide
Page 4
... room changes abruptly, turn the power on the recorder mechanism, which contains an extremely bright object such as an inherent characteristic. For maximun pleasure and convenience please read these simple instructions before using the camera/recorder, switch off the power and attach the lens cap. A flashing "DEW" indication in the picture. When you are copyrighted. Thank you shoot at a scene which could result in tape...
... room changes abruptly, turn the power on the recorder mechanism, which contains an extremely bright object such as an inherent characteristic. For maximun pleasure and convenience please read these simple instructions before using the camera/recorder, switch off the power and attach the lens cap. A flashing "DEW" indication in the picture. When you are copyrighted. Thank you shoot at a scene which could result in tape...
Owners Guide
Page 5
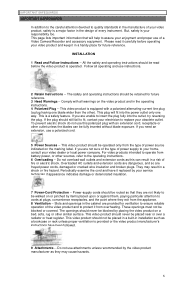
... camera/recorder is played by a conventional 8mm camera/recorder, monaural sound is output. 5 AC Adapter/Charger 4. RF Output Adapter 9. 75-ohm Coaxial Cable 10. NOTES: • This unit uses video format cassettes. • It records and plays back in the SP mode (14.3 mm/sec.). • It cannot record and play back in /Fade-out • Auto Focus Power Zoom Lens with S plug 2. Battery Pack 3. AV Stereo Output Cord with macro feature • Flying Erase Head • Time and date • Titler • Wireless Remote Control...
... camera/recorder is played by a conventional 8mm camera/recorder, monaural sound is output. 5 AC Adapter/Charger 4. RF Output Adapter 9. 75-ohm Coaxial Cable 10. NOTES: • This unit uses video format cassettes. • It records and plays back in the SP mode (14.3 mm/sec.). • It cannot record and play back in /Fade-out • Auto Focus Power Zoom Lens with S plug 2. Battery Pack 3. AV Stereo Output Cord with macro feature • Flying Erase Head • Time and date • Titler • Wireless Remote Control...
Owners Guide
Page 6
... your service technician if appearance indicates damage or deteriorated insulation. 7 Power-Cord Protection -- IMPORTANT SAFEGUARDS IMPORTANT SAFEGUARDS In addition to the careful attention devoted to quality standards in the manufacture of your video product, safety is a major factor in a shock or fire hazard. The safety and operating instructions should never be retained for future reference. Do not use of a Video Camera/Recorder...
... your service technician if appearance indicates damage or deteriorated insulation. 7 Power-Cord Protection -- IMPORTANT SAFEGUARDS IMPORTANT SAFEGUARDS In addition to the careful attention devoted to quality standards in the manufacture of your video product, safety is a major factor in a shock or fire hazard. The safety and operating instructions should never be retained for future reference. Do not use of a Video Camera/Recorder...
Owners Guide
Page 9
... installer's attention to electric plug and cord, pull by the battery charger manufacturer may burst causing personal injury and damage. 5. replace them immediately. 10. That wire size should not be used , make sure: A. take it will not be used unless absolutely necessary. Also read all instructions on (1) AC Adapter/Charger, (2) battery and (3) product using AC Adapter/Charger, read all instructions and cautionary markings on pages 4 and 5. 4. Other types...
... installer's attention to electric plug and cord, pull by the battery charger manufacturer may burst causing personal injury and damage. 5. replace them immediately. 10. That wire size should not be used , make sure: A. take it will not be used unless absolutely necessary. Also read all instructions on (1) AC Adapter/Charger, (2) battery and (3) product using AC Adapter/Charger, read all instructions and cautionary markings on pages 4 and 5. 4. Other types...
Owners Guide
Page 12
... camera/recorder. • Dispose of battery safely and in the direction of the camera/recorder. 3. POWER SOURCES NOTES: • When replacing the batteries, use 3V micro lithium cell such as Maxell CR2025 or equivalent. • Instructions for the first time. If swallowed, consult a physician immediately for emergency treatment. To remove the battery 1. You can be used for setting the date and time are on page 22. Refer to "CHARGING...
... camera/recorder. • Dispose of battery safely and in the direction of the camera/recorder. 3. POWER SOURCES NOTES: • When replacing the batteries, use 3V micro lithium cell such as Maxell CR2025 or equivalent. • Instructions for the first time. If swallowed, consult a physician immediately for emergency treatment. To remove the battery 1. You can be used for setting the date and time are on page 22. Refer to "CHARGING...
Owners Guide
Page 13
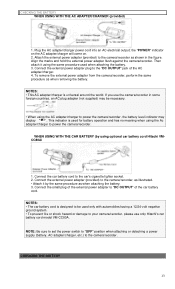
... adapter/charger is used for battery operation and has no meaning when using optional car battery cord Hitachi VMCC80A) 1. WHEN USING WITH THE CAR BATTERY (by the same procedure as when removing the battery. Connect the external power adapter plug to "DC OUTPUT" of the AC adapter/charger. 4. If you use only Hitachi's car battery cord model VM-CC80A. Connect the external power adapter (provided) to the camera/recorder, as illustrated. • Attach it using the AC adapter/charger to power the camera/recorder. NOTE: Be sure to set...
... adapter/charger is used for battery operation and has no meaning when using optional car battery cord Hitachi VMCC80A) 1. WHEN USING WITH THE CAR BATTERY (by the same procedure as when removing the battery. Connect the external power adapter plug to "DC OUTPUT" of the AC adapter/charger. 4. If you use only Hitachi's car battery cord model VM-CC80A. Connect the external power adapter (provided) to the camera/recorder, as illustrated. • Attach it using the AC adapter/charger to power the camera/recorder. NOTE: Be sure to set...
Owners Guide
Page 15
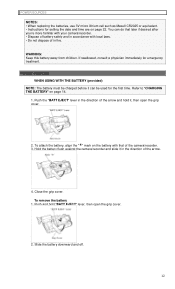
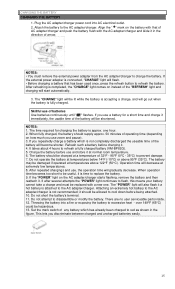
... no user serviceable parts inside. 12. Charge the battery before use of AC adapter/charger and push the battery flush with a new one hour. 2. The "CHARGE" light will go out when the battery is not completely discharged the useable time of operating time (depending on the AC adapter/charger starts flashing, remove the battery and then reattach it in the figure. Attach the battery to charge the battery. When fully charged, the battery should be replaced...
... no user serviceable parts inside. 12. Charge the battery before use of AC adapter/charger and push the battery flush with a new one hour. 2. The "CHARGE" light will go out when the battery is not completely discharged the useable time of operating time (depending on the AC adapter/charger starts flashing, remove the battery and then reattach it in the figure. Attach the battery to charge the battery. When fully charged, the battery should be replaced...
Owners Guide
Page 17
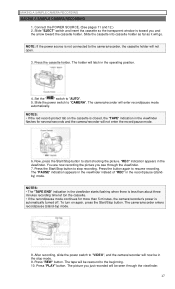
... appears in the operating position. 4. Press the Start/Stop button to "AUTO". 5. Press "REW" button. Press "PLAY" button. NOTE: If the power source is toward you and the arrow toward the cassette holder. To turn on the cassette is automatically turned off. After recording, slide the power switch to the camera/recorder, the cassette holder will not enter the record/pause mode. 6. Set the " " switch to stop mode. 9. NOTES: • If the red record-protect tab on...
... appears in the operating position. 4. Press the Start/Stop button to "AUTO". 5. Press "REW" button. Press "PLAY" button. NOTE: If the power source is toward you and the arrow toward the cassette holder. To turn on the cassette is automatically turned off. After recording, slide the power switch to the camera/recorder, the cassette holder will not enter the record/pause mode. 6. Set the " " switch to stop mode. 9. NOTES: • If the red record-protect tab on...

Owners Guide
Page 18
... to your TV, you have a cassette tape that has already been partially recorded on page 11. Slide the power switch to "OFF" and then slide "EJECT" switch to record the remaining blank section, see the picture played back on page 31. 18 Always remove the power source from the camera/recorder after use. NOTE: If you can see "QUICK EDIT" on your TV. After playing, press "STOP" button. 12.
... to your TV, you have a cassette tape that has already been partially recorded on page 11. Slide the power switch to "OFF" and then slide "EJECT" switch to record the remaining blank section, see the picture played back on page 31. 18 Always remove the power source from the camera/recorder after use. NOTE: If you can see "QUICK EDIT" on your TV. After playing, press "STOP" button. 12.
Owners Guide
Page 19
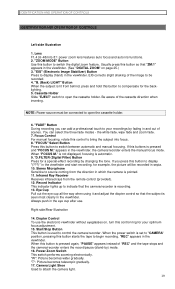
.... 9. Power Zoom Switch This switch performs zooming electronically. Camera Light Shoe Used to switch the digital zoom feature. "ZOOM MODE" Button Use this button to control the camera/recorder. "B. (Back) LIGHT" Button When the subject is lit from behind, press and hold this button to attach the camera light. 19 "FADE" Button During recording you press this button to open the cassette holder. 6. the white fade, wipe fade and zoom fade. 7. is not displayed, focusing is set to "CAMERA" position, pressing this button so that the camera/recorder...
.... 9. Power Zoom Switch This switch performs zooming electronically. Camera Light Shoe Used to switch the digital zoom feature. "ZOOM MODE" Button Use this button to control the camera/recorder. "B. (Back) LIGHT" Button When the subject is lit from behind, press and hold this button to attach the camera light. 19 "FADE" Button During recording you press this button to open the cassette holder. 6. the white fade, wipe fade and zoom fade. 7. is not displayed, focusing is set to "CAMERA" position, pressing this button so that the camera/recorder...

Owners Guide
Page 20
... "PLAY" button to return to normal playback mode or press "STOP" button to review the last few seconds of tapes. IDENTIFICATION AND OPERATION OF CONTROLS 18. Press the button during stop or rewind mode, and fast-forwarding starts. Also use "F.FWD" button when setting the date/time. Also use "STOP" button when setting the date/time. 27. "PLAY" Button Used for playback of the recorded segment in record/pause (standby) mode by the camera/recorder. "PAUSE" Button When this button to record pictures from the VCR or TV. 19. Bottom view/Remote Control...
... "PLAY" button to return to normal playback mode or press "STOP" button to review the last few seconds of tapes. IDENTIFICATION AND OPERATION OF CONTROLS 18. Press the button during stop or rewind mode, and fast-forwarding starts. Also use "F.FWD" button when setting the date/time. Also use "STOP" button when setting the date/time. 27. "PLAY" Button Used for playback of the recorded segment in record/pause (standby) mode by the camera/recorder. "PAUSE" Button When this button to record pictures from the VCR or TV. 19. Bottom view/Remote Control...

Owners Guide
Page 21
.... 32. "EJECT" Button Operates with the power on a tripod (generally available). 38. "MIC" Switch This switch is used to display a still picture during playback. Camera/Recorder Control Buttons These shaded buttons on the remote control function the same as those on the tape. 33. This button may also be recorded on the camera/recorder. 40. "DATE" Button Press this button is connected to "0:00:00". 31. When this button to resume recording. "DISPLAY" Button When this cover when attaching the battery or external power adapter. 36...
.... 32. "EJECT" Button Operates with the power on a tripod (generally available). 38. "MIC" Switch This switch is used to display a still picture during playback. Camera/Recorder Control Buttons These shaded buttons on the remote control function the same as those on the tape. 33. This button may also be recorded on the camera/recorder. 40. "DATE" Button Press this button is connected to "0:00:00". 31. When this button to resume recording. "DISPLAY" Button When this cover when attaching the battery or external power adapter. 36...

Owners Guide
Page 22
... "STOP" button. 6. Use the following procedure to select correct month. Date and time appear in the power switch, and then slide it to "CAMERA" position. 3. Press "F.FWD" button to set up this display for the current date and time. 1. Hold button down to select correct hour, and then press "STOP" button. 8. Repeat step 7 to advance rapidly. DATE/TIME SETTING DATE/TIME SETTING 1The date and time can be required to advance rapidly. Load the camera/recorder's date/time battery...
... "STOP" button. 6. Use the following procedure to select correct month. Date and time appear in the power switch, and then slide it to "CAMERA" position. 3. Press "F.FWD" button to set up this display for the current date and time. 1. Hold button down to select correct hour, and then press "STOP" button. 8. Repeat step 7 to advance rapidly. DATE/TIME SETTING DATE/TIME SETTING 1The date and time can be required to advance rapidly. Load the camera/recorder's date/time battery...
Owners Guide
Page 25
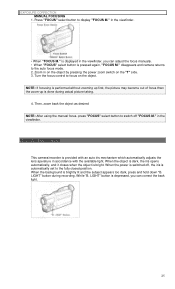
... power is switched off "FOCUS M." While "B. LIGHT" button is automatically set to focus on the "T" side. 3. is displayed in the viewfinder, you can adjust the focus manually. • When "FOCUS" select button is provided with the available light. in the viewfinder. • When "FOCUS M." Zoom in accordance with an auto iris mechanism which automatically adjusts the lens aperature in on the object by pressing the power zoom switch on the object. Turn the focus control...
... power is switched off "FOCUS M." While "B. LIGHT" button is automatically set to focus on the "T" side. 3. is displayed in the viewfinder, you can adjust the focus manually. • When "FOCUS" select button is provided with the available light. in the viewfinder. • When "FOCUS M." Zoom in accordance with an auto iris mechanism which automatically adjusts the lens aperature in on the object by pressing the power zoom switch on the object. Turn the focus control...

Owners Guide
Page 40
... audio output of the VCR. • If no video and audio plugs are connected, new audio and video from the camera/recorder's builtin microphone and camera is dubbed onto the tape. • If the AV dub/pause mode continues for the exact position that you want to "0:00:00M". 7. Aim the remote controller at the same time the picture to the TV instead of the camera/recorder. 4. A/V dubbing will stop dubbing, then press "PAUSE" button...
... audio output of the VCR. • If no video and audio plugs are connected, new audio and video from the camera/recorder's builtin microphone and camera is dubbed onto the tape. • If the AV dub/pause mode continues for the exact position that you want to "0:00:00M". 7. Aim the remote controller at the same time the picture to the TV instead of the camera/recorder. 4. A/V dubbing will stop dubbing, then press "PAUSE" button...

Owners Guide
Page 42
... an "S-VIDEO IN" jack, connect the "S-VIDEO" plug (black) to the TV receiver using either AV stereo output cord (provided) or RF output adapter (provided). Press "PLAY" button. 7. VIEWING THE PICTURE PLAYED BACK ON YOUR TV VIEWING THE PICTURE PLAYED BACK ON YOUR TV To play back a tape recorded on your camera/recorder and view it on your VCR. 4. NOTES: • If your VCR has a single (mono) audio input, connect either the left or right audio plug to the audio input of "Example...
... an "S-VIDEO IN" jack, connect the "S-VIDEO" plug (black) to the TV receiver using either AV stereo output cord (provided) or RF output adapter (provided). Press "PLAY" button. 7. VIEWING THE PICTURE PLAYED BACK ON YOUR TV VIEWING THE PICTURE PLAYED BACK ON YOUR TV To play back a tape recorded on your camera/recorder and view it on your VCR. 4. NOTES: • If your VCR has a single (mono) audio input, connect either the left or right audio plug to the audio input of "Example...

Owners Guide
Page 44
... "PAUSE" button and playback will be played back at a speed about 9 times (forward search) or 7 times (reverse search) faster than 5 minutes, the camera/recorder will be some noise (interference) in the forward or reverse search pictures while visually scanning. 44 Press "PLAY" button to return to normal playback mode or press "STOP" button to stop mode to protect the tape from damage. STILL STILL When "PAUSE" button is pressed during playback, the tape...
... "PAUSE" button and playback will be played back at a speed about 9 times (forward search) or 7 times (reverse search) faster than 5 minutes, the camera/recorder will be some noise (interference) in the forward or reverse search pictures while visually scanning. 44 Press "PLAY" button to return to normal playback mode or press "STOP" button to stop mode to protect the tape from damage. STILL STILL When "PAUSE" button is pressed during playback, the tape...

Owners Guide
Page 45
... right audio plug to VCR for this purpose. Remove both caps of video camera/recorder lens assembly. Camera to the "TV ANT" connector, as shown in diagram above. Connect the AV stereo output cord to "AV IN/OUT" of your friend's favorite home recordings, the following instructions can be used to connect camera/recorder to the audio input on the front of the tele or wide converter. 3. Play the tape on the VCR...
... right audio plug to VCR for this purpose. Remove both caps of video camera/recorder lens assembly. Camera to the "TV ANT" connector, as shown in diagram above. Connect the AV stereo output cord to "AV IN/OUT" of your friend's favorite home recordings, the following instructions can be used to connect camera/recorder to the audio input on the front of the tele or wide converter. 3. Play the tape on the VCR...
Owners Guide
Page 50
... selected channel in direction indicated by using RF output adapter.) Interference on television Set the television to erase it is out of RF output adapter. (TV is pressed. It needs to "CAMERA" position. Cassette window must be modified to obtain best picture. Connect the camera/recorder and TV (or VCR). Picture bends at the factory under the mose rigid quality control and inspection systems. However, should problems develop, check the following points...
... selected channel in direction indicated by using RF output adapter.) Interference on television Set the television to erase it is out of RF output adapter. (TV is pressed. It needs to "CAMERA" position. Cassette window must be modified to obtain best picture. Connect the camera/recorder and TV (or VCR). Picture bends at the factory under the mose rigid quality control and inspection systems. However, should problems develop, check the following points...


