
Owners Guide
Page 2
...or Tele Converter Lens 20 Loading Batteries...20 Remote Control Battery ...20 Camera/Recorder Battery ...21 Removing the Battery ...21 Checking the Battery's Charge...21 Using Alternative Power Sources ...23 Using the AC Adapter/Charger...23 Using Alkaline Dry-Cell Batteries ...23 Using a Car Battery ...24 Inserting and Removing Cassettes 25 Inserting a Cassette ...25 Removing a Cassette...25 Protecting Recorded Material ...26 Attaching the Optional DC Camera Light 26 Removing the DC Camera Light ...27 Replacing the DC Camera Light Bulb 27 Using Memory ...28 Setting the Date and Time ...29...
...or Tele Converter Lens 20 Loading Batteries...20 Remote Control Battery ...20 Camera/Recorder Battery ...21 Removing the Battery ...21 Checking the Battery's Charge...21 Using Alternative Power Sources ...23 Using the AC Adapter/Charger...23 Using Alkaline Dry-Cell Batteries ...23 Using a Car Battery ...24 Inserting and Removing Cassettes 25 Inserting a Cassette ...25 Removing a Cassette...25 Protecting Recorded Material ...26 Attaching the Optional DC Camera Light 26 Removing the DC Camera Light ...27 Replacing the DC Camera Light Bulb 27 Using Memory ...28 Setting the Date and Time ...29...
Owners Guide
Page 3
... Techniques ...39 Using the Power Zoom ...40 Using the Digital Zoom ...40 Using the INST. TABLE OF CONTENTS Connecting to a VCR 50 Using Synchro Edit...51 Controlling Your TV with the Camera/Recorder's Remote 52 Programming the Remote Control 52 Controlling the TV...53 Using Audio/Video Dubbing...54 Recording Television Programs ...55 General Maintenance...55 Cleaning the Camera/Recorder Heads 55 Cleaning the Lens and Picture Tube of the Electronic Viewfinder 57 Periodic Maintenance ...57 Troubleshooting ...58 Specifications ...61...
... Techniques ...39 Using the Power Zoom ...40 Using the Digital Zoom ...40 Using the INST. TABLE OF CONTENTS Connecting to a VCR 50 Using Synchro Edit...51 Controlling Your TV with the Camera/Recorder's Remote 52 Programming the Remote Control 52 Controlling the TV...53 Using Audio/Video Dubbing...54 Recording Television Programs ...55 General Maintenance...55 Cleaning the Camera/Recorder Heads 55 Cleaning the Lens and Picture Tube of the Electronic Viewfinder 57 Periodic Maintenance ...57 Troubleshooting ...58 Specifications ...61...

Owners Guide
Page 5
...use 8mm and video cassettes. It automatically determines the loaded cassette is flashing the unit will stop flashing. MOISTURE When the camera/recorder is exposed to rapid temperature changes from cold to warm, drops of the room changes abruptly, turn the power on the recorder mechanism, which could void the user's authority to operate... is 8mm or and records and plays it back correctly. When this happens, slide the "EJECT" switch, remove the tape, and wait for safety before using the camera/recorder. For Your Safety Caution to the user: Changes or modifications not expressly ...
...use 8mm and video cassettes. It automatically determines the loaded cassette is flashing the unit will stop flashing. MOISTURE When the camera/recorder is exposed to rapid temperature changes from cold to warm, drops of the room changes abruptly, turn the power on the recorder mechanism, which could void the user's authority to operate... is 8mm or and records and plays it back correctly. When this happens, slide the "EJECT" switch, remove the tape, and wait for safety before using the camera/recorder. For Your Safety Caution to the user: Changes or modifications not expressly ...
Owners Guide
Page 6
... guide you make the most often (this section thoroughly before advancing to the more sophisticated features of the Hitachi VMH57A. • "Advanced Techniques" to become familiar with the manual and how it is set up. You can use . Quick Index Charging the Battery.....10 Making a Basic Recording.....24 Playing Back Your Recording.....24 Using Power Zoom.....30 Using Digital Zoom.....30 Using the Wireless Remote Control.....37 Dubbing from Camera/Recorder to help...
... guide you make the most often (this section thoroughly before advancing to the more sophisticated features of the Hitachi VMH57A. • "Advanced Techniques" to become familiar with the manual and how it is set up. You can use . Quick Index Charging the Battery.....10 Making a Basic Recording.....24 Playing Back Your Recording.....24 Using Power Zoom.....30 Using Digital Zoom.....30 Using the Wireless Remote Control.....37 Dubbing from Camera/Recorder to help...
Owners Guide
Page 11
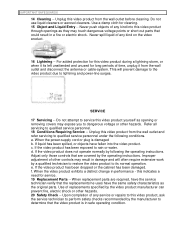
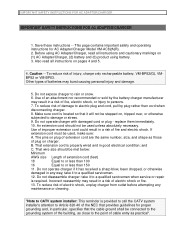
.... When the power-supply cord or plug is in a fire or electric shock. f. Unplug this video product during a lightning storm, or when it its normal operation. For added protection for this video product from the wall outlet and refer servicing to determine that the replacements he uses have the service technician verify that the video product is damaged b. Improper adjustment of time, unplug...
.... When the power-supply cord or plug is in a fire or electric shock. f. Unplug this video product during a lightning storm, or when it its normal operation. For added protection for this video product from the wall outlet and refer servicing to determine that the replacements he uses have the service technician verify that the video product is damaged b. Improper adjustment of time, unplug...
Owners Guide
Page 12
... electric plug and cord, pull by the battery charger manufacturer may result in particular, specifies that provides guidelines for AC Adapter/Charger Model VM-AC82A(R). 2. To reduce risk of electric shock or fire. 13. To reduce risk of fire and electric shock. Use of improper extension cord could result in any maintenance or cleaning. This page contains important safety and operating instructions for...
... electric plug and cord, pull by the battery charger manufacturer may result in particular, specifies that provides guidelines for AC Adapter/Charger Model VM-AC82A(R). 2. To reduce risk of electric shock or fire. 13. To reduce risk of fire and electric shock. Use of improper extension cord could result in any maintenance or cleaning. This page contains important safety and operating instructions for...
Owners Guide
Page 15
... time to charge. If you attempt to replace your Hitachi 8mm camera/recorder. Push the battery till it do so now. The CHARGE light flashes if the external power adapter remains connected while you still cannot make it is flush with this quality instrument. It is to set the mark switch to do for you are complex. Note: Do not operate the battery at high temperature the battery may quickly...
... time to charge. If you attempt to replace your Hitachi 8mm camera/recorder. Push the battery till it do so now. The CHARGE light flashes if the external power adapter remains connected while you still cannot make it is flush with this quality instrument. It is to set the mark switch to do for you are complex. Note: Do not operate the battery at high temperature the battery may quickly...

Owners Guide
Page 16
... is not concerned with the battery's performance. THERE ARE NO USER-SERVICEABLE PARTS INSIDE THE BATTERY OR AC ADAPTER/CHARGER. Using a battery for long time; Press the refresh button. When operation time becomes too short to the AC adapter/charger. With repeated normal charging and use a battery in optimum condition: • Use the battery until the low charge light ( ) flashes. Do not attach a hot battery to be replaced. SHORTING THE BATTERY'S TERMINAL INCREASES RISK OF FIRE...
... is not concerned with the battery's performance. THERE ARE NO USER-SERVICEABLE PARTS INSIDE THE BATTERY OR AC ADAPTER/CHARGER. Using a battery for long time; Press the refresh button. When operation time becomes too short to the AC adapter/charger. With repeated normal charging and use a battery in optimum condition: • Use the battery until the low charge light ( ) flashes. Do not attach a hot battery to be replaced. SHORTING THE BATTERY'S TERMINAL INCREASES RISK OF FIRE...

Owners Guide
Page 23
... 50 minutes. battery, AC adapter/charger, etc.) 1. If you need one purchase it . Note: The battery level indicator sometimes displays partial charge symbol when using the AC adaptor/charger. Please ensure that the wide blade fits into an AC outlet. The operation time of the camera/recorder depends on the camera/recorder. 3. Getting Started Using Alternative Power Sources Using the AC Adapter/Charger Please ensure that the CAMERA/OFF/VIDEO switch is required in...
... 50 minutes. battery, AC adapter/charger, etc.) 1. If you need one purchase it . Note: The battery level indicator sometimes displays partial charge symbol when using the AC adaptor/charger. Please ensure that the wide blade fits into an AC outlet. The operation time of the camera/recorder depends on the camera/recorder. 3. Getting Started Using Alternative Power Sources Using the AC Adapter/Charger Please ensure that the CAMERA/OFF/VIDEO switch is required in...

Owners Guide
Page 26
... cooling vents may use a charged battery. Use the camera light wisely as the camera/recorder's lens. 4. Connect a fully charged batteries or the AC adapter/charger ("Loading Batteries; Hold down the red button on and off. NEVER TOUCH THE DC CAMERA LIGHT TERMINAL WHEN THE CAMERA/RECORDER IS TURNED ON TO AVOID ELECTRIC SHOCK. 1. Press the operate button on the DC camera light to turn it on the CAMERA/OFF/VIDEO switch while sliding it greatly reduces the time you may become...
... cooling vents may use a charged battery. Use the camera light wisely as the camera/recorder's lens. 4. Connect a fully charged batteries or the AC adapter/charger ("Loading Batteries; Hold down the red button on and off. NEVER TOUCH THE DC CAMERA LIGHT TERMINAL WHEN THE CAMERA/RECORDER IS TURNED ON TO AVOID ELECTRIC SHOCK. 1. Press the operate button on the DC camera light to turn it on the CAMERA/OFF/VIDEO switch while sliding it greatly reduces the time you may become...

Owners Guide
Page 29
... the Batteries: Camera/Recorder battery" p 12). The display changes and the internal clock starts. Getting Started Setting the Date and Time Take the time to the camera/recorder for 24 hours. Set the CAMERA/OFF/VIDEO switch to OFF and connect a charged battery or the AC adapter/charger to set the date and time now: The time backup battery is rechargeable. Note: The backup battery should appear in the viewfinder. Press the red button on the CAMERA/OFF/VIDEO switch as a handy reminder when viewing tapes...
... the Batteries: Camera/Recorder battery" p 12). The display changes and the internal clock starts. Getting Started Setting the Date and Time Take the time to the camera/recorder for 24 hours. Set the CAMERA/OFF/VIDEO switch to OFF and connect a charged battery or the AC adapter/charger to set the date and time now: The time backup battery is rechargeable. Note: The backup battery should appear in the viewfinder. Press the red button on the CAMERA/OFF/VIDEO switch as a handy reminder when viewing tapes...
Owners Guide
Page 32
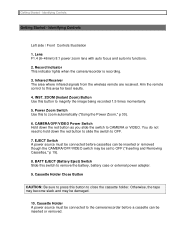
... or removed though the CAMERA/OFF/VIDEO switch may be connected to zoom automatically ("Using the Power Zoom," p 30). 6. Identifying Controls Left side / Front Controls Illustration 1. Power Zoom Switch Use this area for best results. 4. EJECT Switch A power source must be damaged. 10. Getting Started - Identifying Controls Getting Started - You do not need to hold down the red button as you slide the switch to OFF. 7. Lens F1.4 (6~46mm) 8:1 power zoom lens with auto focus and auto iris functions. 2. Cassette Holder Close Button...
... or removed though the CAMERA/OFF/VIDEO switch may be connected to zoom automatically ("Using the Power Zoom," p 30). 6. Identifying Controls Left side / Front Controls Illustration 1. Power Zoom Switch Use this area for best results. 4. EJECT Switch A power source must be damaged. 10. Getting Started - Identifying Controls Getting Started - You do not need to hold down the red button as you slide the switch to OFF. 7. Lens F1.4 (6~46mm) 8:1 power zoom lens with auto focus and auto iris functions. 2. Cassette Holder Close Button...
Owners Guide
Page 34
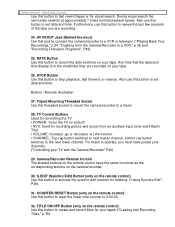
Furthermore, use this button to set date and time. Also use this jack to connect the camera/recorder to a VCR or television ("Playing Back Your Recordings," p 24, "Dubbing from an auxiliary input (only wity Hitachi TVs) • VOLUME: Increase ( ) or decrease ( ) the volume. • CHANNEL: Top ( ) button switches to next higher channel, bottom ( ) button switches to set date and time. STOP Button Use this button to review the last few seconds of the tape you must have the same functions as...
Furthermore, use this button to set date and time. Also use this jack to connect the camera/recorder to a VCR or television ("Playing Back Your Recordings," p 24, "Dubbing from an auxiliary input (only wity Hitachi TVs) • VOLUME: Increase ( ) or decrease ( ) the volume. • CHANNEL: Top ( ) button switches to next higher channel, bottom ( ) button switches to set date and time. STOP Button Use this button to review the last few seconds of the tape you must have the same functions as...

Owners Guide
Page 36
... charged, the date and time are set, and you are familiar with the controls it to CAMERA. This section guides you are ready to record press the Start/Stop button. When you through basic recording and playback. Basic recording is now ready to a power source ("Loading Batteries; Let's get started! Press the red button on the side of time to match the viewfinder's focus with less stress. Use the diopter control...
... charged, the date and time are set, and you are familiar with the controls it to CAMERA. This section guides you are ready to record press the Start/Stop button. When you through basic recording and playback. Basic recording is now ready to a power source ("Loading Batteries; Let's get started! Press the red button on the side of time to match the viewfinder's focus with less stress. Use the diopter control...

Owners Guide
Page 47
... remote control and a flashing cursor appears in memory can store 2 different titles in its memory. The camera/recorder contains 47 different characters for creating a title. Connect the camera/recorder to select the first character of an inch. Press and hold the power zoom control W. A title stored in the viewfinder. 4. Check your lighting as it to shoot subjects as close as 3/8 of your title. Hold down the red button...
... remote control and a flashing cursor appears in memory can store 2 different titles in its memory. The camera/recorder contains 47 different characters for creating a title. Connect the camera/recorder to select the first character of an inch. Press and hold the power zoom control W. A title stored in the viewfinder. 4. Check your lighting as it to shoot subjects as close as 3/8 of your title. Hold down the red button...

Owners Guide
Page 50
... AUDIO IN and VIDEO IN jacks of the corresponding buttons on the camera/recorder. The PLAY, F.FWD, REW, STOP, PAUSE (START/STOP) and ZOOM buttons on the wireless remote control operate the functions of your camera/recorder. 2. Dubbing Diagram 1. Connect the AV output cord plug to the AV IN/OUT jack of the camera/recorder shown above. Note: The wireless remote control may malfunction when you slide the switch to VIDEO. 4. Note: The remote control code of this camera/recorder is set to VCR...
... AUDIO IN and VIDEO IN jacks of the corresponding buttons on the camera/recorder. The PLAY, F.FWD, REW, STOP, PAUSE (START/STOP) and ZOOM buttons on the wireless remote control operate the functions of your camera/recorder. 2. Dubbing Diagram 1. Connect the AV output cord plug to the AV IN/OUT jack of the camera/recorder shown above. Note: The wireless remote control may malfunction when you slide the switch to VIDEO. 4. Note: The remote control code of this camera/recorder is set to VCR...

Owners Guide
Page 51
... button. It automatically sets to use the synchro edit. Your VCR must have the EDIT IN jack to pause. Synchro Edit Diagram 1. Connect either the right or left audio plug into the VCR. 4. Press the F.FWD, REW/REVIEW, STOP and Start/Stop buttons to resume normal playback. Press the PLAY button to pause the VCR. Rewind to the point where you cannot start copying. Press the COUNTER RESET button on the remote control...
... button. It automatically sets to use the synchro edit. Your VCR must have the EDIT IN jack to pause. Synchro Edit Diagram 1. Connect either the right or left audio plug into the VCR. 4. Press the F.FWD, REW/REVIEW, STOP and Start/Stop buttons to resume normal playback. Press the PLAY button to pause the VCR. Rewind to the point where you cannot start copying. Press the COUNTER RESET button on the remote control...

Owners Guide
Page 54
... memory ("Using Memory," p 17). Press the PAUSE (START/STOP) button. 6. When the linear time counter reaches 0:00:00M the camera/recorder stops automatically, recording only the portion of the tape that you wish to the AUDIO IN and VIDEO IN jacks of your camera/recorder. 4. Note: Automatic date recording is played back, noise may appear at the end of your television. 3. Connect the provided AV output cord to start dubbing. Connect the free square plug...
... memory ("Using Memory," p 17). Press the PAUSE (START/STOP) button. 6. When the linear time counter reaches 0:00:00M the camera/recorder stops automatically, recording only the portion of the tape that you wish to the AUDIO IN and VIDEO IN jacks of your camera/recorder. 4. Note: Automatic date recording is played back, noise may appear at the end of your television. 3. Connect the provided AV output cord to start dubbing. Connect the free square plug...
Owners Guide
Page 58
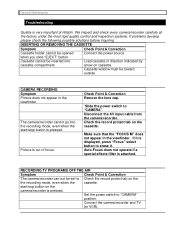
... /sop button on cassette. arrow on the camera/recorder is pressed. start /stop button is pressed. Cassette window must be opened Connect the power source. Check the record protect tab on the the recording mode, even when the cassette. Set the power switch to erase it is displayed, press "Focus" select button to "CAMERA" position. If it . Connect the camera/recorder and TV (or VCR). General Maintenance Troubleshooting Quality is very important at the factory under the most rigid quality control and...
... /sop button on cassette. arrow on the camera/recorder is pressed. start /stop button is pressed. Cassette window must be opened Connect the power source. Check the record protect tab on the the recording mode, even when the cassette. Set the power switch to erase it is displayed, press "Focus" select button to "CAMERA" position. If it . Connect the camera/recorder and TV (or VCR). General Maintenance Troubleshooting Quality is very important at the factory under the most rigid quality control and...

Owners Guide
Page 59
... display will then stop flashing. Picture bends at the top of your TV screen is pressed. wait until you see the playback picture on yourTV, adjust fine tuning knob on television set has VIR circuit. It needs to "VIDEO" position. be modified to obtain best picture. Check Point & Correction Remove the power source, and after about one minute, push the reset switch gently using RF output adapter.) Interference on the camera/recorder...
... display will then stop flashing. Picture bends at the top of your TV screen is pressed. wait until you see the playback picture on yourTV, adjust fine tuning knob on television set has VIR circuit. It needs to "VIDEO" position. be modified to obtain best picture. Check Point & Correction Remove the power source, and after about one minute, push the reset switch gently using RF output adapter.) Interference on the camera/recorder...


