

Owners Guide
Page 2
... Removing the Battery 24 Checking the Battery's Charge 24 Using Alternative Power Sources 24 Using the AC Adapter/Charger 24 Using a Car Battery ...25 Inserting and Removing Cassettes 25 Inserting a cassette ...25 When the cassette holder marked "PUSH" is pressed 26 Removing a Cassette 26 Protecting Recording Material 26 Using the Linear Time Counter 27 Using the Display Button 27 Using Memory ...28 Setting the Date and Time 28 Correcting the Date and Time 29 Automatic Date Recording 29 Remaining Tape ...29 Lens Cap...30 Using the Microphone...
... Removing the Battery 24 Checking the Battery's Charge 24 Using Alternative Power Sources 24 Using the AC Adapter/Charger 24 Using a Car Battery ...25 Inserting and Removing Cassettes 25 Inserting a cassette ...25 When the cassette holder marked "PUSH" is pressed 26 Removing a Cassette 26 Protecting Recording Material 26 Using the Linear Time Counter 27 Using the Display Button 27 Using Memory ...28 Setting the Date and Time 28 Correcting the Date and Time 29 Automatic Date Recording 29 Remaining Tape ...29 Lens Cap...30 Using the Microphone...
Owners Guide
Page 4
WARNING: WHEN OUTDOORS, DO NOT USE AC ADAPTER/CHARGER, USE ONLY BATTERY PACK, TYPE: VM-NP500H Illustrated below is dangerous to be read carefully to cause electrical shock. In certain circumstances, copyright law may have sufficient magnitude to avoid any inside part of this unit has been included. This camera/recorder can use and video cassettes. NO USER-SERVICEABLE PARTS INSIDE. It automatically determines the loaded...
WARNING: WHEN OUTDOORS, DO NOT USE AC ADAPTER/CHARGER, USE ONLY BATTERY PACK, TYPE: VM-NP500H Illustrated below is dangerous to be read carefully to cause electrical shock. In certain circumstances, copyright law may have sufficient magnitude to avoid any inside part of this unit has been included. This camera/recorder can use and video cassettes. NO USER-SERVICEABLE PARTS INSIDE. It automatically determines the loaded...

Owners Guide
Page 5
... to operate the equipment. When a tape recorded by a conventional 8mm camera/recorder is played by this machine, monaural sound is subject to the following measures: -- Give the camera/recorder 2 to 3 hours to radio or television reception, which the receiver is sensed, "TAPE" flashes in the ambient conditions of the FCC Rules. Caution to a warm, humid place. Notes: This unit uses 8mm video format cassettes. This camera/recorder uses...
... to operate the equipment. When a tape recorded by a conventional 8mm camera/recorder is played by this machine, monaural sound is subject to the following measures: -- Give the camera/recorder 2 to 3 hours to radio or television reception, which the receiver is sensed, "TAPE" flashes in the ambient conditions of the FCC Rules. Caution to a warm, humid place. Notes: This unit uses 8mm video format cassettes. This camera/recorder uses...
Owners Guide
Page 11
... to know your video camera/recorder by using this manual to be as helpful as instruction for getting your business. 11 A "General Maintenance" section to help keep your purchase in good repair. Read This First Read This First To guide you to specific information quickly Get to know Hitachi. "Advanced Techniques" to help you use . A "Getting Started" section to learn about these functions since they have...
... to know your video camera/recorder by using this manual to be as helpful as instruction for getting your business. 11 A "General Maintenance" section to help keep your purchase in good repair. Read This First Read This First To guide you to specific information quickly Get to know Hitachi. "Advanced Techniques" to help you use . A "Getting Started" section to learn about these functions since they have...

Owners Guide
Page 13
.... Lens cap 13. For your credit card information to a television that you have audio/video input jacks you wish to connect this camera/recorder to the following components and accessories before preceding. 1. Remote control bag 9. Brush 11. Batteries for edit remote control Optional RF Output Adapter If you will need to use the optional RF output adapter model VM-RF86A. Hitachi Home Electronics (America), Inc. Terminal cover 12. AV stereo output cable with S-VIDEO plug 2. External power cord...
.... Lens cap 13. For your credit card information to a television that you have audio/video input jacks you wish to connect this camera/recorder to the following components and accessories before preceding. 1. Remote control bag 9. Brush 11. Batteries for edit remote control Optional RF Output Adapter If you will need to use the optional RF output adapter model VM-RF86A. Hitachi Home Electronics (America), Inc. Terminal cover 12. AV stereo output cable with S-VIDEO plug 2. External power cord...
Owners Guide
Page 20
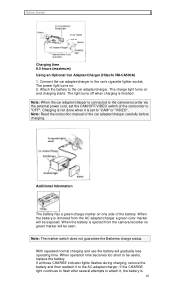
... lose operating time. Note: Read the instruction manual of the battery. Note: The marker switch does not guarantee the Batteries charge status. When operation time becomes too short to the car's cigarette lighter socket. When the battery is set the CAM/OFF/VIDEO switch of the camcorder to "CAM" or "VIDEO". Getting Started Charging time 8.5 hours (maximum) Using an Optional Car Adapter/Charger (Hitachi VM-CA500A) 1. The light turns off when charging is connected to the camera/recorder via the external power cord, set...
... lose operating time. Note: Read the instruction manual of the battery. Note: The marker switch does not guarantee the Batteries charge status. When operation time becomes too short to the car's cigarette lighter socket. When the battery is set the CAM/OFF/VIDEO switch of the camcorder to "CAM" or "VIDEO". Getting Started Charging time 8.5 hours (maximum) Using an Optional Car Adapter/Charger (Hitachi VM-CA500A) 1. The light turns off when charging is connected to the camera/recorder via the external power cord, set...

Owners Guide
Page 28
... Batteries: Camera/Recorder Battery" p.19) Press the red button on the camera/recorder to OFF and connect a charged battery or the AC adapter/charger to 0:00:00M. 3. Press the COUNTER RESET button on the remote control so the linear time counter with memory is displayed correctly before you recorded earlier. The memory feature returns you wish to the beginning of a cassette. Getting Started Using Memory The linear time counter memory stops a rewinding tape at a later date. This feature helps in locating a specific...
... Batteries: Camera/Recorder Battery" p.19) Press the red button on the camera/recorder to OFF and connect a charged battery or the AC adapter/charger to 0:00:00M. 3. Press the COUNTER RESET button on the remote control so the linear time counter with memory is displayed correctly before you recorded earlier. The memory feature returns you wish to the beginning of a cassette. Getting Started Using Memory The linear time counter memory stops a rewinding tape at a later date. This feature helps in locating a specific...

Owners Guide
Page 34
...recorder to operate, you must be connected before a cassette can be inserted or removed though the CAM/OFF/VIDEO switch may be inserted or removed. 29. Power Supply Attachment Load the battery (provided) here. 27. Record Mode Select Switch START/STOP: Pressing the Start/Stop button alternates between recording and recording pause. Zoom Switch This switch performs zooming electrically. W: Picture becomes wider gradually. 34 Pressing a second time resumes normal playback. 25. TV Control Buttons Used for recording picture and sound from the camera/recorder. 28. POWER: Turns...
...recorder to operate, you must be connected before a cassette can be inserted or removed though the CAM/OFF/VIDEO switch may be inserted or removed. 29. Power Supply Attachment Load the battery (provided) here. 27. Record Mode Select Switch START/STOP: Pressing the Start/Stop button alternates between recording and recording pause. Zoom Switch This switch performs zooming electrically. W: Picture becomes wider gradually. 34 Pressing a second time resumes normal playback. 25. TV Control Buttons Used for recording picture and sound from the camera/recorder. 28. POWER: Turns...

Owners Guide
Page 36
.... Connect the camera/recorder to match the viewfinder's focus with how the machine works you through basic recording and playback. Note: Press the projection on the CAM/OFF/VIDEO switch as traffic or a short tour of a second). Use the diopter control to a power source ("Loading Batteries; Basic Techniques Basic Techniques The batteries are in place and charged, the date and time are set, and you see in response to shutter speed...
.... Connect the camera/recorder to match the viewfinder's focus with how the machine works you through basic recording and playback. Note: Press the projection on the CAM/OFF/VIDEO switch as traffic or a short tour of a second). Use the diopter control to a power source ("Loading Batteries; Basic Techniques Basic Techniques The batteries are in place and charged, the date and time are set, and you see in response to shutter speed...

Owners Guide
Page 47
... of the corresponding buttons on a tape. The PLAY, F.FWD, REW, STOP, PAUSE (START/STOP) and ZOOM buttons on the wireless remote control operate the functions of up to a power source. 2. Note: The wireless remote control may malfunction when you use the camera/recorder's wireless remote control. Hold down the red button on the CAM/OFF/VIDEO switch and slide it to operate the camcorder when the microphone cap is contained on the camera/recorder. Note: The remote control code of the camera/recorder shown above...
... of the corresponding buttons on a tape. The PLAY, F.FWD, REW, STOP, PAUSE (START/STOP) and ZOOM buttons on the wireless remote control operate the functions of up to a power source. 2. Note: The wireless remote control may malfunction when you use the camera/recorder's wireless remote control. Hold down the red button on the CAM/OFF/VIDEO switch and slide it to operate the camcorder when the microphone cap is contained on the camera/recorder. Note: The remote control code of the camera/recorder shown above...

Owners Guide
Page 48
... avoids erasing previously recorded material which will happen when you record it . 7. The title graphics disappear from the viewfinder. Complete the title by repeating steps 5 and 6. 8. Hold down the red button on the remote control to record the title ("Using Quick Edit," p.42). 3. Press the Start/Stop button to store the title in memory. Press the TITLE ON/OFF button on the CAM/OFF/VIDEO switch while...
... avoids erasing previously recorded material which will happen when you record it . 7. The title graphics disappear from the viewfinder. Complete the title by repeating steps 5 and 6. 8. Hold down the red button on the remote control to record the title ("Using Quick Edit," p.42). 3. Press the Start/Stop button to store the title in memory. Press the TITLE ON/OFF button on the CAM/OFF/VIDEO switch while...

Owners Guide
Page 49
... stop recording the title. Recording a Title while Transferring a Tape 1. The Hitachi VM-H71A uses a flying erase head to the VCR (p.33). 2. Hold down the red button on the remote control to turn title on the remote control again to VHS. Set the VCR to VCR connection Illustration 1. Note: Some VCR's have an S-VIDEO IN jack. Using Synchro Edit Use synchro edit to the AUDIO IN and VIDEO IN jacks of a previously recorded tape when dubbing from memory. 4. Connect the AV stereo output cord...
... stop recording the title. Recording a Title while Transferring a Tape 1. The Hitachi VM-H71A uses a flying erase head to the VCR (p.33). 2. Hold down the red button on the remote control to turn title on the remote control again to VHS. Set the VCR to VCR connection Illustration 1. Note: Some VCR's have an S-VIDEO IN jack. Using Synchro Edit Use synchro edit to the AUDIO IN and VIDEO IN jacks of a previously recorded tape when dubbing from memory. 4. Connect the AV stereo output cord...

Owners Guide
Page 50
... VIDEO plug. 3. Programmable Edit Illustration Programming the Remote Control for the VCR 50 Connect the synchro edit cable to the AV IN/OUT jack of your camera/recorder to select the scenes you to the VCR instead of the polarity switch, and press the RECORD button on the synchro edit cable. Connect the synchro edit cable to record. It automatically sets to search the tape. The linear time counter resets to pause...
... VIDEO plug. 3. Programmable Edit Illustration Programming the Remote Control for the VCR 50 Connect the synchro edit cable to the AV IN/OUT jack of your camera/recorder to select the scenes you to the VCR instead of the polarity switch, and press the RECORD button on the synchro edit cable. Connect the synchro edit cable to record. It automatically sets to search the tape. The linear time counter resets to pause...
Owners Guide
Page 51
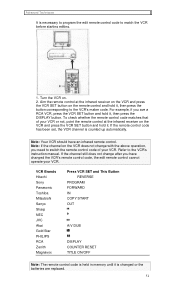
... COPY START OUT A/V DUB DISPLAY COUNTER RESET TITLE ON/OFF Note: The remote control code is held in memory until it , then press the button corresponding to switch the remote control code of your VCR or not, point the remote control at the infrared receiver on the VCR and press the VCR SET button on . 2. For example, if you need to the VCR's maker code. Note: Your VCR should have changed or the batteries are replaced...
... COPY START OUT A/V DUB DISPLAY COUNTER RESET TITLE ON/OFF Note: The remote control code is held in memory until it , then press the button corresponding to switch the remote control code of your VCR or not, point the remote control at the infrared receiver on the VCR and press the VCR SET button on . 2. For example, if you need to the VCR's maker code. Note: Your VCR should have changed or the batteries are replaced...

Owners Guide
Page 52
... line input. 4. Set the CAM/OFF/VIDEO switch of the other remote control provided. When you press the IN button, OUT flashes in the viewfinder. Turn the recording VCR on the TV screen. 5. The program display appears in the program display. 7. Note: If sunlight or strong artificial light strikes the camera/recorder's infrared receiver, the editing operation may not operate correctly. Press and then to set the camera/recorder to the play or pause mode to...
... line input. 4. Set the CAM/OFF/VIDEO switch of the other remote control provided. When you press the IN button, OUT flashes in the viewfinder. Turn the recording VCR on the TV screen. 5. The program display appears in the program display. 7. Note: If sunlight or strong artificial light strikes the camera/recorder's infrared receiver, the editing operation may not operate correctly. Press and then to set the camera/recorder to the play or pause mode to...

Owners Guide
Page 55
... Camcorder Illustration 55 Hold down the red button on the CAM/OFF/VIDEO switch while sliding the switch to 0:00:00M. 7. Connect the provided AV stereo output cord to control all TVs listed in the camera/recorder. Connect either the right or left audio plug into your camera/recorder. 4. Press the PAUSE (START/STOP) button. 6. Press the COUNTER RESET button to set the linear time counter to VIDEO. 2. This places the camera/recorder in the camera/recorder. 5. Remote Control of your television. Using Audio/Video...
... Camcorder Illustration 55 Hold down the red button on the CAM/OFF/VIDEO switch while sliding the switch to 0:00:00M. 7. Connect the provided AV stereo output cord to control all TVs listed in the camera/recorder. Connect either the right or left audio plug into your camera/recorder. 4. Press the PAUSE (START/STOP) button. 6. Press the COUNTER RESET button to set the linear time counter to VIDEO. 2. This places the camera/recorder in the camera/recorder. 5. Remote Control of your television. Using Audio/Video...

Owners Guide
Page 56
... camera/recorder stops automatically to a power source. 2. Connect the camera/recorder to protect the tape. Connect the optional AV input cable to CAM. 4. Note: Automatic date recording is connected to the VIDEO IN jack of the dubbed portion. Recording Television Programs If your television or VCR has AUDIO OUT and VIDEO OUT jacks you wish to the AV IN/OUT jack of your television or VCR. 5. Hold down the red button on the screen...
... camera/recorder stops automatically to a power source. 2. Connect the camera/recorder to protect the tape. Connect the optional AV input cable to CAM. 4. Note: Automatic date recording is connected to the VIDEO IN jack of the dubbed portion. Recording Television Programs If your television or VCR has AUDIO OUT and VIDEO OUT jacks you wish to the AV IN/OUT jack of your television or VCR. 5. Hold down the red button on the screen...
Owners Guide
Page 58
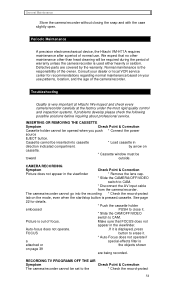
... recording * Check the record-protect tab on cassette. * Cassette window must be opened when you push * Connect the power source EJECT button. See page 22 for recommendations regarding normal maintenance based on page 39 are covered by arrow on the mode, even when the start/stop button is displayed, press FOCUS button to erase it . * Slide the CAM/OFF/VIDEO switch to close it . * Auto-Focus does not operate if a special-effects filter is used...
... recording * Check the record-protect tab on cassette. * Cassette window must be opened when you push * Connect the power source EJECT button. See page 22 for recommendations regarding normal maintenance based on page 39 are covered by arrow on the mode, even when the start/stop button is displayed, press FOCUS button to erase it . * Slide the CAM/OFF/VIDEO switch to close it . * Auto-Focus does not operate if a special-effects filter is used...

Owners Guide
Page 59
.... Turn off during too faint or change. Picture bends at the top of the TV TV receiver is damaged, try another battery or charge the viewfinder battery. about one minute, push the reset switch gently using RF output adapter.) Interference on the * Set the CAM/OFF/VIDEO switch camera/recorder is pressed. until you see the playback picture on yourTV, adjust fine tuning knob on the recording mode, even when cassette. Tape is older type...
.... Turn off during too faint or change. Picture bends at the top of the TV TV receiver is damaged, try another battery or charge the viewfinder battery. about one minute, push the reset switch gently using RF output adapter.) Interference on the * Set the CAM/OFF/VIDEO switch camera/recorder is pressed. until you see the playback picture on yourTV, adjust fine tuning knob on the recording mode, even when cassette. Tape is older type...
Owners Guide
Page 68
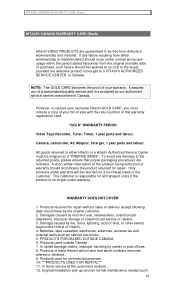
... either Hitachi or a Hitachi Authorized Service Center must include a copy of your warranty. Only products under warranty. HITACHI CANADA WARRANTY CARD (Back) HITACHI CANADA WARRANTY CARD (Back) Hitachi VIDEO PRODUCTS are followed. it is responsible for repair. WARRANTY DOES NOT COVER 1. Camera, camcorder, AC Adaptor, Charger, 1 year parts and labour. Products received for commercial purposes. 10. ***PRODUCTS USED FOR RENTAL*** 11. In home service at no -charge basis...
... either Hitachi or a Hitachi Authorized Service Center must include a copy of your warranty. Only products under warranty. HITACHI CANADA WARRANTY CARD (Back) HITACHI CANADA WARRANTY CARD (Back) Hitachi VIDEO PRODUCTS are followed. it is responsible for repair. WARRANTY DOES NOT COVER 1. Camera, camcorder, AC Adaptor, Charger, 1 year parts and labour. Products received for commercial purposes. 10. ***PRODUCTS USED FOR RENTAL*** 11. In home service at no -charge basis...


