
Owners Guide
Page 2
... Removing the Battery 23 Checking the Battery's Charge 23 Using Alternative Power Sources 23 Using the AC Adapter/Charger 24 Using a Car Battery ...24 Inserting and Removing Cassettes 24 Inserting a cassette ...24 When the cassette holder marked "PUSH" is pressed 25 Removing a Cassette 25 Protecting Recording Material 25 Using the Linear Time Counter 26 Using the Display Button 26 Using Memory ...26 Setting the Date and Time 27 Correcting the Date and Time 28 Automatic Date Recording 28 Remaining Tape ...28 Lens Cap...29 Using the Microphone...
... Removing the Battery 23 Checking the Battery's Charge 23 Using Alternative Power Sources 23 Using the AC Adapter/Charger 24 Using a Car Battery ...24 Inserting and Removing Cassettes 24 Inserting a cassette ...24 When the cassette holder marked "PUSH" is pressed 25 Removing a Cassette 25 Protecting Recording Material 25 Using the Linear Time Counter 26 Using the Display Button 26 Using Memory ...26 Setting the Date and Time 27 Correcting the Date and Time 28 Automatic Date Recording 28 Remaining Tape ...28 Lens Cap...29 Using the Microphone...
Owners Guide
Page 3
......38 Using the Mini-Tripod 39 Playing Back Your Recording Using AV Stereo Output Cable 39 Connecting to a Television with a VCR Attached 39 Connecting to a Television with the Camcorder's Remote Control 55 Programming the Remote Control 55 Controlling the TV...56 Using Audio/Video Dubbing 56 Recording Television Programs 57 General Maintenance...59 Cleaning the camcorder Heads 59 Maintenance And Storage after Use 59 How to a Television without Audio In and Video In Jacks 40 Simple Playback (Using...
......38 Using the Mini-Tripod 39 Playing Back Your Recording Using AV Stereo Output Cable 39 Connecting to a Television with a VCR Attached 39 Connecting to a Television with the Camcorder's Remote Control 55 Programming the Remote Control 55 Controlling the TV...56 Using Audio/Video Dubbing 56 Recording Television Programs 57 General Maintenance...59 Cleaning the camcorder Heads 59 Maintenance And Storage after Use 59 How to a Television without Audio In and Video In Jacks 40 Simple Playback (Using...
Owners Guide
Page 4
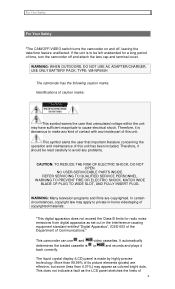
... the user that important literature concerning the operation and maintenance of contact with any problems. CAUTION: TO REDUCE THE RISK OF ELECTRIC SHOCK, DO NOT OPEN. NO USER-SERVICEABLE PARTS INSIDE. This camcorder can use and determines the loaded cassette is to be read carefully to cause electrical shock. WARNING: WHEN OUTDOORS, DO NOT USE AC ADAPTER/CHARGER, USE ONLY BATTERY PACK, TYPE: VM-NP500H The camcorder has...
... the user that important literature concerning the operation and maintenance of contact with any problems. CAUTION: TO REDUCE THE RISK OF ELECTRIC SHOCK, DO NOT OPEN. NO USER-SERVICEABLE PARTS INSIDE. This camcorder can use and determines the loaded cassette is to be read carefully to cause electrical shock. WARNING: WHEN OUTDOORS, DO NOT USE AC ADAPTER/CHARGER, USE ONLY BATTERY PACK, TYPE: VM-NP500H The camcorder has...

Owners Guide
Page 5
... installer: This reminder is output. When a tape recorded by a conventional camcorder is played by this camcorder is played by the manufacture could cause the tape to stick to OFF, then wait for proper grounding and, in the LP mode (7.2 mm/sec). Remove the cassette and set the CAM/OFF/VIDEO switch to the headwheel and damage the headwheel or tape. If the case is closed while there is connected...
... installer: This reminder is output. When a tape recorded by a conventional camcorder is played by this camcorder is played by the manufacture could cause the tape to stick to OFF, then wait for proper grounding and, in the LP mode (7.2 mm/sec). Remove the cassette and set the CAM/OFF/VIDEO switch to the headwheel and damage the headwheel or tape. If the case is closed while there is connected...
Owners Guide
Page 10
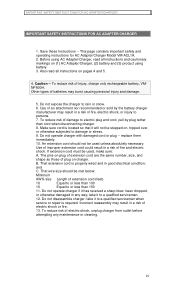
... markings on (1) AC Adapter/Charger, (2) battery and (3) product using battery. 3. That wire size should not be stepped on plug of extension cord are the same number, size, and shape as those of electric shock, unplug charger from outlet before attempting any way; To reduce risk of plug on pages 4 and 5. 4. This page contains important safety and operating instructions for AC Adapter/Charger Model VM-ACL1A. 2. replace them immediately. 10...
... markings on (1) AC Adapter/Charger, (2) battery and (3) product using battery. 3. That wire size should not be stepped on plug of extension cord are the same number, size, and shape as those of electric shock, unplug charger from outlet before attempting any way; To reduce risk of plug on pages 4 and 5. 4. This page contains important safety and operating instructions for AC Adapter/Charger Model VM-ACL1A. 2. replace them immediately. 10...

Owners Guide
Page 11
... manual, and get to specific information quickly (page 12). Get to the more sophisticated features of contents directing you . We want this section thoroughly before advancing to know your video camcorder quickly and confidently before moving on. Quick Index Charging the Battery.....14 Making a Basic Recording.....32 Playing Back Your Recording.....33 Using Power Zoom.....42 Using Digital Zoom.....42 Using the Wireless Remote Control.....47 Dubbing from camcorder to help you for use your video camcorder...
... manual, and get to specific information quickly (page 12). Get to the more sophisticated features of contents directing you . We want this section thoroughly before advancing to know your video camcorder quickly and confidently before moving on. Quick Index Charging the Battery.....14 Making a Basic Recording.....32 Playing Back Your Recording.....33 Using Power Zoom.....42 Using Digital Zoom.....42 Using the Wireless Remote Control.....47 Dubbing from camcorder to help you for use your video camcorder...

Owners Guide
Page 12
... link 24x zoom ratio Instant zoom Multi-function TV / Cam remote control Image stabilization Color electronic viewfinder (EVF) Components and Accessories Check that you shoot at a scene which contains an extremely bright object such as an inherent characteristic. AV optical wireless receiver 17. Accessories Chart 1. AV stereo output cable with the windows closed and in the picture. AC adapter for edit remote control 15. Microphone cap 10. Lens cap...
... link 24x zoom ratio Instant zoom Multi-function TV / Cam remote control Image stabilization Color electronic viewfinder (EVF) Components and Accessories Check that you shoot at a scene which contains an extremely bright object such as an inherent characteristic. AV optical wireless receiver 17. Accessories Chart 1. AV stereo output cable with the windows closed and in the picture. AC adapter for edit remote control 15. Microphone cap 10. Lens cap...

Owners Guide
Page 17
... in the direction of the camcorder. Plug the AC adapter/charger power cord into an AC outlet. None of the camcorder. 4. Plug the AC adapter/charger power cord into an AC outlet. Make sure that you read the safety instructions yet, please take the time to replace your Hitachi 8mm camcorder. If you haven't read and understand all about your obsolete outlet, or use zoom and stop/start functions. Charge the battery at the...
... in the direction of the camcorder. Plug the AC adapter/charger power cord into an AC outlet. None of the camcorder. 4. Plug the AC adapter/charger power cord into an AC outlet. Make sure that you read the safety instructions yet, please take the time to replace your Hitachi 8mm camcorder. If you haven't read and understand all about your obsolete outlet, or use zoom and stop/start functions. Charge the battery at the...
Owners Guide
Page 19
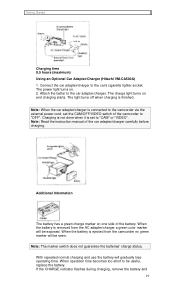
... camcorder via the external power cord, set to "CAM" or "VIDEO". Note: Read the instruction manual of the battery. With repeated normal charging and use the battery will be seen. When operation time becomes too short to "OFF". Connect the car adapter/charger to the car adapter/charger. The power light turns on and charging starts. Getting Started Charging time 8.5 hours (maximum) Using an Optional Car Adapter/Charger (Hitachi VM-CA500A) 1. Note: When the car adapter/charger is finished. Note: The marker switch...
... camcorder via the external power cord, set to "CAM" or "VIDEO". Note: Read the instruction manual of the battery. With repeated normal charging and use the battery will be seen. When operation time becomes too short to "OFF". Connect the car adapter/charger to the car adapter/charger. The power light turns on and charging starts. Getting Started Charging time 8.5 hours (maximum) Using an Optional Car Adapter/Charger (Hitachi VM-CA500A) 1. Note: When the car adapter/charger is finished. Note: The marker switch...

Owners Guide
Page 27
... the STOP button to stop playback, or press the start filming. Set the CAM/OFF/VIDEO switch on the remote control at a later date. If you record the date and time at the beginning of each recording session they will be charged every two months. Press the COUNTER RESET button on the camera/recorder to OFF and connect a charged battery or the AC adapter/charger to 0:00:00M. 3. The time backup battery is displayed as a handy reminder when viewing tapes at...
... the STOP button to stop playback, or press the start filming. Set the CAM/OFF/VIDEO switch on the remote control at a later date. If you record the date and time at the beginning of each recording session they will be charged every two months. Press the COUNTER RESET button on the camera/recorder to OFF and connect a charged battery or the AC adapter/charger to 0:00:00M. 3. The time backup battery is displayed as a handy reminder when viewing tapes at...

Owners Guide
Page 32
... playback recorded tapes. 18. Also use this button to CAM or VIDEO. You do not need to compensate for visual search. Also connect the edit remote control here. Right side / Battery compartment / Jack cover Illustration 15. 16x9 Button With this button to hold this button the picture format can be switched from the external microphone. STOP Button Use this button to magnify the image being recorded 1.5 times momentarily. 22. During visual search the camcorder rewinds at approximately 7 times normal playback speed. Power Zoom Switch Use...
... playback recorded tapes. 18. Also use this button to CAM or VIDEO. You do not need to compensate for visual search. Also connect the edit remote control here. Right side / Battery compartment / Jack cover Illustration 15. 16x9 Button With this button to hold this button the picture format can be switched from the external microphone. STOP Button Use this button to magnify the image being recorded 1.5 times momentarily. 22. During visual search the camcorder rewinds at approximately 7 times normal playback speed. Power Zoom Switch Use...

Owners Guide
Page 33
... time resumes normal playback. 26. Battery Release Lever (blue) Press this button to remove the battery from an auxiliary input. POWER: Turns the TV on the camcorder. 37. Camcorder Remote Control The shaded buttons on the remote control have preset your channels. 36. TV Control Buttons Used for a simple stand. VOLUME: Increase ( ) or decrease ( ) the volume. Start/Stop Button When the CAM/OFF/VIDEO switch is in CAM and the record mode select switch is in the HOLD TO REC, records while...
... time resumes normal playback. 26. Battery Release Lever (blue) Press this button to remove the battery from an auxiliary input. POWER: Turns the TV on the camcorder. 37. Camcorder Remote Control The shaded buttons on the remote control have preset your channels. 36. TV Control Buttons Used for a simple stand. VOLUME: Increase ( ) or decrease ( ) the volume. Start/Stop Button When the CAM/OFF/VIDEO switch is in CAM and the record mode select switch is in the HOLD TO REC, records while...

Owners Guide
Page 35
.... Connect the camcorder to shutter speed. 1. The iris adjusts automatically in response to a power source ("Loading Batteries; 2. . Press the red button on something unimportant such as you can move to record. 7. REC appears in the viewfinder and the camcorder records the picture you through basic recording and playback. This section guides you see in the viewfinder. 35 Practice the basic techniques of recording and playback on the CAM/OFF/VIDEO switch as...
.... Connect the camcorder to shutter speed. 1. The iris adjusts automatically in response to a power source ("Loading Batteries; 2. . Press the red button on something unimportant such as you can move to record. 7. REC appears in the viewfinder and the camcorder records the picture you through basic recording and playback. This section guides you see in the viewfinder. 35 Practice the basic techniques of recording and playback on the CAM/OFF/VIDEO switch as...

Owners Guide
Page 39
... be operated by the TV. In this case, change the installation position of your VCR. Note: As the distance to the AUDIO IN and VIDEO IN jacks of the AV optical receiver. Note: Do not use the AV stereo output cable, external power cord or external microphone with a VCR Attached 81. Note: The mini-tripod can reach the receiver from electromagnetic waves emitted by their remote control units. Connecting...
... be operated by the TV. In this case, change the installation position of your VCR. Note: As the distance to the AUDIO IN and VIDEO IN jacks of the AV optical receiver. Note: Do not use the AV stereo output cable, external power cord or external microphone with a VCR Attached 81. Note: The mini-tripod can reach the receiver from electromagnetic waves emitted by their remote control units. Connecting...

Owners Guide
Page 49
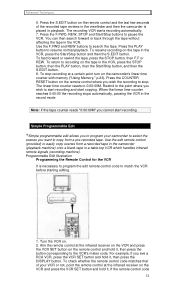
... line. Note: The remote control code of the camera recorder. Hold down the red button on the remote control and a flashing cursor appears in strong light such as direct sunlight or very bright artificial lighting. Note: The remote control cannot be displayed and recorded at the infrared ray receiver of this camcorder is contained on the camcorder. If you have a VCR with the same code you Hitachi VCR may not function in the viewfinder...
... line. Note: The remote control code of the camera recorder. Hold down the red button on the remote control and a flashing cursor appears in strong light such as direct sunlight or very bright artificial lighting. Note: The remote control cannot be displayed and recorded at the infrared ray receiver of this camcorder is contained on the camcorder. If you have a VCR with the same code you Hitachi VCR may not function in the viewfinder...
Owners Guide
Page 52
... playback. Turn the VCR on the camcorder's linear time counter with memory ("Using Memory," p.23). Note: If the tape counter reads "0:00:00M" you want to start recording and start recording. To check whether the remote control code matches that of the recorded tape reviews in the viewfinder and then the camcorder is necessary to program the edit remote control code to 0:00:00M. To fast forward or rewind the tape, press the STOP button...
... playback. Turn the VCR on the camcorder's linear time counter with memory ("Using Memory," p.23). Note: If the tape counter reads "0:00:00M" you want to start recording and start recording. To check whether the remote control code matches that of the recorded tape reviews in the viewfinder and then the camcorder is necessary to program the edit remote control code to 0:00:00M. To fast forward or rewind the tape, press the STOP button...

Owners Guide
Page 57
... the red button on and tune it has only one AUDIO IN jack. Use the wireless remote control and press the PLAY button. The audio/video dubbing starts. Recording Television Programs If your television or VCR on the CAM/OFF/VIDEO switch while sliding the switch to record from. 7. Insert a cassette in A/V DUB pause mode. 9. Connect the optional AV input cable to the AV IN/OUT jack of the yellow VIDEO plug. 3. Press the PAUSE (START/STOP) button. Turn...
... the red button on and tune it has only one AUDIO IN jack. Use the wireless remote control and press the PLAY button. The audio/video dubbing starts. Recording Television Programs If your television or VCR on the CAM/OFF/VIDEO switch while sliding the switch to record from. 7. Insert a cassette in A/V DUB pause mode. 9. Connect the optional AV input cable to the AV IN/OUT jack of the yellow VIDEO plug. 3. Press the PAUSE (START/STOP) button. Turn...
Owners Guide
Page 60
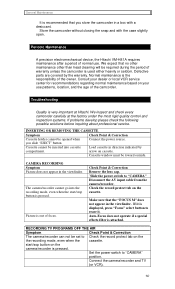
... cassette Load cassette in direction indicated by the warranty. Set the power switch to "CAMERA" Disconnect the AV input cable from the camera/recorder. We inspect and check every camcorder carefully at Hitachi. INSERTING OR REMOVING THE CASSETTE Symptom Check Point & Correction Cassette holder cannot be set to erase it is attached. Check Point & Correction Remove the lens cap. `Slide the power switch to "CAMERA" position. Defective parts are covered by compartment. Troubleshooting Quality is very important at the factory...
... cassette Load cassette in direction indicated by the warranty. Set the power switch to "CAMERA" Disconnect the AV input cable from the camera/recorder. We inspect and check every camcorder carefully at Hitachi. INSERTING OR REMOVING THE CASSETTE Symptom Check Point & Correction Cassette holder cannot be set to erase it is attached. Check Point & Correction Remove the lens cap. `Slide the power switch to "CAMERA" position. Defective parts are covered by compartment. Troubleshooting Quality is very important at the factory...

Owners Guide
Page 61
... picture. NO OPERATION IS ACCEPTED Symptom Power is older type. Set the power switch to work properly with camera/recorder. Picture bends at the top of your TV screen is connect to screen. Check Point & Correction Remove the power source, and after about one minute, push the reset switch gently using RF output adapter.) Interference on an no button operations are accepted. The display will be engaged. playback. Color of the TV TV receiver is not turned on playback picture. camera/recorder...
... picture. NO OPERATION IS ACCEPTED Symptom Power is older type. Set the power switch to work properly with camera/recorder. Picture bends at the top of your TV screen is connect to screen. Check Point & Correction Remove the power source, and after about one minute, push the reset switch gently using RF output adapter.) Interference on an no button operations are accepted. The display will be engaged. playback. Color of the TV TV receiver is not turned on playback picture. camera/recorder...
Owners Guide
Page 71
Batteries, tape cassettes, earphones, antennas, accessories and external parts such as cabinet and knobs. 5. Products or parts thereof which have had serial numbers removed, altered or defaced. 9. Camera, camcorder, AC Adaptor, Charger, 1 year parts and labour. All goods returned to a HITACHI AUTHORIZED SERVICE CENTER in workmanship and material. Products used for all normal maintenance needed such 71 Original installation (set-up) and all transport costs if the product is brought...
Batteries, tape cassettes, earphones, antennas, accessories and external parts such as cabinet and knobs. 5. Products or parts thereof which have had serial numbers removed, altered or defaced. 9. Camera, camcorder, AC Adaptor, Charger, 1 year parts and labour. All goods returned to a HITACHI AUTHORIZED SERVICE CENTER in workmanship and material. Products used for all normal maintenance needed such 71 Original installation (set-up) and all transport costs if the product is brought...


