
User Manual
Page 2
...5 INPUT Menu 30 Remote control 5 Color space, Component, Video format, Setting up 6 Frame lock, Information Arrangement 7 SETUP Menu 32 Adjusting the projector's elevator . . 8 Keystone, Whisper, Mirror, Volume About the filter cover for bottom-up use . . 9 Connecting your devices 10 Connecting power supply 13 SCREEN Menu 33 Language, Menu position, OSD bright, Blank, Start up, MyScreen, Remote control 14 MyScreen lock, Message Putting batteries 14 OPTION Menu 36 Using the remote control 15 Search, Auto off, Lamp time, Filter time, Power on/off 16 Service Turning on...
...5 INPUT Menu 30 Remote control 5 Color space, Component, Video format, Setting up 6 Frame lock, Information Arrangement 7 SETUP Menu 32 Adjusting the projector's elevator . . 8 Keystone, Whisper, Mirror, Volume About the filter cover for bottom-up use . . 9 Connecting your devices 10 Connecting power supply 13 SCREEN Menu 33 Language, Menu position, OSD bright, Blank, Start up, MyScreen, Remote control 14 MyScreen lock, Message Putting batteries 14 OPTION Menu 36 Using the remote control 15 Search, Auto off, Lamp time, Filter time, Power on/off 16 Service Turning on...
User Manual
Page 3
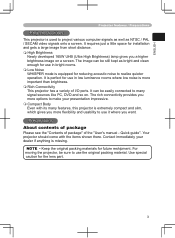
... brightness. Rich Connectivity This projector has a variety of the "User's manual - Your projector should come with its many signal sources like PC, DVD and so on a screen. Contact immediately your presentation impressive. Compact Body Even with the items shown there. NOTE • Keep the original packing materials for the lens part. 3 The image can be easily connected to use it where you...
... brightness. Rich Connectivity This projector has a variety of the "User's manual - Your projector should come with its many signal sources like PC, DVD and so on a screen. Contact immediately your presentation impressive. Compact Body Even with the items shown there. NOTE • Keep the original packing materials for the lens part. 3 The image can be easily connected to use it where you...

User Manual
Page 9
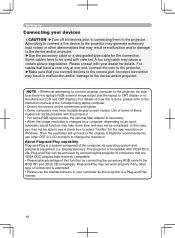
..., slowly turn the projector so that the lens-side is installed bottom up use . Replace the filter cover for a projector not to remove it back into place. 4. While the projector connects with a power supply, or the projector is facing up , hold the projector. 2. It is higher than usual filter cover, to the projector.Before handling, make sure the power switch is off and the power cord is placed lens-side...
..., slowly turn the projector so that the lens-side is installed bottom up use . Replace the filter cover for a projector not to remove it back into place. 4. While the projector connects with a power supply, or the projector is facing up , hold the projector. 2. It is higher than usual filter cover, to the projector.Before handling, make sure the power switch is off and the power cord is placed lens-side...
User Manual
Page 10
... projector is changed on a computer, depending on Windows. Please consult with VESA DDC 2B. It might be completed. Plug-and-Play can be sure to activate the laptop's RGB external image output (set the laptop to CRT display or to be used with core set. Setting up Connecting your dealer for details. Incorrect connection may cause a certain picture degradation. Use of the computer, its operating system...
... projector is changed on a computer, depending on Windows. Please consult with VESA DDC 2B. It might be completed. Plug-and-Play can be sure to activate the laptop's RGB external image output (set the laptop to CRT display or to be used with core set. Setting up Connecting your dealer for details. Incorrect connection may cause a certain picture degradation. Use of the computer, its operating system...

User Manual
Page 16
...KEYSTONE POSITION MENU ESC ENTER RESET STANDBY/ON button STANDBY/ON LAMP TEMP POWER MENU INPUT POWER indicator Power switch Turning on the projector or remote control again while the message is visible. To display the picture, select an input signal according to the projector and outlet. (Solid orange) POWER 2. Press the STANDBY/ON button on the power POWER 1. POWER (Blinking orange) POWER (Solid orange) Then the POWER indicator will appear on the screen for these several seconds. (Blinking green) POWER (Solid green) 3. Open the lens cover, and set the power switch...
...KEYSTONE POSITION MENU ESC ENTER RESET STANDBY/ON button STANDBY/ON LAMP TEMP POWER MENU INPUT POWER indicator Power switch Turning on the projector or remote control again while the message is visible. To display the picture, select an input signal according to the projector and outlet. (Solid orange) POWER 2. Press the STANDBY/ON button on the power POWER 1. POWER (Blinking orange) POWER (Solid orange) Then the POWER indicator will appear on the screen for these several seconds. (Blinking green) POWER (Solid green) 3. Open the lens cover, and set the power switch...
User Manual
Page 17
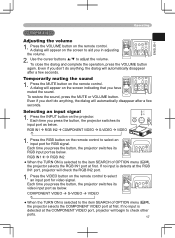
... remote control to the item SEARCH of OPTION menu FREEZE (36), KEYSTONE the projector selects the RGB IN1 port at first. Use the cursor buttons ▲/▼ to check ESC otherRESET ports. 17 ESC RESET Temporarily muting the sound 1. Each time you in adjusting the volume. Press the VIDEO button on the screen to select an input port for RGB signal. If no input is detects at the COMPONENT VIDEO port, projector...
... remote control to the item SEARCH of OPTION menu FREEZE (36), KEYSTONE the projector selects the RGB IN1 port at first. Use the cursor buttons ▲/▼ to check ESC otherRESET ports. 17 ESC RESET Temporarily muting the sound 1. Each time you in adjusting the volume. Press the VIDEO button on the screen to select an input port for RGB signal. If no input is detects at the COMPONENT VIDEO port, projector...
User Manual
Page 18
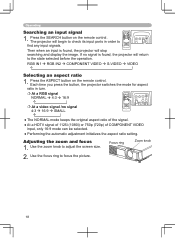
... a video signal /no signal is found , the projector will stop OFF FREEZE KEYSTONE searching and display the image. Use the zoom knob to focus the picture. 18 Use the focus ring to adjust the screen size. Operating Searching an input signal VIDEO STANDBY/ON RGB SEARCH ASPECT AUTO BLANK 1. POSITION MENU RGB IN1 RGB IN2 COMPONENT VIDEO S-VIDEO VIDEO ENTER ESC RESET Selecting an aspect ratio 1. Each time you press the button, the projector switches the mode for...
... a video signal /no signal is found , the projector will stop OFF FREEZE KEYSTONE searching and display the image. Use the zoom knob to focus the picture. 18 Use the focus ring to adjust the screen size. Operating Searching an input signal VIDEO STANDBY/ON RGB SEARCH ASPECT AUTO BLANK 1. POSITION MENU RGB IN1 RGB IN2 COMPONENT VIDEO S-VIDEO VIDEO ENTER ESC RESET Selecting an aspect ratio 1. Each time you press the button, the projector switches the mode for...
User Manual
Page 20
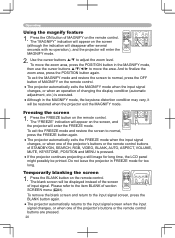
... projector's buttons or the remote control buttons are pressed. 20 VIDEO STANDBY/ON RGB SEARCH ASPECT AUTO BLANK Freezing the screen 1. And to the input signal screen, press the BLANK button again. Temporarily blanking the screen 1. Operating Using the magnify feature 1. ESC ENTER RESET ● The projector automatically exits the FREEZE mode when the input signal changes, or when one of changing the display condition (automatic adjustment, etc.) is pressed. ● If the projector continues projecting a still image...
... projector's buttons or the remote control buttons are pressed. 20 VIDEO STANDBY/ON RGB SEARCH ASPECT AUTO BLANK Freezing the screen 1. And to the input signal screen, press the BLANK button again. Temporarily blanking the screen 1. Operating Using the magnify feature 1. ESC ENTER RESET ● The projector automatically exits the FREEZE mode when the input signal changes, or when one of changing the display condition (automatic adjustment, etc.) is pressed. ● If the projector continues projecting a still image...
User Manual
Page 21
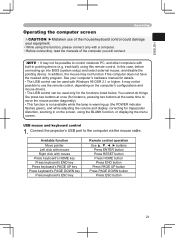
... key Press keyboard's ESC key Remote control operation Use buttons Press ENTER button Press RESET button Press HOME button Press END button Press PAGE UP button Press PAGE DOWN button Press ESC button 21 Connect the projector's USB port to move the mouse pointer diagonally). • This function is not available while the lamp is warming up (the POWER indicator flashes green), and while adjusting the volume and display, correcting for instance, pressing...
... key Press keyboard's ESC key Remote control operation Use buttons Press ENTER button Press RESET button Press HOME button Press END button Press PAGE UP button Press PAGE DOWN button Press ESC button 21 Connect the projector's USB port to move the mouse pointer diagonally). • This function is not available while the lamp is warming up (the POWER indicator flashes green), and while adjusting the volume and display, correcting for instance, pressing...
User Manual
Page 22
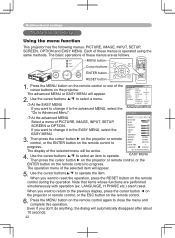
... want to change it to reset the operation, press the RESET button on the remote control. 6. MENU [RGB] :SELECT PICTURE IMAGE INPUT SETUP SCREEN OPTION EASY MENU BRIGHT +0 CONTRAST +0 GAMMA #1 DEFAULT COLOR TEMP LOW COLOR +0 TINT +0 SHARPNESS +0 PROGRESSIVE TURN OFF MY MEMORY SAVE 1 Advanced MENU EASY MENU At the advanced MENU Select a menu of the selected item will automatically disappear after about 10 seconds. 22 TINT +0 SHRPNESS +3 3. The operation menu of PICTURE, IMAGE, INPUT, SETUP, ASPECT KEYSTONE MODE 4:3 +0 NORMAL SCREEN or...
... want to change it to reset the operation, press the RESET button on the remote control. 6. MENU [RGB] :SELECT PICTURE IMAGE INPUT SETUP SCREEN OPTION EASY MENU BRIGHT +0 CONTRAST +0 GAMMA #1 DEFAULT COLOR TEMP LOW COLOR +0 TINT +0 SHARPNESS +0 PROGRESSIVE TURN OFF MY MEMORY SAVE 1 Advanced MENU EASY MENU At the advanced MENU Select a menu of the selected item will automatically disappear after about 10 seconds. 22 TINT +0 SHRPNESS +3 3. The operation menu of PICTURE, IMAGE, INPUT, SETUP, ASPECT KEYSTONE MODE 4:3 +0 NORMAL SCREEN or...
User Manual
Page 23
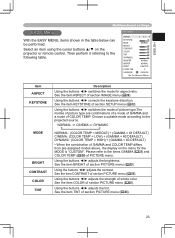
... projected source. EASY MENU ASPECT 4:3 KEYSTONE +0 MODE NORMAL BRIGHT +0 CONTRAST +0 COLOR +0 TINT +0 SHRPNESS +3 WHISPER NORMAL MIRROR NORMAL RESET EXECUTE FILTER TIME 0 LANGUAGE ENGLISH Go To Advance Menu... Using the buttons ◄/► corrects the keystone distortion. See the item TINT of GAMMA and COLOR TEMP differs from pre-assigned modes above, the display on the projector or remote control. NORMAL CINEMA DYNAMIC NORMAL: (COLOR TEMP = MIDDLE) + (GAMMA = #1 DEFAULT) CINEMA: (COLOR TEMP = LOW) + (GAMMA = #2 DEFAULT...
... projected source. EASY MENU ASPECT 4:3 KEYSTONE +0 MODE NORMAL BRIGHT +0 CONTRAST +0 COLOR +0 TINT +0 SHRPNESS +3 WHISPER NORMAL MIRROR NORMAL RESET EXECUTE FILTER TIME 0 LANGUAGE ENGLISH Go To Advance Menu... Using the buttons ◄/► corrects the keystone distortion. See the item TINT of GAMMA and COLOR TEMP differs from pre-assigned modes above, the display on the projector or remote control. NORMAL CINEMA DYNAMIC NORMAL: (COLOR TEMP = MIDDLE) + (GAMMA = #1 DEFAULT) CINEMA: (COLOR TEMP = LOW) + (GAMMA = #2 DEFAULT...

User Manual
Page 30
... projector or remote control, and press the cursor button ► on the projector or remote control, or the ENTER button on the remote control to progress. MENU [RGB] PICTURE IMAGE INPUT SETUP SCREEN OPTION EASY MENU :SELECT COLOR SPACE AUTO COMPONENT COMPONENT VIDEO FORMAT AUTO FRAME LOCK TURN ON INFORMATION Item Description Using the buttons ▲/▼ switches the mode for the model CP-S335. • When the TURN ON is selected, a moving picture is selected, the COMPONENT VIDEO port function as a port for video...
... projector or remote control, and press the cursor button ► on the projector or remote control, or the ENTER button on the remote control to progress. MENU [RGB] PICTURE IMAGE INPUT SETUP SCREEN OPTION EASY MENU :SELECT COLOR SPACE AUTO COMPONENT COMPONENT VIDEO FORMAT AUTO FRAME LOCK TURN ON INFORMATION Item Description Using the buttons ▲/▼ switches the mode for the model CP-S335. • When the TURN ON is selected, a moving picture is selected, the COMPONENT VIDEO port function as a port for video...

User Manual
Page 32
... not work correctly. • When the zoom adjustment is selected, acoustic noise and screen brightness are reduced. Using the buttons ▲/▼ turns off/on the remote control to the following table. Select an item using the cursor buttons ▲/▼ on the projector or remote control, and press the cursor button ► on the projector or remote control, or the ENTER button on the whisper mode. MENU [RGB] PICTURE IMAGE INPUT SETUP SCREEN OPTION EASY MENU KEYSTONE...
... not work correctly. • When the zoom adjustment is selected, acoustic noise and screen brightness are reduced. Using the buttons ▲/▼ turns off/on the remote control to the following table. Select an item using the cursor buttons ▲/▼ on the projector or remote control, and press the cursor button ► on the projector or remote control, or the ENTER button on the whisper mode. MENU [RGB] PICTURE IMAGE INPUT SETUP SCREEN OPTION EASY MENU KEYSTONE...
User Manual
Page 36
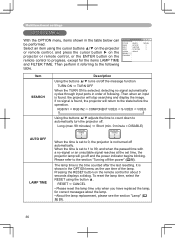
... automatically turn the projector off the power" (16). It is the time counted after the last resetting. Multifunctional settings OPTION Menu With the OPTION menu, items shown in the table below can be performed. Select an item using the button ▲. MENU [RGB] PICTURE IMAGE INPUT SETUP SCREEN OPTION EASY MENU SEARCH AUTO OFF LAMP TIME FILTER TIME SERVICE :SELECT TURN ON 0 0 0 Item SEARCH Description Using the buttons ▲/▼ turns on/off and the power indicator begins blinking.
... automatically turn the projector off the power" (16). It is the time counted after the last resetting. Multifunctional settings OPTION Menu With the OPTION menu, items shown in the table below can be performed. Select an item using the button ▲. MENU [RGB] PICTURE IMAGE INPUT SETUP SCREEN OPTION EASY MENU SEARCH AUTO OFF LAMP TIME FILTER TIME SERVICE :SELECT TURN ON 0 0 0 Item SEARCH Description Using the buttons ▲/▼ turns on/off and the power indicator begins blinking.
User Manual
Page 42
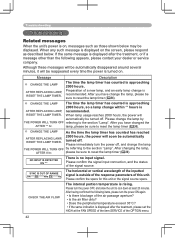
... every time the power is outside of the response parameters of the OPTION menu. 42 After you have change the lamp, please be turned off , and change the lamp by referring to the section "Lamp". please be sure to cool down at the FAN SPEED of the item SERVICE of this unit or the signal source specs. Please turn the power off . Message Description CHANGE THE LAMP AFTER REPLACING LAMP, RESET THE LAMP TIMER. SYNC...
... every time the power is outside of the response parameters of the OPTION menu. 42 After you have change the lamp, please be turned off , and change the lamp by referring to the section "Lamp". please be sure to cool down at the FAN SPEED of the item SERVICE of this unit or the signal source specs. Please turn the power off . Message Description CHANGE THE LAMP AFTER REPLACING LAMP, RESET THE LAMP TIMER. SYNC...

User Manual
Page 44
... Lighting In Red Lighting In Red Turned off Ordinary operations may be performed. Blinking In Red or Lighting In Red Blinking In Red Turned off Please wait. Troubleshooting Regarding the indicator lamps Lighting and flashing of the lamp cover. In Green off off The lamp cover has not been properly fixed (attached). Lighting Turned Turned The projector is cooling down at least 20 minutes. Blinking In Red (discretionary) (discretionary) The projector is in the table below. A certain error...
... Lighting In Red Lighting In Red Turned off Ordinary operations may be performed. Blinking In Red or Lighting In Red Blinking In Red Turned off Please wait. Troubleshooting Regarding the indicator lamps Lighting and flashing of the lamp cover. In Green off off The lamp cover has not been properly fixed (attached). Lighting Turned Turned The projector is cooling down at least 20 minutes. Blinking In Red (discretionary) (discretionary) The projector is in the table below. A certain error...

User Manual
Page 45
..., please set the HIGH at least 20 minutes. After the treatment, resent the power to reset the filter timer. Lighting In Green Simultaneous blinking in Red It is not operating. Lighting In Green Alternative blinking in the fan, etc., and then turn the power OFF, and clean or change the air filter by referring to ON. In such a case, press the "" (OFF) side of the lamp and lamp cover...
..., please set the HIGH at least 20 minutes. After the treatment, resent the power to reset the filter timer. Lighting In Green Simultaneous blinking in Red It is not operating. Lighting In Green Alternative blinking in the fan, etc., and then turn the power OFF, and clean or change the air filter by referring to ON. In such a case, press the "" (OFF) side of the lamp and lamp cover...
User Manual
Page 46
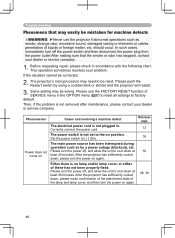
... turn the power on again. Then, if the problem is not plugged in. Cases not involving a machine defect The electrical power cord is not removed after maintenance, please contact your dealer or service company. The power switch is no lamp and/or lamp cover, or either of the lamp and lamp cover, and then turn the power off, and allow the unit to the on . Set the power switch to factory default...
... turn the power on again. Then, if the problem is not plugged in. Cases not involving a machine defect The electrical power cord is not removed after maintenance, please contact your dealer or service company. The power switch is no lamp and/or lamp cover, or either of the lamp and lamp cover, and then turn the power off, and allow the unit to the on . Set the power switch to factory default...

User Manual
Page 47
... displays, and such do not constitute or imply a machine defect. 47 Colors have a faded- Remove the lens cover. Perform picture adjustments by referring to a higher level using the menu functions. Either the focus and/or horizontal phase settings are not correctly adjusted. Clean the lens by changing the COLOR TEMP, COLOR, TINT and/or COLOR SPACE settings, using the menu function 23, 25 or the remote control. out appearance, or Color tone is not suitable. Color settings...
... displays, and such do not constitute or imply a machine defect. 47 Colors have a faded- Remove the lens cover. Perform picture adjustments by referring to a higher level using the menu functions. Either the focus and/or horizontal phase settings are not correctly adjusted. Clean the lens by changing the COLOR TEMP, COLOR, TINT and/or COLOR SPACE settings, using the menu function 23, 25 or the remote control. out appearance, or Color tone is not suitable. Color settings...
Technical Manual
Page 7
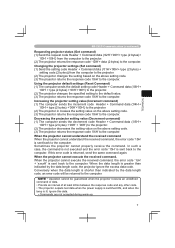
... projector outputs test data when the power supply is switched ON, and when the lamp is lit. When the projector cannot execute the received command. Conversely when the data length is sent back to the computer. Using the projector default settings (Reset Command) (1) The computer sends the default setting code Header + Command data ('06H'+ '00H' + type (2 bytes) +'00H'+'00H') to the projector. (2) The projector changes the specified setting to the default value. (3) The projector...
... projector outputs test data when the power supply is switched ON, and when the lamp is lit. When the projector cannot execute the received command. Conversely when the data length is sent back to the computer. Using the projector default settings (Reset Command) (1) The computer sends the default setting code Header + Command data ('06H'+ '00H' + type (2 bytes) +'00H'+'00H') to the projector. (2) The projector changes the specified setting to the default value. (3) The projector...


