
User Manual
Page 2
Why Measure Your Blood Pressure? Blood Pressure Standard 5 How This Blood Pressure Monitor Works . . . . .7 USAGE INFORMATION: Name/Function of Each Part 8 Display Explanations 9 Installing Batteries 11 Using the AC Adapter 12 Date & Time Set Procedure 13 Applying the Cuff 14 Measurement Procedure 17 Risk Category Indicator 20 Recalling Values from Memory 22 Clearing Values from Memory 23 1 TABLE OF CONTENTS INTRODUCTORY INFORMATION: Important Product Notices and Safety Instructions 3 About Blood Pressure 5 What is Blood Pressure?
Why Measure Your Blood Pressure? Blood Pressure Standard 5 How This Blood Pressure Monitor Works . . . . .7 USAGE INFORMATION: Name/Function of Each Part 8 Display Explanations 9 Installing Batteries 11 Using the AC Adapter 12 Date & Time Set Procedure 13 Applying the Cuff 14 Measurement Procedure 17 Risk Category Indicator 20 Recalling Values from Memory 22 Clearing Values from Memory 23 1 TABLE OF CONTENTS INTRODUCTORY INFORMATION: Important Product Notices and Safety Instructions 3 About Blood Pressure 5 What is Blood Pressure?
User Manual
Page 4
... for accurate measurements. Consult a healthcare professional for interpretation of cuff is being used. • This product is not suitable for people with diabetes, poor circulation of blood, kidney problems or for users who have or suspect any health problem or disease. Save these instructions for future reference. • Please note that this product. Do not...
... for accurate measurements. Consult a healthcare professional for interpretation of cuff is being used. • This product is not suitable for people with diabetes, poor circulation of blood, kidney problems or for users who have or suspect any health problem or disease. Save these instructions for future reference. • Please note that this product. Do not...
User Manual
Page 5
... automated sphygmomanometers. 4 These may lead to those who cannot express their own consent. • The pulse display is not suitable for use . • Do not wrap the cuff around body parts other than your arm. • This unit is intended for checking the frequency of heart pacemakers. • Electromagnetic interference: The device...
... automated sphygmomanometers. 4 These may lead to those who cannot express their own consent. • The pulse display is not suitable for use . • Do not wrap the cuff around body parts other than your arm. • This unit is intended for checking the frequency of heart pacemakers. • Electromagnetic interference: The device...
User Manual
Page 6
... BLOOD PRESSURE What is the pressure exerted on the artery walls while blood flows through the arteries. Among today's various health problems, those at risk. Department of Health and Human Services and the National Institutes of Health have developed a blood pressure standard that identifies areas of the heart is called diastolic (lowest...
... BLOOD PRESSURE What is the pressure exerted on the artery walls while blood flows through the arteries. Among today's various health problems, those at risk. Department of Health and Human Services and the National Institutes of Health have developed a blood pressure standard that identifies areas of the heart is called diastolic (lowest...
User Manual
Page 9
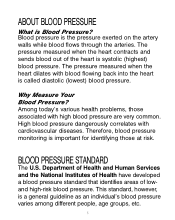
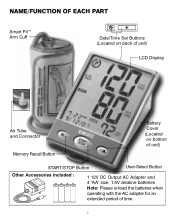
NAME/FUNCTION OF EACH PART Smart Fit™ Arm Cuff Date/Time Set Buttons (Located on back of unit) LCD Display Air Tube and Connector Memory Recall Button Battery Cover (Located on bottom of unit) START/STOP Button User-Select Button Other Accessories Included : 1 12V DC Output AC Adapter and 4 "AA" size, 1.5V alkaline batteries Note: Please unload the batteries when operating with the AC adapter for an extended period of time. 8
NAME/FUNCTION OF EACH PART Smart Fit™ Arm Cuff Date/Time Set Buttons (Located on back of unit) LCD Display Air Tube and Connector Memory Recall Button Battery Cover (Located on bottom of unit) START/STOP Button User-Select Button Other Accessories Included : 1 12V DC Output AC Adapter and 4 "AA" size, 1.5V alkaline batteries Note: Please unload the batteries when operating with the AC adapter for an extended period of time. 8

User Manual
Page 11
...appear in the area that diastolic pressure should be displayed, an error has occurred with your reading. Data Error: Remove and reload the batteries. 10 See Troubleshooting section of last 3 readings Risk Category Indicator: Compares readings ...manual for more information. Measurement Error: Measurement result exceeds measurement range. Pulse Symbol: Shows the pulse rate per minute. Weak Battery Symbol: Appears when batteries should be replaced. User 2: Appears when the monitor is operated by User 2. Display Symbols: User 1: Appears when the monitor is operated by User...
...appear in the area that diastolic pressure should be displayed, an error has occurred with your reading. Data Error: Remove and reload the batteries. 10 See Troubleshooting section of last 3 readings Risk Category Indicator: Compares readings ...manual for more information. Measurement Error: Measurement result exceeds measurement range. Pulse Symbol: Shows the pulse rate per minute. Weak Battery Symbol: Appears when batteries should be replaced. User 2: Appears when the monitor is operated by User 2. Display Symbols: User 1: Appears when the monitor is operated by User...

User Manual
Page 12
... latch and lift the battery cover towards you use batteries only for travelling or when it is fully exposed. 2. INSTALLING BATTERIES Note: It is recommended that the battery cover is not possible to open the battery compartment. 3. Press down on . 11 Extend the tray so that you to use the AC adapter. 1. Battery Cover Slide-Out Tray Replace the batteries if: 1. The...
... latch and lift the battery cover towards you use batteries only for travelling or when it is fully exposed. 2. INSTALLING BATTERIES Note: It is recommended that the battery cover is not possible to open the battery compartment. 3. Press down on . 11 Extend the tray so that you to use the AC adapter. 1. Battery Cover Slide-Out Tray Replace the batteries if: 1. The...

User Manual
Page 18
... move your blood pressure measurement. For greatest accuracy, wait 1 hour after exercising, bathing, eating, drinking beverages with every heartbeat and is suggested that you are using this blood pressure monitor for additional notes regarding your arm or hand muscles. • See page 23 for the first time, please remove the protective...
... move your blood pressure measurement. For greatest accuracy, wait 1 hour after exercising, bathing, eating, drinking beverages with every heartbeat and is suggested that you are using this blood pressure monitor for additional notes regarding your arm or hand muscles. • See page 23 for the first time, please remove the protective...
User Manual
Page 19
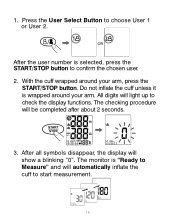
After all symbols disappear, the display will be completed after about 2 seconds. 3. OR After the user number is selected, press the START/STOP button to start measurement. 18 The checking procedure will show a blinking "0". With the cuff wrapped around your arm, ...press the START/STOP button. Do not inflate the cuff unless it is "Ready to Measure" and will light up to choose User 1 or User 2. 1. The monitor is wrapped around your arm. Press the User Select Button to check the display functions. All digits will automatically inflate the cuff to confirm the chosen...
After all symbols disappear, the display will be completed after about 2 seconds. 3. OR After the user number is selected, press the START/STOP button to start measurement. 18 The checking procedure will show a blinking "0". With the cuff wrapped around your arm, ...press the START/STOP button. Do not inflate the cuff unless it is "Ready to Measure" and will light up to choose User 1 or User 2. 1. The monitor is wrapped around your arm. Press the User Select Button to check the display functions. All digits will automatically inflate the cuff to confirm the chosen...

User Manual
Page 21
RISK CATEGORY INDICATOR The U.S. Department of Health and Human Services and the National Institutes of each reading. This monitor automatically turns off . 2. You may press the START/STOP (recommended), "M", User-Select or Date/Time Set buttons. To interrupt the measurement, you may also press the START/STOP button to turn the unit ...blood pressure ranges into 4 stages. Note: 1. This unit is pressed. Symbols are described below and classifications follow the guidelines as described earlier in this manual (page 5). 20 The cuff will deflate immediately after last operation.
RISK CATEGORY INDICATOR The U.S. Department of Health and Human Services and the National Institutes of each reading. This monitor automatically turns off . 2. You may press the START/STOP (recommended), "M", User-Select or Date/Time Set buttons. To interrupt the measurement, you may also press the START/STOP button to turn the unit ...blood pressure ranges into 4 stages. Note: 1. This unit is pressed. Symbols are described below and classifications follow the guidelines as described earlier in this manual (page 5). 20 The cuff will deflate immediately after last operation.
User Manual
Page 22
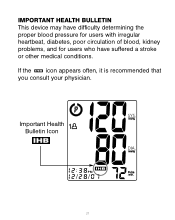
If the icon appears often, it is recommended that you consult your physician. IMPORTANT HEALTH BULLETIN This device may have difficulty determining the proper blood pressure for users with irregular heartbeat, diabetes, poor circulation of blood, kidney problems, and for users who have suffered a stroke or other medical conditions. Important Health Bulletin Icon 21
If the icon appears often, it is recommended that you consult your physician. IMPORTANT HEALTH BULLETIN This device may have difficulty determining the proper blood pressure for users with irregular heartbeat, diabetes, poor circulation of blood, kidney problems, and for users who have suffered a stroke or other medical conditions. Important Health Bulletin Icon 21
User Manual
Page 23
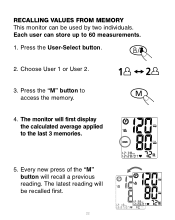
Press the User-Select button. 2. The latest reading will recall a previous reading. Choose User 1 or User 2. 3. Every new press of the "M" button will be used by two individuals. Press the "M" button to the last 3 memories. 5. The monitor will first display the calculated average applied to access the memory. 4. RECALLING VALUES FROM MEMORY This monitor can store up to 60 measurements. 1. Each user can be recalled first. 22
Press the User-Select button. 2. The latest reading will recall a previous reading. Choose User 1 or User 2. 3. Every new press of the "M" button will be used by two individuals. Press the "M" button to the last 3 memories. 5. The monitor will first display the calculated average applied to access the memory. 4. RECALLING VALUES FROM MEMORY This monitor can store up to 60 measurements. 1. Each user can be recalled first. 22
User Manual
Page 24
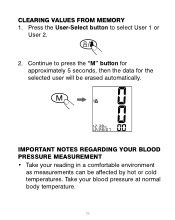
Continue to select User 1 or User 2. 2. IMPORTANT NOTES REGARDING YOUR BLOOD PRESSURE MEASUREMENT • Take your blood pressure at normal body temperature. 23 Take your reading in a comfortable environment as measurements can be erased automatically. Press the User-Select button to press the "M" button for approximately 5 seconds, then the data for the selected user will be affected by hot or cold temperatures. CLEARING VALUES FROM MEMORY 1.
Continue to select User 1 or User 2. 2. IMPORTANT NOTES REGARDING YOUR BLOOD PRESSURE MEASUREMENT • Take your blood pressure at normal body temperature. 23 Take your reading in a comfortable environment as measurements can be erased automatically. Press the User-Select button to press the "M" button for approximately 5 seconds, then the data for the selected user will be affected by hot or cold temperatures. CLEARING VALUES FROM MEMORY 1.
User Manual
Page 25
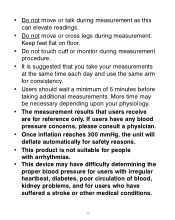
...circulation of 5 minutes before taking additional measurements. Keep feet flat on floor. • Do not touch cuff or monitor during measurement. If users have any blood pressure concerns, please consult a physician. • Once inflation reaches 300 mmHg, the unit will deflate automatically for safety reasons..... • This device may be necessary depending upon your measurements at the same time each day and use the same arm for consistency. • Users should wait a minimum of blood, kidney problems, and for users who have suffered a stroke or other medical conditions. 24
...circulation of 5 minutes before taking additional measurements. Keep feet flat on floor. • Do not touch cuff or monitor during measurement. If users have any blood pressure concerns, please consult a physician. • Once inflation reaches 300 mmHg, the unit will deflate automatically for safety reasons..... • This device may be necessary depending upon your measurements at the same time each day and use the same arm for consistency. • Users should wait a minimum of blood, kidney problems, and for users who have suffered a stroke or other medical conditions. 24
User Manual
Page 26
... If the unit is not field serviceable. You should not use . 4. Do not subject the monitor and cuff to adjust anything inside the device. If you attempt to extreme temperatures, humidity, moisture, and direct sunlight. Leaky batteries can be used for a long time. 3. CARE..., MAINTENANCE & CLEANING 1. Protect from dust. 7. Clean the blood pressure monitor body and cuff carefully with this will not be found on it to acclimate to room temperature before use any tool to open the device nor should you have any problems...
... If the unit is not field serviceable. You should not use . 4. Do not subject the monitor and cuff to adjust anything inside the device. If you attempt to extreme temperatures, humidity, moisture, and direct sunlight. Leaky batteries can be used for a long time. 3. CARE..., MAINTENANCE & CLEANING 1. Protect from dust. 7. Clean the blood pressure monitor body and cuff carefully with this will not be found on it to acclimate to room temperature before use any tool to open the device nor should you have any problems...
User Manual
Page 27
Do not wrap the cuff around arm. 11. Humidity: 40~85% RH max. 26 If in need of repair, refer to extreme shocks (do not drop on floor). 10. Do not subject the monitor to the warranty section of these temperature and humidity ranges: &#...;C ~40°C) Humidity: 10~90% RH max. Do not inflate the cuff unless wrapped around body parts other than your arm. 12. This monitor may not meet its performance specifications if stored or used outside of this manual. 9. Do not disassemble the monitor or cuff. Do not drop or insert any object into any...
Do not wrap the cuff around arm. 11. Humidity: 40~85% RH max. 26 If in need of repair, refer to extreme shocks (do not drop on floor). 10. Do not subject the monitor to the warranty section of these temperature and humidity ranges: &#...;C ~40°C) Humidity: 10~90% RH max. Do not inflate the cuff unless wrapped around body parts other than your arm. 12. This monitor may not meet its performance specifications if stored or used outside of this manual. 9. Do not disassemble the monitor or cuff. Do not drop or insert any object into any...

User Manual
Page 28
...as set out in accordance with the limits for help. POTENTIAL FOR RADIO/TELEVISION INTERFERENCE For USA only: This product has been tested and found to comply with the instructions, may... cause harmful interference to radio communications. If the product does cause harmful interference to radio or television reception, which can radiate radio frequency energy and, if not installed and used ... outlet on and off, the user is connected. • Consult the dealer or an experienced radio/TV technician for a Class B digital device, pursuant to part 15 of FCC rules. These ...
...as set out in accordance with the limits for help. POTENTIAL FOR RADIO/TELEVISION INTERFERENCE For USA only: This product has been tested and found to comply with the instructions, may... cause harmful interference to radio communications. If the product does cause harmful interference to radio or television reception, which can radiate radio frequency energy and, if not installed and used ... outlet on and off, the user is connected. • Consult the dealer or an experienced radio/TV technician for a Class B digital device, pursuant to part 15 of FCC rules. These ...

User Manual
Page 29
.... E2 error symbol shown on display E3 error symbol shown on the warranty page. 28 Contact information for HoMedics Consumer Relations Department can be plugged Measure again. Do not move during measurement? Batteries have been positioned incorrectly. Replace them with...error Cuff has been placed symbol shown on when the START/STOP button is pushed. Note: If the unit still does not work, contact HoMedics Consumer Relations. Cuff Check cuff connection. during measurement. Remove and reload the batteries. TROUBLESHOOTING If any abnormality arises during use...
.... E2 error symbol shown on display E3 error symbol shown on the warranty page. 28 Contact information for HoMedics Consumer Relations Department can be plugged Measure again. Do not move during measurement? Batteries have been positioned incorrectly. Replace them with...error Cuff has been placed symbol shown on when the START/STOP button is pushed. Note: If the unit still does not work, contact HoMedics Consumer Relations. Cuff Check cuff connection. during measurement. Remove and reload the batteries. TROUBLESHOOTING If any abnormality arises during use...
User Manual
Page 30
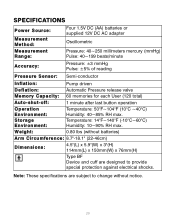
... Device and cuff are subject to provide special protection against electrical shocks. SPECIFICATIONS Power Source: Measurement Method: Four 1.5V DC (AA) batteries or supplied 12V DC AC adapter Oscillometric Measurement Range: Pressure: 40~250... millimeters mercury (mmHg) Pulse: 40~199 beats/minute Accuracy: Pressure: ±3 mmHg Pulse: ±5% of reading Pressure Sensor: Semi-conductor Inflation: Deflation: Memory Capacity: Pump driven Automatic Pressure release valve 60 memories for each User...
... Device and cuff are subject to provide special protection against electrical shocks. SPECIFICATIONS Power Source: Measurement Method: Four 1.5V DC (AA) batteries or supplied 12V DC AC adapter Oscillometric Measurement Range: Pressure: 40~250... millimeters mercury (mmHg) Pulse: 40~199 beats/minute Accuracy: Pressure: ±3 mmHg Pulse: ±5% of reading Pressure Sensor: Semi-conductor Inflation: Deflation: Memory Capacity: Pump driven Automatic Pressure release valve 60 memories for each User...
User Manual
Page 31
... REPLACEMENT. unauthorized repairs or modifications; or environmental conditions; IB-BPA200H 30 THE WARRANTY PROVIDED HEREIN SHALL BE THE SOLE AND EXCLUSIVE WARRANTY. Contact HoMedics Consumer Relations at a repair facility or otherwise awaiting parts or repair; HoMedics does not authorize anyone, including, but not limited to country. alteration to the retailer. and its products will be free of use...
... REPLACEMENT. unauthorized repairs or modifications; or environmental conditions; IB-BPA200H 30 THE WARRANTY PROVIDED HEREIN SHALL BE THE SOLE AND EXCLUSIVE WARRANTY. Contact HoMedics Consumer Relations at a repair facility or otherwise awaiting parts or repair; HoMedics does not authorize anyone, including, but not limited to country. alteration to the retailer. and its products will be free of use...


