

User Manual
Page 1
Hip & Pocket Pedometer Ple ase Take A Moment N Register Your Product At: www.homedics.com/register Your valuable input regarding this product will help us create the products you will want in the future. A El manual en español empieza en la página 22 ow PDM-100 Ver.
Hip & Pocket Pedometer Ple ase Take A Moment N Register Your Product At: www.homedics.com/register Your valuable input regarding this product will help us create the products you will want in the future. A El manual en español empieza en la página 22 ow PDM-100 Ver.

User Manual
Page 3
TABLE OF CONTENTS BASIC INFORMATION: Introduction 3 Name/Function of Each Part 3 Installing the Battery 4 Pedometer Modes 6 Calculating Stride Length 8 Setting the Time 9 Setting User Information 11 OPERATING THE PEDOMETER: Time Mode 13 Steps Mode 13 Distance Mode 14 Calories Mode 14 Average Speed Mode 14 Exercise Time Mode 15 Memory Mode 15 Care, Maintenance & Cleaning.......... 17 Specifications 19 Default Settings 19 1 Year Limited Warranty 20 2
TABLE OF CONTENTS BASIC INFORMATION: Introduction 3 Name/Function of Each Part 3 Installing the Battery 4 Pedometer Modes 6 Calculating Stride Length 8 Setting the Time 9 Setting User Information 11 OPERATING THE PEDOMETER: Time Mode 13 Steps Mode 13 Distance Mode 14 Calories Mode 14 Average Speed Mode 14 Exercise Time Mode 15 Memory Mode 15 Care, Maintenance & Cleaning.......... 17 Specifications 19 Default Settings 19 1 Year Limited Warranty 20 2

User Manual
Page 4
..., including weight-loss, it is recommended that adults should walk 10,000 steps a day.* When you keep this manual for future reference. NAME/FUNCTION OF EACH PART Reset Button Mode Button RES ET MO D E S ET Set Button MASTER RESET *American Heart Association 3 We suggest you start to walk or run, this pedometer. INTRODUCTION...
..., including weight-loss, it is recommended that adults should walk 10,000 steps a day.* When you keep this manual for future reference. NAME/FUNCTION OF EACH PART Reset Button Mode Button RES ET MO D E S ET Set Button MASTER RESET *American Heart Association 3 We suggest you start to walk or run, this pedometer. INTRODUCTION...

User Manual
Page 5
Fig. Fig. B to the polarity indications inside the compartment. Unscrew the battery compartment and remove the cover. A 2. B 4 A Fig. Battery Type: 1 3V Lithium CR2032 battery (included). The battery cover is located on the back of the pedometer. Clip Master Reset Button Battery Compartment INSTALLING THE BATTERY 1. Place the battery according Fig.
Fig. Fig. B to the polarity indications inside the compartment. Unscrew the battery compartment and remove the cover. A 2. B 4 A Fig. Battery Type: 1 3V Lithium CR2032 battery (included). The battery cover is located on the back of the pedometer. Clip Master Reset Button Battery Compartment INSTALLING THE BATTERY 1. Place the battery according Fig.

User Manual
Page 6
... each time you install batteries. 5 All user info, including the time, will need to be reset if the battery is dark. • Batteries are hazardous waste. Remove the battery when the unit is not in battery compartment with the household garbage. C Fig. Replace the battery compartment cover and fasten the screw. Clean contact on battery and in use for this pedometer...
... each time you install batteries. 5 All user info, including the time, will need to be reset if the battery is dark. • Batteries are hazardous waste. Remove the battery when the unit is not in battery compartment with the household garbage. C Fig. Replace the battery compartment cover and fasten the screw. Clean contact on battery and in use for this pedometer...
User Manual
Page 9
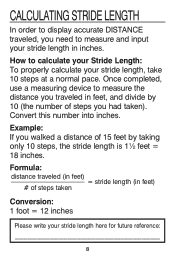
... properly calculate your stride length, take 10 steps at a normal pace. How to measure and input your stride length here for future reference: 8 Once completed, use a measuring device to measure the distance you traveled in feet, and divide by 10 (the number of steps you walked a distance of steps taken Conversion...
... properly calculate your stride length, take 10 steps at a normal pace. How to measure and input your stride length here for future reference: 8 Once completed, use a measuring device to measure the distance you traveled in feet, and divide by 10 (the number of steps you walked a distance of steps taken Conversion...

User Manual
Page 10
SETTING THE TIME Note: To start, please install the battery. While in a cycling manner. Pressing the MODE button will automatically display the TIME. Change the MINUTE, SECOND and 12 or 24 HOUR MODES as described in step 2 above, using the RESET button to increase the selection and the MODE button to the INSTALLING THE BATTERY... refer to confirm the entries. 9 If the pedometer does not automatically display this manual. Each press will increase the number by one in TIME mode, press and hold down the SET button for 2 seconds and then will confirm the entry. 3. The HOUR should ...
SETTING THE TIME Note: To start, please install the battery. While in a cycling manner. Pressing the MODE button will automatically display the TIME. Change the MINUTE, SECOND and 12 or 24 HOUR MODES as described in step 2 above, using the RESET button to increase the selection and the MODE button to the INSTALLING THE BATTERY... refer to confirm the entries. 9 If the pedometer does not automatically display this manual. Each press will increase the number by one in TIME mode, press and hold down the SET button for 2 seconds and then will confirm the entry. 3. The HOUR should ...
User Manual
Page 11
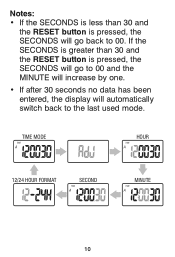
If the SECONDS is greater than 30 and the RESET button is pressed, the SECONDS will go to 00 and the MINUTE will increase by one. • If after 30 seconds no data has been entered, the display will go back to the last used mode. TIME MODE TIME A HOUR TIME A 12/24 HOUR FORMAT SECOND TIME A MINUTE TIME A 10 Notes: • If the SECONDS is less than 30 and the RESET button is pressed, the SECONDS will automatically switch back to 00.
If the SECONDS is greater than 30 and the RESET button is pressed, the SECONDS will go to 00 and the MINUTE will increase by one. • If after 30 seconds no data has been entered, the display will go back to the last used mode. TIME MODE TIME A HOUR TIME A 12/24 HOUR FORMAT SECOND TIME A MINUTE TIME A 10 Notes: • If the SECONDS is less than 30 and the RESET button is pressed, the SECONDS will automatically switch back to 00.

User Manual
Page 12
... displayed in Imperial format. To change the selection in a cycling manner. Pressing the MODE button will confirm the entry. Press and hold the SET button until you reach STEP mode. 2. Each press will be displayed in Metric format. 4. To change the STRIDE LENGTH, press the RESET... the selection and the MODE button to increase the number by one in a cycling manner. Pressing the MODE button will confirm the entry. 5. SETTING USER INFORMATION 1. Press the MODE button until UNIT displays on the screen, and a blinking MILE or KM. 3. To change the WEIGHT, press the...
... displayed in Imperial format. To change the selection in a cycling manner. Pressing the MODE button will confirm the entry. Press and hold the SET button until you reach STEP mode. 2. Each press will be displayed in Metric format. 4. To change the STRIDE LENGTH, press the RESET... the selection and the MODE button to increase the number by one in a cycling manner. Pressing the MODE button will confirm the entry. 5. SETTING USER INFORMATION 1. Press the MODE button until UNIT displays on the screen, and a blinking MILE or KM. 3. To change the WEIGHT, press the...

User Manual
Page 13
STEPS MODE Step UNIT Mile STRIDE LENGTH STRIDE WEIGHT WEIGHT inch lb Notes: • If after 30 seconds no data has been entered, the display will automatically switch back to the last mode used. • Resetting any one of the following features will result in clearing all of the following features: STEPS TAKEN, DISTANCE TRAVELED, CALORIES BURNED, AVERAGE SPEED, or EXERCISE TIME. • If after 5 minutes no buttons are pressed, the display will return to TIME mode. • To reset ALL INFORMATION on the 12
STEPS MODE Step UNIT Mile STRIDE LENGTH STRIDE WEIGHT WEIGHT inch lb Notes: • If after 30 seconds no data has been entered, the display will automatically switch back to the last mode used. • Resetting any one of the following features will result in clearing all of the following features: STEPS TAKEN, DISTANCE TRAVELED, CALORIES BURNED, AVERAGE SPEED, or EXERCISE TIME. • If after 5 minutes no buttons are pressed, the display will return to TIME mode. • To reset ALL INFORMATION on the 12

User Manual
Page 14
... through the different modes of the pedometer. If the pedometer does not automatically display this mode, a running total of the amount of the pedometer. pedometer, use a paperclip to press the MASTER RESET button on the back of steps taken per day will show full LCD segments for 2 seconds and then automatically...
... through the different modes of the pedometer. If the pedometer does not automatically display this mode, a running total of the amount of the pedometer. pedometer, use a paperclip to press the MASTER RESET button on the back of steps taken per day will show full LCD segments for 2 seconds and then automatically...
User Manual
Page 15
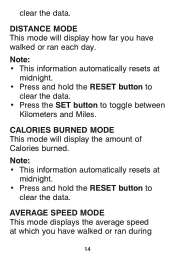
clear the data. Note: • This information automatically resets at midnight. • Press and hold the RESET button to clear the data. • Press the SET button to clear the data. Note: • This information automatically resets at midnight. • Press and hold the RESET button to toggle between Kilometers and ...
clear the data. Note: • This information automatically resets at midnight. • Press and hold the RESET button to clear the data. • Press the SET button to clear the data. Note: • This information automatically resets at midnight. • Press and hold the RESET button to toggle between Kilometers and ...

User Manual
Page 16
... up to 7 days. Note: • This information automatically resets at midnight. • Press and hold the RESET button to clear the data. • Press the SET button to clear the data. EXERCISE TIME MODE In this mode, you can see the length of time you were active per day. • Exercise...
... up to 7 days. Note: • This information automatically resets at midnight. • Press and hold the RESET button to clear the data. • Press the SET button to clear the data. EXERCISE TIME MODE In this mode, you can see the length of time you were active per day. • Exercise...
User Manual
Page 17
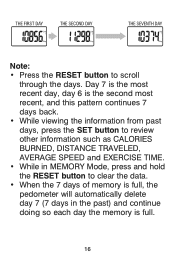
... to clear the data. • When the 7 days of memory is full, the pedometer will automatically delete day 7 (7 days in the past days, press the SET button to review other information such as CALORIES BURNED, DISTANCE TRAVELED, AVERAGE SPEED and EXERCISE TIME. • While in MEMORY Mode, press and hold the...
... to clear the data. • When the 7 days of memory is full, the pedometer will automatically delete day 7 (7 days in the past days, press the SET button to review other information such as CALORIES BURNED, DISTANCE TRAVELED, AVERAGE SPEED and EXERCISE TIME. • While in MEMORY Mode, press and hold the...

User Manual
Page 18
If in need of repair, refer to the warranty section of the device and device components, including batteries. 17 Remove the battery when the unit will not be used for a long time. • Follow local ordinances and recycling instructions regarding disposal or recycling of this manual. • Do not subject the device to extreme shocks (do not...
If in need of repair, refer to the warranty section of the device and device components, including batteries. 17 Remove the battery when the unit will not be used for a long time. • Follow local ordinances and recycling instructions regarding disposal or recycling of this manual. • Do not subject the device to extreme shocks (do not...
User Manual
Page 19
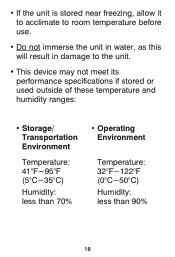
• If the unit is stored near freezing, allow it to acclimate to room temperature before use. • Do not immerse the unit in water, as this will result in damage to the unit. • This device may not meet its performance specifications if stored or used outside of these temperature and humidity ranges: • Storage/ Transportation Environment Temperature: 41°F~95°F (5°C~35°C) Humidity: less than 70% • Operating Environment Temperature: 32°F~122°F (0°C~50°C) Humidity: less than 90% 18
• If the unit is stored near freezing, allow it to acclimate to room temperature before use. • Do not immerse the unit in water, as this will result in damage to the unit. • This device may not meet its performance specifications if stored or used outside of these temperature and humidity ranges: • Storage/ Transportation Environment Temperature: 41°F~95°F (5°C~35°C) Humidity: less than 70% • Operating Environment Temperature: 32°F~122°F (0°C~50°C) Humidity: less than 90% 18
User Manual
Page 20
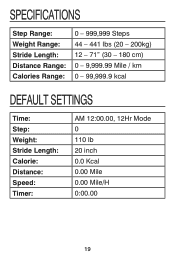
SPECIFICATIONS Step Range: Weight Range: Stride Length: Distance Range: Calories Range: 0 - 999,999 Steps 44 - 441 lbs (20 - 200kg) 12 - 71" (30 - 180 cm) 0 - 9,999.99 Mile / km 0 - 99,999.9 kcal DEFAULT SETTINGS Time: Step: Weight: Stride Length: Calorie: Distance: Speed: Timer: AM 12:00.00, 12Hr Mode 0 110 lb 20 inch 0.0 Kcal 0.00 Mile 0.00 Mile/H 0:00.00 19
SPECIFICATIONS Step Range: Weight Range: Stride Length: Distance Range: Calories Range: 0 - 999,999 Steps 44 - 441 lbs (20 - 200kg) 12 - 71" (30 - 180 cm) 0 - 9,999.99 Mile / km 0 - 99,999.9 kcal DEFAULT SETTINGS Time: Step: Weight: Stride Length: Calorie: Distance: Speed: Timer: AM 12:00.00, 12Hr Mode 0 110 lb 20 inch 0.0 Kcal 0.00 Mile 0.00 Mile/H 0:00.00 19

User Manual
Page 21
... supply; alteration to obligate HoMedics in material and workmanship under normal use and service. unauthorized repairs or modifications; vandalism; or environmental conditions; loss of use of the product from failure to have the model number of power; HoMedics warrants that its products with...HoMedics sells its products will be free of original purchase, except as noted below. malfunction or damage of any way beyond the terms set forth herein. Contact HoMedics Consumer Relations at a repair facility or otherwise awaiting the attachment of an operating part ...
... supply; alteration to obligate HoMedics in material and workmanship under normal use and service. unauthorized repairs or modifications; vandalism; or environmental conditions; loss of use of the product from failure to have the model number of power; HoMedics warrants that its products with...HoMedics sells its products will be free of original purchase, except as noted below. malfunction or damage of any way beyond the terms set forth herein. Contact HoMedics Consumer Relations at a repair facility or otherwise awaiting the attachment of an operating part ...
User Manual
Page 22
..., please visit: www.homedics.com. IF REPLACEMENT PARTS FOR DEFECTIVE MATERIALS ARE NOT AVAILABLE, HOMEDICS RESERVES THE RIGHT TO MAKE PRODUCT SUBSTITUTIONS IN LIEU OF REPAIR OR REPLACEMENT. Any and all warranties or guarantees shall immediately cease and terminate as to you with specific legal rights. You may...OTHER OBLIGATION ON THE PART OF THE COMPANY WITH RESPECT TO PRODUCTS COVERED BY THIS WARRANTY. All rights reserved. THE WARRANTY PROVIDED HEREIN SHALL BE THE SOLE AND EXCLUSIVE WARRANTY. This warranty does not extend to the purchase of opened, used, repaired, repackaged and/or...
..., please visit: www.homedics.com. IF REPLACEMENT PARTS FOR DEFECTIVE MATERIALS ARE NOT AVAILABLE, HOMEDICS RESERVES THE RIGHT TO MAKE PRODUCT SUBSTITUTIONS IN LIEU OF REPAIR OR REPLACEMENT. Any and all warranties or guarantees shall immediately cease and terminate as to you with specific legal rights. You may...OTHER OBLIGATION ON THE PART OF THE COMPANY WITH RESPECT TO PRODUCTS COVERED BY THIS WARRANTY. All rights reserved. THE WARRANTY PROVIDED HEREIN SHALL BE THE SOLE AND EXCLUSIVE WARRANTY. This warranty does not extend to the purchase of opened, used, repaired, repackaged and/or...


