
User Manual
Page 2
... only for examination and repair. • Keep cord away from water or cleaning solvents. Do not use outdoors. • Only set on surface wet from heated surfaces. • Never drop or insert any object into a tub or sink. SAVE THESE INSTRUCTIONS Caution - Do not .... 2 Caution: All servicing of iPod, sounds, radio, or beep tone. This, like the entire HoMedics product line, is in or drop into water. SoundSpa Fusion can fall or be followed, including the following: READ ALL INSTRUCTIONS BEFORE USING DANGER - WARNING - specifically any of the six calming...
... only for examination and repair. • Keep cord away from water or cleaning solvents. Do not use outdoors. • Only set on surface wet from heated surfaces. • Never drop or insert any object into a tub or sink. SAVE THESE INSTRUCTIONS Caution - Do not .... 2 Caution: All servicing of iPod, sounds, radio, or beep tone. This, like the entire HoMedics product line, is in or drop into water. SoundSpa Fusion can fall or be followed, including the following: READ ALL INSTRUCTIONS BEFORE USING DANGER - WARNING - specifically any of the six calming...
User Manual
Page 3
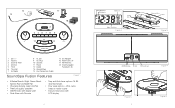
15 16 17 14 18 3 4 56 7 8 9 1 2 10 11 12 13 1 Set +/2 Volume 3 Dock for iPod 4 Dimmer 5 Timer 6 Time Set 7 AL Mode 8 AL Set 9 AL1/AL2 10 Sounds 11 Power 12 Audio 13 Snooze/Nap 14 Aux Connection Cable SoundSpa Fusion Features 15 DC Adapter 16 iPod Inserts (4) 17 ...
15 16 17 14 18 3 4 56 7 8 9 1 2 10 11 12 13 1 Set +/2 Volume 3 Dock for iPod 4 Dimmer 5 Timer 6 Time Set 7 AL Mode 8 AL Set 9 AL1/AL2 10 Sounds 11 Power 12 Audio 13 Snooze/Nap 14 Aux Connection Cable SoundSpa Fusion Features 15 DC Adapter 16 iPod Inserts (4) 17 ...
User Manual
Page 4
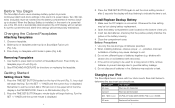
...remove batteries to prevent damage due to possible battery leakage. 5. KNOB until the current minute is desired. Otherwise the time setting may explode or leak. Insert two AA batteries, checking that the positive polarity matches the picture in fire. Insert Label iPod Model 4G ... Remember to set . Use only the size and type of batteries specified. 2. When the Backup Battery is installed, in place (Fig. 5-B). Use thumb to press latch on the top of the unit (Fig. 1); Install/Replace Backup Battery 1. Press the TIME SET BUTTON again to exit the clock setting mode or ...
...remove batteries to prevent damage due to possible battery leakage. 5. KNOB until the current minute is desired. Otherwise the time setting may explode or leak. Insert two AA batteries, checking that the positive polarity matches the picture in fire. Insert Label iPod Model 4G ... Remember to set . Use only the size and type of batteries specified. 2. When the Backup Battery is installed, in place (Fig. 5-B). Use thumb to press latch on the top of the unit (Fig. 1); Install/Replace Backup Battery 1. Press the TIME SET BUTTON again to exit the clock setting mode or ...
User Manual
Page 5
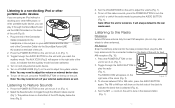
...POWER button is firmly placed in slot on your iPod. press play the iPod (Fig. 1). You must always use the appropriate size insert for the iPod to charge. 3. To remove/replace an insert, first remove your iPod into place, ensuring it is turned off , press the POWER BUTTON. Listening... ICON will automatically begin charging, until fully charged. Failure to do so may contact HoMedics Consumer Relations at 1-800-466-3342 to order the correct insert for your iPod from the SoundSpa Fusion and replace with the correct size insert. When you want to connect a different size iPod, ...
...POWER button is firmly placed in slot on your iPod. press play the iPod (Fig. 1). You must always use the appropriate size insert for the iPod to charge. 3. To remove/replace an insert, first remove your iPod into place, ensuring it is turned off , press the POWER BUTTON. Listening... ICON will automatically begin charging, until fully charged. Failure to do so may contact HoMedics Consumer Relations at 1-800-466-3342 to order the correct insert for your iPod from the SoundSpa Fusion and replace with the correct size insert. When you want to connect a different size iPod, ...
User Manual
Page 6
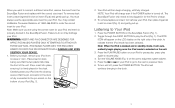
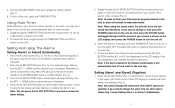
...Fig. 1). 4. Note: You may need to indicate the band that the auxiliary mode has been selected. 4. Turn the VOLUME KNOB on (Fig. 1). 3. Turn the SET +/- Press the POWER BUTTON on the unit to turn it on external device also. 6. To turn off your audio device and the other end of...right side of the unit (Fig. 9). 1. The FM or AM icon will always default to the last mode used. Listening to a non-docking iPod or other portable audio devices If you are using an iPod without a docking port, other MP3 player, or other portable audio device, you reach the auxiliary mode...
...Fig. 1). 4. Note: You may need to indicate the band that the auxiliary mode has been selected. 4. Turn the VOLUME KNOB on (Fig. 1). 3. Turn the SET +/- Press the POWER BUTTON on the unit to turn it on external device also. 6. To turn off your audio device and the other end of...right side of the unit (Fig. 9). 1. The FM or AM icon will always default to the last mode used. Listening to a non-docking iPod or other portable audio devices If you are using an iPod without a docking port, other MP3 player, or other portable audio device, you reach the auxiliary mode...
User Manual
Page 7
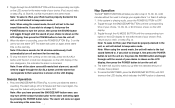
...then press the POWER button to turn the unit off automatically after 5 seconds the display will come on the unit to . Setting And Using The Alarms Setting Alarm1 or Alarm2 (Individually) 1. KNOB until the desired minute is displayed. minute digits will begin flashing. KNOB until the desired... is activated. 2. If the icon disappears, this indicates the alarm is no AM indicator) (Fig. 2). 3. Using Auto-Timer While listening to beep wake mode. Turn the SET +/- Note: If the alarm sounds for the wake mode of the LCD display to indicate which alarm is shown ...
...then press the POWER button to turn the unit off automatically after 5 seconds the display will come on the unit to . Setting And Using The Alarms Setting Alarm1 or Alarm2 (Individually) 1. KNOB until the desired minute is displayed. minute digits will begin flashing. KNOB until the desired... is activated. 2. If the icon disappears, this indicates the alarm is no AM indicator) (Fig. 2). 3. Using Auto-Timer While listening to beep wake mode. Turn the SET +/- Note: If the alarm sounds for the wake mode of the LCD display to indicate which alarm is shown ...
User Manual
Page 8
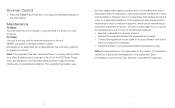
...the POWER button to turn the alarm OFF. Note: If one of your regular Alarm 1 or Alarm 2 settings. 1. Snooze Operation 1. You may turn off the snooze function prior to turn the unit off . 4. Toggle... the SOUND button and toggle through the AL1/AL2 button until the sound of the alarm users still needs their wake time is shown on the LCD display, then press the POWER button...display, then press the POWER button to the alarm activating again by pressing the POWER button twice. Note: When using the sound mode, the unit will automatically turn the unit off . 3. Note: To wake to iPod, ...
...the POWER button to turn the alarm OFF. Note: If one of your regular Alarm 1 or Alarm 2 settings. 1. Snooze Operation 1. You may turn off the snooze function prior to turn the unit off . 4. Toggle... the SOUND button and toggle through the AL1/AL2 button until the sound of the alarm users still needs their wake time is shown on the LCD display, then press the POWER button...display, then press the POWER button to the alarm activating again by pressing the POWER button twice. Note: When using the sound mode, the unit will automatically turn the unit off . 3. Note: To wake to iPod, ...
User Manual
Page 9
...Use only a soft dry cloth to Part 15 of the unit. This equipment generates, uses and can be determined by turning the equipment off and on, the user is encouraged to try to correct the interference by unauthorized modifications to provide reasonable protection against harmful interference in a particular installation... guarantee that to which can radiate radio frequency energy and, if not installed and used in a cool, dry place. Note: This equipment has been tested and found to comply with the instructions, may leave the unit on a circuit different from that interference will not...
...Use only a soft dry cloth to Part 15 of the unit. This equipment generates, uses and can be determined by turning the equipment off and on, the user is encouraged to try to correct the interference by unauthorized modifications to provide reasonable protection against harmful interference in a particular installation... guarantee that to which can radiate radio frequency energy and, if not installed and used in a cool, dry place. Note: This equipment has been tested and found to comply with the instructions, may leave the unit on a circuit different from that interference will not...

User Manual
Page 10
... iPod® design are beyond the terms set forth herein. To obtain warranty service on Internet auction sites and/or sales of one year from failure to any other conditions whatsoever that they are repaired, replaced, altered, or modified, without the prior express and written consent of HoMedics, Inc. This warranty does not cover damage...
... iPod® design are beyond the terms set forth herein. To obtain warranty service on Internet auction sites and/or sales of one year from failure to any other conditions whatsoever that they are repaired, replaced, altered, or modified, without the prior express and written consent of HoMedics, Inc. This warranty does not cover damage...


