

User Manual
Page 2
... pleasant and enjoyable. Page 2 TABLE OF CONTENTS Introduction ...2 General Safety Rules...3-4 Specific Safety Rules ...4 Symbols ...5-6 Electrical...7 Features...8-9 Assembly...9-11 Operation...12-13 Maintenance...14-16 Troubleshooting...17 Exploded View/Parts List ...18-19 Warranty ...20 Parts Ordering / Service ...Back Page INTRODUCTION This product has many features for making it easy...
... pleasant and enjoyable. Page 2 TABLE OF CONTENTS Introduction ...2 General Safety Rules...3-4 Specific Safety Rules ...4 Symbols ...5-6 Electrical...7 Features...8-9 Assembly...9-11 Operation...12-13 Maintenance...14-16 Troubleshooting...17 Exploded View/Parts List ...18-19 Warranty ...20 Parts Ordering / Service ...Back Page INTRODUCTION This product has many features for making it easy...
User Manual
Page 3
... good artificial light. Always wear safety glasses with ANSI Z87.1 standard when operating this rule will fit into the polarized wall outlet only one heavy enough to a complete stop before cleaning the lawn mower, removing the grass catcher, or unclogging the discharge guard. When not in length. If the plug does not fit fully into the extension cord, reverse the plug. When using an...
... good artificial light. Always wear safety glasses with ANSI Z87.1 standard when operating this rule will fit into the polarized wall outlet only one heavy enough to a complete stop before cleaning the lawn mower, removing the grass catcher, or unclogging the discharge guard. When not in length. If the plug does not fit fully into the extension cord, reverse the plug. When using an...

User Manual
Page 4
..., ruts, bumps, rocks, or other objects that may use . SPECIFIC SAFETY RULES Do not operate the mower without the entire grass catcher, discharge guard, rear guard, or other objects which may be used for this measure of safety. Inspect extension cords periodically and replace if damaged. Never place any adjustments, changing accessories, or storing the lawn mower. Walk, never run. Use extra care when approaching blind corners, shrubs, trees...
..., ruts, bumps, rocks, or other objects that may use . SPECIFIC SAFETY RULES Do not operate the mower without the entire grass catcher, discharge guard, rear guard, or other objects which may be used for this measure of safety. Inspect extension cords periodically and replace if damaged. Never place any adjustments, changing accessories, or storing the lawn mower. Walk, never run. Use extra care when approaching blind corners, shrubs, trees...

User Manual
Page 6
...levels of any power tool can result in severe eye damage. Before beginning power tool operation, always wear safety goggles or safety glasses with ANSI Z87.1. SAVE THESE INSTRUCTIONS Page 6 WARNING: Indicates a potentially hazardous situation, which , if not avoided, may result in death or serious injury. SERVICE Servicing...needed, a full face shield. CAUTION: (Without Safety Alert Symbol) Indicates a situation that may result in the operator's manual, do not attempt to use this product. Call Homelite customer service for use only identical replacement parts...
...levels of any power tool can result in severe eye damage. Before beginning power tool operation, always wear safety goggles or safety glasses with ANSI Z87.1. SAVE THESE INSTRUCTIONS Page 6 WARNING: Indicates a potentially hazardous situation, which , if not avoided, may result in death or serious injury. SERVICE Servicing...needed, a full face shield. CAUTION: (Without Safety Alert Symbol) Indicates a situation that may result in the operator's manual, do not attempt to use this product. Call Homelite customer service for use only identical replacement parts...

User Manual
Page 7
... the motor will draw. Only round jacketed cords listed by a qualified service technician. Failure to do not need for outside use. Never use the product with a power tool. Double insulated tools do so can also be performed only by Underwriter's Laboratories (UL) should be used . Observe all normal safety precautions to your nearest authorized service center for loose or exposed wires and cut...
... the motor will draw. Only round jacketed cords listed by a qualified service technician. Failure to do not need for outside use. Never use the product with a power tool. Double insulated tools do so can also be performed only by Underwriter's Laboratories (UL) should be used . Observe all normal safety precautions to your nearest authorized service center for loose or exposed wires and cut...

User Manual
Page 8
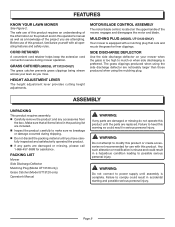
..., AC only, 12 Amps No-load Speed 3,600 r/min. (RPM) Cutting Path 20 in . Wheel Size 7 in . Weight 42 lb. rear Weight 53 lb. CORD RETAINER GRASS CATCHER (MODEL UT13120 ONLY) HEIGHT ADJUSTMENT LEVER MOTOR/BLADE CONTROL ASSEMBLY SIDE DISCHARGE DEFLECTOR MULCHING PLUG (MODEL UT13120 ONLY) Page 8 Fig. 2 Wheel Size 7 in . Height Adjustments 1-3/4 in . to 3-3/4 in. Height Adjustments 1-1/2 in . front, 8 in . to 3-3/4 in . FEATURES PRODUCT SPECIFICATIONS UT13118 Input 120 V, 60 Hz...
..., AC only, 12 Amps No-load Speed 3,600 r/min. (RPM) Cutting Path 20 in . Wheel Size 7 in . Weight 42 lb. rear Weight 53 lb. CORD RETAINER GRASS CATCHER (MODEL UT13120 ONLY) HEIGHT ADJUSTMENT LEVER MOTOR/BLADE CONTROL ASSEMBLY SIDE DISCHARGE DEFLECTOR MULCHING PLUG (MODEL UT13120 ONLY) Page 8 Fig. 2 Wheel Size 7 in . Height Adjustments 1-3/4 in . to 3-3/4 in. Height Adjustments 1-1/2 in . front, 8 in . to 3-3/4 in . FEATURES PRODUCT SPECIFICATIONS UT13118 Input 120 V, 60 Hz...
User Manual
Page 9
... that cuts and recuts the grass for assistance. SIDE DISCHARGE DEFLECTOR Use the side discharge deflector on the product and in the packing list are included. Inspect the product carefully to make sure no breakage or damage occurred during mower operation. PACKING LIST Mower Side Discharge Deflector Mulching Plug (Model UT13120 only) Grass Catcher (Model UT13120 only) Operator's Manual WARNING: If any accessories from the box. Failure to power supply until the parts are...
... that cuts and recuts the grass for assistance. SIDE DISCHARGE DEFLECTOR Use the side discharge deflector on the product and in the packing list are included. Inspect the product carefully to make sure no breakage or damage occurred during mower operation. PACKING LIST Mower Side Discharge Deflector Mulching Plug (Model UT13120 only) Grass Catcher (Model UT13120 only) Operator's Manual WARNING: If any accessories from the box. Failure to power supply until the parts are...
User Manual
Page 10
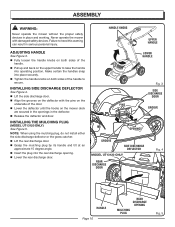
... using the mulching plug, do not install either the side discharge deflector or the grass catcher. Lift the rear discharge door. Grasp the mulching plug by its handle and tilt at an approximate 15 degree angle. Insert the plug into place securely. Tighten the handle knobs on the upper handle to heed this warning can result in serious personal injury. Never operate the mower with...
... using the mulching plug, do not install either the side discharge deflector or the grass catcher. Lift the rear discharge door. Grasp the mulching plug by its handle and tilt at an approximate 15 degree angle. Insert the plug into place securely. Tighten the handle knobs on the upper handle to heed this warning can result in serious personal injury. Never operate the mower with...
User Manual
Page 11
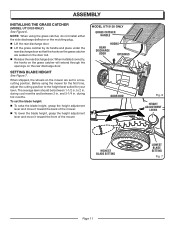
... using the mower for the first time, adjust the cutting position to the height best suited for your lawn. Before using the grass catcher, do not install either the side discharge deflector or the mulching plug. Lift the rear discharge door. Lift the grass catcher by its handle and place under the rear discharge door so that the hooks on the grass catcher are set the blade height: To raise the blade height, grasp the height adjustment lever...
... using the mower for the first time, adjust the cutting position to the height best suited for your lawn. Before using the grass catcher, do not install either the side discharge deflector or the mulching plug. Lift the rear discharge door. Lift the grass catcher by its handle and place under the rear discharge door so that the hooks on the grass catcher are set the blade height: To raise the blade height, grasp the height adjustment lever...

User Manual
Page 12
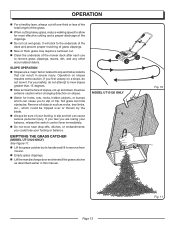
... safety glasses with this type of the mower. The use the cord retainer provided. from the outlet so the cord remains behind the other obstacles. NOTE: Use only an approved outdoor extension cord as the electric motor decelerates. Continue to hold to allow access to the switch control lever. � Pull the switch control lever toward the mower handle and let go of stones, sticks, wires...
... safety glasses with this type of the mower. The use the cord retainer provided. from the outlet so the cord remains behind the other obstacles. NOTE: Use only an approved outdoor extension cord as the electric motor decelerates. Continue to hold to allow access to the switch control lever. � Pull the switch control lever toward the mower handle and let go of stones, sticks, wires...
User Manual
Page 13
... grass catcher by the blade. Always be sure of your footing or balance. It will stick to the underside of the deck and prevent proper mulching of grass clippings. New or thick grass may require a narrower cut. Clean the underside of the mower deck after each use to remove from mower. Empty grass clippings. Lift the rear discharge door and reinstall the grass catcher...
... grass catcher by the blade. Always be sure of your footing or balance. It will stick to the underside of the deck and prevent proper mulching of grass clippings. New or thick grass may require a narrower cut. Clean the underside of the mower deck after each use to remove from mower. Empty grass clippings. Lift the rear discharge door and reinstall the grass catcher...
User Manual
Page 14
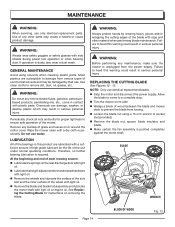
... cloth occasionally. See Replacing the Cutting Blade for instructions on the rear discharge door with light oil. � Lubricate the height adjustment lever and related hardware with light oil. � Remove the wheels and lubricate the surface of the axle bolt and the inner surface of the wheel with light oil. � Remove the blade and blade hub assembly and lubricate the motor shaft with a sufficient amount of high grade lubricant for...
... cloth occasionally. See Replacing the Cutting Blade for instructions on the rear discharge door with light oil. � Lubricate the height adjustment lever and related hardware with light oil. � Remove the wheels and lubricate the surface of the axle bolt and the inner surface of the wheel with light oil. � Remove the blade and blade hub assembly and lubricate the motor shaft with a sufficient amount of high grade lubricant for...

User Manual
Page 15
... curved ends pointing up toward the mower deck and not down using a torque wrench (not provided) to sharpen the blade while it is properly tightened. FAN ASSEMBLY SHAFT BLADE SPACER BLADE INSULATOR BLADE NUT Fig. 13 Fig. 14 Fig. 15 Page 15 MAINTENANCE Place the new blade on the shaft and finger tighten. A dull blade does not cut grass evenly and overloads the motor. To check the blade balance: ...
... curved ends pointing up toward the mower deck and not down using a torque wrench (not provided) to sharpen the blade while it is properly tightened. FAN ASSEMBLY SHAFT BLADE SPACER BLADE INSULATOR BLADE NUT Fig. 13 Fig. 14 Fig. 15 Page 15 MAINTENANCE Place the new blade on the shaft and finger tighten. A dull blade does not cut grass evenly and overloads the motor. To check the blade balance: ...

User Manual
Page 16
... mower deck. Wipe the mower clean with new wheel and insert new cotter pin to bend or kink the power cord. Have repairs made on its side. Using a flat blade screwdriver, pry off the hubcap. Remove the cotter pin from the power supply. Turn mower on its side and clean grass clippings that have accumulated on each side of the lower handle...
... mower deck. Wipe the mower clean with new wheel and insert new cotter pin to bend or kink the power cord. Have repairs made on its side. Using a flat blade screwdriver, pry off the hubcap. Remove the cotter pin from the power supply. Turn mower on its side and clean grass clippings that have accumulated on each side of the lower handle...

User Manual
Page 17
... house circuit breaker. High grass, rear of the deck. Have repaired by an authorized service center. Mower not mulching properly. Extension cord not connected to power source. Motor control switch defective. If it trips again, call the Homelite® Help Line! Have motor control switch replaced by an authorized service center before underside of mower housing and blade dragging in the house. Balance the blade by grinding each cutting edge equally. Stop the motor, disconnect the power...
... house circuit breaker. High grass, rear of the deck. Have repaired by an authorized service center. Mower not mulching properly. Extension cord not connected to power source. Motor control switch defective. If it trips again, call the Homelite® Help Line! Have motor control switch replaced by an authorized service center before underside of mower housing and blade dragging in the house. Balance the blade by grinding each cutting edge equally. Stop the motor, disconnect the power...
User Manual
Page 18
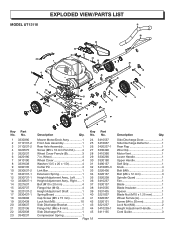
... 3330637 21 3220136 22 3320338 23 3340237 Description Key Part Qty. Side Discharge Door 1 Side Discharge Deflector 1 Rear Flap 1 Wire Clip 2 Motor Vent 1 Lower Handle 1 Upper Handle 1 Soft Grip 1 Knob 4 Bolt (M8 2 Bolt (M6 x 12 mm 3 Spindle Guard 1 Fan 1 Blade 1 Blade Insulator 1 Spacer 1 Blade Nut (M10 x 1.25 mm 1 Wheel Ferrule (A 1 Screw (M4 x 20 mm 2 Lock Nut (M4 2 Height Adjustment Handle 1 Cord Guide 3 EXPLODED VIEW49/PARTS LIST MODEL UT13118 31 28 1 25 24 20 22 23...
... 3330637 21 3220136 22 3320338 23 3340237 Description Key Part Qty. Side Discharge Door 1 Side Discharge Deflector 1 Rear Flap 1 Wire Clip 2 Motor Vent 1 Lower Handle 1 Upper Handle 1 Soft Grip 1 Knob 4 Bolt (M8 2 Bolt (M6 x 12 mm 3 Spindle Guard 1 Fan 1 Blade 1 Blade Insulator 1 Spacer 1 Blade Nut (M10 x 1.25 mm 1 Wheel Ferrule (A 1 Screw (M4 x 20 mm 2 Lock Nut (M4 2 Height Adjustment Handle 1 Cord Guide 3 EXPLODED VIEW49/PARTS LIST MODEL UT13118 31 28 1 25 24 20 22 23...

User Manual
Page 19
No. Wheel 2 31 Wheel Cover 4 32 8 in . Wire Clip 2 Side Discharge Bracket 1 Flange Nut (M6 x 8 mm 2 Side Discharge Pin 1 Side Compression Spring 1 Side Discharge Door 1 Side Discharge Deflector 1 Motor Vent 1 Flange Nut (M6 x 12 mm 3 Spindle Guard 1 Fan 1 Blade Insulator 1 Spacer 1 Blade 1 Blade Nut (M10 x 1.25 mm 1 Upper Handle 1 Lower Handle 1 Soft Grip 1 Bolt (M8 2 Screw (M4 x 20 mm pan hd 2 Grass Catcher Frame 1 Knob 4 Lock Nut (M4 2 Grass Catcher 1 Cord Guide 3 "O" ring 2 EXPLODED VIEW/PARTS LIST MODEL UT13120...
No. Wheel 2 31 Wheel Cover 4 32 8 in . Wire Clip 2 Side Discharge Bracket 1 Flange Nut (M6 x 8 mm 2 Side Discharge Pin 1 Side Compression Spring 1 Side Discharge Door 1 Side Discharge Deflector 1 Motor Vent 1 Flange Nut (M6 x 12 mm 3 Spindle Guard 1 Fan 1 Blade Insulator 1 Spacer 1 Blade 1 Blade Nut (M10 x 1.25 mm 1 Upper Handle 1 Lower Handle 1 Soft Grip 1 Bolt (M8 2 Screw (M4 x 20 mm pan hd 2 Grass Catcher Frame 1 Knob 4 Lock Nut (M4 2 Grass Catcher 1 Cord Guide 3 "O" ring 2 EXPLODED VIEW/PARTS LIST MODEL UT13120...

User Manual
Page 20
..., installation, or normal adjustments explained in the operator's manual. Damage or liability caused by shipping, improper handling, improper installation, incorrect voltage or improper wiring, improper maintenance, improper modification, or the use of accessories and/or attachments not specifically recommended. Repairs necessary because of products or parts determined not to homelite@reelin.com. Some states do not interfere with questions about operating or maintaining your lawn mower...
..., installation, or normal adjustments explained in the operator's manual. Damage or liability caused by shipping, improper handling, improper installation, incorrect voltage or improper wiring, improper maintenance, improper modification, or the use of accessories and/or attachments not specifically recommended. Repairs necessary because of products or parts determined not to homelite@reelin.com. Some states do not interfere with questions about operating or maintaining your lawn mower...

User Manual
Page 22
...-457-5888 or visit us online at www.homelite.com. Please record the serial number in . - MODEL NUMBER SERIAL NUMBER 987000-034 11-8-06 (REV:00) HOMELITE CONSUMER PRODUCTS, INC. 1428 Pearman Dairy Road Anderson, SC 29625 Phone 1-866-457-5888 www.homelite.com UT13120 SERVICE For parts or service, contact your nearest Homelite authorized service dealer. OPERATOR'S MANUAL ELECTRIC LAWN MOWER 18 in the space provided below...
...-457-5888 or visit us online at www.homelite.com. Please record the serial number in . - MODEL NUMBER SERIAL NUMBER 987000-034 11-8-06 (REV:00) HOMELITE CONSUMER PRODUCTS, INC. 1428 Pearman Dairy Road Anderson, SC 29625 Phone 1-866-457-5888 www.homelite.com UT13120 SERVICE For parts or service, contact your nearest Homelite authorized service dealer. OPERATOR'S MANUAL ELECTRIC LAWN MOWER 18 in the space provided below...

Parts List
Page 1
... support flange bolt self locking nut gasket motor radiator resistance electric bridge self-tapping screw motor cover envelope motor cover Machine screw motor vent right shutter self-tapping screw left shutter E-ring rear discharge pin height adjust bracket(left rear wheel self locking nut wheel cover rear discharge door height adjust bracket(right) nut spring pad screw height adjustment handle spring board compression spring rubber cap screw side discharge door side discharge deflector flange bolt spring board side discharge pin spindle guard fan blade blade insulator spacer Qty. Key...
... support flange bolt self locking nut gasket motor radiator resistance electric bridge self-tapping screw motor cover envelope motor cover Machine screw motor vent right shutter self-tapping screw left shutter E-ring rear discharge pin height adjust bracket(left rear wheel self locking nut wheel cover rear discharge door height adjust bracket(right) nut spring pad screw height adjustment handle spring board compression spring rubber cap screw side discharge door side discharge deflector flange bolt spring board side discharge pin spindle guard fan blade blade insulator spacer Qty. Key...


