

User Manual
Page 1
SAVE THIS MANUAL FOR FUTURE REFERENCE WARNING: To reduce the risk of operation, and operator safety. Thank you years of rugged, trouble-free performance. Properly cared for, it will give you for dependability, ease of injury, the user must read and understand the operator's manual before using this product. OPERATOR'S MANUAL 20 in. 24 VOLT CORDLESS LAWN MOWER UT13122 Your lawn mower has been engineered and manufactured to our high standard for your purchase.
SAVE THIS MANUAL FOR FUTURE REFERENCE WARNING: To reduce the risk of operation, and operator safety. Thank you years of rugged, trouble-free performance. Properly cared for, it will give you for dependability, ease of injury, the user must read and understand the operator's manual before using this product. OPERATOR'S MANUAL 20 in. 24 VOLT CORDLESS LAWN MOWER UT13122 Your lawn mower has been engineered and manufactured to our high standard for your purchase.

User Manual
Page 2
... pleasant and enjoyable. TABLE OF CONTENTS Introduction ...2 General Safety Rules...3 Specific Safety Rules ...3-4 Symbols ...5-6 Features...7-8 Assembly...8-10 Operation...10-12 Maintenance...13-15 Troubleshooting...16 Exploded View/Parts List ...17 Warranty ...18 Parts Ordering / Service ...Back Page INTRODUCTION This product has many features for making it easy to maintain and...
... pleasant and enjoyable. TABLE OF CONTENTS Introduction ...2 General Safety Rules...3 Specific Safety Rules ...3-4 Symbols ...5-6 Features...7-8 Assembly...8-10 Operation...10-12 Maintenance...13-15 Troubleshooting...16 Exploded View/Parts List ...17 Warranty ...18 Parts Ordering / Service ...Back Page INTRODUCTION This product has many features for making it easy to maintain and...

User Manual
Page 3
... and behind the handle when the motor is intended. Do not force the lawn mower. Do not overreach. Following this product. Use the right appliance. SPECIFIC SAFETY RULES Do not operate the mower without the entire grass catcher, discharge guard, rear guard, or other hidden objects. Uneven terrain could result in safe working order. Check all instructions listed below and on wet grass or excessively steep...
... and behind the handle when the motor is intended. Do not force the lawn mower. Do not overreach. Following this product. Use the right appliance. SPECIFIC SAFETY RULES Do not operate the mower without the entire grass catcher, discharge guard, rear guard, or other hidden objects. Uneven terrain could result in safe working order. Check all instructions listed below and on wet grass or excessively steep...

User Manual
Page 4
... electric shock. The cutting blade continues to damage or stress. Vibration is properly wired and in good electrical condition; SPECIFIC SAFETY RULES If the lawn mower strikes a foreign object, follow these steps: • Stop the lawn mower and release the switch control lever. • Disconnect the power cord. • Thoroughly inspect the mower for any damage. • Repair any damage before restarting and continuing to operate the mower...
... electric shock. The cutting blade continues to damage or stress. Vibration is properly wired and in good electrical condition; SPECIFIC SAFETY RULES If the lawn mower strikes a foreign object, follow these steps: • Stop the lawn mower and release the switch control lever. • Disconnect the power cord. • Thoroughly inspect the mower for any damage. • Repair any damage before restarting and continuing to operate the mower...

User Manual
Page 5
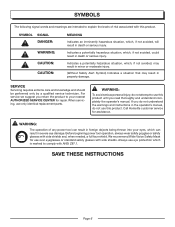
... Safety Alert Electric Shock To reduce the risk of injury, user must read and understand operator's manual before using this product. SYMBOL NAME DESIGNATION/EXPLANATION V Volts Voltage A Amperes Hz Hertz W Watt Current Frequency (cycles per second) Power hrs Hours Time gal Gallon Volume qt Quart Volume Wet Conditions Alert Do not expose to rain or use in damp locations...
... Safety Alert Electric Shock To reduce the risk of injury, user must read and understand operator's manual before using this product. SYMBOL NAME DESIGNATION/EXPLANATION V Volts Voltage A Amperes Hz Hertz W Watt Current Frequency (cycles per second) Power hrs Hours Time gal Gallon Volume qt Quart Volume Wet Conditions Alert Do not expose to rain or use in damp locations...
User Manual
Page 6
... your nearest AUTHORIZED SERVICE CENTER for repair. When servicing, use this product. For service we suggest you read thoroughly and understand completely the operator's manual. SYMBOLS The following signal words and meanings are intended to explain the levels of any power tool can result in death or serious injury. WARNING: To avoid serious personal injury, do not use only identical replacement parts.
... your nearest AUTHORIZED SERVICE CENTER for repair. When servicing, use this product. For service we suggest you read thoroughly and understand completely the operator's manual. SYMBOLS The following signal words and meanings are intended to explain the levels of any power tool can result in death or serious injury. WARNING: To avoid serious personal injury, do not use only identical replacement parts.
User Manual
Page 7
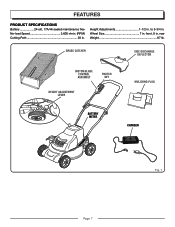
Height Adjustments 1-1/2 in . Wheel Size 7 in . FEATURES PRODUCT SPECIFICATIONS Battery 24volt, 17A/Hr sealed maintenance free No-load Speed 3,600 r/min. (RPM) Cutting Path 20 in . rear Weight 87 lb. front, 8 in . GRASS CATCHER SIDE DISCHARGE DEFLECTOR MOTOR/BLADE CONTROL ASSEMBLY SWITCH KEY HEIGHT ADJUSTMENT LEVER MULCHING PLUG BATTERY METER CHARGER Fig. 1 Page 7 to 3-3/4 in.
Height Adjustments 1-1/2 in . Wheel Size 7 in . FEATURES PRODUCT SPECIFICATIONS Battery 24volt, 17A/Hr sealed maintenance free No-load Speed 3,600 r/min. (RPM) Cutting Path 20 in . rear Weight 87 lb. front, 8 in . GRASS CATCHER SIDE DISCHARGE DEFLECTOR MOTOR/BLADE CONTROL ASSEMBLY SWITCH KEY HEIGHT ADJUSTMENT LEVER MULCHING PLUG BATTERY METER CHARGER Fig. 1 Page 7 to 3-3/4 in.

User Manual
Page 8
... inspected and satisfactorily operated the product. If any adjustments or installations with a mulching plug that all operating features and safety rules. BATTERY METER The battery meter measures the amount of the mower, engages and disengages the motor and blade. Make sure that cuts and recuts the grass for assistance. PACKING LIST Mower Switch key Side Discharge Deflector Mulching Plug Grass Catcher Charger Operator's Manual WARNING: If any parts are noticeably larger than those produced when using the mulching plug. F...
... inspected and satisfactorily operated the product. If any adjustments or installations with a mulching plug that all operating features and safety rules. BATTERY METER The battery meter measures the amount of the mower, engages and disengages the motor and blade. Make sure that cuts and recuts the grass for assistance. PACKING LIST Mower Switch key Side Discharge Deflector Mulching Plug Grass Catcher Charger Operator's Manual WARNING: If any parts are noticeably larger than those produced when using the mulching plug. F...
User Manual
Page 9
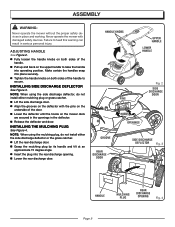
... grooves on the mower deck are secured in the openings in the deflector. Release the deflector and door. INSTALLING SIDE DISCHARGE DEFLECTOR See Figure 3. NOTE: When using the mulching plug, do not install either the side discharge deflector or the grass catcher. Lift the rear discharge door. Grasp the mulching plug by its handle and tilt at an approximate 15 degree angle. Insert the plug into operating position.
... grooves on the mower deck are secured in the openings in the deflector. Release the deflector and door. INSTALLING SIDE DISCHARGE DEFLECTOR See Figure 3. NOTE: When using the mulching plug, do not install either the side discharge deflector or the grass catcher. Lift the rear discharge door. Grasp the mulching plug by its handle and tilt at an approximate 15 degree angle. Insert the plug into operating position.
User Manual
Page 10
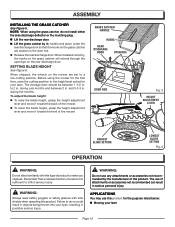
..., the wheels on the rear discharge door. GRASS CATCHER HANDLE HOOKS REAR DISCHARGE DOOR OPENINGS DOOR ROD Fig. 5 HEIGHT ADJUSTMENT LEVER HIGHEST BLADE SETTING OPERATION LOWEST BLADE SETTING Fig. 6 WARNING: Do not allow familiarity with side shields when operating this product for your lawn. The use of product to inflict serious injury. Remember that the hooks on the grass catcher are set to the height best suited for the purpose listed below: Mowing your eyes...
..., the wheels on the rear discharge door. GRASS CATCHER HANDLE HOOKS REAR DISCHARGE DOOR OPENINGS DOOR ROD Fig. 5 HEIGHT ADJUSTMENT LEVER HIGHEST BLADE SETTING OPERATION LOWEST BLADE SETTING Fig. 6 WARNING: Do not allow familiarity with side shields when operating this product for your lawn. The use of product to inflict serious injury. Remember that the hooks on the grass catcher are set to the height best suited for the purpose listed below: Mowing your eyes...

User Manual
Page 11
... motor/blade control assembly. Rotate the lever release counterclockwise and hold the switch control lever against the mower handle as the electric motor decelerates. The battery is at 5-30% charge when the yellow light illuminates If the RED light illuminates and/or flashes at least 17 hours of the charger into the slot on . NOTE: A high-pitched noise and sparking may be required to achieve maximum run time/capacity...
... motor/blade control assembly. Rotate the lever release counterclockwise and hold the switch control lever against the mower handle as the electric motor decelerates. The battery is at 5-30% charge when the yellow light illuminates If the RED light illuminates and/or flashes at least 17 hours of the charger into the slot on . NOTE: A high-pitched noise and sparking may be required to achieve maximum run time/capacity...

User Manual
Page 12
... mower in this manual. EMPTYING THE GRASS CATCHER See Figure 11. Lift the grass catcher by the blade. Always be tripped over or thrown by its handle and lift to the underside of the deck and prevent proper mulching of grass clippings. New or thick grass may require a narrower cut. Clean the underside of stones, sticks, wires, and other accumulated debris. SWITCH KEY SWITCH KEY SWITCH CONTROL LEVER LEVER...
... mower in this manual. EMPTYING THE GRASS CATCHER See Figure 11. Lift the grass catcher by the blade. Always be tripped over or thrown by its handle and lift to the underside of the deck and prevent proper mulching of grass clippings. New or thick grass may require a narrower cut. Clean the underside of stones, sticks, wires, and other accumulated debris. SWITCH KEY SWITCH KEY SWITCH CONTROL LEVER LEVER...

User Manual
Page 13
... the motor cover. Failure to prevent the blade from the power supply and the switch key is dusty, also wear a dust mask. Use of any buildup of the unit under normal operating conditions. Periodically check all nuts and bolts for the life of grass and leaves on the rear discharge door with light oil. � Lubricate the height adjustment lever and related hardware with light oil. � Remove the wheels...
... the motor cover. Failure to prevent the blade from the power supply and the switch key is dusty, also wear a dust mask. Use of any buildup of the unit under normal operating conditions. Periodically check all nuts and bolts for the life of grass and leaves on the rear discharge door with light oil. � Lubricate the height adjustment lever and related hardware with light oil. � Remove the wheels...

User Manual
Page 14
... motor. If blade is bent or damaged, replace immediately with the curved ends pointing up toward the mower deck and not down using a torque wrench (not provided) to keep the blade balanced. If either end of material from both ends of the blade, removing equal amounts of the blade drops downward, sharpen the heavy side until the blade is installed with a new blade. A dull blade does not cut grass...
... motor. If blade is bent or damaged, replace immediately with the curved ends pointing up toward the mower deck and not down using a torque wrench (not provided) to keep the blade balanced. If either end of material from both ends of the blade, removing equal amounts of the blade drops downward, sharpen the heavy side until the blade is installed with a new blade. A dull blade does not cut grass...

User Manual
Page 15
.... BATTERY MAINTENANCE It is recommended to secure. Replace hubcap. To replace a wheel: Stop the motor and remove the switch key. � Turn the mower on the underside of the mower deck. Wipe the mower clean with new tire and insert new cotter pin to charge the mower every 2 months for a long time without recharging, it will be in use. Have repairs made on any damaged or missing parts...
.... BATTERY MAINTENANCE It is recommended to secure. Replace hubcap. To replace a wheel: Stop the motor and remove the switch key. � Turn the mower on the underside of the mower deck. Wipe the mower clean with new tire and insert new cotter pin to charge the mower every 2 months for a long time without recharging, it will be in use. Have repairs made on any damaged or missing parts...

User Manual
Page 16
.... TROUBLESHOOTING Problem Handle not in charge. Possible Cause Carriage bolts not seated properly. Charge the battery. Mower not mulching properly. Bent motor shaft. Your product has been fully tested prior to shipment to cut evenly. Mower cutting grass unevenly. Lawn is low in position. All wheels must be placed in heavy grass, or cutting height too low. Handle knobs not tightened. Raise cutting height. Have repaired by grinding each cutting edge equally. Move the wheels to push. High grass, rear of mower housing and blade...
.... TROUBLESHOOTING Problem Handle not in charge. Possible Cause Carriage bolts not seated properly. Charge the battery. Mower not mulching properly. Bent motor shaft. Your product has been fully tested prior to shipment to cut evenly. Mower cutting grass unevenly. Lawn is low in position. All wheels must be placed in heavy grass, or cutting height too low. Handle knobs not tightened. Raise cutting height. Have repaired by grinding each cutting edge equally. Move the wheels to push. High grass, rear of mower housing and blade...
User Manual
Page 17
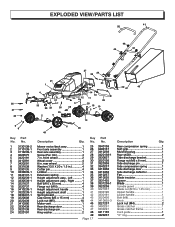
... . front wheel 2 29 Wheel cover 4 30 8 in. EXPLODED VIEW/PARTS LIST 41 26 48 44 42 43 34 36 37 40 9 8 Key Part No. No. Rear compression spring 1 Soft grip 1 Mulching plug 1 Rear shield 1 Side discharge bracket 1 Flange nut (M6 x 8 mm 2 Side discharge pin 1 Side compression spring 1 Side discharge door 1 Side discharge deflector 1 Fan 1 Blade insulator 1 Spacer 1 Blade 1 Spindle guard 1 Blade nut (M10 x 1.25 mm 1 Upper handle 1 Lower handle 1 Bolt (M8 2 Knob 4 Lock nut (M4 2 Grass catcher 1 Grass catcher frame 1 Cord guide...
... . front wheel 2 29 Wheel cover 4 30 8 in. EXPLODED VIEW/PARTS LIST 41 26 48 44 42 43 34 36 37 40 9 8 Key Part No. No. Rear compression spring 1 Soft grip 1 Mulching plug 1 Rear shield 1 Side discharge bracket 1 Flange nut (M6 x 8 mm 2 Side discharge pin 1 Side compression spring 1 Side discharge door 1 Side discharge deflector 1 Fan 1 Blade insulator 1 Spacer 1 Blade 1 Spindle guard 1 Blade nut (M10 x 1.25 mm 1 Upper handle 1 Lower handle 1 Bolt (M8 2 Knob 4 Lock nut (M4 2 Grass catcher 1 Grass catcher frame 1 Cord guide...

User Manual
Page 18
... operator's manual. Damage or liability caused by shipping, improper handling, improper installation, incorrect voltage or improper wiring, improper maintenance, improper modification, or the use of accessories and/or attachments not specifically recommended. Repairs necessary because of operator abuse or negligence, or the failure to install, operate, maintain and store the product according to the instructions in material and workmanship and agrees to repair or replace...
... operator's manual. Damage or liability caused by shipping, improper handling, improper installation, incorrect voltage or improper wiring, improper maintenance, improper modification, or the use of accessories and/or attachments not specifically recommended. Repairs necessary because of operator abuse or negligence, or the failure to install, operate, maintain and store the product according to the instructions in material and workmanship and agrees to repair or replace...

User Manual
Page 20
... . 24 VOLT CORDLESS LAWN MOWER UT13122 SERVICE For parts or service, contact your nearest Homelite authorized service dealer. MODEL NUMBER ______U_T_1_3_1_2__2______ SERIAL NUMBER HOMELITE CONSUMER PRODUCTS, INC. 1428 Pearman Dairy Road Anderson, SC 29625 Phone 1-866-457-5888 www.homelite.com 987000-039 11-27-06 (REV:00) OPERATOR'S MANUAL 20 in the space provided below. REPAIR PARTS The model number of the authorized service dealer nearest you call...
... . 24 VOLT CORDLESS LAWN MOWER UT13122 SERVICE For parts or service, contact your nearest Homelite authorized service dealer. MODEL NUMBER ______U_T_1_3_1_2__2______ SERIAL NUMBER HOMELITE CONSUMER PRODUCTS, INC. 1428 Pearman Dairy Road Anderson, SC 29625 Phone 1-866-457-5888 www.homelite.com 987000-039 11-27-06 (REV:00) OPERATOR'S MANUAL 20 in the space provided below. REPAIR PARTS The model number of the authorized service dealer nearest you call...


