

User Manual
Page 4
...61550; Save these instructions. This will reduce the risk of electric shock, fire, or serious personal injury. Do not service mower with switch key or charger installed. Do not use to prevent damage to the charger during a power surge. Risk of electric shock. Keep cord...good working order. Unplug charger from outlet before restarting and continuing to operate the mower. Stop the motor, remove the switch key, and wait until you loan someone this rule will reduce the risk of explosion and possibly injury. Do not open or mutilate battery...
...61550; Save these instructions. This will reduce the risk of electric shock, fire, or serious personal injury. Do not service mower with switch key or charger installed. Do not use to prevent damage to the charger during a power surge. Risk of electric shock. Keep cord...good working order. Unplug charger from outlet before restarting and continuing to operate the mower. Stop the motor, remove the switch key, and wait until you loan someone this rule will reduce the risk of explosion and possibly injury. Do not open or mutilate battery...
User Manual
Page 7
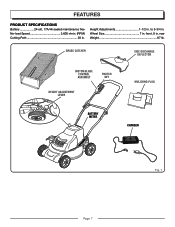
Height Adjustments 1-1/2 in . to 3-3/4 in . Wheel Size 7 in . front, 8 in . FEATURES PRODUCT SPECIFICATIONS Battery 24volt, 17A/Hr sealed maintenance free No-load Speed 3,600 r/min. (RPM) Cutting Path 20 in. GRASS CATCHER SIDE DISCHARGE DEFLECTOR MOTOR/BLADE CONTROL ASSEMBLY SWITCH KEY HEIGHT ADJUSTMENT LEVER MULCHING PLUG BATTERY METER CHARGER Fig. 1 Page 7 rear Weight 87 lb.
Height Adjustments 1-1/2 in . to 3-3/4 in . Wheel Size 7 in . front, 8 in . FEATURES PRODUCT SPECIFICATIONS Battery 24volt, 17A/Hr sealed maintenance free No-load Speed 3,600 r/min. (RPM) Cutting Path 20 in. GRASS CATCHER SIDE DISCHARGE DEFLECTOR MOTOR/BLADE CONTROL ASSEMBLY SWITCH KEY HEIGHT ADJUSTMENT LEVER MULCHING PLUG BATTERY METER CHARGER Fig. 1 Page 7 rear Weight 87 lb.

User Manual
Page 8
...packing material until the parts are noticeably larger than those produced when using the side discharge deflector are replaced. PACKING LIST Mower Switch key Side Discharge Deflector Mulching Plug Grass Catcher Charger Operator's Manual WARNING: If any parts are attempting. GRASS CATCHER The grass catcher ... operated the product. If any parts are damaged or missing do not operate this product, familiarize yourself with the switch key inserted. The safe use of this product requires an understanding of the information on the upper handle of this product until you mow...
...packing material until the parts are noticeably larger than those produced when using the side discharge deflector are replaced. PACKING LIST Mower Switch key Side Discharge Deflector Mulching Plug Grass Catcher Charger Operator's Manual WARNING: If any parts are attempting. GRASS CATCHER The grass catcher ... operated the product. If any parts are damaged or missing do not operate this product, familiarize yourself with the switch key inserted. The safe use of this product requires an understanding of the information on the upper handle of this product until you mow...

User Manual
Page 11
...the switch control lever against the mower handle as the electric motor decelerates. TO CHARGE See Figures 7 - 8. Remove the switch key and store in temperatures between 23°F and 104°F. The battery supplied is recommended that the battery be charged before use of... low charge condition, the battery must be safely stored in a controlled climate. STARTING/STOPPING THE MOWER See Figure 9. Insert the switch key into the wall receptacle. The battery is less than 5% of the lever release. The lawn mower comes with a maintenance free, sealed 24 volt ...
...the switch control lever against the mower handle as the electric motor decelerates. TO CHARGE See Figures 7 - 8. Remove the switch key and store in temperatures between 23°F and 104°F. The battery supplied is recommended that the battery be charged before use of... low charge condition, the battery must be safely stored in a controlled climate. STARTING/STOPPING THE MOWER See Figure 9. Insert the switch key into the wall receptacle. The battery is less than 5% of the lever release. The lawn mower comes with a maintenance free, sealed 24 volt ...

User Manual
Page 12
... as described earlier in any other objects that can cause you feel you could be sure of your footing or balance. SWITCH KEY SWITCH KEY SWITCH CONTROL LEVER LEVER RELEASE KEY HOLE SWITCH CONTROL LEVER Fig. 9 Fig. 10 Page 12 Fig. 11 If you feel uneasy on slopes requires extra caution. EMPTYING THE...
... as described earlier in any other objects that can cause you feel you could be sure of your footing or balance. SWITCH KEY SWITCH KEY SWITCH CONTROL LEVER LEVER RELEASE KEY HOLE SWITCH CONTROL LEVER Fig. 9 Fig. 10 Page 12 Fig. 11 If you feel uneasy on slopes requires extra caution. EMPTYING THE...

User Manual
Page 13
...dust. Wipe the mower clean with light oil or engine oil. Do not use identical replacement blades. Stop the motor and remove the switch key. Therefore, no further bearing lubrication is dusty, also wear a dust mask. At the beginning and end of each mowing season: � Lubricate...12 - 13. NOTE: Only use water. MAINTENANCE WARNING: When servicing, use . Use clean cloths to damage from the power supply and the switch key is pushed completely against the motor shaft. Chemicals can be damaged by wearing heavy gloves and/or wrapping the cutting edges of the wheel with...
...dust. Wipe the mower clean with light oil or engine oil. Do not use identical replacement blades. Stop the motor and remove the switch key. Therefore, no further bearing lubrication is dusty, also wear a dust mask. At the beginning and end of each mowing season: � Lubricate...12 - 13. NOTE: Only use water. MAINTENANCE WARNING: When servicing, use . Use clean cloths to damage from the power supply and the switch key is pushed completely against the motor shaft. Chemicals can be damaged by wearing heavy gloves and/or wrapping the cutting edges of the wheel with...

User Manual
Page 15
... recommended to secure. Replace hubcap. STORING THE MOWER See Figure 17. Remove the switch key and store in a low charge state. To replace a wheel: Stop the motor and remove the switch key. � Turn the mower on its side and clean grass clippings that have accumulated on its...
... recommended to secure. Replace hubcap. STORING THE MOWER See Figure 17. Remove the switch key and store in a low charge state. To replace a wheel: Stop the motor and remove the switch key. � Turn the mower on its side and clean grass clippings that have accumulated on its...
User Manual
Page 17
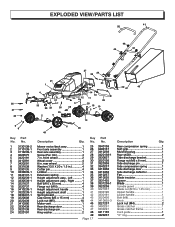
EXPLODED VIEW/PARTS LIST 41 26 48 44 42 43 34 36 37 40 9 8 Key Part No. Mower motor/deck assy 1 25 Front axle assembly 1 26 Rear axle assembly 1 27 Screw (Pan Hd 4 28 7 in 4 32 Cotter pin 4 33 Linkbar 1 ... 32 30 35 2 5 12 15 16 17 39 27 25 24 23 45 14 10 12 11 28 20 18 19 3 7 13 6 38 49 Description Key Part Qty. No. No. rear wheel 2 31 Washer (13.5 X 20 x 1.5 in . front wheel 2 29 Wheel cover 4 30 8 in.
EXPLODED VIEW/PARTS LIST 41 26 48 44 42 43 34 36 37 40 9 8 Key Part No. Mower motor/deck assy 1 25 Front axle assembly 1 26 Rear axle assembly 1 27 Screw (Pan Hd 4 28 7 in 4 32 Cotter pin 4 33 Linkbar 1 ... 32 30 35 2 5 12 15 16 17 39 27 25 24 23 45 14 10 12 11 28 20 18 19 3 7 13 6 38 49 Description Key Part Qty. No. No. rear wheel 2 31 Washer (13.5 X 20 x 1.5 in . front wheel 2 29 Wheel cover 4 30 8 in.


