
User Guide
Page 11
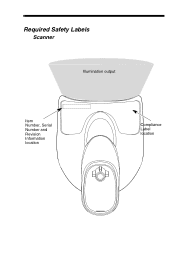
Required Safety Labels Scanner Illumination output Item Number, Serial Number and Revision Information location Compliance Label location
Required Safety Labels Scanner Illumination output Item Number, Serial Number and Revision Information location Compliance Label location
User Guide
Page 14
... 2-23 RS232 Receiver Time-Out 2-24 RS232 Handshaking 2-24 RS232 Timeout 2-25 XON/XOFF 2-25 ACK/NAK 2-25 Scanner to an Access Point 3-2 Communication Between the Cordless System and the Host 3-2 RF (Radio Frequency) Module Operation 3-3 System Conditions 3-3 Linking Process... 3-3 Scanner Is Out of Range 3-4 Scanner Is Moved Back Into Range 3-4 Out of Range and Back into Range with Batch Mode On 3-4 Page Button 3-4 About the Battery...
... 2-23 RS232 Receiver Time-Out 2-24 RS232 Handshaking 2-24 RS232 Timeout 2-25 XON/XOFF 2-25 ACK/NAK 2-25 Scanner to an Access Point 3-2 Communication Between the Cordless System and the Host 3-2 RF (Radio Frequency) Module Operation 3-3 System Conditions 3-3 Linking Process... 3-3 Scanner Is Out of Range 3-4 Scanner Is Moved Back Into Range 3-4 Out of Range and Back into Range with Batch Mode On 3-4 Page Button 3-4 About the Battery...
User Guide
Page 15
... 3-11 Charge Only Mode 3-11 Linked Modes 3-12 Unlinking the Scanner 3-13 Override Locked Scanner 3-13 Out-of Beeps - Base Error 3-9 Number of -Range Alarm 3-13 Alarm Sound Type 3-14 Flexible Power Management 3-15 Batch Mode... All Codes 3-20 Transmit Records to Host 3-21 Batch Mode Transmit Delay 3-21 Multiple Scanner Operation 3-21 iii Charging Information 3-5 Battery Recommendations 3-5 Proper Disposal of the Battery 3-6 Beeper and LED Sequences and Meaning 3-6 Scanner LED Sequences and Meaning 3-7 Base/Access Point LED Sequences and Meaning 3-7 Base Power Communication...
... 3-11 Charge Only Mode 3-11 Linked Modes 3-12 Unlinking the Scanner 3-13 Override Locked Scanner 3-13 Out-of Beeps - Base Error 3-9 Number of -Range Alarm 3-13 Alarm Sound Type 3-14 Flexible Power Management 3-15 Batch Mode... All Codes 3-20 Transmit Records to Host 3-21 Batch Mode Transmit Delay 3-21 Multiple Scanner Operation 3-21 iii Charging Information 3-5 Battery Recommendations 3-5 Proper Disposal of the Battery 3-6 Beeper and LED Sequences and Meaning 3-6 Scanner LED Sequences and Meaning 3-7 Base/Access Point LED Sequences and Meaning 3-7 Base Power Communication...
User Guide
Page 16
...4-6 User-Specified Good Read Delay 4-6 Manual/Serial Trigger Modes 4-6 Manual Trigger 4-6 Serial Trigger 4-7 iv Good Read 4-3 Beeper Pitch - Scanner Name 3-22 Application Work Groups 3-24 Application Work Group Selection 3-25 Resetting the Factory Defaults: All Application Work Groups 3-25 Resetting the ...Custom Defaults: All Application Work Groups 3-26 Using the Scanner with Bluetooth Devices 3-26 PCs/Laptops 3-26 PDAs/Mobility Systems Devices 3-27 Changing the Scanner's Bluetooth PIN Code...... 3-27 Minimizing Bluetooth/ISM Band Network Activity ......3-27 ...
...4-6 User-Specified Good Read Delay 4-6 Manual/Serial Trigger Modes 4-6 Manual Trigger 4-6 Serial Trigger 4-7 iv Good Read 4-3 Beeper Pitch - Scanner Name 3-22 Application Work Groups 3-24 Application Work Group Selection 3-25 Resetting the Factory Defaults: All Application Work Groups 3-25 Resetting the ...Custom Defaults: All Application Work Groups 3-26 Using the Scanner with Bluetooth Devices 3-26 PCs/Laptops 3-26 PDAs/Mobility Systems Devices 3-27 Changing the Scanner's Bluetooth PIN Code...... 3-27 Minimizing Bluetooth/ISM Band Network Activity ......3-27 ...
User Guide
Page 17
... 4-12 Hands Free Time-Out 4-12 Reread Delay 4-12 User-Specified Reread Delay 4-13 Illumination Lights 4-13 Aimer Delay 4-14 User-Specified Aimer Delay 4-14 Scanner Time-Out 4-14 Aimer Mode 4-15 Centering 4-15 Preferred Symbology 4-17 High Priority Symbology 4-17 Low Priority Symbology 4-18 Preferred Symbology Time-out 4-18 Preferred...
... 4-12 Hands Free Time-Out 4-12 Reread Delay 4-12 User-Specified Reread Delay 4-13 Illumination Lights 4-13 Aimer Delay 4-14 User-Specified Aimer Delay 4-14 Scanner Time-Out 4-14 Aimer Mode 4-15 Centering 4-15 Preferred Symbology 4-17 High Priority Symbology 4-17 Low Priority Symbology 4-18 Preferred Symbology Time-out 4-18 Preferred...
User Guide
Page 21
... Replacing Cables and Batteries in Cordless Systems 13-2 Replacing an Interface Cable in a Base 13-2 Changing a scanner Battery 13-3 Troubleshooting a Xenon Scanner 13-3 ix EZConfig Introduction 10-3 Installing EZConfig from the Web 10-4 Chapter 11 - Serial Programming Commands Conventions... Trigger Commands 11-4 Resetting the Custom Defaults 11-4 Menu Commands 11-5 Chapter 12 - Product Specifications 1900 Scanner Product Specifications 12-1 1902 Scanner Product Specifications 12-2 CCB01-010BT Charge Base Product Specifications 12-3 Standard Cable Pinouts 12-4 Keyboard Wedge 12-4...
... Replacing Cables and Batteries in Cordless Systems 13-2 Replacing an Interface Cable in a Base 13-2 Changing a scanner Battery 13-3 Troubleshooting a Xenon Scanner 13-3 ix EZConfig Introduction 10-3 Installing EZConfig from the Web 10-4 Chapter 11 - Serial Programming Commands Conventions... Trigger Commands 11-4 Resetting the Custom Defaults 11-4 Menu Commands 11-5 Chapter 12 - Product Specifications 1900 Scanner Product Specifications 12-1 1902 Scanner Product Specifications 12-2 CCB01-010BT Charge Base Product Specifications 12-3 Standard Cable Pinouts 12-4 Keyboard Wedge 12-4...

User Guide
Page 22
Troubleshooting a Cordless System 13-4 Troubleshooting a Base 13-4 Troubleshooting a Cordless Scanner 13-5 Chapter 14 - Reference Charts Symbology Chart A-1 ASCII Conversion Chart (Code Page 1252 A-4 Code Page Mapping of Printed Barcodes A-6 x Customer Support Appendix A -
Troubleshooting a Cordless System 13-4 Troubleshooting a Base 13-4 Troubleshooting a Cordless Scanner 13-5 Chapter 14 - Reference Charts Symbology Chart A-1 ASCII Conversion Chart (Code Page 1252 A-4 Code Page Mapping of Printed Barcodes A-6 x Customer Support Appendix A -

User Guide
Page 23
... the carton match your order. • Save the shipping container for damage during shipment. Report damage immediately to an option indicates the default setting. Honeywell bar code scanners are also included. An asterisk (*) next to the carrier who delivered the carton. • Make sure the items in this guide. 1 Getting Started About... common terminal and communications settings. Product specifications, dimensions, warranty, and customer support information are factory programmed for the Xenon™ 1900 and 1902 area-imaging scanners.
... the carton match your order. • Save the shipping container for damage during shipment. Report damage immediately to an option indicates the default setting. Honeywell bar code scanners are also included. An asterisk (*) next to the carrier who delivered the carton. • Make sure the items in this guide. 1 Getting Started About... common terminal and communications settings. Product specifications, dimensions, warranty, and customer support information are factory programmed for the Xenon™ 1900 and 1902 area-imaging scanners.

User Guide
Page 24
Connect the appropriate interface cable to the device first, then to the USB port of a computer. 1. Corded Scanner USB Connection: Cordless Base USB Connection: 1 - 2 Connecting the Device Connecting with USB A scanner or a cordless base can be connected to the computer.
Connect the appropriate interface cable to the device first, then to the USB port of a computer. 1. Corded Scanner USB Connection: Cordless Base USB Connection: 1 - 2 Connecting the Device Connecting with USB A scanner or a cordless base can be connected to the computer.

User Guide
Page 25
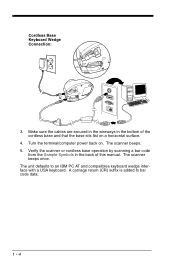
...a "keyboard wedge," plugged into the serial port, or connected to a portable data terminal in the bottom of a keyboard wedge connection: 1. Corded Scanner Keyboard Wedge Connection: 1 - 3 The unit defaults to page 2-4 for other USB terminal settings. Refer to a USB PC Keyboard. For additional ...USB programming and technical information, refer to the terminal/computer. Verify the scanner or cordless base operation by scanning a bar code from the back of this manual. Connect the appropriate interface cable to the device...
...a "keyboard wedge," plugged into the serial port, or connected to a portable data terminal in the bottom of a keyboard wedge connection: 1. Corded Scanner Keyboard Wedge Connection: 1 - 3 The unit defaults to page 2-4 for other USB terminal settings. Refer to a USB PC Keyboard. For additional ...USB programming and technical information, refer to the terminal/computer. Verify the scanner or cordless base operation by scanning a bar code from the back of this manual. Connect the appropriate interface cable to the device...
User Guide
Page 26
Make sure the cables are secured in the wireways in the back of the cordless base and that the base sits flat on . The scanner beeps. 5. The scanner beeps once. Verify the scanner or cordless base operation by scanning a bar code from the Sample Symbols in the bottom of this manual. The unit defaults to bar code data. 1 - 4 A carriage return (CR) suffix is added to an IBM PC AT and compatibles keyboard wedge interface with a USA keyboard. Turn the terminal/computer power back on a horizontal surface. 4. Cordless Base Keyboard Wedge Connection: 3.
Make sure the cables are secured in the wireways in the back of the cordless base and that the base sits flat on . The scanner beeps. 5. The scanner beeps once. Verify the scanner or cordless base operation by scanning a bar code from the Sample Symbols in the bottom of this manual. The unit defaults to bar code data. 1 - 4 A carriage return (CR) suffix is added to an IBM PC AT and compatibles keyboard wedge interface with a USA keyboard. Turn the terminal/computer power back on a horizontal surface. 4. Cordless Base Keyboard Wedge Connection: 3.
User Guide
Page 27
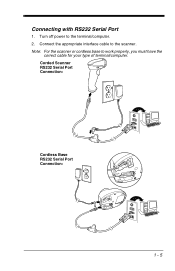
Corded Scanner RS232 Serial Port Connection: Cordless Base RS232 Serial Port Connection: 1 - 5 Turn off power to work properly, you must have the correct cable for your type of terminal/computer. Note: For the scanner or cordless base to the terminal/computer. 2. Connect the appropriate interface cable to the scanner. Connecting with RS232 Serial Port 1.
Corded Scanner RS232 Serial Port Connection: Cordless Base RS232 Serial Port Connection: 1 - 5 Turn off power to work properly, you must have the correct cable for your type of terminal/computer. Note: For the scanner or cordless base to the terminal/computer. 2. Connect the appropriate interface cable to the scanner. Connecting with RS232 Serial Port 1.
User Guide
Page 28
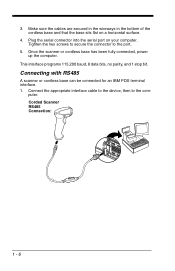
... cordless base has been fully connected, power up the computer. Connecting with RS485 A scanner or cordless base can be connected for an IBM POS terminal interface. 1. Corded Scanner RS485 Connection: 1 - 6 3. This interface programs 115,200 baud, 8 data bits, no parity, and 1 stop bit. Connect the appropriate interface cable to the device, then...
... cordless base has been fully connected, power up the computer. Connecting with RS485 A scanner or cordless base can be connected for an IBM POS terminal interface. 1. Corded Scanner RS485 Connection: 1 - 6 3. This interface programs 115,200 baud, 8 data bits, no parity, and 1 stop bit. Connect the appropriate interface cable to the device, then...

User Guide
Page 29
The scanner beeps. 4. The scanner beeps once. Turn the terminal/computer power back on a horizontal surface. 3. For further RS485 settings, refer to RS485, page 2-2.. 1 - 7 Verify the scanner or cordless base operation by scanning a bar code from the Sample Symbols in the bottom of this manual. Make sure the cables are secured in the wireways in the back of the cordless base and that the base sits flat on . Cordless Base RS485 Connection: 2.
The scanner beeps. 4. The scanner beeps once. Turn the terminal/computer power back on a horizontal surface. 3. For further RS485 settings, refer to RS485, page 2-2.. 1 - 7 Verify the scanner or cordless base operation by scanning a bar code from the Sample Symbols in the bottom of this manual. Make sure the cables are secured in the wireways in the back of the cordless base and that the base sits flat on . Cordless Base RS485 Connection: 2.
User Guide
Page 30
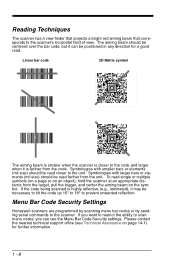
... (e.g., laminated), it may be read . Please contact the nearest technical support office (see Technical Assistance on the symbol. Menu Bar Code Security Settings Honeywell scanners are programmed by scanning menu bar codes or by sending serial commands to scan menu codes, you want to restrict the ability to the...but it can use the Menu Bar Code Security settings. Linear bar code 2D Matrix symbol The aiming beam is smaller when the scanner is closer to the scanner's horizontal field of view. The aiming beam should be necessary to tilt the code up 15° to 18° to the...
... (e.g., laminated), it may be read . Please contact the nearest technical support office (see Technical Assistance on the symbol. Menu Bar Code Security Settings Honeywell scanners are programmed by scanning menu bar codes or by sending serial commands to scan menu codes, you want to restrict the ability to the...but it can use the Menu Bar Code Security settings. Linear bar code 2D Matrix symbol The aiming beam is smaller when the scanner is closer to the scanner's horizontal field of view. The aiming beam should be necessary to tilt the code up 15° to 18° to the...
User Guide
Page 31
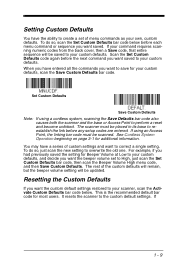
..., just scan the Set Custom Defaults bar code, then scan the Beeper Volume High menu code, and then Save Custom Defaults. If 1 - 9 The scanner must be saved to your custom defaults, scan the Save Custom Defaults bar code. The rest of the custom defaults will remain, but the beeper..., custom defaults. Setting Custom Defaults You have the ability to the custom default settings. You may have a series of menu commands as your scanner, scan the Activate Custom Defaults bar code below before any setup codes are entered. Resetting the Custom Defaults If you want the custom default settings...
..., just scan the Set Custom Defaults bar code, then scan the Beeper Volume High menu code, and then Save Custom Defaults. If 1 - 9 The scanner must be saved to your custom defaults, scan the Save Custom Defaults bar code. The rest of the custom defaults will remain, but the beeper..., custom defaults. Setting Custom Defaults You have the ability to the custom default settings. You may have a series of menu commands as your scanner, scan the Activate Custom Defaults bar code below before any setup codes are entered. Resetting the Custom Defaults If you want the custom default settings...
User Guide
Page 32
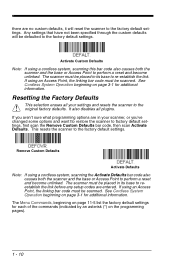
..., the linking bar code must be scanned. If using a cordless system, scanning the Activate Defaults bar code also causes both the scanner and the base or Access Point to perform a reset and become unlinked. If using a cordless system, scanning this bar code also causes ...Defaults bar code, then scan Activate Defaults. See Cordless System Operation beginning on the programming pages). 1 - 10 It also disables all your scanner, or you aren't sure what programming options are no custom defaults, it will be defaulted to the factory default settings. Activate Custom Defaults Note...
..., the linking bar code must be scanned. If using a cordless system, scanning the Activate Defaults bar code also causes both the scanner and the base or Access Point to perform a reset and become unlinked. If using a cordless system, scanning this bar code also causes ...Defaults bar code, then scan Activate Defaults. See Cordless System Operation beginning on the programming pages). 1 - 10 It also disables all your scanner, or you aren't sure what programming options are no custom defaults, it will be defaulted to the factory default settings. Activate Custom Defaults Note...
User Guide
Page 33
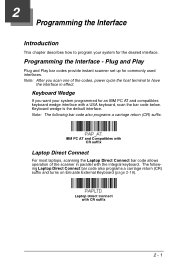
... up for an IBM PC AT and compatibles keyboard wedge interface with the integral keyboard. Keyboard Wedge If you scan one of the scanner in effect. Note: The following Laptop Direct Connect bar code also programs a carriage return (CR) suffix and turns on Emulate External Keyboard (page 2-18). IBM ...
... up for an IBM PC AT and compatibles keyboard wedge interface with the integral keyboard. Keyboard Wedge If you scan one of the scanner in effect. Note: The following Laptop Direct Connect bar code also programs a carriage return (CR) suffix and turns on Emulate External Keyboard (page 2-18). IBM ...
User Guide
Page 34
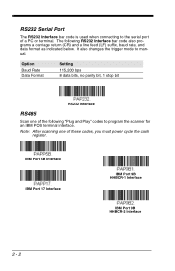
... 5B Interface IBM Port 17 Interface IBM Port 9B HHBCR-1 Interface IBM Port 9B HHBCR-2 Interface 2 - 2 The following "Plug and Play" codes to program the scanner for an IBM POS terminal interface. Option Baud Rate Data Format Setting 115,200 bps 8 data bits, no parity bit, 1 stop bit RS232 Interface RS485...
... 5B Interface IBM Port 17 Interface IBM Port 9B HHBCR-1 Interface IBM Port 9B HHBCR-2 Interface 2 - 2 The following "Plug and Play" codes to program the scanner for an IBM POS terminal interface. Option Baud Rate Data Format Setting 115,200 bps 8 data bits, no parity bit, 1 stop bit RS232 Interface RS485...

User Guide
Page 36
... (PC) USB Keyboard (Mac) 2 - 4 Note: After scanning one of the following "Plug and Play" codes to program the scanner for an IBM SurePos (USB handheld scanner) or IBM SurePos (USB tabletop scanner) interface. Scanning these codes, you must power cycle the cash register. USB IBM SurePos (USB Handheld... Scanner) Interface USB IBM SurePos (USB Tabletop Scanner) Interface Each bar code above also programs the following suffixes for each symbology: Symbology EAN 8 EAN 13 UPC A UPC E ...
... (PC) USB Keyboard (Mac) 2 - 4 Note: After scanning one of the following "Plug and Play" codes to program the scanner for an IBM SurePos (USB handheld scanner) or IBM SurePos (USB tabletop scanner) interface. Scanning these codes, you must power cycle the cash register. USB IBM SurePos (USB Handheld... Scanner) Interface USB IBM SurePos (USB Tabletop Scanner) Interface Each bar code above also programs the following suffixes for each symbology: Symbology EAN 8 EAN 13 UPC A UPC E ...


