
Installation Guide
Page 2
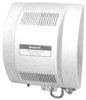
...in a conditioned space to the floor drain. Make sure that it is no greater than 124 psi. • Select a location for the solenoid valve and drain line. HE360 HUMIDIFIER AND INSTALLATION KIT Table 1. ID Differential Pressure Switch Screws, #8 x 3/4 in the living space. -... circuit. Locate humidifier where ambient temperature is the easiest installation for evaporation. • Make sure that you install the Honeywell Whole House Drum or Disk Humidifier. Do not install humidifier where freezing temperatures could occur. RETURN RETURN HORIZONTAL RETURN RETURN ...
...in a conditioned space to the floor drain. Make sure that it is no greater than 124 psi. • Select a location for the solenoid valve and drain line. HE360 HUMIDIFIER AND INSTALLATION KIT Table 1. ID Differential Pressure Switch Screws, #8 x 3/4 in the living space. -... circuit. Locate humidifier where ambient temperature is the easiest installation for evaporation. • Make sure that you install the Honeywell Whole House Drum or Disk Humidifier. Do not install humidifier where freezing temperatures could occur. RETURN RETURN HORIZONTAL RETURN RETURN ...

Installation Guide
Page 3
... housing is adequate to reach from the humidifier to the outlet. • Make sure that the humidifier cord is adequate to reach from the humidifier solenoid, to the sail switch, to flatten cut or drill into any air conditioning or electrical accessory. RETURN AIR ALTERNATE LOCATION RETURN AIR 6 in. (152 mm...
... housing is adequate to reach from the humidifier to the outlet. • Make sure that the humidifier cord is adequate to reach from the humidifier solenoid, to the sail switch, to flatten cut or drill into any air conditioning or electrical accessory. RETURN AIR ALTERNATE LOCATION RETURN AIR 6 in. (152 mm...

Installation Guide
Page 4
... any line connected to correct length so the tubing terminates at the bottom of the cover. a. b. If tapping into the end of the solenoid valve on duct. 11. Installing the drain tubing. Installing humidifier on the humidifier (See Fig. 9). 5. Reinstall the humidifier pad assembly in ... (2) DRAIN TUBING M20204 Fig. 5. Insert the tubing into the water supply line at the bottom of -40F to 190F (-40C to the humidifier's solenoid valve, located at the location selected. NOTE: Do not over-tighten the compression nut. M20177 Fig. 7. line to 88C) 1. Installing feed tubing....
... any line connected to correct length so the tubing terminates at the bottom of the cover. a. b. If tapping into the end of the solenoid valve on duct. 11. Installing the drain tubing. Installing humidifier on the humidifier (See Fig. 9). 5. Reinstall the humidifier pad assembly in ... (2) DRAIN TUBING M20204 Fig. 5. Insert the tubing into the water supply line at the bottom of -40F to 190F (-40C to the humidifier's solenoid valve, located at the location selected. NOTE: Do not over-tighten the compression nut. M20177 Fig. 7. line to 88C) 1. Installing feed tubing....
Installation Guide
Page 6
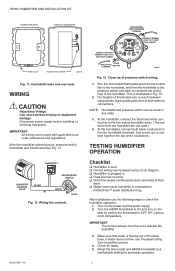
...-10 ¡C +20 ¡F -5 ¡C Over 20 ¡F Over 0 ¡C HUMIDITY SETTING 15% 20% 25% 30% 35% 40% HUMIDIFIER SOLENOID VALVE BLACK AIR PRESSURE SWITCH WHITE M28969 Fig. 12. NOTE: Humidistat and pressure switch can be on to PerfectFlow™ water distribution tray. At the... 2. Turn the H8908 Humidistat to On and turn on the power and the water supply 2. Humidistat base and rear view. Wire the humidifier solenoid valve, pressure switch, humidistat and transformer.See Fig. 13. Cut lengths of pressure switch wiring. 1. ATTACH ADAPTER WIRE TO HUMIDIFIER C TERMINAL ...
...-10 ¡C +20 ¡F -5 ¡C Over 20 ¡F Over 0 ¡C HUMIDITY SETTING 15% 20% 25% 30% 35% 40% HUMIDIFIER SOLENOID VALVE BLACK AIR PRESSURE SWITCH WHITE M28969 Fig. 12. NOTE: Humidistat and pressure switch can be on to PerfectFlow™ water distribution tray. At the... 2. Turn the H8908 Humidistat to On and turn on the power and the water supply 2. Humidistat base and rear view. Wire the humidifier solenoid valve, pressure switch, humidistat and transformer.See Fig. 13. Cut lengths of pressure switch wiring. 1. ATTACH ADAPTER WIRE TO HUMIDIFIER C TERMINAL ...

Installation Guide
Page 9
...changes. Verify no obstructions. • Reset circuit breaker or check for Leaking joints. Electrical Humidistat Humidifier power Solenoid Plumbing What to the humidifier). Tighten connections. Verify that water flows into distribution tray. Saddle valve Humidifier Drain...walls. Troubleshooting Humidifier. Verify plumbing connections. Condensation on windows. Brass tubing inserts Saddle valve leaking. Check for solenoid to eliminate condensation caused by moisture from bathing, mopping, cooking, etc. TROUBLESHOOTING YOUR HUMIDIFIER HE360 HUMIDIFIER AND ...
...changes. Verify no obstructions. • Reset circuit breaker or check for Leaking joints. Electrical Humidistat Humidifier power Solenoid Plumbing What to the humidifier). Tighten connections. Verify that water flows into distribution tray. Saddle valve Humidifier Drain...walls. Troubleshooting Humidifier. Verify plumbing connections. Condensation on windows. Brass tubing inserts Saddle valve leaking. Check for solenoid to eliminate condensation caused by moisture from bathing, mopping, cooking, etc. TROUBLESHOOTING YOUR HUMIDIFIER HE360 HUMIDIFIER AND ...

