Honeywell RPWL800 Support and Manuals
Get Help and Manuals for this Honeywell item

View All Support Options Below
Free Honeywell RPWL800 manuals!
Problems with Honeywell RPWL800?
Ask a Question
Free Honeywell RPWL800 manuals!
Problems with Honeywell RPWL800?
Ask a Question
Popular Honeywell RPWL800 Manual Pages
Owner's Manual - Page 1

Installation and Use
VISIOCAMTM RCWL8000A and RPWL800A
Wireless Video Chime System
69-2108EFS_A.indd 1
69-2108EFS-01
11/30/2007 1:51:44 PM
Owner's Manual - Page 2

... and that you have chosen! (See 'Setting up 2 Pre-installation Setup 2
Installing the Door Camera 4 Door Camera TransformerOption 7
Installing the receiver 8 Receiver Operation 8 Door Camera 10
Expanding Your System 11
Maintenance and Use 12 Care and Maintenance 12 Replacing the Receiver Batteries 12 Troubleshooting 13
Specifications 15 Declaration 16 Disposal and Recycling 16...
Owner's Manual - Page 3

...LOOKS FOR CONNECTED CCTV-TYPE CAMERAS
Pre-installation setup
Before fixing the door camera in place, set up and test the system as follows:
Install the batteries in the door camera
Note:... light flashes and the tamper alert sounds on the receiver.
1. TO CONNECT TO A TV SET (OPTIONAL)
CHIME FLASHER
BATTERY INDICATOR
MIC VOLUME - FOR FUTURE USE
Scan
DISPLAY
BRIGHTNESS
CHIME VOLUME...
Owner's Manual - Page 4

... in the battery compartment at the end of the battery compartment, add your name or other information. Never mix old and new batteries.
3. Installation and Use
Pre-installation setup
Note: Removing the cover also provides access to the nameplate, so now is an option to write your text at the end of the...
Owner's Manual - Page 5

Pre-installation setup
Charge the receiver batteries
1. To program the door camera into the receiver, the receiver remains active in use: this is normal.
Note: You can select ...
Owner's Manual - Page 8

...using the camera base as moisture or condensation will affect the internal parts. The distance between mounting holes is working after installation by pressing the call button, the confidence light should illuminate...unit from the base. Drill using the screws and wall plugs provided.
4. Installation and Use
Installing the door camera
Mount the door camera Do not mount the camera in wet...
Owner's Manual - Page 9

...tacks as bell wire. Follow the transformer instructions carefully for later service access. Important: Higher voltage transformer might damage the camera.
Secure the cable using suitable low voltage cable ...of the transformer TO THE
to the power terminals.
Installing the door camera
VISIOCAM
Door camera transformer option
For installations where there is provided in the rear of the ...
Owner's Manual - Page 10

...charging base and needs recharging. Chime volume control
The chime volume level can be used on the charging base and is fully charged. Installation and Use
Installing the receiver
Receiver operation
When the call ...adjustable. If the caller presses the call when the chime volume control is in place, check that the receiver can be set to 0) and the camera image is too low for reliable ...
Owner's Manual - Page 11

Replace the batteries in the door camera.
Privacy
Remember that this product uses the public airwaves, and that follows the chime when a visitor presses the call button. Installing the receiver
VISIOCAM
Chime ... and white. MIC volume
[For future use] The topmost control along the side (see diagram on page 8) will control the volume produced from the door camera(s) can be viewed ...
Owner's Manual - Page 13

...set instructions...set via the accessory RCA lead provided.
Follow the programming sequence under Receiver Setup...instructions provided with the additional unit, or see 'To reprogram or reset the receiver', in . During the two minute programming time, press the call button or button on a different video channel (1-4), and be set at the default channel manually...must be set or ... set on the...
Owner's Manual - Page 14

...door camera, as it may damage the internal parts.
• Avoid replacing door camera batteries during wet weather.
• Do not take the products apart; Installation and Use
Maintenance and use cleaning products.... Do not place rings or other metal objects over the peg in the charging unit - REPLACING THE RECEIVER BATTERIES
Constant use a soft, damp cloth to either unit.
• Only use...
Owner's Manual - Page 15

...chimes, followed by a beep-beep... Replace the door camera batteries.
13
69...when the call button is a likely problem, move the receiver 20 in the ...on . • There is fully charged. Troubleshooting
VISIOCAM
The system does not work... •...the receiver closer to fully recharge the batteries.
installation Setup' on the charging unit for example. •...set to the receiver -
Owner's Manual - Page 16

... near the floor. • The battery charge is trying to the 'DOOR CAMERA' section), block off , (refer to unscrew and remove the door camera. Installation and Use
Troubleshooting
A beep-beep tone sounds for at least four hours to stop the alert tone. Press any button on randomly...
Switch the PIR sensor off...
Owner's Manual - Page 17
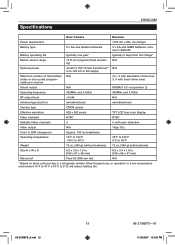
...-size NiMH batteries, minimum 1200mAh
Battery operating life
typically one year*
typically 3 days from full charge*
Motion sensor range
12 ft. (4 m) typical (fixed sensitiv- ASpbeocuitfiycoautironnesw thermostat
VISIOCAM
Door Camera
Receiver
Power requirement
110V AC ±10% via 8V to 10V 1A bell transformer** N/A or 8-12V AC or DC supply
Maximum number...
Owner's Manual - Page 18

... this product complies with Part 15 of with your statutory rights. Registered Trademark. © 2007 Honeywell International Inc. 69-2108EFS-01 M.S. 11-07
69-2108EFS_A.indd 16
Printed in CUL and UL60065 safety requirements. The charging base is required; Check with household waste. ACS, Environmental and Combustion Controls 1985 Douglas Drive, Golden Valley, MN...
Honeywell RPWL800 Reviews
We have not received any reviews for Honeywell yet.