User Manual
Page 1
Honeywell Wireless In/Out Thermometer (TE109NL) USER MANUAL TABLE OF CONTENTS INTRODUCTION 3 PRODUCT OVERVIEW 4 BEFORE YOU BEGIN 8 BATTERY INSTALLATION 9 LOW BATTERY WARNING 9 GETTING STARTED 10 PLACEMENT OF THE UNITS 10 REMOTE AND INDOOR TEMPERATURE 10 MAXIMUM AND MINIMUM READINGS 11 LOST COMMUNICATION 11 TRANSMISSION COLLISION 12 CALENDAR AND CLOCK DISPLAY MODES 12 MANUAL SETTINGS 12 CLOCK ALARMS 13 SNOOZE 14 PRECAUTIONS 15 TROUBLESHOOTING 15 SPECIFICATIONS 16 FCC STATEMENT 17 DECLARATION OF CONFORMITY 18 STANDARD WARRANTY INFORMATION 19 2
Honeywell Wireless In/Out Thermometer (TE109NL) USER MANUAL TABLE OF CONTENTS INTRODUCTION 3 PRODUCT OVERVIEW 4 BEFORE YOU BEGIN 8 BATTERY INSTALLATION 9 LOW BATTERY WARNING 9 GETTING STARTED 10 PLACEMENT OF THE UNITS 10 REMOTE AND INDOOR TEMPERATURE 10 MAXIMUM AND MINIMUM READINGS 11 LOST COMMUNICATION 11 TRANSMISSION COLLISION 12 CALENDAR AND CLOCK DISPLAY MODES 12 MANUAL SETTINGS 12 CLOCK ALARMS 13 SNOOZE 14 PRECAUTIONS 15 TROUBLESHOOTING 15 SPECIFICATIONS 16 FCC STATEMENT 17 DECLARATION OF CONFORMITY 18 STANDARD WARRANTY INFORMATION 19 2
User Manual
Page 2
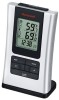
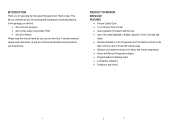
... as you use your new item. This device combines precise time keeping with Snooze • Day of the week displayed in English, Spanish, French, German and Italian • Wireless Reception of the Temperature from the Remote Sensor to the Main Unit from up to 100 feet (30 meters) away • Minimum and maximum memory for selecting the Honeywell Wireless In/Out Thermometer. PRODUCT OVERVIEW...
... as you use your new item. This device combines precise time keeping with Snooze • Day of the week displayed in English, Spanish, French, German and Italian • Wireless Reception of the Temperature from the Remote Sensor to the Main Unit from up to 100 feet (30 meters) away • Minimum and maximum memory for selecting the Honeywell Wireless In/Out Thermometer. PRODUCT OVERVIEW...
User Manual
Page 3
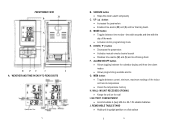
... week • Activates clock's programming mode E. MOUNT RECESSED OPENING • Keeps the unit on a flat surface 5 6 WEATHER AND TIME IN EASY-TO READ DIGITS 5 B. REMOVABLE TABLE STAND • Holds unit in upright position on the wall I A. MODE button • Toggles between the calendar display and three time alarm modes • Allows programming available alarms G. WALL- time with seconds and time with the day of the indoor and remote temperature • Clears...
... week • Activates clock's programming mode E. MOUNT RECESSED OPENING • Keeps the unit on a flat surface 5 6 WEATHER AND TIME IN EASY-TO READ DIGITS 5 B. REMOVABLE TABLE STAND • Holds unit in upright position on the wall I A. MODE button • Toggles between the calendar display and three time alarm modes • Allows programming available alarms G. WALL- time with seconds and time with the day of the indoor and remote temperature • Clears...

User Manual
Page 4
... pressing any buttons on the main unit before first use, matching the polarity in the battery compartment • Press RESET after each battery change with a paper clip or similar tool. • During an initial setup, place the main unit close to be measured. WALL-MOUNT RECESSED OPENING • Keeps the remote sensor on the main unit's display), position the remote sensor and...
... pressing any buttons on the main unit before first use, matching the polarity in the battery compartment • Press RESET after each battery change with a paper clip or similar tool. • During an initial setup, place the main unit close to be measured. WALL-MOUNT RECESSED OPENING • Keeps the remote sensor on the main unit's display), position the remote sensor and...
User Manual
Page 5
.... LOW BATTERY WARNING A low-battery indicator [ ] will automatically update readings at 45 second intervals. The best suggested location for the remote sensor for two seconds to it. NOTE: When the temperature falls below . If no signal is received from direct sunlight, rain or snow. There are installed; Upon successful reception, remote temperature will appear on any flat surface indoors. No...
.... LOW BATTERY WARNING A low-battery indicator [ ] will automatically update readings at 45 second intervals. The best suggested location for the remote sensor for two seconds to it. NOTE: When the temperature falls below . If no signal is received from direct sunlight, rain or snow. There are installed; Upon successful reception, remote temperature will appear on any flat surface indoors. No...
User Manual
Page 6
... or 24 hour time format, hour, minute, day of obstacles. Shorten the distance if necessary. • Fresh batteries are installed correctly in month-date or date-month format. This is clear of the week display language, time zone and Fahrenheit or Celsius display. 11 12 MANUAL SETTINGS CLOCK • Press and hold DOWN (▼) button for two seconds and all previously stored readings will be automatically stored...
... or 24 hour time format, hour, minute, day of obstacles. Shorten the distance if necessary. • Fresh batteries are installed correctly in month-date or date-month format. This is clear of the week display language, time zone and Fahrenheit or Celsius display. 11 12 MANUAL SETTINGS CLOCK • Press and hold DOWN (▼) button for two seconds and all previously stored readings will be automatically stored...

User Manual
Page 7
... displayed. • Press and hold ALARM ON/OFF button for two seconds. When alarms are programmed. CLOCK ALARMS The Personal Weather Station has two time alarms - The hour digit will be programmed. • Press ALARM ON/OFF button once to enter into the alarms setting mode. After the SNOOZE is a Weekday alarm (W). and one or both - If the alarm is not disabled after the last parameter is set . SETTING THE WEEKDAY (W) AND SINGLE DAY (S) ALARMS • Press ALARM...
... displayed. • Press and hold ALARM ON/OFF button for two seconds. When alarms are programmed. CLOCK ALARMS The Personal Weather Station has two time alarms - The hour digit will be programmed. • Press ALARM ON/OFF button once to enter into the alarms setting mode. After the SNOOZE is a Weekday alarm (W). and one or both - If the alarm is not disabled after the last parameter is set . SETTING THE WEEKDAY (W) AND SINGLE DAY (S) ALARMS • Press ALARM...
User Manual
Page 8
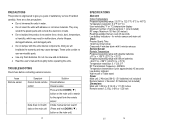
... the remote sensor Initiate manual sensor search (Press and hold DOWN ( ▼) button on the main unit) 15 SPECIFICATIONS Main Unit Indoor Temperature Proposed operating range: 23.0°F to 122.0°F (-5°C to +50°C) Temperature resolution: 0.2°F (0.1°C) User-selectable (°F or °C) temperature display Maximum number of satisfactory service if handled carefully. They may scratch the plastic parts and...
... the remote sensor Initiate manual sensor search (Press and hold DOWN ( ▼) button on the main unit) 15 SPECIFICATIONS Main Unit Indoor Temperature Proposed operating range: 23.0°F to 122.0°F (-5°C to +50°C) Temperature resolution: 0.2°F (0.1°C) User-selectable (°F or °C) temperature display Maximum number of satisfactory service if handled carefully. They may scratch the plastic parts and...
User Manual
Page 9
... that the product Product No.: TE109NL Product Name: Honeywell Wireless In/Out Thermometer Manufacturer: Hideki Electronics Ltd. If this unit not expressly approved by one or more of the FCC Rules. Address: 7865 SW Mohawk Tualatin, OR 97062 declare that may cause undesired operation. Please call our Customer Service (refer to the Standard Warranty Information) for help. This equipment, installed and used as...
... that the product Product No.: TE109NL Product Name: Honeywell Wireless In/Out Thermometer Manufacturer: Hideki Electronics Ltd. If this unit not expressly approved by one or more of the FCC Rules. Address: 7865 SW Mohawk Tualatin, OR 97062 declare that may cause undesired operation. Please call our Customer Service (refer to the Standard Warranty Information) for help. This equipment, installed and used as...
User Manual
Page 10
... this product and its operation, please contact our Customer Service at 1(866) 443 3543. Honeywell International Inc. It does not cover damages or wear resulting from Honeywell Intellectual Properties Inc. Should you may be refused. Please retain your product, go to this product. All Rights Reserved. Note that online product registration is required to repair or replace the product at : www.honeywellweatherstations.com. Please direct...
... this product and its operation, please contact our Customer Service at 1(866) 443 3543. Honeywell International Inc. It does not cover damages or wear resulting from Honeywell Intellectual Properties Inc. Should you may be refused. Please retain your product, go to this product. All Rights Reserved. Note that online product registration is required to repair or replace the product at : www.honeywellweatherstations.com. Please direct...


