
Product Manual
Page 1
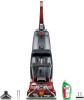
IMPORTANT: READ CAREFULLY BEFORE ASSEMBLY AND USE. IF USED COMMERCIALLY WARRANTY IS VOID. © 2015 Techtronic Floor Care Technology Limited. Questions or concerns? THIS PRODUCT IS INTENDED FOR HOUSEHOLD USE ONLY. All rights reserved. OWNER'S MANUAL Operating and Servicing Instructions Español - Co. For assistance, please call Customer Service at 1-800-944-9200 Mon-Fri 8am-7pm EST before returning this cleaner. Glenwillow, Oh 44139...
IMPORTANT: READ CAREFULLY BEFORE ASSEMBLY AND USE. IF USED COMMERCIALLY WARRANTY IS VOID. © 2015 Techtronic Floor Care Technology Limited. Questions or concerns? THIS PRODUCT IS INTENDED FOR HOUSEHOLD USE ONLY. All rights reserved. OWNER'S MANUAL Operating and Servicing Instructions Español - Co. For assistance, please call Customer Service at 1-800-944-9200 Mon-Fri 8am-7pm EST before returning this cleaner. Glenwillow, Oh 44139...
Product Manual
Page 3
... for warranty service of Hoover® authorized dealer locations (U.S. PLEASE DO NOT RETURN THIS PRODUCT TO THE STORE. 2 MANUFACTURING CODE (Label located on rear of cleaner) CONTENTS Important Safeguards 3 Carton Contents...5 How To Assemble...6 Features...7 How To Use...8 On-Off Pedal...8 Handle Release Pedal 8 Transporting...8 Carry Handles...8 Clean Water/Solution Tank 8 Dirty Water Tank 9 How To Clean...10 Tools...13 Maintenance...16 Nozzle...16 Brushes...16 Service...17 Troubleshooting...18 Cleaning Solutions...19 Warranty...20...
... for warranty service of Hoover® authorized dealer locations (U.S. PLEASE DO NOT RETURN THIS PRODUCT TO THE STORE. 2 MANUFACTURING CODE (Label located on rear of cleaner) CONTENTS Important Safeguards 3 Carton Contents...5 How To Assemble...6 Features...7 How To Use...8 On-Off Pedal...8 Handle Release Pedal 8 Transporting...8 Carry Handles...8 Clean Water/Solution Tank 8 Dirty Water Tank 9 How To Clean...10 Tools...13 Maintenance...16 Nozzle...16 Brushes...16 Service...17 Troubleshooting...18 Cleaning Solutions...19 Warranty...20...
Product Manual
Page 6
... a handle, close a door on floor. Close supervision is necessary when used as a toy. Do not run appliance over floor electrical outlets. • WARNING: This product contains chemicals known to the State of stairs or on cord, or pull cord around sharp edges or corners. Do not use with wet hands. • Do not put any opening blocked; See Grounding Instructions. • Unplug before cleaning or servicing...
... a handle, close a door on floor. Close supervision is necessary when used as a toy. Do not run appliance over floor electrical outlets. • WARNING: This product contains chemicals known to the State of stairs or on cord, or pull cord around sharp edges or corners. Do not use with wet hands. • Do not put any opening blocked; See Grounding Instructions. • Unplug before cleaning or servicing...

Product Manual
Page 7
... plug (A) illustrated in one location for an extended period of the product after use of electric shock. Keep children and pets away from the brushes and underside of time, as they may puddle. This appliance is not available (Fig. 2). NOTE: In Canada, the use (a) do not allow cleaner to a hard surface and (b) place unit on hard floors without proper attachment may be installed...
... plug (A) illustrated in one location for an extended period of the product after use of electric shock. Keep children and pets away from the brushes and underside of time, as they may puddle. This appliance is not available (Fig. 2). NOTE: In Canada, the use (a) do not allow cleaner to a hard surface and (b) place unit on hard floors without proper attachment may be installed...
Product Manual
Page 10
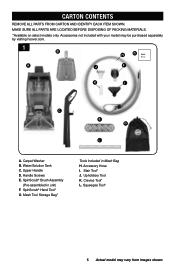
... Tool Storage Bag* Tools Included in unit) F. Stair Tool* J. CARTON CONTENTS REMOVE ALL PARTS FROM CARTON AND IDENTIFY EACH ITEM SHOWN. Carpet Washer B. SpinScrub® Brush Assembly (Pre-assembled in Mesh Bag H. Squeegee Tool* 5 Actual model may be purchased separately by visiting hoover.com. 1 B H D A J F K I . Upholstery Tool K. Accessory Hose I C E G L A. Upper Handle D. Crevice Tool* L. SpinScrub® Hand Tool* G. Accessories not included with your model may vary from images shown. MAKE SURE ALL PARTS ARE LOCATED...
... Tool Storage Bag* Tools Included in unit) F. Stair Tool* J. CARTON CONTENTS REMOVE ALL PARTS FROM CARTON AND IDENTIFY EACH ITEM SHOWN. Carpet Washer B. SpinScrub® Brush Assembly (Pre-assembled in Mesh Bag H. Squeegee Tool* 5 Actual model may be purchased separately by visiting hoover.com. 1 B H D A J F K I . Upholstery Tool K. Accessory Hose I C E G L A. Upper Handle D. Crevice Tool* L. SpinScrub® Hand Tool* G. Accessories not included with your model may vary from images shown. MAKE SURE ALL PARTS ARE LOCATED...
Product Manual
Page 11
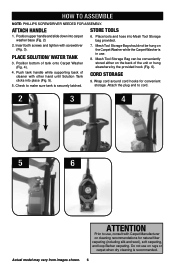
... place (Fig. 5). 5. Push tank handle while supporting back of cleaner with screwdriver (Fig. 3). Do not use on the back of tank onto Carpet Washer (Fig. 4). 7. PLACE SOLUTION/ WATER TANK 3. Check to use . 8. Wrap cord around cord hooks for natural fiber carpeting (including silk and wool), soft carpeting, and loop Berber carpeting. HOW TO ASSEMBLE NOTE: PHILLIPS SCREWDRIVER NEEDED FOR ASSEMBLY. Mesh Tool Storage Bag should not be conveniently...
... place (Fig. 5). 5. Push tank handle while supporting back of cleaner with screwdriver (Fig. 3). Do not use on the back of tank onto Carpet Washer (Fig. 4). 7. PLACE SOLUTION/ WATER TANK 3. Check to use . 8. Wrap cord around cord hooks for natural fiber carpeting (including silk and wool), soft carpeting, and loop Berber carpeting. HOW TO ASSEMBLE NOTE: PHILLIPS SCREWDRIVER NEEDED FOR ASSEMBLY. Mesh Tool Storage Bag should not be conveniently...
Product Manual
Page 14
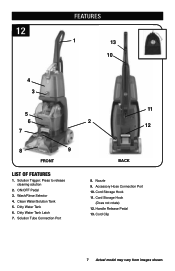
Solution Trigger: Press to release cleaning solution 2. ON/OFF Pedal 3. Nozzle 9. Handle Release Pedal 13. Cord Clip 7 Actual model may vary from images shown. Clean Water/Solution Tank 5. Dirty Water Tank 6. Dirty Water Tank Latch 7. Accessory Hose Connection Port 10. Cord Storage Hook 11. Cord Storage Hook (Does not rotate) 12. Solution Tube Connection Port 11 2 12 BACK 8. Wash/Rinse Selector 4. FEATURES 12 1 13 10 4 3 5 6 7 8 9 FRONT LIST OF FEATURES 1.
Solution Trigger: Press to release cleaning solution 2. ON/OFF Pedal 3. Nozzle 9. Handle Release Pedal 13. Cord Clip 7 Actual model may vary from images shown. Clean Water/Solution Tank 5. Dirty Water Tank 6. Dirty Water Tank Latch 7. Accessory Hose Connection Port 10. Cord Storage Hook 11. Cord Storage Hook (Does not rotate) 12. Solution Tube Connection Port 11 2 12 BACK 8. Wash/Rinse Selector 4. FEATURES 12 1 13 10 4 3 5 6 7 8 9 FRONT LIST OF FEATURES 1.
Product Manual
Page 15
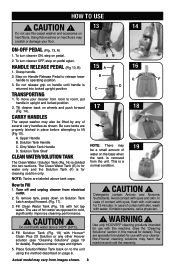
... 13, B) 1. CAUTION ! WARNING ! Solution Tank Handle C. CARRY HANDLES The carpet washer may harm the machine and void the warranty. NOTE: Tanks are properly latched in upright and locked position. 2. Upper Handle B. CAUTION ! 13 14 Do not use of water on pedal agian. Turn off and unplug cleaner from images shown. 8 Tilt cleaner back on hard floors. Non-Hoover cleaning solutions may also be a small...
... 13, B) 1. CAUTION ! WARNING ! Solution Tank Handle C. CARRY HANDLES The carpet washer may harm the machine and void the warranty. NOTE: Tanks are properly latched in upright and locked position. 2. Upper Handle B. CAUTION ! 13 14 Do not use of water on pedal agian. Turn off and unplug cleaner from images shown. 8 Tilt cleaner back on hard floors. Non-Hoover cleaning solutions may also be a small...
Product Manual
Page 18
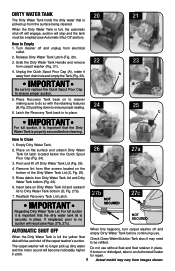
... Quick Spout Pour Cap (Fig. 24). 27a 3. it away from carpet washer (Fig. 21). 4. Release Dirty Water Tank Latch (Fig. 20). 3. The carpet washer will no suction will become noticeably higher in pitch. DIRTY WATER TANK 20 21 The Dirty Water Tank holds the dirty water that is securely in place. Turn cleaner off the carpet washer's suction. Grab the Dirty Water Tank Handle and remove...
... Quick Spout Pour Cap (Fig. 24). 27a 3. it away from carpet washer (Fig. 21). 4. Release Dirty Water Tank Latch (Fig. 20). 3. The carpet washer will no suction will become noticeably higher in pitch. DIRTY WATER TANK 20 21 The Dirty Water Tank holds the dirty water that is securely in place. Turn cleaner off the carpet washer's suction. Grab the Dirty Water Tank Handle and remove...
Product Manual
Page 19
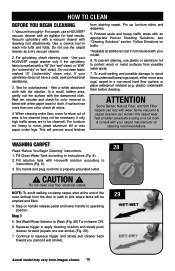
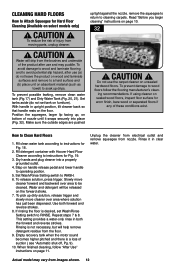
... wet stroke) (Fig. 29). 7. When cleaning entire floor, move furniture out of the room farthest from possible water spray. 7. Do not clean over floor electrical outlets. Step 1 5. HOW TO CLEAN BEFORE YOU BEGIN CLEANING 1. Do not use a HOOVER® vacuum cleaner with an agitator for colorfastness - If your carpet manufacturer on cleaning recommendations. plastic) underneath them before using on handle release pedal and lower handle to Wash (Fig. 28) Turn cleaner ON. 6. Some vacuums & carpet cleaners...
... wet stroke) (Fig. 29). 7. When cleaning entire floor, move furniture out of the room farthest from possible water spray. 7. Do not clean over floor electrical outlets. Step 1 5. HOW TO CLEAN BEFORE YOU BEGIN CLEANING 1. Do not use a HOOVER® vacuum cleaner with an agitator for colorfastness - If your carpet manufacturer on cleaning recommendations. plastic) underneath them before using on handle release pedal and lower handle to Wash (Fig. 28) Turn cleaner ON. 6. Some vacuums & carpet cleaners...
Product Manual
Page 22
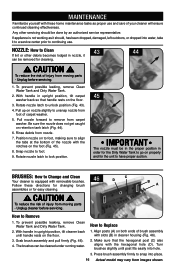
... "Cleaning Nozzle" page 16. 4. CAUTION ! IMPORTANT To avoid saturating carpet, do not leave the product on wood and laminate surfaces and remove to be replaced before Carpet Washer is completely dry. See "Dirty Water Tank: How to dry. When finished cleaning, follow "After Cleaning" instructions on floor for both forward and reverse strokes. Always end with solution (dry stroke). See "Cleaning Brushes" page 16. 5. IMPORTANT When brushes seem...
... "Cleaning Nozzle" page 16. 4. CAUTION ! IMPORTANT To avoid saturating carpet, do not leave the product on wood and laminate surfaces and remove to be replaced before Carpet Washer is completely dry. See "Dirty Water Tank: How to dry. When finished cleaning, follow "After Cleaning" instructions on floor for both forward and reverse strokes. Always end with solution (dry stroke). See "Cleaning Brushes" page 16. 5. IMPORTANT When brushes seem...
Product Manual
Page 23
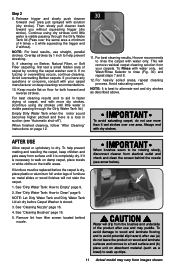
... the brushes and underside of the product after use (a) do not set Wash/Rinse Setting switch to avoid potential slip hazard, after use the carpet cleaner on page 10. 32 ! If rinsing the floor is desired, set tank on the forward stroke. 7. up , on handle release pedal and lower handle to cleaning carpets. CAUTION ! Water will be cleaned. Repeat steps 7 & 8. Actual model may puddle. remove the squeegee to return to operating postion...
... the brushes and underside of the product after use (a) do not set Wash/Rinse Setting switch to avoid potential slip hazard, after use the carpet cleaner on page 10. 32 ! If rinsing the floor is desired, set tank on the forward stroke. 7. up , on handle release pedal and lower handle to cleaning carpets. CAUTION ! Water will be cleaned. Repeat steps 7 & 8. Actual model may puddle. remove the squeegee to return to operating postion...
Product Manual
Page 25
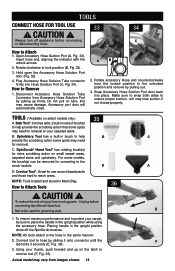
... pull on tube, this may lose suction if not closed properly. Make sure to snap both sides to Attach Tools ! For some models, the brush(s) can be used for removal on select models only.) A. NOTE: Tools located and stored in the upright position while using the accessory hose. To ensure maximum performance and to protect your carpet, be sure to place the handle in Mesh Bag. 36...
... pull on tube, this may lose suction if not closed properly. Make sure to snap both sides to Attach Tools ! For some models, the brush(s) can be used for removal on select models only.) A. NOTE: Tools located and stored in the upright position while using the accessory hose. To ensure maximum performance and to protect your carpet, be sure to place the handle in Mesh Bag. 36...
Product Manual
Page 28
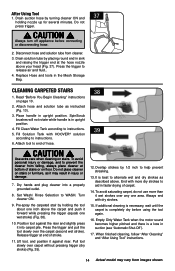
.... Overlap strokes by turning cleaner ON and 37 holding the tool about one area. End with more than 4 wet strokes over the carpet (second wet stroke). Replace Hose and tools in upright position. CAUTION ! To avoid personal injury or damage, and to instructions. 6. Set Wash/ Rinse Selection to help prevent streaking. 13. Position tool against riser. CLEANING CARPETED STAIRS 38 1. Place handle in the Mesh Storage Bag. Press the...
.... Overlap strokes by turning cleaner ON and 37 holding the tool about one area. End with more than 4 wet strokes over the carpet (second wet stroke). Replace Hose and tools in upright position. CAUTION ! To avoid personal injury or damage, and to instructions. 6. Set Wash/ Rinse Selection to help prevent streaking. 13. Position tool against riser. CLEANING CARPETED STAIRS 38 1. Place handle in the Mesh Storage Bag. Press the...
Product Manual
Page 29
... Cleaning" and "After Using Tool" instructions. Make crisscrossing strokes to help prevent streaking. 10. If you would like to rinse the carpet with water only, set Wash/ Rinse Selector to remove more than 2 passes with water only. SpinScrub brushes will remove residual carpet cleaning solution from images shown. 15 Attach tool to RINSE (Fig. 42). Turn cleaner ON. 8. Be sure to WASH. Set Wash/Rinse Selector to check Hoover Cleaning Guide on page 10 and the cleaning code...
... Cleaning" and "After Using Tool" instructions. Make crisscrossing strokes to help prevent streaking. 10. If you would like to rinse the carpet with water only, set Wash/ Rinse Selector to remove more than 2 passes with water only. SpinScrub brushes will remove residual carpet cleaning solution from images shown. 15 Attach tool to RINSE (Fig. 42). Turn cleaner ON. 8. Be sure to WASH. Set Wash/Rinse Selector to check Hoover Cleaning Guide on page 10 and the cleaning code...
Product Manual
Page 32
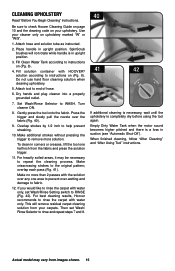
... bottom of injury from nozzle. 7. To prevent possible leaking, remove Clean Water Tank and Dirty Water Tank. The brushes can be in the proper position in upright position, tilt carpet washer back so that the hexagonal post (C) also aligns with the hexagonal hole (D). Unplug before servicing. Turn brushes slightly until handle rests on the floor. 3. MAINTENANCE Familiarize yourself with these directions for changing brush assemblies or for easy...
... bottom of injury from nozzle. 7. To prevent possible leaking, remove Clean Water Tank and Dirty Water Tank. The brushes can be in the proper position in upright position, tilt carpet washer back so that the hexagonal post (C) also aligns with the hexagonal hole (D). Unplug before servicing. Turn brushes slightly until handle rests on the floor. 3. MAINTENANCE Familiarize yourself with these directions for changing brush assemblies or for easy...
Product Manual
Page 33
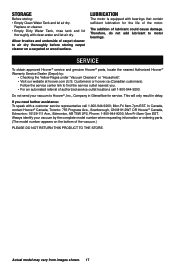
... to find the service outlet nearest you need further assistance: To speak with bearings that contain sufficient lubrication for service. STORAGE Before storing: • Empty Clean Water Tank and let air dry. Actual model may vary from images shown. 17 Customers) or hoover.ca (Canadian customers). Do not send your vacuum by : • Checking the Yellow Pages under "Vacuum Cleaners" or "Household". •...
... to find the service outlet nearest you need further assistance: To speak with bearings that contain sufficient lubrication for service. STORAGE Before storing: • Empty Clean Water Tank and let air dry. Actual model may vary from images shown. 17 Customers) or hoover.ca (Canadian customers). Do not send your vacuum by : • Checking the Yellow Pages under "Vacuum Cleaners" or "Household". •...
Product Manual
Page 36
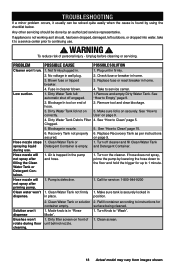
... Filter Clogged. 5. If appliance is found by an authorized service representative. Hose nozzle stops spraying liquid during floor cleaning. 2. Check fuse or breaker in home. 3. See "How to instructions for surface being cleaned. 1. TROUBLESHOOTING If a minor problem occurs, it to a service center prior to continuing use . Clean water won 't run. Turn Knob to "Wash". 1. Replace Recovoery Tank as it should be solved quite easily when the cause is not working as per instructions on securely. PROBLEM Cleaner...
... Filter Clogged. 5. If appliance is found by an authorized service representative. Hose nozzle stops spraying liquid during floor cleaning. 2. Check fuse or breaker in home. 3. See "How to instructions for surface being cleaned. 1. TROUBLESHOOTING If a minor problem occurs, it to a service center prior to continuing use . Clean water won 't run. Turn Knob to "Wash". 1. Replace Recovoery Tank as it should be solved quite easily when the cause is not working as per instructions on securely. PROBLEM Cleaner...
Product Manual
Page 37
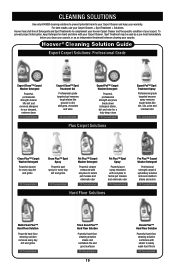
... 19 Steam Plus™ Hard Floor Solution Powerful hard floor cleaning solution combines with your Carpet Cleaner. For best results, use your carpets. Hoover has a full line of Detergents and Spot Treatments to complement your Hoover Carpet Cleaner and the specific condition of your warranty. CLEANING SOLUTIONS Use only HOOVER cleaning solutions to prevent potential harm to your Carpet Cleaner and keep Detergent on hand and store with steam to safely wash hard floors 4X...
... 19 Steam Plus™ Hard Floor Solution Powerful hard floor cleaning solution combines with your Carpet Cleaner. For best results, use your carpets. Hoover has a full line of Detergents and Spot Treatments to complement your Hoover Carpet Cleaner and the specific condition of your warranty. CLEANING SOLUTIONS Use only HOOVER cleaning solutions to prevent potential harm to your Carpet Cleaner and keep Detergent on hand and store with steam to safely wash hard floors 4X...

Product Manual
Page 40
... TO MAKE A WARRANTY CLAIM If this Warranty or the availability of Ohio. WHAT THIS WARRANTY DOES NOT COVER This Warranty does not cover: use of the product in a commercial operation (such as maid, janitorial and equipment rental services), improper maintenance of the product, damage due to either a Hoover® Sales and Service Center or Hoover® Authorized Warranty Service Dealer along with the Owner's Manual, your product to you...
... TO MAKE A WARRANTY CLAIM If this Warranty or the availability of Ohio. WHAT THIS WARRANTY DOES NOT COVER This Warranty does not cover: use of the product in a commercial operation (such as maid, janitorial and equipment rental services), improper maintenance of the product, damage due to either a Hoover® Sales and Service Center or Hoover® Authorized Warranty Service Dealer along with the Owner's Manual, your product to you...


