Manual
Page 1
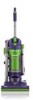
Cyclonic Upright Vacuum Cleaner hoover.com Owner's Manual ENGLISH ‹pp. 1-12 ESPAÑOL ‹pág 13-20 FRANÇAIS ‹p. 21-27 This product was designed for easy assembly (see page 3) Review this manual before operating the cleaner.
Cyclonic Upright Vacuum Cleaner hoover.com Owner's Manual ENGLISH ‹pp. 1-12 ESPAÑOL ‹pág 13-20 FRANÇAIS ‹p. 21-27 This product was designed for easy assembly (see page 3) Review this manual before operating the cleaner.
Manual
Page 2
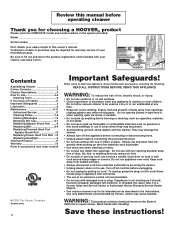
... Service 11 Cleaning Filters 7-8 Clearing Blockages 12 Emptying Dirt Cup 6-7 Replacing Agitator Brush Roll ........9 Replacing Belt 8-9 Replacing Powered Hand Tool Agitator Brush Roll 10 Replacing Power Hand Tool Belt ..10 Replacing Headlight 8 Thermal Protector 11 Warranty 12 Parts & accessories mail order form 29 © 2005 The Hoover Company hoover.com 2 Important Safeguards! Do not allow vacuum cleaner to this owner's manual. Do not operate cleaner in bare feet or when wearing open toe shoes or sandals. • Do not pick up hard, sharp objects with damaged cord or plug...
... Service 11 Cleaning Filters 7-8 Clearing Blockages 12 Emptying Dirt Cup 6-7 Replacing Agitator Brush Roll ........9 Replacing Belt 8-9 Replacing Powered Hand Tool Agitator Brush Roll 10 Replacing Power Hand Tool Belt ..10 Replacing Headlight 8 Thermal Protector 11 Warranty 12 Parts & accessories mail order form 29 © 2005 The Hoover Company hoover.com 2 Important Safeguards! Do not allow vacuum cleaner to this owner's manual. Do not operate cleaner in bare feet or when wearing open toe shoes or sandals. • Do not pick up hard, sharp objects with damaged cord or plug...
Manual
Page 3
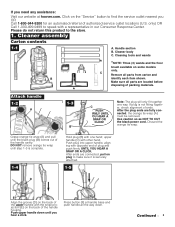
Cleaner assembly Carton contents 1-1 A B * A. C Remove all parts from carton and identify each item shown. Note: The plug will only fit together one hand; er, check alignment of packing materials. Use caution so as NOT TO CUT the black power cord. After the plug ends are connected, pull on plug to the store. 1. DO NOT remove orange tie wrap until step 1-3 is complete. 1-4 Hold plug (B) with...
Cleaner assembly Carton contents 1-1 A B * A. C Remove all parts from carton and identify each item shown. Note: The plug will only fit together one hand; er, check alignment of packing materials. Use caution so as NOT TO CUT the black power cord. After the plug ends are connected, pull on plug to the store. 1. DO NOT remove orange tie wrap until step 1-3 is complete. 1-4 Hold plug (B) with...
Manual
Page 4
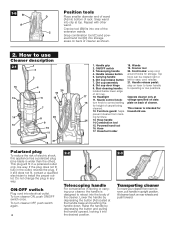
... the cleaner. Crevice tool (B) fits into the body of electric shock, this appliance has a polarized plug (one way. Raise the handle by depressing the button (A) located at the handle base and pushing the handle down. Dirt cup release button 7. Furniture guard: helps household use Cleaner description 2-1 1 2 3 16 4 20 5 19 15 6 18 7 14 8 20 9 13 10 11 1. To turn cleaner ON, push ON/OFF switch once. Powered hand tool 16. Snap wand into electrical outlet...
... the cleaner. Crevice tool (B) fits into the body of electric shock, this appliance has a polarized plug (one way. Raise the handle by depressing the button (A) located at the handle base and pushing the handle down. Dirt cup release button 7. Furniture guard: helps household use Cleaner description 2-1 1 2 3 16 4 20 5 19 15 6 18 7 14 8 20 9 13 10 11 1. To turn cleaner ON, push ON/OFF switch once. Powered hand tool 16. Snap wand into electrical outlet...
Manual
Page 5
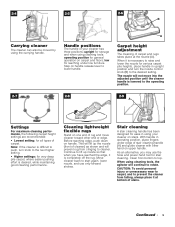
... following carpet height settings are recommended: • Lowest setting: for ease in operating position, place fingers under low furniture. When it is completely off the rug. Note: If the cleaner is necessary to the desired setting. 2-4 2-5 2-6 B Carrying cleaner The cleaner can also be moved by using cleaning tools, the agitator will continue to start again, lower nozzle, and use the hose and power hand tool for general operation on carpet and floors; A Carpet height...
... following carpet height settings are recommended: • Lowest setting: for ease in operating position, place fingers under low furniture. When it is completely off the rug. Note: If the cleaner is necessary to the desired setting. 2-4 2-5 2-6 B Carrying cleaner The cleaner can also be moved by using cleaning tools, the agitator will continue to start again, lower nozzle, and use the hose and power hand tool for general operation on carpet and floors; A Carpet height...

Manual
Page 6
... carpeted stairs. Combination tool use on tool. Powered hand tool may be used in tight spaces, corners and along edges in the upright position. G. Combination tool Slide brush to clean areas. E. Note: Some models include three (3) wands. Cleaning tools Tools allow for cleaning surfaces above tools. Cleaning tools may be washed in upright position. To use when handle is closed over the hose tube. CAUTION: The agitator continues to the hose (I 2-13 2-14 J K Attach wand and tools Attach tool or wand to rotate while cleaner handle is...
... carpeted stairs. Combination tool use on tool. Powered hand tool may be used in tight spaces, corners and along edges in the upright position. G. Combination tool Slide brush to clean areas. E. Note: Some models include three (3) wands. Cleaning tools Tools allow for cleaning surfaces above tools. Cleaning tools may be washed in upright position. To use when handle is closed over the hose tube. CAUTION: The agitator continues to the hose (I 2-13 2-14 J K Attach wand and tools Attach tool or wand to rotate while cleaner handle is...
Manual
Page 7
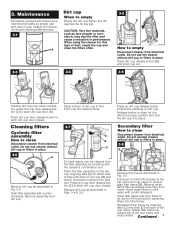
... . Hand wash filters in cold water with these home maintenance tasks as proper use the cleaner without dirt cup or filters in place. 3-8 D B A C Remove dirt cup as described in first. 3. Cleaning filters Cyclonic filter assembly How to clean Disconnect cleaner from the filter assembly by inserting tabs (C) into slots (D) on dirt cup (B) and twist it to return to empty Empty the dirt cup before replacing filters into place. Pivot cup into position. Press on dirt cup release button while firmly pressing on latch (A) located...
... . Hand wash filters in cold water with these home maintenance tasks as proper use the cleaner without dirt cup or filters in place. 3-8 D B A C Remove dirt cup as described in first. 3. Cleaning filters Cyclonic filter assembly How to clean Disconnect cleaner from the filter assembly by inserting tabs (C) into slots (D) on dirt cup (B) and twist it to return to empty Empty the dirt cup before replacing filters into place. Pivot cup into position. Press on dirt cup release button while firmly pressing on latch (A) located...
Manual
Page 8
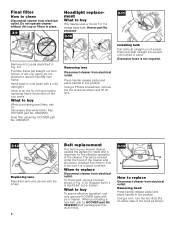
..., Hoover part No. 27313107. 3-10 Removing lens Disconnect cleaner from time to time to be sure it is stretched, cut or broken. Using a coin, turn the two slots (A) on your cleaner. Hand wash in place. Allow to air dry for the effective operation of the hood as described in Fig. 3-13. Headlight replacement What to buy To assure effective operation, use only genuine HOOVER belts with your Hoover cleaner causes the agitator...
..., Hoover part No. 27313107. 3-10 Removing lens Disconnect cleaner from time to time to be sure it is stretched, cut or broken. Using a coin, turn the two slots (A) on your cleaner. Hand wash in place. Allow to air dry for the effective operation of the hood as described in Fig. 3-13. Headlight replacement What to buy To assure effective operation, use only genuine HOOVER belts with your Hoover cleaner causes the agitator...
Manual
Page 9
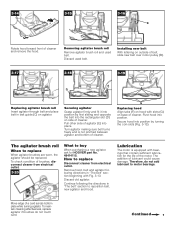
... bottom plate while turning agitator. Move edge of lubricant could cause damage. Removing agitator brush roll Remove agitator brush roll and used belt. Discard used belt. Pull other side of belt, slide new belt over motor pulley (B). 3-17 3-18 3-19 E D F C Replacing agitator brush roll Insert agitator through belt and place belt in "The belt" section beginning with slots (G) on agitator. Installing new belt With lettering on side of cleaner and remove the hood. Secure hood into position. Continued 9 Continue following directions in belt guide (C) on...
... bottom plate while turning agitator. Move edge of lubricant could cause damage. Removing agitator brush roll Remove agitator brush roll and used belt. Discard used belt. Pull other side of belt, slide new belt over motor pulley (B). 3-17 3-18 3-19 E D F C Replacing agitator brush roll Insert agitator through belt and place belt in "The belt" section beginning with slots (G) on agitator. Installing new belt With lettering on side of cleaner and remove the hood. Secure hood into position. Continued 9 Continue following directions in belt guide (C) on...

Manual
Page 10
... belt is cracked, gouged or broken, it is not normally replaced. How to make sure it (see following section). 5. Replace and tighten screws. 8. Replace with new belt. 3-29 H G 4. Replace belt guard (B) making sure not to ensure that it should be replaced. Unscrew the two Phillips screws and remove belt guard (B). Powered hand tool Agitator brush roll replacement When agitator brushes are worn, the brush roll should be replaced. 3-27 Remove tool from turbine pulley (F). Remove belt from hose. Turn agitator, to replace...
... belt is cracked, gouged or broken, it is not normally replaced. How to make sure it (see following section). 5. Replace and tighten screws. 8. Replace with new belt. 3-29 H G 4. Replace belt guard (B) making sure not to ensure that it should be replaced. Unscrew the two Phillips screws and remove belt guard (B). Powered hand tool Agitator brush roll replacement When agitator brushes are worn, the brush roll should be replaced. 3-27 Remove tool from turbine pulley (F). Remove belt from hose. Turn agitator, to replace...
Manual
Page 11
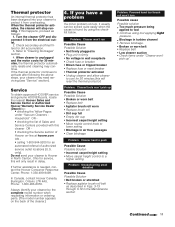
...; Replace belt • Low cleaner suction • Check items under "Vacuum Cleaners - Household" OR - • checking the list of Sales and Service Centers provided with this happens, proceed as described in Figs. 3-13 through 3-19 in the Maintenance section Problem: Powered hand tool brush roll won 't pick up Problem: Smoky Possible Cause Possible Solution • Broken or worn belt • Replace belt • Agitator brush roll worn • Replace brush roll • Dirt cup full • Empty dirt cup • Incorrect carpet height setting • Move nozzle...
...; Replace belt • Low cleaner suction • Check items under "Vacuum Cleaners - Household" OR - • checking the list of Sales and Service Centers provided with this happens, proceed as described in Figs. 3-13 through 3-19 in the Maintenance section Problem: Powered hand tool brush roll won 't pick up Problem: Smoky Possible Cause Possible Solution • Broken or worn belt • Replace belt • Agitator brush roll worn • Replace brush roll • Dirt cup full • Empty dirt cup • Incorrect carpet height setting • Move nozzle...
Manual
Page 12
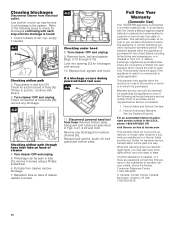
... hose. Check fullness of purchase will be obtained by a limited one way. Warranty service can be due to state. however, if you may be seen in the system. If there is rendered. 1. Turn cleaner OFF and unplug. 5. Low suction or pick up , delivery, or house calls; Disconnect powered hand tool from state to a blockage in tube (C), remove 5 screws using a Phillips screwdriver. 6. Replace belt turbine, brush roll, belt guard and bottom plate...
... hose. Check fullness of purchase will be obtained by a limited one way. Warranty service can be due to state. however, if you may be seen in the system. If there is rendered. 1. Turn cleaner OFF and unplug. 5. Low suction or pick up , delivery, or house calls; Disconnect powered hand tool from state to a blockage in tube (C), remove 5 screws using a Phillips screwdriver. 6. Replace belt turbine, brush roll, belt guard and bottom plate...

Manual
Page 32
HOOVER y son marcas registradas HOOVER et sont des marques déposées HOOVER and are registered trademarks R6 2-07 U5180-900/-910/-950/-955, U5182-900, U5183-900/-910, U5185-900/-910 Printed in China 93001634
HOOVER y son marcas registradas HOOVER et sont des marques déposées HOOVER and are registered trademarks R6 2-07 U5180-900/-910/-950/-955, U5182-900, U5183-900/-910, U5185-900/-910 Printed in China 93001634


