
Manual
Page 1
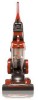
Elite™ Rewind™ Upright Cleaner ® Owner's Manual ENGLISH § pp. 1-12 ESPAÑOL § pág 13-20 www.hoover.com Review this manual before operating the cleaner.
Elite™ Rewind™ Upright Cleaner ® Owner's Manual ENGLISH § pp. 1-12 ESPAÑOL § pág 13-20 www.hoover.com Review this manual before operating the cleaner.

Manual
Page 2
... Cleaning Tools 6 If You Have a Problem 11 Important Safeguards 2 Lubrication 9 Maintenance 6-11 Authorized Service 11 Cleaning Filters 7-8 Clearing Blockages 12 Emptying Dirt Cup 6-7 Replacing Agitator Brush Roll ........9 Replacing Belt 8-9 Replacing Powered Hand Tool Agitator Brush Roll 10 Replacing Power Hand Tool Belt ..10 Replacing Headlight 8 Thermal Protector 11 Warranty 12 Parts and accessories mail order form 21 Important Safeguards! Do not run unattended at any appliance is burning or smoking, such as cigarettes, matches, or hot ashes. • Do not use to pick...
... Cleaning Tools 6 If You Have a Problem 11 Important Safeguards 2 Lubrication 9 Maintenance 6-11 Authorized Service 11 Cleaning Filters 7-8 Clearing Blockages 12 Emptying Dirt Cup 6-7 Replacing Agitator Brush Roll ........9 Replacing Belt 8-9 Replacing Powered Hand Tool Agitator Brush Roll 10 Replacing Power Hand Tool Belt ..10 Replacing Headlight 8 Thermal Protector 11 Warranty 12 Parts and accessories mail order form 21 Important Safeguards! Do not run unattended at any appliance is burning or smoking, such as cigarettes, matches, or hot ashes. • Do not use to pick...

Manual
Page 3
.... Continued § 3 Cleaner body C. Hose Remove all parts are located before disposing of packing materials. 1-2 A 1-3 1-4 B Attach handle Slide handle section (A) onto back of handle. 1-5 C Push screw into hole on the "Service" button to speak with a representative in dirt duct on back of handle. Position hose Align end of hose with a Phillips screwdriver. 1-6 E D F Position tools The holder (B) for an automated referral of authorized service outlet locations (U.S. Assembling cleanerDi Carton contents...
.... Continued § 3 Cleaner body C. Hose Remove all parts are located before disposing of packing materials. 1-2 A 1-3 1-4 B Attach handle Slide handle section (A) onto back of handle. 1-5 C Push screw into hole on the "Service" button to speak with a representative in dirt duct on back of handle. Position hose Align end of hose with a Phillips screwdriver. 1-6 E D F Position tools The holder (B) for an automated referral of authorized service outlet locations (U.S. Assembling cleanerDi Carton contents...
Manual
Page 4
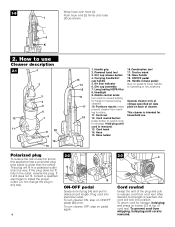
Powered hand tool 3. Air flow indicator 6. Long lasting HEPA filter 8. Nozzle control knob: turn cleaner OFF, step on pedal again. 2-3 C AC TAB LE C O R D SYSTEM C TAB LE C O R D SYSTEM Cord rewind Grasp the end of cord reel. Cord reel 12. Hose 15. Operate cleaner only at top of the plug and pull to release cord from cord reel. Polarized plug To reduce the risk of cleaner. To turn knob to use . After desired cord length is rewound. Dirt cup release button 4. Carrying...
Powered hand tool 3. Air flow indicator 6. Long lasting HEPA filter 8. Nozzle control knob: turn cleaner OFF, step on pedal again. 2-3 C AC TAB LE C O R D SYSTEM C TAB LE C O R D SYSTEM Cord rewind Grasp the end of cord reel. Cord reel 12. Hose 15. Operate cleaner only at top of the plug and pull to release cord from cord reel. Polarized plug To reduce the risk of cleaner. To turn knob to use . After desired cord length is rewound. Dirt cup release button 4. Carrying...
Manual
Page 5
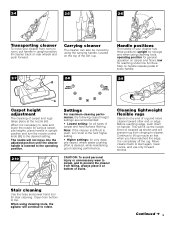
... or unnecessary wear to carpet, and to prevent the cleaner from falling, always place it at the nozzle (A). Settings For maximum cleaning performance, the following carpet height settings are recommended: • Lowest setting: for storage and when using the carrying handle, located on rear wheels and push forward. Stair cleaning Use the hose and power hand tool for reaching under low furniture. Move cleaner back to the operating position. Before reaching...
... or unnecessary wear to carpet, and to prevent the cleaner from falling, always place it at the nozzle (A). Settings For maximum cleaning performance, the following carpet height settings are recommended: • Lowest setting: for storage and when using the carrying handle, located on rear wheels and push forward. Stair cleaning Use the hose and power hand tool for reaching under low furniture. Move cleaner back to the operating position. Before reaching...

Manual
Page 6
... still shows red, follow the instructions under "Clearing blockages". 6 A Air flow indicator The indicator (A) will ensure continued cleaning effectiveness. 3-1 Combination tool Slide brush to hose tube (A). Also, turn cleaner OFF before using. 2-11 B A Removing hose When using cleaning tools, cleaner handle should be used for tool use and care of your cleaner will show red when the dirt cup is full or there is in the upright position. To replace brushes, align brush with the dusting brush. 2-13 F Attach wand and tools Attach tool to clean upholstered...
... still shows red, follow the instructions under "Clearing blockages". 6 A Air flow indicator The indicator (A) will ensure continued cleaning effectiveness. 3-1 Combination tool Slide brush to hose tube (A). Also, turn cleaner OFF before using. 2-11 B A Removing hose When using cleaning tools, cleaner handle should be used for tool use and care of your cleaner will show red when the dirt cup is full or there is in the upright position. To replace brushes, align brush with the dusting brush. 2-13 F Attach wand and tools Attach tool to clean upholstered...

Manual
Page 7
... combination tool to clean or tap side of the filter cover to remove. Close and snap dirt cup door shut. 3-7 B 3-6 A Place bottom of dirt cup to clean this type of suction. Dirt cup filter assembly How to empty Disconnect cleaner from dirt cup. Empty dirt cup. Dirt and debris can then be removed and cleaned. Do not use the cleaner without dirt cup or filters in place. 3-9 Remove the HEPA filter (B) and brush with slot (D). Press dirt cup firmly until you wish to open dirt cup door...
... combination tool to clean or tap side of the filter cover to remove. Close and snap dirt cup door shut. 3-7 B 3-6 A Place bottom of dirt cup to clean this type of suction. Dirt cup filter assembly How to empty Disconnect cleaner from dirt cup. Empty dirt cup. Dirt and debris can then be removed and cleaned. Do not use the cleaner without dirt cup or filters in place. 3-9 Remove the HEPA filter (B) and brush with slot (D). Press dirt cup firmly until you wish to open dirt cup door...

Manual
Page 8
..., Hoover part No. 27313107. 3-14 Replace the filter assembly in Fig. 3-5. 3-15 Belt replacement The belt on your cleaner. The belt is located under the bottom plate of trash container to inside cartridge. Lift off lens. 3-16 A How to replace Disconnect cleaner from electrical outlet. Installing bulb Pull old bulb straight out of the cleaner. To check belt, remove bottom plate as shown with the screws. 3-17 C B Removing belt Remove agitator brush roll (B) and used belt. 8 When purchasing a new belt, ask...
..., Hoover part No. 27313107. 3-14 Replace the filter assembly in Fig. 3-5. 3-15 Belt replacement The belt on your cleaner. The belt is located under the bottom plate of trash container to inside cartridge. Lift off lens. 3-16 A How to replace Disconnect cleaner from electrical outlet. Installing bulb Pull old bulb straight out of the cleaner. To check belt, remove bottom plate as shown with the screws. 3-17 C B Removing belt Remove agitator brush roll (B) and used belt. 8 When purchasing a new belt, ask...

Manual
Page 9
... belt into your cleaner may continue. To check condition of the motor. Remove bottom plate, belt and agitator following the directions in belt guide (E) on agitator. To maintain cleaning effectiveness, replace agitator if brushes do not add lubricant to reposition belt, new agitator and bottom plate. The addition of its belt guide (G). Turn the cleaner OFF and disconnect it from electrical outlet. 3-22 What to buy When purchasing a new agitator, ask for dirt accumulation. 3. Check filters for HOOVER part No. 48414113. If the thermal protector...
... belt into your cleaner may continue. To check condition of the motor. Remove bottom plate, belt and agitator following the directions in belt guide (E) on agitator. To maintain cleaning effectiveness, replace agitator if brushes do not add lubricant to reposition belt, new agitator and bottom plate. The addition of its belt guide (G). Turn the cleaner OFF and disconnect it from electrical outlet. 3-22 What to buy When purchasing a new agitator, ask for dirt accumulation. 3. Check filters for HOOVER part No. 48414113. If the thermal protector...

Manual
Page 10
... Remove tool from hose. Powered hand tool 3-24 B C Agitator brush roll replacement When agitator brushes are worn, the brush roll should be replaced. 3-27 Replace belt When replacing belt, ask for HOOVER part No. 48414088. 3-23 A How to replace 1. Turn agitator to make sure it so bottom faces up ), slide end plates (D) of tool. Powered hand tool Belt replacement Inspect the belt The powered hand tool belt is designed to ensure that it (see following section). 4. Press turbine retainers (H) into grooves (I 4. The belt can be replaced. Replace with new belt. Insert brush...
... Remove tool from hose. Powered hand tool 3-24 B C Agitator brush roll replacement When agitator brushes are worn, the brush roll should be replaced. 3-27 Replace belt When replacing belt, ask for HOOVER part No. 48414088. 3-23 A How to replace 1. Turn agitator to make sure it so bottom faces up ), slide end plates (D) of tool. Powered hand tool Belt replacement Inspect the belt The powered hand tool belt is designed to ensure that it (see following section). 4. Press turbine retainers (H) into grooves (I 4. The belt can be replaced. Replace with new belt. Insert brush...

Manual
Page 11
...service, this will reset the thermal protector) Problem: Cleaner/tools won't pick up ". Service To obtain approved HOOVER service and genuine HOOVER parts, locate the nearest Hoover Sales and Service Center or Authorized Hoover Warranty Service Dealer (Depot) by: • checking the Yellow Pages under "Cleaner won't pick up Problem: Smoky Possible Cause Possible Solution • Broken or worn belt • Replace belt • Agitator brush roll worn • Replace brush roll • Dirt cup full • Empty dirt cup • Filters dirty • Clean filters • Incorrect carpet...
...service, this will reset the thermal protector) Problem: Cleaner/tools won't pick up ". Service To obtain approved HOOVER service and genuine HOOVER parts, locate the nearest Hoover Sales and Service Center or Authorized Hoover Warranty Service Dealer (Depot) by: • checking the Yellow Pages under "Cleaner won't pick up Problem: Smoky Possible Cause Possible Solution • Broken or worn belt • Replace belt • Agitator brush roll worn • Replace brush roll • Dirt cup full • Empty dirt cup • Filters dirty • Clean filters • Incorrect carpet...

Manual
Page 12
...). Remove agitator shield (see Fig. 3-18) and remove any loose debris which vary from a U. If a blockage occurs during the warranted period. Disconnect powered hand tool from electrical outlet. Remove bottom plate and turbine as follows: 4-2 C 3. Remove any blockage. 4-3 D Checking under it is no cost to you mail your appliance to a blockage in use : 4-4 E F 11. Replace belt, turbine, brush roll, and bottom plate. This warranty provides, at no suction, check for...
...). Remove agitator shield (see Fig. 3-18) and remove any loose debris which vary from a U. If a blockage occurs during the warranted period. Disconnect powered hand tool from electrical outlet. Remove bottom plate and turbine as follows: 4-2 C 3. Remove any blockage. 4-3 D Checking under it is no cost to you mail your appliance to a blockage in use : 4-4 E F 11. Replace belt, turbine, brush roll, and bottom plate. This warranty provides, at no suction, check for...

Manual
Page 21
... COST $ $7.50 $ SHIP TO: Please print your Authorized Hoover Dealer, Leading Retailers, Hoover Sales & Service Centers, on Card Signature (Required Daytime Phone & Area Code ¢ Cost No. ¢ 21 ¢ PARTS & ACCESSORIES MAIL ORDER FORM ® Item Description Primary filter Secondary filter (HEPA) Headlight bulb Agitator belt (belt part no. 38528040) Powered hand tool Combination tool Crevice wand Part No. 59157055 59157014 27313107 40201190 59157029 59157093 59157086 No...
... COST $ $7.50 $ SHIP TO: Please print your Authorized Hoover Dealer, Leading Retailers, Hoover Sales & Service Centers, on Card Signature (Required Daytime Phone & Area Code ¢ Cost No. ¢ 21 ¢ PARTS & ACCESSORIES MAIL ORDER FORM ® Item Description Primary filter Secondary filter (HEPA) Headlight bulb Agitator belt (belt part no. 38528040) Powered hand tool Combination tool Crevice wand Part No. 59157055 59157014 27313107 40201190 59157029 59157093 59157086 No...

Manual
Page 24
1-06 U5507-/09-900 HOOVER y ®son marcas registradas HOOVER and ® are registered trademarks Printed in China 59157088
1-06 U5507-/09-900 HOOVER y ®son marcas registradas HOOVER and ® are registered trademarks Printed in China 59157088


