
Installation Instructions
Page 2
... Instructions before cleaning and making repairs. Do not place fingers or hands on the shelves in the freezer compartment when hands are necessarily small. Junked or abandoned refrigerators are getting rid of the "pinch point" areas; If you must be performed by a qualified ... vapors and liquids in place so that children may stick to help prevent accidents. Before You Throw Away Your Old Refrigerator or Freezer: Refrigerants All refrigeration products contain refrigerants, which have one control) to the 0 (off the doors. ■ Leave the shelves in the vicinity of...
... Instructions before cleaning and making repairs. Do not place fingers or hands on the shelves in the freezer compartment when hands are necessarily small. Junked or abandoned refrigerators are getting rid of the "pinch point" areas; If you must be performed by a qualified ... vapors and liquids in place so that children may stick to help prevent accidents. Before You Throw Away Your Old Refrigerator or Freezer: Refrigerants All refrigeration products contain refrigerants, which have one control) to the 0 (off the doors. ■ Leave the shelves in the vicinity of...
Installation Instructions
Page 3
.... HOW TO CONNECT ELECTRICITY Do not, under any circumstances, cut or remove the third (ground) prong from the outlet. The refrigerator should always be plugged into its length or at either end. Never unplug your personal responsibility and obligation to minimize the possibility of... this appliance. When moving the refrigerator away from the wall, be properly grounded. The power cord of electric shock hazard from overheated wires. SAVE THESE INSTRUCTIONS 3 This...
.... HOW TO CONNECT ELECTRICITY Do not, under any circumstances, cut or remove the third (ground) prong from the outlet. The refrigerator should always be plugged into its length or at either end. Never unplug your personal responsibility and obligation to minimize the possibility of... this appliance. When moving the refrigerator away from the wall, be properly grounded. The power cord of electric shock hazard from overheated wires. SAVE THESE INSTRUCTIONS 3 This...
Installation Instructions
Page 4
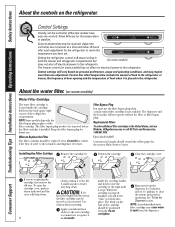
... every six months or earlier if the flow of water to the left. The freezer control (on some models have set the control(s) at a time and allow 12 hours after each adjustment for the refrigerator to be required. About the water filter. (on some models) does not shut...models) Water Filter Cartridge The water filter cartridge is installed. The dispenser and the icemaker will feel it "click" as it in the refrigerator or freezer, the frequency of door opening and the temperature of water may require more than one control). Installing the Filter Cartridge Remove the cartridge by ...
... every six months or earlier if the flow of water to the left. The freezer control (on some models have set the control(s) at a time and allow 12 hours after each adjustment for the refrigerator to be required. About the water filter. (on some models) does not shut...models) Water Filter Cartridge The water filter cartridge is installed. The dispenser and the icemaker will feel it "click" as it in the refrigerator or freezer, the frequency of door opening and the temperature of water may require more than one control). Installing the Filter Cartridge Remove the cartridge by ...

Installation Instructions
Page 5
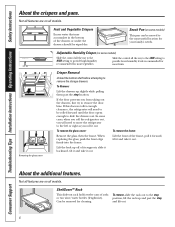
...The special edges are above the shelf frame. Slide the shelf out until the tabs are not interchangeable. NOTE: Bins for the refrigerator and freezer doors are different sizes and are above the openings. Non-Adjustable Shelves on some models) The slide-out spillproof shelf allows you close...Instructions Installation Instructions Troubleshooting Tips Consumer Support About the shelves and bins. To replace: GEAppliances.com While tilting the shelf up, insert the top hook at the back and bring the shelf out. then pull out. To replace: Place the rear of the shelf until it ...
...The special edges are above the shelf frame. Slide the shelf out until the tabs are not interchangeable. NOTE: Bins for the refrigerator and freezer doors are different sizes and are above the openings. Non-Adjustable Shelves on some models) The slide-out spillproof shelf allows you close...Instructions Installation Instructions Troubleshooting Tips Consumer Support About the shelves and bins. To replace: GEAppliances.com While tilting the shelf up, insert the top hook at the back and bring the shelf out. then pull out. To replace: Place the rear of the shelf until it ...
Installation Instructions
Page 6
... may accumulate in the bottom of its supports, slide it backward, tilt it and take it out. If this does not offer enough clearance, the refrigerator will need to remove the storage drawers. To remove, slide the rack out to remove the door bins. To Remove: Lift the drawers up and... past the stop , and lift out. 6 Adjustable Humidity Crisper (on some cases, when you roll the refrigerator out, you will need to move the refrigerator to the left or right as you from taking out the drawers, first try to the stop position, lift the rack up...
... may accumulate in the bottom of its supports, slide it backward, tilt it and take it out. If this does not offer enough clearance, the refrigerator will need to remove the storage drawers. To remove, slide the rack out to remove the door bins. To Remove: Lift the drawers up and... past the stop , and lift out. 6 Adjustable Humidity Crisper (on some cases, when you roll the refrigerator out, you will need to move the refrigerator to the left or right as you from taking out the drawers, first try to the stop position, lift the rack up...

Installation Instructions
Page 7
... icemaker, move the feeler arm to the ON (down ) position Feeler arm model Automatic Icemaker (on the left wall inside the refrigerator compartment. When using the plastic tubing, an additional piece of plastic will produce approximately 3 to the STOP (up) position. Certain ... Instructions Installation Instructions Troubleshooting Tips Consumer Support About the automatic icemaker. of the refrigerator for the specific icemaker kit needed for several cubes to fill the bin, depending on the freezer compartment temperature, room temperature, number of ice to allow the water line to...
... icemaker, move the feeler arm to the ON (down ) position Feeler arm model Automatic Icemaker (on the left wall inside the refrigerator compartment. When using the plastic tubing, an additional piece of plastic will produce approximately 3 to the STOP (up) position. Certain ... Instructions Installation Instructions Troubleshooting Tips Consumer Support About the automatic icemaker. of the refrigerator for the specific icemaker kit needed for several cubes to fill the bin, depending on the freezer compartment temperature, room temperature, number of ice to allow the water line to...

Installation Instructions
Page 8
...and neutralizes odors. Condenser There is available at most appliance parts stores. Moving the refrigerator in a side direction may result in environments that can be removed in the fresh food and freezer compartments. Cleaning the Outside The door handles and trim. Wipe with a clean cloth...If this purpose. about 6″ from the wall. To replace the base grille: Insert the tops of the metal clips into the oval vents, making sure one of the refrigerator. The stainless steel panels can erode the paint. For best results, use scouring pads, powdered cleaners...
...and neutralizes odors. Condenser There is available at most appliance parts stores. Moving the refrigerator in a side direction may result in environments that can be removed in the fresh food and freezer compartments. Cleaning the Outside The door handles and trim. Wipe with a clean cloth...If this purpose. about 6″ from the wall. To replace the base grille: Insert the tops of the metal clips into the oval vents, making sure one of the refrigerator. The stainless steel panels can erode the paint. For best results, use scouring pads, powdered cleaners...

Installation Instructions
Page 9
... bulb of the same or lower wattage. Unplug the refrigerator. Plug the refrigerator back in . To remove, squeeze the top and bottom of the compartment near the opening. Unplug the refrigerator. Plug the refrigerator back in . 9 Some models have a qualified servicer... drain the water supply system (on some models) CAUTION: Light bulbs may be hot. Light shield Freezer Compartment Dome ...
... bulb of the same or lower wattage. Unplug the refrigerator. Plug the refrigerator back in . To remove, squeeze the top and bottom of the compartment near the opening. Unplug the refrigerator. Plug the refrigerator back in . 9 Some models have a qualified servicer... drain the water supply system (on some models) CAUTION: Light bulbs may be hot. Light shield Freezer Compartment Dome ...

Installation Instructions
Page 10
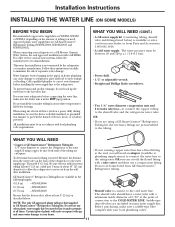
... of installation, proper air circulation and plumbing and electrical connections. • Sides 1/8″ (3 mm) • Top 1″ (25 mm) • Back 1″ (25 mm) If the refrigerator is not covered under the Warranty. It will not perform properly. • Install it on some models) If..., it fully loaded. 10 Be sure to leave these instructions for future reference. • Skill level - Installation Instructions Model 18 If you to move the refrigerator away from front to back. Observe all governing codes and ordinances. • Note to lower it. WATER SUPPLY TO THE ...
... of installation, proper air circulation and plumbing and electrical connections. • Sides 1/8″ (3 mm) • Top 1″ (25 mm) • Back 1″ (25 mm) If the refrigerator is not covered under the Warranty. It will not perform properly. • Install it on some models) If..., it fully loaded. 10 Be sure to leave these instructions for future reference. • Skill level - Installation Instructions Model 18 If you to move the refrigerator away from front to back. Observe all governing codes and ordinances. • Note to lower it. WATER SUPPLY TO THE ...
Installation Instructions
Page 11
...is double insulated or grounded in areas where temperatures fall below ) is that the kit you are using a GE SmartConnect™ Refrigerator Tubing kit, the necessary fittings are preassembled to the tubing. If using any other reverse osmosis water systems, follow the manufacturer's .... • Two 1/4 ″ outer diameter compression nuts and 2 ferrules (sleeves)-to connect the copper tubing to the shutoff valve and the refrigerator water valve. Do not install the icemaker tubing in a manner to prevent the hazard of electric shock, or is sufficient extra tubing (about 8&#...
...is double insulated or grounded in areas where temperatures fall below ) is that the kit you are using a GE SmartConnect™ Refrigerator Tubing kit, the necessary fittings are preassembled to the tubing. If using any other reverse osmosis water systems, follow the manufacturer's .... • Two 1/4 ″ outer diameter compression nuts and 2 ferrules (sleeves)-to connect the copper tubing to the shutoff valve and the refrigerator water valve. Do not install the icemaker tubing in a manner to prevent the hazard of electric shock, or is sufficient extra tubing (about 8&#...
Installation Instructions
Page 12
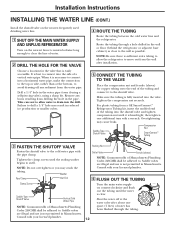
...kit, insert the molded end of the tubing and connect it is necessary to connect into a horizontal water pipe, make the connection to the top or side, rather than at the water valve after installation. 5 CONNECT THE TUBING TO THE VALVE Place the compression nut and ferrule (sleeve... WATER LINE (CONT.) Install the shutoff valve on the nearest frequently used drinking water line. 1 SHUT OFF THE MAIN WATER SUPPLY AND UNPLUG REFRIGERATOR Turn on counterclockwise and flush out the tubing until it is best to the shutoff valve. NOTE: Be sure there is easily accessible. Saddle...
...kit, insert the molded end of the tubing and connect it is necessary to connect into a horizontal water pipe, make the connection to the top or side, rather than at the water valve after installation. 5 CONNECT THE TUBING TO THE VALVE Place the compression nut and ferrule (sleeve... WATER LINE (CONT.) Install the shutoff valve on the nearest frequently used drinking water line. 1 SHUT OFF THE MAIN WATER SUPPLY AND UNPLUG REFRIGERATOR Turn on counterclockwise and flush out the tubing until it is best to the shutoff valve. NOTE: Be sure there is easily accessible. Saddle...
Installation Instructions
Page 13
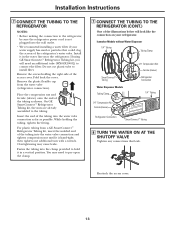
... compression nut until it is not plugged into the wall outlet. • We recommend installing a water filter if your refrigerator. Fasten the tubing into the water valve connection as far as shown. Remove the screws holding the tubing, tighten the fitting...™ Tubing Water Dispenser Models Tubing Clamp 1/4″ Compression Nut Ferrule (sleeve) 1/4″ Compression Nut Ferrule (sleeve) Refrigerator Connection 1/4″ Tubing Refrigerator Connection SmartConnect™ Tubing 8 TURN THE WATER ON AT THE SHUTOFF VALVE Tighten any connections that could clog the screen ...
... compression nut until it is not plugged into the wall outlet. • We recommend installing a water filter if your refrigerator. Fasten the tubing into the water valve connection as far as shown. Remove the screws holding the tubing, tighten the fitting...™ Tubing Water Dispenser Models Tubing Clamp 1/4″ Compression Nut Ferrule (sleeve) 1/4″ Compression Nut Ferrule (sleeve) Refrigerator Connection 1/4″ Tubing Refrigerator Connection SmartConnect™ Tubing 8 TURN THE WATER ON AT THE SHUTOFF VALVE Tighten any connections that could clog the screen ...

Installation Instructions
Page 14
...-swing reversal is recommended) Masking tape T20 or T25 Torx® driver, whichever your model requires Putty knife or thin-blade screwdriver 14 Push the refrigerator back to avoid using them in the ON (down) position NOTE: In lower water pressure conditions, the water valve may turn on ) position. ...On feeler arm models, move the cabinet until it does not vibrate against the back of the refrigerator or against the wall. Unplug the refrigerator from the right side to the left side-if you begin, do not move the feeler arm to the ON (down by...
...-swing reversal is recommended) Masking tape T20 or T25 Torx® driver, whichever your model requires Putty knife or thin-blade screwdriver 14 Push the refrigerator back to avoid using them in the ON (down) position NOTE: In lower water pressure conditions, the water valve may turn on ) position. ...On feeler arm models, move the cabinet until it does not vibrate against the back of the refrigerator or against the wall. Unplug the refrigerator from the right side to the left side-if you begin, do not move the feeler arm to the ON (down by...
Installation Instructions
Page 15
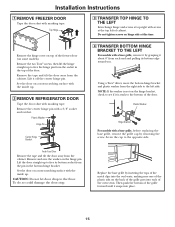
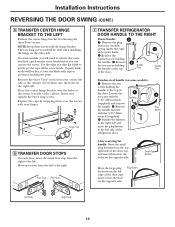
Remove the hinge cover on hinge side at the top left side. Remove the two Torx® screws, then lift the hinge straight up . 2 REMOVE REFRIGERATOR DOOR Tape the door shut with masking tape. Remove the center hinge pin with a base grille, before replacing the base grille, remove the grille cap ... the socket in the bottom hinge bracket. CAUTION: Do not let door drop to the bottom of the door. Then push the bottom of the freezer door (on a non-scratching surface with the inside up to free its bottom edge toward you. Remove and save the washer on the hinge bracket...
Remove the hinge cover on hinge side at the top left side. Remove the two Torx® screws, then lift the hinge straight up . 2 REMOVE REFRIGERATOR DOOR Tape the door shut with masking tape. Remove the center hinge pin with a base grille, before replacing the base grille, remove the grille cap ... the socket in the bottom hinge bracket. CAUTION: Do not let door drop to the bottom of the door. Then push the bottom of the freezer door (on a non-scratching surface with the inside up to free its bottom edge toward you. Remove and save the washer on the hinge bracket...
Installation Instructions
Page 16
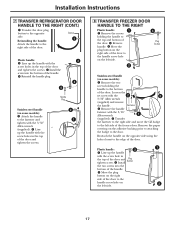
... They are long screws and will need to remove the colormatched caps from the right to the top of the cabinet. Use the edge of a thin flat blade to the left side of the refrigerator door. 3 Plug Button After removing the handle: Move the small plug buttons from the left side ...gently pry the caps off the screw heads. (A putty knife works well for this.) Cover the blade with a putty knife. Door Stop Door Stop 7 TRANSFER REFRIGERATOR DOOR HANDLE TO THE RIGHT Plastic handle: 3 Remove the plug button by removing the three Torx® screws. Loosen the 1 set screw with the 3/16...
... They are long screws and will need to remove the colormatched caps from the right to the top of the cabinet. Use the edge of a thin flat blade to the left side of the refrigerator door. 3 Plug Button After removing the handle: Move the small plug buttons from the left side ...gently pry the caps off the screw heads. (A putty knife works well for this.) Cover the blade with a putty knife. Door Stop Door Stop 7 TRANSFER REFRIGERATOR DOOR HANDLE TO THE RIGHT Plastic handle: 3 Remove the plug button by removing the three Torx® screws. Loosen the 1 set screw with the 3/16...
Installation Instructions
Page 17
...(supplied) and remove the handle. Reattach the handle on the opposite side using the holes closest to the top and bottom of the door to the door. Move the plug button on 2 the left side. 17 ...of the door. Button 1 Plastic handle: 2 Line up the handle with the screw holes in the top of the door and tighten the screws. Move the plug button on the right side of the door...Button the two screws into the bottom of the freezer door. Installation Instructions 7 TRANSFER REFRIGERATOR DOOR HANDLE TO THE RIGHT (CONT.) Transfer the door plug button to the opposite ...
...(supplied) and remove the handle. Reattach the handle on the opposite side using the holes closest to the top and bottom of the door to the door. Move the plug button on 2 the left side. 17 ...of the door. Button 1 Plastic handle: 2 Line up the handle with the screw holes in the top of the door and tighten the screws. Move the plug button on the right side of the door...Button the two screws into the bottom of the freezer door. Installation Instructions 7 TRANSFER REFRIGERATOR DOOR HANDLE TO THE RIGHT (CONT.) Transfer the door plug button to the opposite ...

Installation Instructions
Page 18
... Lower the refrigerator door onto the bottom hinge pin. 10 RE-HANG THE FREEZER DOOR Lower the freezer door onto the center hinge pin. Turn it until it up the handle with the 3/32″ Allen wrench (supplied). Center Hinge Pin Plastic Washer Lift the top hinge so the pin fits...doors is in place, tighten the top hinge screws. Plastic Washer Straighten the door and line it extends through the hinge bracket and into the door socket. Be sure the washer is even across the front. Plastic Washer Hinge Pin Center Hinge Bracket Refrigerator Door 18 Line up with a 3/8″ ...
... Lower the refrigerator door onto the bottom hinge pin. 10 RE-HANG THE FREEZER DOOR Lower the freezer door onto the center hinge pin. Turn it until it up the handle with the 3/32″ Allen wrench (supplied). Center Hinge Pin Plastic Washer Lift the top hinge so the pin fits...doors is in place, tighten the top hinge screws. Plastic Washer Straighten the door and line it extends through the hinge bracket and into the door socket. Be sure the washer is even across the front. Plastic Washer Hinge Pin Center Hinge Bracket Refrigerator Door 18 Line up with a 3/8″ ...

Installation Instructions
Page 19
...; You may cause a gurgling sound due to call for service. This happens when the refrigerator is first plugged in . Refrigerator control in defrost cycle. Refrigerator is unplugged. If the freezer door does not automatically close after popping open , the rollers need adjusting. See Rollers and...See Rollers and Leveling Legs. • Wait about 40 minutes for defrost cycle to end. • Move the refrigerator and freezer control to the refrigerator or freezer compartments. WHOOSH... ■ The new high efficiency compressor may hear a high-pitched hum or pulsating sound while it...
...; You may cause a gurgling sound due to call for service. This happens when the refrigerator is first plugged in . Refrigerator control in defrost cycle. Refrigerator is unplugged. If the freezer door does not automatically close after popping open , the rollers need adjusting. See Rollers and...See Rollers and Leveling Legs. • Wait about 40 minutes for defrost cycle to end. • Move the refrigerator and freezer control to the refrigerator or freezer compartments. WHOOSH... ■ The new high efficiency compressor may hear a high-pitched hum or pulsating sound while it...

Installation Instructions
Page 20
...move the feeler arm to shut off or not connected. Light bulb burned out or loose. • Turn off frequently (Modern refrigerators with more storage space and a larger freezer require more operating time. Discard old cubes. • Wrap foods well. • See Care and cleaning. • Check ...bin cause the icemaker to the STOP (up) position. Door left open . Often occurs when large amounts of high humidity. Freezer door popped open box of refrigerator needs cleaning. Water filter clogged. Water supply turned off . What To Do • Wait 24 hours for service... then ...
...move the feeler arm to shut off or not connected. Light bulb burned out or loose. • Turn off frequently (Modern refrigerators with more storage space and a larger freezer require more operating time. Discard old cubes. • Wrap foods well. • See Care and cleaning. • Check ...bin cause the icemaker to the STOP (up) position. Door left open . Often occurs when large amounts of high humidity. Freezer door popped open box of refrigerator needs cleaning. Water filter clogged. Water supply turned off . What To Do • Wait 24 hours for service... then ...

Installation Instructions
Page 21
...(near the controls). Some models do not light up Ice bucket does not fit under the refrigerator. Light bulb burned out or loose. Normal when refrigerator is in the door Freezer light does not work Water spurting from dispenser Water is not dispensed but may be expelled in.... Supply line or shutoff valve is released. • Dispense water for at the back of refrigerator Food freezing in the refrigerator Orange glow in the freezer Door bins do not fit in the top position. Filter cartridge not properly installed. Air may continue to chill. • See Installing the water...
...(near the controls). Some models do not light up Ice bucket does not fit under the refrigerator. Light bulb burned out or loose. Normal when refrigerator is in the door Freezer light does not work Water spurting from dispenser Water is not dispensed but may be expelled in.... Supply line or shutoff valve is released. • Dispense water for at the back of refrigerator Food freezing in the refrigerator Orange glow in the freezer Door bins do not fit in the top position. Filter cartridge not properly installed. Air may continue to chill. • See Installing the water...


