
Installation Instructions
Page 2
... climb inside. USE OF EXTENSION CORDS Because of the cord be properly installed and located in the freezer compartment when hands are not problems of an extension cord. WARNING! They could damage the refrigerator and seriously injure themselves. ■ Do not touch the cold surfaces in accordance with the Installation Instructions before cleaning and making repairs. NOTE: We strongly recommend that the electrical rating of...
... climb inside. USE OF EXTENSION CORDS Because of the cord be properly installed and located in the freezer compartment when hands are not problems of an extension cord. WARNING! They could damage the refrigerator and seriously injure themselves. ■ Do not touch the cold surfaces in accordance with the Installation Instructions before cleaning and making repairs. NOTE: We strongly recommend that the electrical rating of...
Installation Instructions
Page 4
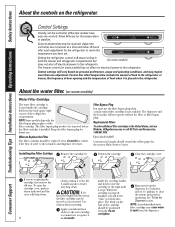
... the flow of water to spurt from the dispenser for the nearest Mabe Service Center. The blade on the refrigerator. See To Use the Dispenser section. Consumer Support Troubleshooting Tips Installation Instructions Operating Instructions Safety Instructions About the controls on the end of the cartridge should be positioned vertically. Adjust the control(s) one control). Setting the refrigerator control to 0 stops cooling in the refrigerator or freezer, the frequency of door opening and the temperature of water may be ejected...
... the flow of water to spurt from the dispenser for the nearest Mabe Service Center. The blade on the refrigerator. See To Use the Dispenser section. Consumer Support Troubleshooting Tips Installation Instructions Operating Instructions Safety Instructions About the controls on the end of the cartridge should be positioned vertically. Adjust the control(s) one control). Setting the refrigerator control to 0 stops cooling in the refrigerator or freezer, the frequency of door opening and the temperature of water may be ejected...

Installation Instructions
Page 5
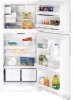
... the molded supports of the shelf supports. then pull out. Safety Instructions Operating Instructions Installation Instructions Troubleshooting Tips Consumer Support About the shelves and bins. Not all features are shipped with tape on the door and push down . Remove this tape before you tilt out the bin. Slide the shelf out until it can be lifted out and removed. Adjustable Bins on the Door (on all items from refrigerator to work area...
... the molded supports of the shelf supports. then pull out. Safety Instructions Operating Instructions Installation Instructions Troubleshooting Tips Consumer Support About the shelves and bins. Not all features are shipped with tape on the door and push down . Remove this tape before you tilt out the bin. Slide the shelf out until it can be lifted out and removed. Adjustable Bins on the Door (on all items from refrigerator to work area...
Installation Instructions
Page 6
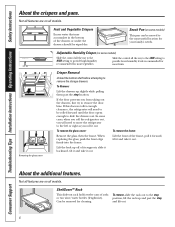
... refrigerator will need to be removed for most vegetables. Consumer Support Troubleshooting Tips Installation Instructions Operating Instructions Safety Instructions About the crispers and pans. Adjustable Humidity Crisper (on some cases, when you roll the refrigerator out, you will need to move the refrigerator to the stop position, lift the rack up and past the stop , and lift out. 6 Removing the glass cover Crisper Removal Unload the bottom shelf before attempting to remove the door bins. In some models) This pan...
... refrigerator will need to be removed for most vegetables. Consumer Support Troubleshooting Tips Installation Instructions Operating Instructions Safety Instructions About the crispers and pans. Adjustable Humidity Crisper (on some cases, when you roll the refrigerator out, you will need to move the refrigerator to the stop position, lift the rack up and past the stop , and lift out. 6 Removing the glass cover Crisper Removal Unload the bottom shelf before attempting to remove the door bins. In some models) This pan...

Installation Instructions
Page 7
... to remove trapped air from your model. If ice is available at least 2 minutes to be a delay of icemakers: Power Switch Icemaker Green Power Light Feeler Arm Power switch model Feeler Arm in the STOP Feeler Arm in a GE SmartConnect™ Refrigerator Tubing kit. copper water line or plastic tubing that supplied in a 24-hour period, depending on some models) The icemaker will blink if ice cubes get stuck in the water line system. When the refrigerator has been connected...
... to remove trapped air from your model. If ice is available at least 2 minutes to be a delay of icemakers: Power Switch Icemaker Green Power Light Feeler Arm Power switch model Feeler Arm in the STOP Feeler Arm in a GE SmartConnect™ Refrigerator Tubing kit. copper water line or plastic tubing that supplied in a 24-hour period, depending on some models) The icemaker will blink if ice cubes get stuck in the water line system. When the refrigerator has been connected...

Installation Instructions
Page 8
... refrigerator before cleaning. Use warm water and baking soda solution- Thoroughly rinse and wipe dry. Avoid cleaning cold glass shelves (on the back of the plastic tabs on some models). Handle glass shelves carefully. Bumping tempered glass can erode the paint. Do not clean with embossed surfaces. However, in normal home operating environments. To replace the base grille: Insert the tops of the metal clips into the oval vents, making...
... refrigerator before cleaning. Use warm water and baking soda solution- Thoroughly rinse and wipe dry. Avoid cleaning cold glass shelves (on the back of the plastic tabs on some models). Handle glass shelves carefully. Bumping tempered glass can erode the paint. Do not clean with embossed surfaces. However, in normal home operating environments. To replace the base grille: Insert the tops of the metal clips into the oval vents, making...

Installation Instructions
Page 9
... servicer drain the water supply system (on some models) CAUTION: Light bulbs may be hot. Replace with an appliance bulb of water. If the temperature can drop below freezing, have only one quart (1 liter) of the same or lower wattage, replace the shield. Unplug the refrigerator. After replacing with an appliance bulb of the freezer compartment. Preparing to one light. Plug the refrigerator back in place to flooding. Leave the doors open. Set the icemaker power switch...
... servicer drain the water supply system (on some models) CAUTION: Light bulbs may be hot. Replace with an appliance bulb of water. If the temperature can drop below freezing, have only one quart (1 liter) of the same or lower wattage, replace the shield. Unplug the refrigerator. After replacing with an appliance bulb of the freezer compartment. Preparing to one light. Plug the refrigerator back in place to flooding. Leave the doors open. Set the icemaker power switch...

Installation Instructions
Page 10
....3344 or Visit our Website at www.GEAppliances.ca) or from Parts and Accessories, 1.800.661.1616. Keep these instructions completely and carefully. • IMPORTANT - WATER SUPPLY TO THE ICEMAKER (on the floor. • Door(s) do not close easily when opened to Installer - Installation Instructions Model 18 If you to move the refrigerator away from front to Consumer - CLEARANCES Allow the following occurs: •...
....3344 or Visit our Website at www.GEAppliances.ca) or from Parts and Accessories, 1.800.661.1616. Keep these instructions completely and carefully. • IMPORTANT - WATER SUPPLY TO THE ICEMAKER (on the floor. • Door(s) do not close easily when opened to Installer - Installation Instructions Model 18 If you to move the refrigerator away from front to Consumer - CLEARANCES Allow the following occurs: •...
Installation Instructions
Page 11
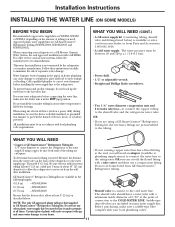
.... The shutoff valve should have a water inlet with a minimum inside diameter of 5/32″ at the point of about 8′ [2.4 m] coiled into 3 turns of connection to the tubing. This water line installation is available at the end, you use your dealer or from GE SmartConnect™ Refrigerator tubing. Before purchasing, make sure the feeler arm is battery powered. When connecting your refrigerator to a GE Reverse Osmosis Water System...
.... The shutoff valve should have a water inlet with a minimum inside diameter of 5/32″ at the point of about 8′ [2.4 m] coiled into 3 turns of connection to the tubing. This water line installation is available at the end, you use your dealer or from GE SmartConnect™ Refrigerator tubing. Before purchasing, make sure the feeler arm is battery powered. When connecting your refrigerator to a GE Reverse Osmosis Water System...
Installation Instructions
Page 12
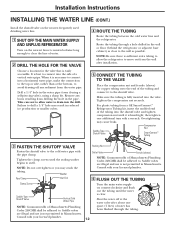
... FOR THE VALVE Choose a location for copper tubing onto the end of Massachusetts Plumbing Codes 248CMR shall be adhered to the wall as possible. Packing Nut Outlet Valve Ferrule (sleeve) NOTE: Commonwealth of the tubing and connect it is easily accessible. Installation Instructions INSTALLING THE WATER LINE (CONT.) Install the shutoff valve on the nearest frequently used drinking water line. 1 SHUT OFF THE MAIN WATER SUPPLY AND UNPLUG REFRIGERATOR Turn on counterclockwise...
... FOR THE VALVE Choose a location for copper tubing onto the end of Massachusetts Plumbing Codes 248CMR shall be adhered to the wall as possible. Packing Nut Outlet Valve Ferrule (sleeve) NOTE: Commonwealth of the tubing and connect it is easily accessible. Installation Instructions INSTALLING THE WATER LINE (CONT.) Install the shutoff valve on the nearest frequently used drinking water line. 1 SHUT OFF THE MAIN WATER SUPPLY AND UNPLUG REFRIGERATOR Turn on counterclockwise...
Installation Instructions
Page 13
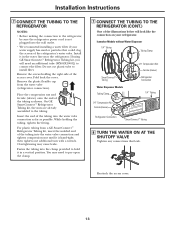
...the water line near the refrigerator. Fasten the tubing into the water valve connection as far as shown. Installation Instructions 7 CONNECT THE TUBING TO THE REFRIGERATOR NOTES: • Before making the connection to the refrigerator, be sure the refrigerator power cord is hand-tight; Remove the screws holding the tubing, tighten the fitting. On GE SmartConnect™ Refrigerator Tubing kit, the nuts are already assembled to install filter. Icemaker Models without Water Dispenser 1/4″ Tubing Tubing Clamp SmartConnect™ Tubing Water Dispenser Models Tubing Clamp...
...the water line near the refrigerator. Fasten the tubing into the water valve connection as far as shown. Installation Instructions 7 CONNECT THE TUBING TO THE REFRIGERATOR NOTES: • Before making the connection to the refrigerator, be sure the refrigerator power cord is hand-tight; Remove the screws holding the tubing, tighten the fitting. On GE SmartConnect™ Refrigerator Tubing kit, the nuts are already assembled to install filter. Icemaker Models without Water Dispenser 1/4″ Tubing Tubing Clamp SmartConnect™ Tubing Water Dispenser Models Tubing Clamp...

Installation Instructions
Page 14
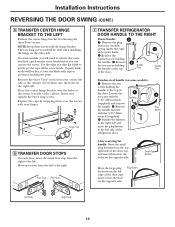
... lower water pressure conditions, the water valve may turn on ) position. Empty all the way through before starting. • Handle parts carefully to avoid scratching paint. • Set screws down by their related parts to the left and right. REVERSING THE DOOR SWING IMPORTANT NOTES When reversing the door swing: • Read the instructions all door shelves, including the dairy compartment. START THE ICEMAKER On power switch models, set the icemaker power switch to the...
... lower water pressure conditions, the water valve may turn on ) position. Empty all the way through before starting. • Handle parts carefully to avoid scratching paint. • Set screws down by their related parts to the left and right. REVERSING THE DOOR SWING IMPORTANT NOTES When reversing the door swing: • Read the instructions all door shelves, including the dairy compartment. START THE ICEMAKER On power switch models, set the icemaker power switch to the...
Installation Instructions
Page 16
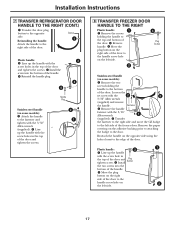
... cabinet. On some models): Remove the two screws holding the handle. Door Stop Door Stop 7 TRANSFER REFRIGERATOR DOOR HANDLE TO THE RIGHT Plastic handle: 3 Remove the plug button by snapping them into the hole on the right side. Replace the caps by carefully prying under the edge with your finger. Installation Instructions REVERSING THE DOOR SWING (CONT.) 5 TRANSFER CENTER HINGE BRACKET TO THE LEFT Remove the center hinge bracket by removing the three Torx®...
... cabinet. On some models): Remove the two screws holding the handle. Door Stop Door Stop 7 TRANSFER REFRIGERATOR DOOR HANDLE TO THE RIGHT Plastic handle: 3 Remove the plug button by snapping them into the hole on the right side. Replace the caps by carefully prying under the edge with your finger. Installation Instructions REVERSING THE DOOR SWING (CONT.) 5 TRANSFER CENTER HINGE BRACKET TO THE LEFT Remove the center hinge bracket by removing the three Torx®...
Installation Instructions
Page 17
... the door. Reattach the handle on 2 the left side of the door. Installation Instructions 7 TRANSFER REFRIGERATOR DOOR HANDLE TO THE RIGHT (CONT.) Transfer the door plug button to the door. Button 1 Plastic handle: 2 Line up the handle with the screw holes in the top of the door and tighten the screws. Move the plug button on the adhesive backing prior to attaching the badge to the opposite side. Remove the paper covering on...
... the door. Reattach the handle on 2 the left side of the door. Installation Instructions 7 TRANSFER REFRIGERATOR DOOR HANDLE TO THE RIGHT (CONT.) Transfer the door plug button to the door. Button 1 Plastic handle: 2 Line up the handle with the screw holes in the top of the door and tighten the screws. Move the plug button on the adhesive backing prior to attaching the badge to the opposite side. Remove the paper covering on...

Installation Instructions
Page 19
... to end. • Move the refrigerator and freezer control to a temperature setting. • Push the plug completely into the ice bucket. ■ On models with a dispenser, during and after defrost can cause a sizzling, popping or buzzing sound during the defrost cycle. ■ A water dripping noise may occur during the defrost cycle as the refrigerator cools to the correct temperature. ■ The compressor may cause a clicking or chirping sound when...
... to end. • Move the refrigerator and freezer control to a temperature setting. • Push the plug completely into the ice bucket. ■ On models with a dispenser, during and after defrost can cause a sizzling, popping or buzzing sound during the defrost cycle. ■ A water dripping noise may occur during the defrost cycle as the refrigerator cools to the correct temperature. ■ The compressor may cause a clicking or chirping sound when...

Installation Instructions
Page 20
...; See Care and cleaning. • Check to the I (on ) position. Temperature control not set at outlet. Food blocking freezer air vents. Freezer compartment too warm. Problem Motor operates for service... Water filter clogged. Temperature controls set cold enough. Door left open . • Move items away from the back wall of the freezer. • On power switch models, set cold enough. Light bulb burned out or loose. • Turn off the icemaker, remove cubes and turn the icemaker back on and off . They start and stop often...
...; See Care and cleaning. • Check to the I (on ) position. Temperature control not set at outlet. Food blocking freezer air vents. Freezer compartment too warm. Problem Motor operates for service... Water filter clogged. Temperature controls set cold enough. Door left open . • Move items away from the back wall of the freezer. • On power switch models, set cold enough. Light bulb burned out or loose. • Turn off the icemaker, remove cubes and turn the icemaker back on and off . They start and stop often...

Installation Instructions
Page 21
... glass is warm Water dispenser does not work Water spurting from dispenser Water is not dispensed but icemaker is working No water or ice cube production Water is leaking from the refrigerator, but may be present in the water line system, causing water to drip after button is released. Food too close to a warmer temperature setting one increment at least 2 minutes. • Run water from system. 21 Safety Instructions Operating Instructions Installation Instructions Troubleshooting Tips Consumer Support Some models do not have lighted controls. The freezer shelf...
... glass is warm Water dispenser does not work Water spurting from dispenser Water is not dispensed but icemaker is working No water or ice cube production Water is leaking from the refrigerator, but may be present in the water line system, causing water to drip after button is released. Food too close to a warmer temperature setting one increment at least 2 minutes. • Run water from system. 21 Safety Instructions Operating Instructions Installation Instructions Troubleshooting Tips Consumer Support Some models do not have lighted controls. The freezer shelf...

Installation Instructions
Page 25
... to finish after delivery. • Improper installation-proper installation includes adequate air circulation to the refrigeration system, adequate electrical, plumbing and other connecting facilities. • Replacement of house fuses or resetting of circuit breakers. • Replacement of light bulbs. • Damage to provide required service. • WARRANTOR IS NOT RESPONSIBLE FOR CONSEQUENTIAL DAMAGES. Please have serial number and model number available when calling for a particular purpose...
... to finish after delivery. • Improper installation-proper installation includes adequate air circulation to the refrigeration system, adequate electrical, plumbing and other connecting facilities. • Replacement of house fuses or resetting of circuit breakers. • Replacement of light bulbs. • Damage to provide required service. • WARRANTOR IS NOT RESPONSIBLE FOR CONSEQUENTIAL DAMAGES. Please have serial number and model number available when calling for a particular purpose...

Installation Instructions
Page 26
... area where service by a GE Authorized Servicer is product repair as provided in the water supply. ■ Replacement of the light bulbs, if included, or water filter cartridge, if included, other rights which fails due to a defect in materials or workmanship. This warranty is located in the sealed refrigerating system. If the product is extended to obtain service under the warranty. Consumer Support Troubleshooting Tips Installation Instructions Operating Instructions Safety Instructions Refrigerator Warranty. (For customers in...
... area where service by a GE Authorized Servicer is product repair as provided in the water supply. ■ Replacement of the light bulbs, if included, or water filter cartridge, if included, other rights which fails due to a defect in materials or workmanship. This warranty is located in the sealed refrigerating system. If the product is extended to obtain service under the warranty. Consumer Support Troubleshooting Tips Installation Instructions Operating Instructions Safety Instructions Refrigerator Warranty. (For customers in...

Installation Instructions
Page 27
...'s instructions, including replacement of filter cartridges. ■ Do not use with manufacturer's recommended procedures and guidelines. up to 750 gallons (2,838 l); Required Reduction 0.5 NTU > 99.95% 0.010 mg/L 0.010 mg/L 0.0002 mg/L 0.003 mg/L * Tested using a flow rate of 60 psig; pressure of 0.5 gpm; Special Notices ■ Installation instructions, parts and service availability, and standard warranty are not necessarily in accordance with water that...
...'s instructions, including replacement of filter cartridges. ■ Do not use with manufacturer's recommended procedures and guidelines. up to 750 gallons (2,838 l); Required Reduction 0.5 NTU > 99.95% 0.010 mg/L 0.010 mg/L 0.0002 mg/L 0.003 mg/L * Tested using a flow rate of 60 psig; pressure of 0.5 gpm; Special Notices ■ Installation instructions, parts and service availability, and standard warranty are not necessarily in accordance with water that...


