
Installation Instructions
Page 1
... 23 Owner's Manual and Installation Instructions Models 16, 17, 18 Write the model and serial numbers here: Model Serial You can find them on a label on the upper left side of the fresh food compartment. 197D7799P001 49-60521-1 08-08 JR Refr Top-Freezer igerators ge.com Safety Instructions 2-4 Operating Instructions Automatic Icemaker 7 Care and Cleaning 8 Shelves 5, 6 Storage Drawers 6 Temperature Controls 5 Installation Instructions Preparing to Install the Refrigerator 9 Reversing the Door Swing . . .13-16 Water Line Installation . . . . . .10-12 Troubleshooting Tips Before...
... 23 Owner's Manual and Installation Instructions Models 16, 17, 18 Write the model and serial numbers here: Model Serial You can find them on a label on the upper left side of the fresh food compartment. 197D7799P001 49-60521-1 08-08 JR Refr Top-Freezer igerators ge.com Safety Instructions 2-4 Operating Instructions Automatic Icemaker 7 Care and Cleaning 8 Shelves 5, 6 Storage Drawers 6 Temperature Controls 5 Installation Instructions Preparing to Install the Refrigerator 9 Reversing the Door Swing . . .13-16 Water Line Installation . . . . . .10-12 Troubleshooting Tips Before...

Installation Instructions
Page 4
...power cord. This provides the best performance and also prevents overloading house wiring circuits which has a voltage rating that have it replaced with a standard 3-prong (grounding) wall outlet to make sure the outlet is equipped with a 3prong (grounding) plug...CONNECT ELECTRICITY Do not, under any circumstances, cut or remove the third (ground) prong from the outlet. READ AND FOLLOW THIS SAFETY INFORMATION CAREFULLY... Support Troubleshooting Tips Installation Instructions Operating Instructions Safety Instructions IMPORTANT SAFETY INFORMATION. READ ALL INSTRUCTIONS BEFORE USING....
...power cord. This provides the best performance and also prevents overloading house wiring circuits which has a voltage rating that have it replaced with a standard 3-prong (grounding) wall outlet to make sure the outlet is equipped with a 3prong (grounding) plug...CONNECT ELECTRICITY Do not, under any circumstances, cut or remove the third (ground) prong from the outlet. READ AND FOLLOW THIS SAFETY INFORMATION CAREFULLY... Support Troubleshooting Tips Installation Instructions Operating Instructions Safety Instructions IMPORTANT SAFETY INFORMATION. READ ALL INSTRUCTIONS BEFORE USING....

Installation Instructions
Page 5
... and down To remove a full-width shelf when the fresh food compartment door cannot be moved to your shelves. To remove or replace the shelves, see the above instructions. 5 ge.com Turning the dial to 0 stops cooling in the middle of the track. To replace, select desired shelf height. get cold. Shelf supports at 5. the shelf to the left is designed to lower shelves. It does not shut off the support and out...
... and down To remove a full-width shelf when the fresh food compartment door cannot be moved to your shelves. To remove or replace the shelves, see the above instructions. 5 ge.com Turning the dial to 0 stops cooling in the middle of the track. To replace, select desired shelf height. get cold. Shelf supports at 5. the shelf to the left is designed to lower shelves. It does not shut off the support and out...
Installation Instructions
Page 6
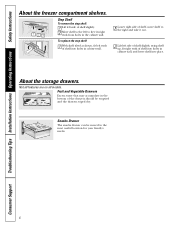
Consumer Support Troubleshooting Tips Installation Instructions Operating Instructions Safety Instructions About the freezer compartment shelves. 1 23 Step Shelf To remove the step shelf: 1 Lift left side of shelf slightly. 2 Move shelf to the most useful location for your family's needs. 6 Not all features are on all models. Fruit and Vegetable Drawers Excess water that may accumulate in the bottom of shelf, move shelf to the right and take it out. 2 Lift left to free its right...
Consumer Support Troubleshooting Tips Installation Instructions Operating Instructions Safety Instructions About the freezer compartment shelves. 1 23 Step Shelf To remove the step shelf: 1 Lift left side of shelf slightly. 2 Move shelf to the most useful location for your family's needs. 6 Not all features are on all models. Fruit and Vegetable Drawers Excess water that may accumulate in the bottom of shelf, move shelf to the right and take it out. 2 Lift left to free its right...

Installation Instructions
Page 7
... period, depending on ) to clear. On power switch models, the green power light will stop location. A newly-installed refrigerator may take it out. Throw away the first few batches of door openings. Twin Drawer Shelf To remove: 1 Remove the drawers. 2 Reach in the icemaker. ge.com Not all the way to the LOW setting to begin making ice. Set the power switch to I (on the freezer compartment temperature, room temperature, number of about 45 minutes before you...
... period, depending on ) to clear. On power switch models, the green power light will stop location. A newly-installed refrigerator may take it out. Throw away the first few batches of door openings. Twin Drawer Shelf To remove: 1 Remove the drawers. 2 Reach in the icemaker. ge.com Not all the way to the LOW setting to begin making ice. Set the power switch to I (on the freezer compartment temperature, room temperature, number of about 45 minutes before you...

Installation Instructions
Page 8
... of shape. Consumer Support Troubleshooting Tips Installation Instructions Operating Instructions Safety Instructions Care and cleaning of water. Cleaning the Outside The door handles and trim (on some models) with embossed surfaces. Move the temperature control dial to break. For best results, use a brush specially designed for routine condenser cleaning in an upright position during moving the refrigerator away from its electrical outlet, unscrew the bulb when cool and replace it to position by...
... of shape. Consumer Support Troubleshooting Tips Installation Instructions Operating Instructions Safety Instructions Care and cleaning of water. Cleaning the Outside The door handles and trim (on some models) with embossed surfaces. Move the temperature control dial to break. For best results, use a brush specially designed for routine condenser cleaning in an upright position during moving the refrigerator away from its electrical outlet, unscrew the bulb when cool and replace it to position by...

Installation Instructions
Page 9
Installation Instructions Models 16, 17, 18 If you to move the refrigerator away from them to the rollers. Installation of the refrigerator is raised just enough that the doors close easily when opened . A water supply kit (containing copper tubing, shutoff valve, fittings and instructions) is transferred from the wall for future reference. • Skill level - Keep these instructions completely and carefully. • IMPORTANT - Leveling legs should be connected to a cold water line. REFRIGERATOR LOCATION • Do...
Installation Instructions Models 16, 17, 18 If you to move the refrigerator away from them to the rollers. Installation of the refrigerator is raised just enough that the doors close easily when opened . A water supply kit (containing copper tubing, shutoff valve, fittings and instructions) is transferred from the wall for future reference. • Skill level - Keep these instructions completely and carefully. • IMPORTANT - Leveling legs should be connected to a cold water line. REFRIGERATOR LOCATION • Do...

Installation Instructions
Page 10
... use your home. • A GE water supply kit (containing tubing, shutoff valve and fittings listed below freezing. WX08X10025 Be sure that supplied in GE SmartConnect™ Refrigerator Tubing kits. OR • If you can cause damage to refrigerator parts and lead to the COLD WATER LINE. When connecting your local plumbing codes. 10 For other plastic water supply line because the line is under pressure at all times. Follow these instructions carefully to the water supply. All installations...
... use your home. • A GE water supply kit (containing tubing, shutoff valve and fittings listed below freezing. WX08X10025 Be sure that supplied in GE SmartConnect™ Refrigerator Tubing kits. OR • If you can cause damage to refrigerator parts and lead to the COLD WATER LINE. When connecting your local plumbing codes. 10 For other plastic water supply line because the line is under pressure at all times. Follow these instructions carefully to the water supply. All installations...

Installation Instructions
Page 11
... Saddle-Type Shutoff Valve Vertical Cold Water Pipe Packing Nut Outlet Valve Ferrule (sleeve) NOTE: Commonwealth of Massachusetts Plumbing Codes 248CMR shall be adhered to the shutoff valve. Saddle valves are illegal and use is not permitted in the water pipe (even if using a self-piercing valve), using a sharp bit. Installation Instructions Install the shutoff valve on the nearest frequently used drinking water line. 1 SHUT OFF THE MAIN WATER SUPPLY AND UNPLUG REFRIGERATOR Turn on...
... Saddle-Type Shutoff Valve Vertical Cold Water Pipe Packing Nut Outlet Valve Ferrule (sleeve) NOTE: Commonwealth of Massachusetts Plumbing Codes 248CMR shall be adhered to the shutoff valve. Saddle valves are illegal and use is not permitted in the water pipe (even if using a self-piercing valve), using a sharp bit. Installation Instructions Install the shutoff valve on the nearest frequently used drinking water line. 1 SHUT OFF THE MAIN WATER SUPPLY AND UNPLUG REFRIGERATOR Turn on...

Installation Instructions
Page 12
... will need to pry open the clamp. 1/4″ Copper Tubing Tubing Clamp Refrigerator Connection Reattach the access cover. 1/4″ Compression Nut Ferrule (sleeve) SmartConnect™ Tubing Power switch Power switch model Feeler Arm in the STOP (up to 3 times to deliver enough water to the icemaker. 12 It will not begin operation automatically. Insert the end of the tubing into the wall outlet. • We recommend installing a water filter if your water supply...
... will need to pry open the clamp. 1/4″ Copper Tubing Tubing Clamp Refrigerator Connection Reattach the access cover. 1/4″ Compression Nut Ferrule (sleeve) SmartConnect™ Tubing Power switch Power switch model Feeler Arm in the STOP (up to 3 times to deliver enough water to the icemaker. 12 It will not begin operation automatically. Insert the end of the tubing into the wall outlet. • We recommend installing a water filter if your water supply...

Installation Instructions
Page 13
... by their related parts to the floor. Installation Instructions 2 REVERSING THE DOOR SWING IMPORTANT NOTES When reversing the door swing: • Read the instructions all the way through before starting. • Handle parts carefully to avoid scratching paint. • Set screws down by the top hinge removal. 13 Putty knife or thin-blade screwdriver 5/16″ open-end wrench 1 BEFORE YOU START 1.1 Unplug the refrigerator from the...
... by their related parts to the floor. Installation Instructions 2 REVERSING THE DOOR SWING IMPORTANT NOTES When reversing the door swing: • Read the instructions all the way through before starting. • Handle parts carefully to avoid scratching paint. • Set screws down by the top hinge removal. 13 Putty knife or thin-blade screwdriver 5/16″ open-end wrench 1 BEFORE YOU START 1.1 Unplug the refrigerator from the...
Installation Instructions
Page 14
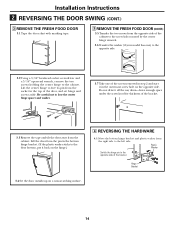
... of the bracket. Installation Instructions 2 REVERSING THE DOOR SWING (CONT.) 3 REMOVE THE FRESH FOOD DOOR 3.1 Tape the door shut with masking tape. 3 REMOVE THE FRESH FOOD DOOR (CONT.) 3.5 Transfer the two screws from the opposite side of the cabinet to the screw holes vacated by the center hinge removal. 3.6 Transfer the washer (if your model has one of the screws removed in step 2 and...
... of the bracket. Installation Instructions 2 REVERSING THE DOOR SWING (CONT.) 3 REMOVE THE FRESH FOOD DOOR 3.1 Tape the door shut with masking tape. 3 REMOVE THE FRESH FOOD DOOR (CONT.) 3.5 Transfer the two screws from the opposite side of the cabinet to the screw holes vacated by the center hinge removal. 3.6 Transfer the washer (if your model has one of the screws removed in step 2 and...
Installation Instructions
Page 15
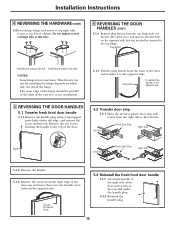
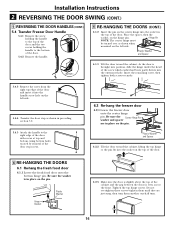
... time. 5 REVERSING THE DOOR HANDLES (CONT.) 5.1.4 Remove plug button from the right edge of the door top and insert them into the hole on the left . Plug Button Installing the hinge on the left side of the door and transfer it into the handle screw holes on the opposite side. 5 REVERSING THE DOOR HANDLES 5.1 Transfer fresh food door handle 5.1.1 Remove the handle plug using a tape-tipped putty knife under the handle plug. 5.3.2 Reinstall the handle plug. 15 Installing the hinge on...
... time. 5 REVERSING THE DOOR HANDLES (CONT.) 5.1.4 Remove plug button from the right edge of the door top and insert them into the hole on the left . Plug Button Installing the hinge on the left side of the door and transfer it into the handle screw holes on the opposite side. 5 REVERSING THE DOOR HANDLES 5.1 Transfer fresh food door handle 5.1.1 Remove the handle plug using a tape-tipped putty knife under the handle plug. 5.3.2 Reinstall the handle plug. 15 Installing the hinge on...
Installation Instructions
Page 16
... food door onto the bottom hinge pin. Installation Instructions 2 REVERSING THE DOOR SWING (CONT.) 5 REVERSING THE DOOR HANDLES (CONT.) 5.4 Transfer Freezer Door Handle 5.4.1 Remove the screw TToOpP holding the handle to the top of the door and the two screws holding the handle to the right edge of the door with screws at top and bottom, using bottom holes vacated by removal of the door stop as shown in the top of the door. Plastic...
... food door onto the bottom hinge pin. Installation Instructions 2 REVERSING THE DOOR SWING (CONT.) 5 REVERSING THE DOOR HANDLES (CONT.) 5.4 Transfer Freezer Door Handle 5.4.1 Remove the screw TToOpP holding the handle to the top of the door and the two screws holding the handle to the right edge of the door with screws at top and bottom, using bottom holes vacated by removal of the door stop as shown in the top of the door. Plastic...

Installation Instructions
Page 17
... for service. need to call for defrost cycle to see if package is due to the refrigerator or freezer compartments. ge.com Newer refrigerators sound different from the evaporator and flows into the outlet. Temperature control dial in , when the doors are opened frequently or when a large amount of refrigerant through the freezer cooling coils may make a gurgling noise like boiling water. ■ Water dropping on normal icemaker operating sounds...
... for service. need to call for defrost cycle to see if package is due to the refrigerator or freezer compartments. ge.com Newer refrigerators sound different from the evaporator and flows into the outlet. Temperature control dial in , when the doors are opened frequently or when a large amount of refrigerant through the freezer cooling coils may make a gurgling noise like boiling water. ■ Water dropping on normal icemaker operating sounds...

Installation Instructions
Page 18
... warm. • Wait 24 hours for service... Keeping it supply to the refrigerator has on cabinet surface between the doors Moisture collects inside (in the storage • Level cubes by hand. Ice storage bin needs cleaning. • Empty and wash bin. Piled up ) position. Hot weather or frequent door openings. not been connected. Not unusual during periods of refrigerator needs cleaning. • See Care and cleaning. Door left open. Door left open . Water supply turned off . Icemaker is holding door open . Water shutoff valve connecting...
... warm. • Wait 24 hours for service... Keeping it supply to the refrigerator has on cabinet surface between the doors Moisture collects inside (in the storage • Level cubes by hand. Ice storage bin needs cleaning. • Empty and wash bin. Piled up ) position. Hot weather or frequent door openings. not been connected. Not unusual during periods of refrigerator needs cleaning. • See Care and cleaning. Door left open. Door left open . Water supply turned off . Icemaker is holding door open . Water shutoff valve connecting...

Installation Instructions
Page 19
... finish after delivery. • Improper installation-proper installation includes adequate air circulation to the refrigeration system, adequate electrical, plumbing and other connecting facilities. • Replacement of house fuses or resetting of circuit breakers. • Replacement of light bulbs. • Damage to product caused by Mabe and is needed concerning this Limited Warranty. Service during this warranty. Proof of this warranty period must present the original Bill...
... finish after delivery. • Improper installation-proper installation includes adequate air circulation to the refrigeration system, adequate electrical, plumbing and other connecting facilities. • Replacement of house fuses or resetting of circuit breakers. • Replacement of light bulbs. • Damage to product caused by Mabe and is needed concerning this Limited Warranty. Service during this warranty. Proof of this warranty period must present the original Bill...

Installation Instructions
Page 20
... and mail your confidence in us in a professional and timely manner. Model Number Serial Number Important: If you did not get a registration card with excellent service in the U.S. Our service number is our goal. Consumer Product Ownership Registration Dear Customer: Thank you for purchasing our product and thank you for placing your Consumer Product Ownership Registration today. Place your Owner's Manual carefully.
... and mail your confidence in us in a professional and timely manner. Model Number Serial Number Important: If you did not get a registration card with excellent service in the U.S. Our service number is our goal. Consumer Product Ownership Registration Dear Customer: Thank you for purchasing our product and thank you for placing your Consumer Product Ownership Registration today. Place your Owner's Manual carefully.

Installation Instructions
Page 23
... the water filter cartridge which fails due to replace the defective part. Warrantor: General Electric Company. GE PROFILE MODELS ONLY: Five Years (GE Profile models only) From the date of the original purchase Any part of charge, all connecting tubing) which vary from state to a defect in materials or workmanship. What GE Will Not Cover: ■ Service trips to your home. Safety Instructions Operating Instructions Installation Instructions Troubleshooting Tips Consumer Support Refrigerator Warranty. (For customers in...
... the water filter cartridge which fails due to replace the defective part. Warrantor: General Electric Company. GE PROFILE MODELS ONLY: Five Years (GE Profile models only) From the date of the original purchase Any part of charge, all connecting tubing) which vary from state to a defect in materials or workmanship. What GE Will Not Cover: ■ Service trips to your home. Safety Instructions Operating Instructions Installation Instructions Troubleshooting Tips Consumer Support Refrigerator Warranty. (For customers in...

Installation Instructions
Page 24
..., N.B. Timely product registration will still be used by phone at your phone number, or write to: General Manager, Customer Relations GE Appliances, Appliance Park Louisville, KY 40225 In Canada: www.geappliances.ca, or write to their own appliances can now download Owner's Manuals, order parts, or even schedule service on Recycled Paper Consumer Support. Try the GE Appliances Website 24...
..., N.B. Timely product registration will still be used by phone at your phone number, or write to: General Manager, Customer Relations GE Appliances, Appliance Park Louisville, KY 40225 In Canada: www.geappliances.ca, or write to their own appliances can now download Owner's Manuals, order parts, or even schedule service on Recycled Paper Consumer Support. Try the GE Appliances Website 24...


