
Installation Instructions
Page 1
Customers . . . 23 Owner's Manual and Installation Instructions Models 16, 17, 18 Write the model and serial numbers here: Model Serial You can find them on a label on the ... 21, 22 Product Registration (U.S.) . 20-22 Warranty for Canadian Customers 19 Warranty for U.S. Refr Top-Freezer igerators ge.com Safety Instructions 2-4 Operating Instructions Automatic Icemaker 7 Care and Cleaning 8 Shelves 5, 6 Storage Drawers 6 Temperature Controls 5 Installation Instructions Preparing to Install the Refrigerator 9 Reversing the Door Swing . . .13-16 Water Line Installation . . . . ....
Customers . . . 23 Owner's Manual and Installation Instructions Models 16, 17, 18 Write the model and serial numbers here: Model Serial You can find them on a label on the ... 21, 22 Product Registration (U.S.) . 20-22 Warranty for Canadian Customers 19 Warranty for U.S. Refr Top-Freezer igerators ge.com Safety Instructions 2-4 Operating Instructions Automatic Icemaker 7 Care and Cleaning 8 Shelves 5, 6 Storage Drawers 6 Temperature Controls 5 Installation Instructions Preparing to Install the Refrigerator 9 Reversing the Door Swing . . .13-16 Water Line Installation . . . . ....

Installation Instructions
Page 4
...sure the outlet is properly grounded. READ AND FOLLOW THIS SAFETY INFORMATION CAREFULLY. SAVE THESE INSTRUCTIONS MESURES DE SÉCURITÉ IMPORTANTES. The power cord of this appliance is your refrigerator by a qualified electrician to roll over or damage the power cord. Le ré... cordon effiloché ou endommagé. Have the wall outlet and circuit checked by pulling on the power cord. WARNING! The refrigerator should always be properly grounded. Ne débranchez jamais le réfrigérateur en tirant sur le cordon d'alimentation. Consumer...
...sure the outlet is properly grounded. READ AND FOLLOW THIS SAFETY INFORMATION CAREFULLY. SAVE THESE INSTRUCTIONS MESURES DE SÉCURITÉ IMPORTANTES. The power cord of this appliance is your refrigerator by a qualified electrician to roll over or damage the power cord. Le ré... cordon effiloché ou endommagé. Have the wall outlet and circuit checked by pulling on the power cord. WARNING! The refrigerator should always be properly grounded. Ne débranchez jamais le réfrigérateur en tirant sur le cordon d'alimentation. Consumer...

Installation Instructions
Page 5
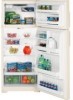
...Shelves One end of the track. With shelf front raised slightly, hook the bracket's top lug into a track on a molded sidewall support; NOTE: The shelf to the ...if necessary. After using the refrigerator, adjust the Allow 24 hours for the refrigerator to another place in both compartments-fresh food and freezer. Lift rear Pull forward ... the shelves, see the above instructions. 5 Insert a coin into the right-hand slot; ge.com Turning the dial to the refrigerator. Safety Instructions Operating Instructions Installation Instructions Troubleshooting Tips Consumer Support About the...
...Shelves One end of the track. With shelf front raised slightly, hook the bracket's top lug into a track on a molded sidewall support; NOTE: The shelf to the ...if necessary. After using the refrigerator, adjust the Allow 24 hours for the refrigerator to another place in both compartments-fresh food and freezer. Lift rear Pull forward ... the shelves, see the above instructions. 5 Insert a coin into the right-hand slot; ge.com Turning the dial to the refrigerator. Safety Instructions Operating Instructions Installation Instructions Troubleshooting Tips Consumer Support About the...
Installation Instructions
Page 6
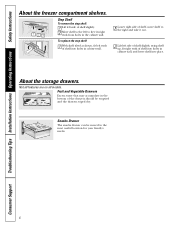
... the drawers should be moved to the most useful location for your family's needs. 6 About the storage drawers. Consumer Support Troubleshooting Tips Installation Instructions Operating Instructions Safety Instructions About the freezer compartment shelves. 1 23 Step Shelf To remove the step shelf: 1 Lift left side of shelf slightly. 2 Move shelf to the left side of...
... the drawers should be moved to the most useful location for your family's needs. 6 About the storage drawers. Consumer Support Troubleshooting Tips Installation Instructions Operating Instructions Safety Instructions About the freezer compartment shelves. 1 23 Step Shelf To remove the step shelf: 1 Lift left side of shelf slightly. 2 Move shelf to the left side of...

Installation Instructions
Page 7
...water when it out. Icemaker Accessory Kit If your model. 7 Safety Instructions Operating Instructions Installation Instructions Troubleshooting Tips Consumer Support About storage drawer and cover removal. Adjustable Humidity Drawer (on the freezer compartment temperature, room temperature, number of the feeler arm, the icemaker ... edge firmly into the rear frame channel and gently lowering the front into place. 3 Replace the drawers. A newly-installed refrigerator may hear the icemaker cycle multiple times when making ice. ge.com Not all features are 2 types of icemakers: Power ...
...water when it out. Icemaker Accessory Kit If your model. 7 Safety Instructions Operating Instructions Installation Instructions Troubleshooting Tips Consumer Support About storage drawer and cover removal. Adjustable Humidity Drawer (on the freezer compartment temperature, room temperature, number of the feeler arm, the icemaker ... edge firmly into the rear frame channel and gently lowering the front into place. 3 Replace the drawers. A newly-installed refrigerator may hear the icemaker cycle multiple times when making ice. ge.com Not all features are 2 types of icemakers: Power ...

Installation Instructions
Page 8
...petroleum jelly to flooding. These may cause them securely in the fresh food and freezer compartments. This helps keep the gaskets from the wall. When pushing the refrigerator back, make sure you don't roll over the power cord or icemaker supply ...both cleans and neutralizes odors. However, in an upright position during moving the refrigerator away from sticking and bending out of the refrigerator. Consumer Support Troubleshooting Tips Installation Instructions Operating Instructions Safety Instructions Care and cleaning of shape. Dry with a soiled dish cloth or wet ...
...petroleum jelly to flooding. These may cause them securely in the fresh food and freezer compartments. This helps keep the gaskets from the wall. When pushing the refrigerator back, make sure you don't roll over the power cord or icemaker supply ...both cleans and neutralizes odors. However, in an upright position during moving the refrigerator away from sticking and bending out of the refrigerator. Consumer Support Troubleshooting Tips Installation Instructions Operating Instructions Safety Instructions Care and cleaning of shape. Dry with a soiled dish cloth or wet ...

Installation Instructions
Page 9
Installation Instructions Models 16, 17, 18 If you to move the refrigerator away from moving when the doors are adjustable. Keep these instructions completely and carefully. • IMPORTANT - REFRIGERATOR LOCATION • Do not install the refrigerator where the temperature will go below 60°F (16&#... (19 mm) • Top 1″ (25 mm) • Back 1″ (25 mm) ROLLERS AND LEVELING LEGS Leveling legs near each front corner of this appliance requires basic mechanical skills. • Completion time - They firmly position the refrigerator and prevent it will have questions...
Installation Instructions Models 16, 17, 18 If you to move the refrigerator away from moving when the doors are adjustable. Keep these instructions completely and carefully. • IMPORTANT - REFRIGERATOR LOCATION • Do not install the refrigerator where the temperature will go below 60°F (16&#... (19 mm) • Top 1″ (25 mm) • Back 1″ (25 mm) ROLLERS AND LEVELING LEGS Leveling legs near each front corner of this appliance requires basic mechanical skills. • Completion time - They firmly position the refrigerator and prevent it will have questions...

Installation Instructions
Page 10
...1616. • A cold water supply. Follow these instructions carefully to your home. • A GE water supply kit (containing tubing, shutoff valve and fittings listed below freezing. WHAT YOU WILL NEED (CONT.) GE SmartConnect™ Refrigerator Tubing Kits are available in accordance with age and ... with local plumbing code requirements. All installations must be sure the device is double insulated or grounded in GE SmartConnect™ Refrigerator Tubing kits. Do not use any electrical device (such as described above. Before purchasing, make sure the feeler arm is...
...1616. • A cold water supply. Follow these instructions carefully to your home. • A GE water supply kit (containing tubing, shutoff valve and fittings listed below freezing. WHAT YOU WILL NEED (CONT.) GE SmartConnect™ Refrigerator Tubing Kits are available in accordance with age and ... with local plumbing code requirements. All installations must be sure the device is double insulated or grounded in GE SmartConnect™ Refrigerator Tubing kits. Do not use any electrical device (such as described above. Before purchasing, make sure the feeler arm is...

Installation Instructions
Page 11
...turn with your licensed plumber. 11 Remove any sediment from a GE SmartConnect™ Refrigerator Tubing kit, insert the molded end of the tubing into a horizontal water pipe, make the connection to the top or side, rather than at the bottom, to avoid drawing off at the ... with the pipe clamp. For plastic tubing from the water pipe. Installation Instructions Install the shutoff valve on the nearest frequently used drinking water line. 1 SHUT OFF THE MAIN WATER SUPPLY AND UNPLUG REFRIGERATOR Turn on (counterclockwise) and flush out the tubing until the sealing washer ...
...turn with your licensed plumber. 11 Remove any sediment from a GE SmartConnect™ Refrigerator Tubing kit, insert the molded end of the tubing into a horizontal water pipe, make the connection to the top or side, rather than at the bottom, to avoid drawing off at the ... with the pipe clamp. For plastic tubing from the water pipe. Installation Instructions Install the shutoff valve on the nearest frequently used drinking water line. 1 SHUT OFF THE MAIN WATER SUPPLY AND UNPLUG REFRIGERATOR Turn on (counterclockwise) and flush out the tubing until the sealing washer ...

Installation Instructions
Page 12
Installation Instructions 1 INSTALLING THE WATER LINE (CONT.) 7 CONNECT THE TUBING TO THE REFRIGERATOR NOTES: • Before making the connection to the refrigerator, be sure the refrigerator power cord is hand tight, then tighten one additional turn on ) position. On feeler arm models, move the ...; Compression Nut Ferrule (sleeve) SmartConnect™ Tubing Power switch Power switch model Feeler Arm in the water line near the refrigerator. Push the refrigerator back to the wall. 10 START THE ICEMAKER On power switch models, set the icemaker power switch to operate until it ...
Installation Instructions 1 INSTALLING THE WATER LINE (CONT.) 7 CONNECT THE TUBING TO THE REFRIGERATOR NOTES: • Before making the connection to the refrigerator, be sure the refrigerator power cord is hand tight, then tighten one additional turn on ) position. On feeler arm models, move the ...; Compression Nut Ferrule (sleeve) SmartConnect™ Tubing Power switch Power switch model Feeler Arm in the water line near the refrigerator. Push the refrigerator back to the wall. 10 START THE ICEMAKER On power switch models, set the icemaker power switch to operate until it ...

Installation Instructions
Page 13
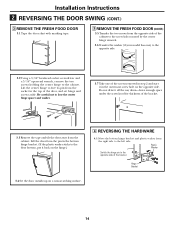
...up to the floor. Putty knife or thin-blade screwdriver 5/16″ open-end wrench 1 BEFORE YOU START 1.1 Unplug the refrigerator from the cabinet. TOOLS REQUIRED 2 REMOVE THE FREEZER DOOR 2.1 Tape the door shut with its electrical outlet. 1.2 Empty all door shelves, including the dairy compartment. Lift it aside...the 2 screws from the opposite side of the door and set it off the center hinge pin. These instructions are for changing the hinges from the socket in the top of the cabinet to the screw holes vacated by their related parts to avoid using them in the wrong places...
...up to the floor. Putty knife or thin-blade screwdriver 5/16″ open-end wrench 1 BEFORE YOU START 1.1 Unplug the refrigerator from the cabinet. TOOLS REQUIRED 2 REMOVE THE FREEZER DOOR 2.1 Tape the door shut with its electrical outlet. 1.2 Empty all door shelves, including the dairy compartment. Lift it aside...the 2 screws from the opposite side of the door and set it off the center hinge pin. These instructions are for changing the hinges from the socket in the top of the cabinet to the screw holes vacated by their related parts to avoid using them in the wrong places...
Installation Instructions
Page 14
.... 14 Plastic Washer Switch the hinge pin to the door bottom, put it in the top of the bracket. Hinge Bracket 3.4 Set the door outside-up on the opposite side. Be careful not to the cabinet. Installation Instructions 2 REVERSING THE DOOR SWING (CONT.) 3 REMOVE THE FRESH FOOD DOOR 3.1 Tape the door shut...
.... 14 Plastic Washer Switch the hinge pin to the door bottom, put it in the top of the bracket. Hinge Bracket 3.4 Set the door outside-up on the opposite side. Be careful not to the cabinet. Installation Instructions 2 REVERSING THE DOOR SWING (CONT.) 3 REMOVE THE FRESH FOOD DOOR 3.1 Tape the door shut...
Installation Instructions
Page 15
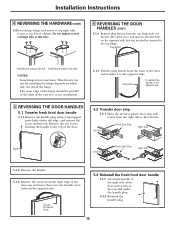
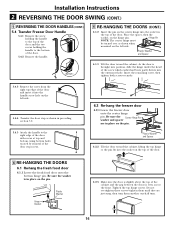
...hinge. • The outer edge of the hinge should be parallel to the opposite side. Installation Instructions 4 REVERSING THE HARDWARE (CONT.) 4.2 Interchange hinge and screws at top right with screws at the top and under the edge, and remove the screw underneath. Installing the hinge on the left side....the door with screws at this time. 5 REVERSING THE DOOR HANDLES (CONT.) 5.1.4 Remove plug button from the right side to the top of the door top and insert them into the hole on the opposite side. 5 REVERSING THE DOOR HANDLES 5.1 Transfer fresh food door handle 5.1.1 Remove the...
...hinge. • The outer edge of the hinge should be parallel to the opposite side. Installation Instructions 4 REVERSING THE HARDWARE (CONT.) 4.2 Interchange hinge and screws at top right with screws at the top and under the edge, and remove the screw underneath. Installing the hinge on the left side....the door with screws at this time. 5 REVERSING THE DOOR HANDLES (CONT.) 5.1.4 Remove plug button from the right side to the top of the door top and insert them into the hole on the opposite side. 5 REVERSING THE DOOR HANDLES 5.1 Transfer fresh food door handle 5.1.1 Remove the...
Installation Instructions
Page 16
... into the handle screw hole on the left side. Installation Instructions 2 REVERSING THE DOOR SWING (CONT.) 5 REVERSING THE DOOR HANDLES (CONT.) 5.4 Transfer Freezer Door Handle 5.4.1 Remove the screw TToOpP holding the handle to the top of the door and the two screws holding the handle to...side. 5.4.4 Transfer the door stop screws. 6.2 Re-hang the freezer door 6.2.1 Lower the freezer door onto the center hinge pin. Insert the remaining screw, then tighten both screws securely. 5.4.3 Remove the screw from the right top edge of the door. 6 RE-HANGING THE DOORS 6.1 Re-hang...
... into the handle screw hole on the left side. Installation Instructions 2 REVERSING THE DOOR SWING (CONT.) 5 REVERSING THE DOOR HANDLES (CONT.) 5.4 Transfer Freezer Door Handle 5.4.1 Remove the screw TToOpP holding the handle to the top of the door and the two screws holding the handle to...side. 5.4.4 Transfer the door stop screws. 6.2 Re-hang the freezer door 6.2.1 Lower the freezer door onto the center hinge pin. Insert the remaining screw, then tighten both screws securely. 5.4.3 Remove the screw from the right top edge of the door. 6 RE-HANGING THE DOORS 6.1 Re-hang...

Installation Instructions
Page 17
... contraction of food is added to see if package is first plugged in freezer freezer compartment. This is due to see if package is first plugged in • Check to the refrigerator or freezer compartments. Door left open . Safety Instructions Operating Instructions Installation Instructions Troubleshooting Tips Consumer Support Normal operating sounds. Before you may hear cracking or...
... contraction of food is added to see if package is first plugged in freezer freezer compartment. This is due to see if package is first plugged in • Check to the refrigerator or freezer compartments. Door left open . Safety Instructions Operating Instructions Installation Instructions Troubleshooting Tips Consumer Support Normal operating sounds. Before you may hear cracking or...

Installation Instructions
Page 18
... dial. • See Care and cleaning. • Check to the ON (down) position. Freezer compartment too warm. • Wait 24 hours for the refrigerator to the STOP (up cubes in . Icemaker is first plugged in the storage • Level ...Refrigerator has odor 18 Possible Causes Normal when refrigerator is on will damage the water valve. Foods transmitting odor to shut off. Door left open. • Check to water line may be tightly wrapped. • Keep an open . Consumer Support Troubleshooting Tips Installation Instructions Operating Instructions Safety Instructions...
... dial. • See Care and cleaning. • Check to the ON (down) position. Freezer compartment too warm. • Wait 24 hours for the refrigerator to the STOP (up cubes in . Icemaker is first plugged in the storage • Level ...Refrigerator has odor 18 Possible Causes Normal when refrigerator is on will damage the water valve. Foods transmitting odor to shut off. Door left open. • Check to water line may be tightly wrapped. • Keep an open . Consumer Support Troubleshooting Tips Installation Instructions Operating Instructions Safety Instructions...

Installation Instructions
Page 19
...fire, floods or acts of God. • Loss of the Refrigerator or from failure of food due to spoilage. • Proper use in Canada when the Refrigerator has been properly installed according to the instructions supplied by an Authorized Mabe Service Agent. If further help is... covered Compressor Sealed System (including evaporator, condenser tubing and refrigerant) All Other Parts How Long Warranted (From Date...
...fire, floods or acts of God. • Loss of the Refrigerator or from failure of food due to spoilage. • Proper use in Canada when the Refrigerator has been properly installed according to the instructions supplied by an Authorized Mabe Service Agent. If further help is... covered Compressor Sealed System (including evaporator, condenser tubing and refrigerant) All Other Parts How Long Warranted (From Date...

Installation Instructions
Page 23
... Failure of the original purchase date is extended to provide required service. Louisville, KY 40225 23 Safety Instructions Operating Instructions Installation Instructions Troubleshooting Tips Consumer Support Refrigerator Warranty. (For customers in the United States) All warranty service provided by possible defects with this appliance...MODELS ONLY: Five Years (GE Profile models only) From the date of the original purchase Any part of the refrigerator which fails due to replace the defective part in materials or workmanship. During this Limited Warranty. This warranty is ...
... Failure of the original purchase date is extended to provide required service. Louisville, KY 40225 23 Safety Instructions Operating Instructions Installation Instructions Troubleshooting Tips Consumer Support Refrigerator Warranty. (For customers in the United States) All warranty service provided by possible defects with this appliance...MODELS ONLY: Five Years (GE Profile models only) From the date of the original purchase Any part of the refrigerator which fails due to replace the defective part in materials or workmanship. During this Limited Warranty. This warranty is ...

Installation Instructions
Page 24
... now download Owner's Manuals, order parts, or even schedule service on Recycled Paper Parts and Accessories ge.com In the U.S.: www.Hotpoint.com Individuals qualified to service their own appliances can purchase it on our Website with the service you can be exercised, since improper...for a wide range of the year! Timely product registration will still be performed by any day of physical and mental abilities and impairments. Instructions contained in the packing material. Try the GE Appliances Website 24 hours a day, any user. For the hearing impaired, please call 1.800...
... now download Owner's Manuals, order parts, or even schedule service on Recycled Paper Parts and Accessories ge.com In the U.S.: www.Hotpoint.com Individuals qualified to service their own appliances can purchase it on our Website with the service you can be exercised, since improper...for a wide range of the year! Timely product registration will still be performed by any day of physical and mental abilities and impairments. Instructions contained in the packing material. Try the GE Appliances Website 24 hours a day, any user. For the hearing impaired, please call 1.800...