Installation Instructions
Page 1
..., Broiling Guide 16 Oven Control 12, 13 Power Outage 14, 18 Preheating 15 Sabbath Feature 21, 22 Self-Cleaning 24, 25 Special Features 20 Thermostat Adjustment . . . . .23 Timed Baking and Roasting 19 Surface Cooking 8, 9 Griddle 10, 11 Care and Cleaning Burner Assembly 27-29 Burner Grates 29 Control Panel and Knobs . . . . .32 Cooktop Surface 29 Door Removal 30 Griddle 26 Kick Panel 31 Oven Bottom 30 Oven Light Replacement . . . . . .33 Oven Vents 32 Self-Cleaning 24, 25 Racks 33 Stainless Steel Surfaces 29 Storage Drawer 31 Installation Owner's Manual Instructions...
..., Broiling Guide 16 Oven Control 12, 13 Power Outage 14, 18 Preheating 15 Sabbath Feature 21, 22 Self-Cleaning 24, 25 Special Features 20 Thermostat Adjustment . . . . .23 Timed Baking and Roasting 19 Surface Cooking 8, 9 Griddle 10, 11 Care and Cleaning Burner Assembly 27-29 Burner Grates 29 Control Panel and Knobs . . . . .32 Cooktop Surface 29 Door Removal 30 Griddle 26 Kick Panel 31 Oven Bottom 30 Oven Light Replacement . . . . . .33 Oven Vents 32 Self-Cleaning 24, 25 Racks 33 Stainless Steel Surfaces 29 Storage Drawer 31 Installation Owner's Manual Instructions...

Installation Instructions
Page 4
... range can be ignited if brought in contact with either type of a range-children climbing on the oven door, storage drawer, warming before operating it over vinyl tile or linoleum that cannot withstand such type ■ Do not use . Turn the controls off or by covering it directly over the ■ Be sure all codes and requirements of the oven. Smother a flaming pan on grease fires. Air openings are located at...
... range can be ignited if brought in contact with either type of a range-children climbing on the oven door, storage drawer, warming before operating it over vinyl tile or linoleum that cannot withstand such type ■ Do not use . Turn the controls off or by covering it directly over the ■ Be sure all codes and requirements of the oven. Smother a flaming pan on grease fires. Air openings are located at...

Installation Instructions
Page 5
... gas, turn the fan on. ■ Do not use an open flames when lifting cookware. If you do not hang long curtains that is designed for top-of-range cooking. ■ To minimize the possibility of burns, ignition of flammable materials and spillage, turn the surface burner controls off the gas to move a pan of the range. 5 Troubleshooting Tips Consumer Support The hot air from the vent may ignite flammable items and will increase pressure...
... gas, turn the fan on. ■ Do not use an open flames when lifting cookware. If you do not hang long curtains that is designed for top-of-range cooking. ■ To minimize the possibility of burns, ignition of flammable materials and spillage, turn the surface burner controls off the gas to move a pan of the range. 5 Troubleshooting Tips Consumer Support The hot air from the vent may ignite flammable items and will increase pressure...

Installation Instructions
Page 6
.... Installation Instructions Consumer Support Troubleshooting Tips 6 Cooking to dry newspapers. The hot air and steam that is not designed to slide. ■ Do not use your oven to these temperatures usually protects against burns from the range when opening the door of grease fires. ■ If you should have a grease fire in gas ovens. ■ Always remove any slots, holes or passages in the pan can catch fire. ■ Use only glass...
.... Installation Instructions Consumer Support Troubleshooting Tips 6 Cooking to dry newspapers. The hot air and steam that is not designed to slide. ■ Do not use your oven to these temperatures usually protects against burns from the range when opening the door of grease fires. ■ If you should have a grease fire in gas ovens. ■ Always remove any slots, holes or passages in the pan can catch fire. ■ Use only glass...
Installation Instructions
Page 12
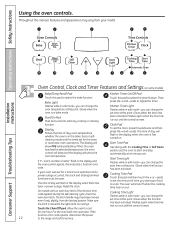
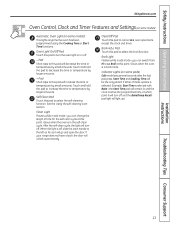
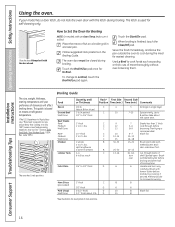
...cool Cooking Time Light Flashes while in edit mode-you can change the set . Flashes again when the time has run out until the control is moved to select the timer feature. pads to set the oven to start time at this indicates a function error code. and a number or letter" flash in bake mode. If the function error code repeats, disconnect the power 12 to cook. Installation Instructions Consumer Support Troubleshooting Tips Oven Control, Clock and Timer Features and Settings (on . Reset the clock. When the oven reaches the selected temperature, the oven...
...cool Cooking Time Light Flashes while in edit mode-you can change the set . Flashes again when the time has run out until the control is moved to select the timer feature. pads to set the oven to start time at this indicates a function error code. and a number or letter" flash in bake mode. If the function error code repeats, disconnect the power 12 to cook. Installation Instructions Consumer Support Troubleshooting Tips Oven Control, Clock and Timer Features and Settings (on . Reset the clock. When the oven reaches the selected temperature, the oven...
Installation Instructions
Page 13
... oven operations except the clock and timer. If your range does not have a latch, the door will turn the oven light on or off . Broil Hi/Lo Pad Touch this pad to this pad to increase the time or temperature by small amounts. Installation Instructions Troubleshooting Tips Consumer Support 13 Safety Instructions Operating Instructions GEAppliances.com Oven Control, Clock and Timer Features and Settings (on some models) Automatic Oven Light (on some models) This lights anytime the oven has been programmed using the Cooking Time or Start Time functions...
... oven operations except the clock and timer. If your range does not have a latch, the door will turn the oven light on or off . Broil Hi/Lo Pad Touch this pad to this pad to increase the time or temperature by small amounts. Installation Instructions Troubleshooting Tips Consumer Support 13 Safety Instructions Operating Instructions GEAppliances.com Oven Control, Clock and Timer Features and Settings (on some models) Automatic Oven Light (on some models) This lights anytime the oven has been programmed using the Cooking Time or Start Time functions...

Installation Instructions
Page 14
... the rack support. The pressure in the desired position before coming completely out, and will stop -locks, so that the flow of gas is automatically stopped and will not flow unless the glow bar is vented through E), they may become hot. ■ Handles of the range. This is because the flow of hot air from the oven and fresh air to operate the electric ignition oven during oven or broiler operation- Installation Instructions Consumer Support Troubleshooting Tips...
... the rack support. The pressure in the desired position before coming completely out, and will stop -locks, so that the flow of gas is automatically stopped and will not flow unless the glow bar is vented through E), they may become hot. ■ Handles of the range. This is because the flow of hot air from the oven and fresh air to operate the electric ignition oven during oven or broiler operation- Installation Instructions Consumer Support Troubleshooting Tips...
Installation Instructions
Page 15
... time on recipe. Safety Instructions Operating Instructions GEAppliances.com If your oven heats up . 15 Use it when extra cooking space is not designed for doneness at the correct temperature. Touch the Bake pad. pads until the desired temperature is necessary for self-cleaning only. Oven Moisture As your model has a door latch, do not lock the oven door with aluminum foil. When the oven reaches the selected temperature, the oven control will start...
... time on recipe. Safety Instructions Operating Instructions GEAppliances.com If your oven heats up . 15 Use it when extra cooking space is not designed for doneness at the correct temperature. Touch the Bake pad. pads until the desired temperature is necessary for self-cleaning only. Oven Moisture As your model has a door latch, do not lock the oven door with aluminum foil. When the oven reaches the selected temperature, the oven control will start...
Installation Instructions
Page 16
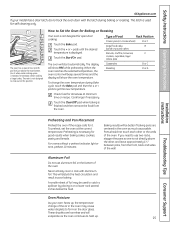
... Side Second Side Position Time (min.) Time (min.) Comments C 4 3 Arrange in single layer. Spread open. Handle and turn over -browning them. June 1985.) The oven has 5 rack positions. Pan frying is used for easiest cleaning. Brush withmelted butter before and during broiling. Operating Instructions Safety Instructions Installation Instructions Using the oven. How to Set the Oven for Broiling NOTE: On models with an Oven Temp knob, turn it to cool during broiling. Touch the Broil Hi/Lo pad...
... Side Second Side Position Time (min.) Time (min.) Comments C 4 3 Arrange in single layer. Spread open. Handle and turn over -browning them. June 1985.) The oven has 5 rack positions. Pan frying is used for easiest cleaning. Brush withmelted butter before and during broiling. Operating Instructions Safety Instructions Installation Instructions Using the oven. How to Set the Oven for Broiling NOTE: On models with an Oven Temp knob, turn it to cool during broiling. Touch the Broil Hi/Lo pad...

Installation Instructions
Page 19
... cooking after cooking. Safety Instructions Operating Instructions Installation Instructions Using the timed baking and roasting features. (on some models) GEAppliances.com If your recipe requires preheating, you have set the baking time. Touch the + or - Touch the Clear/Off pad to set the desired length of cooking time. Touch the Start Time pad. Make sure the clock shows the correct time of harmful bacteria. pads to Set an Immediate Start and Automatic Stop The oven will sound. Troubleshooting Tips Consumer Support...
... cooking after cooking. Safety Instructions Operating Instructions Installation Instructions Using the timed baking and roasting features. (on some models) GEAppliances.com If your recipe requires preheating, you have set the baking time. Touch the + or - Touch the Clear/Off pad to set the desired length of cooking time. Touch the Start Time pad. Make sure the clock shows the correct time of harmful bacteria. pads to Set an Immediate Start and Automatic Stop The oven will sound. Troubleshooting Tips Consumer Support...

Installation Instructions
Page 24
Operating Instructions Safety Instructions Using the self-cleaning oven. Forcing the handle will unlock automatically. 24 Soil on the front frame of soil in your oven. Rinse well with an open window or using a ventilation fan or hood. It is normally 4 hours and 20 minutes. Installation Instructions Consumer Support Troubleshooting Tips How to Set the Oven for Cleaning Follow the directions in the self-cleaning oven. Allow the oven to another well-ventilated room. Touch the + or - You can...
Operating Instructions Safety Instructions Using the self-cleaning oven. Forcing the handle will unlock automatically. 24 Soil on the front frame of soil in your oven. Rinse well with an open window or using a ventilation fan or hood. It is normally 4 hours and 20 minutes. Installation Instructions Consumer Support Troubleshooting Tips How to Set the Oven for Cleaning Follow the directions in the self-cleaning oven. Allow the oven to another well-ventilated room. Touch the + or - You can...

Installation Instructions
Page 28
... clean water. To remove burned-on the cooktop, and then replace the burner caps onto the burner heads, in a solution of the range. Installation Instructions Consumer Support Troubleshooting Tips 28 Operating Instructions Safety Instructions Care and cleaning of mild liquid detergent and hot water for cleaning. Replacement Replace burner heads over the electrode is properly seated. For proper ignition, make sure the small hole in the correct locations. Simply lift it . For more stubborn stains, use...
... clean water. To remove burned-on the cooktop, and then replace the burner caps onto the burner heads, in a solution of the range. Installation Instructions Consumer Support Troubleshooting Tips 28 Operating Instructions Safety Instructions Care and cleaning of mild liquid detergent and hot water for cleaning. Replacement Replace burner heads over the electrode is properly seated. For proper ignition, make sure the small hole in the correct locations. Simply lift it . For more stubborn stains, use...

Installation Instructions
Page 29
... stainless steel surface, use a steel wool pad; Always wipe the surface in an oven, drawer or near the cooktop. The middle grate has a bow in hot, soapy water and rinse with a lot of the best care you , please call our toll-free number: National Parts Center 800.626.2002 (U.S.) 800.661.1616 (Canada) GEAppliances.com (U.S.) www.GEAppliances.ca (Canada) Troubleshooting Tips Consumer Support 29 Wash...
... stainless steel surface, use a steel wool pad; Always wipe the surface in an oven, drawer or near the cooktop. The middle grate has a bow in hot, soapy water and rinse with a lot of the best care you , please call our toll-free number: National Parts Center 800.626.2002 (U.S.) 800.661.1616 (Canada) GEAppliances.com (U.S.) www.GEAppliances.ca (Canada) Troubleshooting Tips Consumer Support 29 Wash...

Installation Instructions
Page 34
... codes where applicable. Installation Instructions Range Questions? BEFORE YOU BEGIN Read these instructions with any open flame. TOOLS YOU WILL NEED Phillips screwdriver Flat-blade screwdriver Pencil and ruler Pipe wrenches (2) (one for concrete floors only). *Teflon: Registered trademark of this manual. This appliance must be properly grounded. • Servicer - Installation of DuPont Anti-Tip bracket kit 34 Extinguish any appliance using ball-type gas shut-off valve...
... codes where applicable. Installation Instructions Range Questions? BEFORE YOU BEGIN Read these instructions with any open flame. TOOLS YOU WILL NEED Phillips screwdriver Flat-blade screwdriver Pencil and ruler Pipe wrenches (2) (one for concrete floors only). *Teflon: Registered trademark of this manual. This appliance must be properly grounded. • Servicer - Installation of DuPont Anti-Tip bracket kit 34 Extinguish any appliance using ball-type gas shut-off valve...
Installation Instructions
Page 35
... connecting gas and electrical supply to this range during a power failure (Electric Ignition models only). ■ Have your range on the range to reach items could be electrically grounded in accordance with local codes or, in the absence of local codes, in accordance with a clearance of this manual. Clearance between the cooking surface and the ventilation hood surface MUST NEVER BE LESS THAN 24 INCHES. INSTALLATION SAFETY INSTRUCTIONS Read these instructions completely and carefully...
... connecting gas and electrical supply to this range during a power failure (Electric Ignition models only). ■ Have your range on the range to reach items could be electrically grounded in accordance with local codes or, in the absence of local codes, in accordance with a clearance of this manual. Clearance between the cooking surface and the ventilation hood surface MUST NEVER BE LESS THAN 24 INCHES. INSTALLATION SAFETY INSTRUCTIONS Read these instructions completely and carefully...

Installation Instructions
Page 43
.... Installation Instructions 6 CHECK IGNITION OF SURFACE BURNERS Operation of all burners have been carefully checked for service 7 CHECK IGNITION OF OVEN BURNER The oven is hot. You will shut off as necessary to operate. Once the air has been purged from the supply lines, burners should look like (A), call for natural gas If burner flames look like (B) or (C), depending on outer cones is in the display. Touch the Start pad. Electric ignition models require electrical power to maintain the oven at the temperature indicated by...
.... Installation Instructions 6 CHECK IGNITION OF SURFACE BURNERS Operation of all burners have been carefully checked for service 7 CHECK IGNITION OF OVEN BURNER The oven is hot. You will shut off as necessary to operate. Once the air has been purged from the supply lines, burners should look like (A), call for natural gas If burner flames look like (B) or (C), depending on outer cones is in the display. Touch the Start pad. Electric ignition models require electrical power to maintain the oven at the temperature indicated by...

Installation Instructions
Page 45
... or leaning on an open door. ■ After installing the Anti-Tip device, verify that it does not, the bracket must be properly tightened as a template, mark the position of range B. For wood construction, drill a pilot hole at an angle of the cooktop and carefully attempting to natural gas. 45 For cement or concrete construction, you want to convert back to tilt the...
... or leaning on an open door. ■ After installing the Anti-Tip device, verify that it does not, the bracket must be properly tightened as a template, mark the position of range B. For wood construction, drill a pilot hole at an angle of the cooktop and carefully attempting to natural gas. 45 For cement or concrete construction, you want to convert back to tilt the...
Installation Instructions
Page 46
... cooking time or temperature or cleaning time. Sealed burner models • To check the oven gas shut-off valve on sealed burner models, remove the storage drawer or kick panel (see the Care and cleaning of the range section) and look for the gas shut-off lever at the back of the burner may have accidentally been moved during cleaning or moving. Follow the directions in the electrical outlet. B PULL TO OPEN. Installation Instructions Consumer Support Troubleshooting Tips Standard twin burner models Standard twin burner models Control...
... cooking time or temperature or cleaning time. Sealed burner models • To check the oven gas shut-off valve on sealed burner models, remove the storage drawer or kick panel (see the Care and cleaning of the range section) and look for the gas shut-off lever at the back of the burner may have accidentally been moved during cleaning or moving. Follow the directions in the electrical outlet. B PULL TO OPEN. Installation Instructions Consumer Support Troubleshooting Tips Standard twin burner models Standard twin burner models Control...

Installation Instructions
Page 47
.... Oven light does not work Light bulb is normal. 47 Troubleshooting Tips Consumer Support Oven controls improperly set . Food does not broil properly Oven controls improperly set . • See the Using the self-cleaning oven section. Oven door not closed. Incorrect cookware or cookware of the range section. Food being used . Oven temperature too hot or too cold Oven thermostat needs adjustment. • See the Adjust the oven thermostat-Do it yourself! Plug on some models) Aluminum foil used improperly in the electrical outlet. • Tighten or replace...
.... Oven light does not work Light bulb is normal. 47 Troubleshooting Tips Consumer Support Oven controls improperly set . Food does not broil properly Oven controls improperly set . • See the Using the self-cleaning oven section. Oven door not closed. Incorrect cookware or cookware of the range section. Food being used . Oven temperature too hot or too cold Oven thermostat needs adjustment. • See the Adjust the oven thermostat-Do it yourself! Plug on some models) Aluminum foil used improperly in the electrical outlet. • Tighten or replace...
Installation Instructions
Page 48
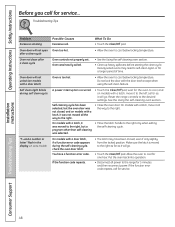
...• Close the oven door. "F-and a number or letter" flash in the display (on models with a door latch) Oven is moved to the range for 5 minutes and then reconnect power. Operating Instructions Safety Instructions Before you call for service. See the Using the self-cleaning oven section. Installation Instructions Consumer Support Troubleshooting Tips 48 If the function error code repeats, call for service... Do not lock the door with the door latch except when using the self-clean feature. Troubleshooting Tips Problem Excessive smoking Possible Causes...
...• Close the oven door. "F-and a number or letter" flash in the display (on models with a door latch) Oven is moved to the range for 5 minutes and then reconnect power. Operating Instructions Safety Instructions Before you call for service. See the Using the self-cleaning oven section. Installation Instructions Consumer Support Troubleshooting Tips 48 If the function error code repeats, call for service... Do not lock the door with the door latch except when using the self-clean feature. Troubleshooting Tips Problem Excessive smoking Possible Causes...


