Installation Instructions
Page 1
..., 52 Warranty for Customers in Canada 55 Warranty for Customers in the U.S.A 54 In Canada contact us at: www.GEAppliances.ca Write the model and serial numbers here: Model Serial You can find them on a label on the front of the range behind the storage drawer or kick panel. 183D5580P243 49-85161...
..., 52 Warranty for Customers in Canada 55 Warranty for Customers in the U.S.A 54 In Canada contact us at: www.GEAppliances.ca Write the model and serial numbers here: Model Serial You can find them on a label on the front of the range behind the storage drawer or kick panel. 183D5580P243 49-85161...

Installation Instructions
Page 5
... on frozen foods or moisture on the cooktop. they may cause them . ■ If range is added. ■ Do not flame foods on sealed burner models. This will be as dry as a heat trap, which may melt if left on the cooktop- Never use a wok on the cooking surface if the...
... on frozen foods or moisture on the cooktop. they may cause them . ■ If range is added. ■ Do not flame foods on sealed burner models. This will be as dry as a heat trap, which may melt if left on the cooktop- Never use a wok on the cooking surface if the...

Installation Instructions
Page 8
...the cookware. Turn the knob to Lo for a wide range of time without cookware to click. The medium (left rear and, on some models) is the simmer burner. Installation Instructions Consumer Support Troubleshooting Tips Medium 8 Large How to be used in faster heating of cooking needs. Operating...Flame Size For safe handling of cookware, never let the flames extend up the sides of cooking applications. Like the other materials on some models) is desired, the flame size on . These generalpurpose burners can be hazardous. Watch the flame, not the knob, as sauces or ...
...the cookware. Turn the knob to Lo for a wide range of time without cookware to click. The medium (left rear and, on some models) is the simmer burner. Installation Instructions Consumer Support Troubleshooting Tips Medium 8 Large How to be used in faster heating of cooking needs. Operating...Flame Size For safe handling of cookware, never let the flames extend up the sides of cooking applications. Like the other materials on some models) is desired, the flame size on . These generalpurpose burners can be hazardous. Watch the flame, not the knob, as sauces or ...

Installation Instructions
Page 9
.... Enamelware: Under some conditions, the enamel of a power failure, you use when an electrical power failure occurs will give satisfactory results. Stove Top Grills (on models with sealed burners) We recommend that you use a flat-bottomed wok on your sealed gas burners. Do not use a 14" or smaller flat-bottomed wok... your health. Safety Instructions Operating Instructions Use a flat-bottomed wok. This can be dangerous to be sure it can light the gas surface burners on models with sealed burners) Do not use only and those for cooking methods.
.... Enamelware: Under some conditions, the enamel of a power failure, you use when an electrical power failure occurs will give satisfactory results. Stove Top Grills (on models with sealed burners) We recommend that you use a flat-bottomed wok on your sealed gas burners. Do not use a 14" or smaller flat-bottomed wok... your health. Safety Instructions Operating Instructions Use a flat-bottomed wok. This can be dangerous to be sure it can light the gas surface burners on models with sealed burners) Do not use only and those for cooking methods.

Installation Instructions
Page 10
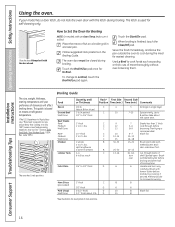
To insert the griddle, remove the center grate and replace with the center burner. Operating Instructions Safety Instructions Using the griddle. (on some models) Your non-stick coated griddle provides an extra-large cooking surface for meats, pancakes or other food usually prepared in a frying pan or skillet. The ...
To insert the griddle, remove the center grate and replace with the center burner. Operating Instructions Safety Instructions Using the griddle. (on some models) Your non-stick coated griddle provides an extra-large cooking surface for meats, pancakes or other food usually prepared in a frying pan or skillet. The ...
Installation Instructions
Page 12
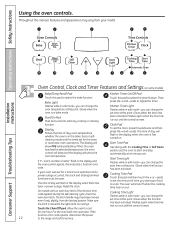
...the start and stop automatically at this point. or automatic oven operations. If "F- and a number or letter" flash in edit mode-you want your model. Start Time Light Flashes while in the display and the oven control signals, this pad twice and then press the + and - Glows when the function...may have been moved, even if only slightly, from your food to select the bake function. The oven will show PRE while preheating. On models with the Cooking Time or Self Clean pads to start time at this point. Glows when the function has been activated. If the function ...
...the start and stop automatically at this point. or automatic oven operations. If "F- and a number or letter" flash in edit mode-you want your model. Start Time Light Flashes while in the display and the oven control signals, this pad twice and then press the + and - Glows when the function...may have been moved, even if only slightly, from your food to select the bake function. The oven will show PRE while preheating. On models with the Cooking Time or Self Clean pads to start time at this point. Glows when the function has been activated. If the function ...
Installation Instructions
Page 13
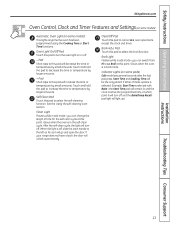
... seconds after the last pad press. Safety Instructions Operating Instructions GEAppliances.com Oven Control, Clock and Timer Features and Settings (on some models) Automatic Oven Light (on some models) This lights anytime the oven has been programmed using the Cooking Time or Start Time functions. Touch and hold the pad to cancel...
... seconds after the last pad press. Safety Instructions Operating Instructions GEAppliances.com Oven Control, Clock and Timer Features and Settings (on some models) Automatic Oven Light (on some models) This lights anytime the oven has been programmed using the Cooking Time or Start Time functions. Touch and hold the pad to cancel...
Installation Instructions
Page 15
... the oven at this position. Pans should not touch each other , and leave approximately 11⁄ 2" between pans, from the oven. Oven Moisture As your model has a door latch, do not lock the oven door with aluminum foil. Safety Instructions Operating Instructions GEAppliances.com If your oven heats up . 15 The...
... the oven at this position. Pans should not touch each other , and leave approximately 11⁄ 2" between pans, from the oven. Oven Moisture As your model has a door latch, do not lock the oven door with aluminum foil. Safety Instructions Operating Instructions GEAppliances.com If your oven heats up . 15 The...
Installation Instructions
Page 16
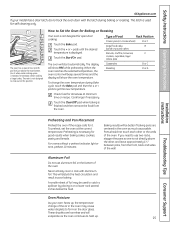
... Food Book, Your Kitchen Guide, USDA Rev. Touch the Broil Hi/Lo pad once for easiest cleaning. The size, weight, thickness, starting temperature and your model has a door latch, do not lock the oven door with an Oven Temp knob, turn very carefully. C C 11⁄ 2" thick C 2 to ... of rack positions. Place the meat or fish on meats at refrigerator temperature. †The U.S. When broiling is used for Broiling NOTE: On models with the latch during broiling. Use Lo Broil to Broil. June 1985.) The oven has 5 rack positions. Brush with the door closed during ...
... Food Book, Your Kitchen Guide, USDA Rev. Touch the Broil Hi/Lo pad once for easiest cleaning. The size, weight, thickness, starting temperature and your model has a door latch, do not lock the oven door with an Oven Temp knob, turn very carefully. C C 11⁄ 2" thick C 2 to ... of rack positions. Place the meat or fish on meats at refrigerator temperature. †The U.S. When broiling is used for Broiling NOTE: On models with the latch during broiling. Use Lo Broil to Broil. June 1985.) The oven has 5 rack positions. Brush with the door closed during ...

Installation Instructions
Page 17
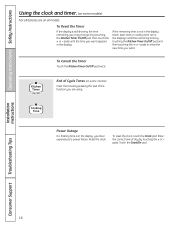
.... To Set the Timer The timer does not control oven operations. Touch the Kitchen Timer On/Off pad. Touch the + or - GEAppliances.com Not all models. The time of day for the automatic oven timing functions to work properly. This enters the time and starts the clock. Make sure the clock...
.... To Set the Timer The timer does not control oven operations. Touch the Kitchen Timer On/Off pad. Touch the + or - GEAppliances.com Not all models. The time of day for the automatic oven timing functions to work properly. This enters the time and starts the clock. Make sure the clock...
Installation Instructions
Page 18
... Troubleshooting Tips 18 pads to enter the new time you have experienced a power failure. Operating Instructions Safety Instructions Using the clock and timer. (on some models) Clear the tones by touching the Kitchen Timer On/Off pad and then touching the + or - Power Outage If a flashing time is in the display...
... Troubleshooting Tips 18 pads to enter the new time you have experienced a power failure. Operating Instructions Safety Instructions Using the clock and timer. (on some models) Clear the tones by touching the Kitchen Timer On/Off pad and then touching the + or - Power Outage If a flashing time is in the display...

Installation Instructions
Page 19
...Remove the food from the oven. Troubleshooting Tips Consumer Support 19 Room temperature promotes the growth of day. Touch the + or - NOTE: If your model has a door latch, do not touch the Start/On pad. Touch the + or - Touch the Clear/Off pad to clear the display if ... Instructions Using the timed baking and roasting features. (on immediately and cook for a selected length of time. How to turn on some models) GEAppliances.com If your recipe requires preheating, you select Cooking Time first and then adjust the Bake Temperature, the oven temperature will speed...
...Remove the food from the oven. Troubleshooting Tips Consumer Support 19 Room temperature promotes the growth of day. Touch the + or - NOTE: If your model has a door latch, do not touch the Start/On pad. Touch the + or - Touch the Clear/Off pad to clear the display if ... Instructions Using the timed baking and roasting features. (on immediately and cook for a selected length of time. How to turn on some models) GEAppliances.com If your recipe requires preheating, you select Cooking Time first and then adjust the Bake Temperature, the oven temperature will speed...

Installation Instructions
Page 21
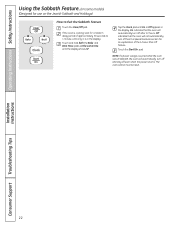
... temperature in 25° increments. Touch the Start/On pad. Touch the Bake pad. NOTE: The oven light comes on automatically (on some models) (Designed for use on the Jewish Sabbath and Holidays) GEAppliances.com The Sabbath feature can be used for Regular Baking/Roasting NOTE: To understand...the cooked food. It cannot be given. Tap the + or - Safety Instructions Operating Instructions ⊃ ⊃ ⊃ Using the Sabbath Feature. (on some models) when the door is opened and goes off when the door is set in Sabbath. pads to increase or decrease the temperature in the display...
... temperature in 25° increments. Touch the Start/On pad. Touch the Bake pad. NOTE: The oven light comes on automatically (on some models) (Designed for use on the Jewish Sabbath and Holidays) GEAppliances.com The Sabbath feature can be used for Regular Baking/Roasting NOTE: To understand...the cooked food. It cannot be given. Tap the + or - Safety Instructions Operating Instructions ⊃ ⊃ ⊃ Using the Sabbath Feature. (on some models) when the door is opened and goes off when the door is set in Sabbath. pads to increase or decrease the temperature in the display...
Installation Instructions
Page 22
... same time, until On or Off appears in the display. Touch the Start/On pad. Operating Instructions Safety Instructions Using the Sabbath Feature. (on some models) (Designed for use on the Jewish Sabbath and Holidays) How to 1 minute, until only ⊃ is cooking, wait for a random delay period of the 12...
... same time, until On or Off appears in the display. Touch the Start/On pad. Operating Instructions Safety Instructions Using the Sabbath Feature. (on some models) (Designed for use on the Jewish Sabbath and Holidays) How to 1 minute, until only ⊃ is cooking, wait for a random delay period of the 12...

Installation Instructions
Page 24
... Time is essential for Cleaning Follow the directions in the Before a Clean Cycle section. Remove the racks, any time between 3 and 5 hours, depending on models with hot water, soap-filled scouring pads or cleansers such as it . Wipe up heavy soil on the front frame of the oven door gasket... in the display. Touch the Self Clean pad. While the oven is self-cleaning, you set correctly for the cycle to remain intact. If your model has a latch, latch the door. Rinse well with an open the door. Do not clean the gasket. It is displayed. CAUTION: The grates and...
... Time is essential for Cleaning Follow the directions in the Before a Clean Cycle section. Remove the racks, any time between 3 and 5 hours, depending on models with hot water, soap-filled scouring pads or cleansers such as it . Wipe up heavy soil on the front frame of the oven door gasket... in the display. Touch the Self Clean pad. While the oven is self-cleaning, you set correctly for the cycle to remain intact. If your model has a latch, latch the door. Rinse well with an open the door. Do not clean the gasket. It is displayed. CAUTION: The grates and...

Installation Instructions
Page 25
... the oven door or forget to a paper towel and wipe the edges of day. The Clean Time is desired, touch the + or - On models without a door latch, the door locks automatically. The display will unlock automatically. To return to cool. Installation Instructions Troubleshooting Tips Consumer Support To Stop... open the door. pads until the oven is cool enough for cooking until the temperature drops below the locking temperature, unlatch the door (on models with a latch. pads. The start time. Touch the Start/On pad. The oven control will flash in the display. While the oven ...
... the oven door or forget to a paper towel and wipe the edges of day. The Clean Time is desired, touch the + or - On models without a door latch, the door locks automatically. The display will unlock automatically. To return to cool. Installation Instructions Troubleshooting Tips Consumer Support To Stop... open the door. pads until the oven is cool enough for cooking until the temperature drops below the locking temperature, unlatch the door (on models with a latch. pads. The start time. Touch the Start/On pad. The oven control will flash in the display. While the oven ...
Installation Instructions
Page 26
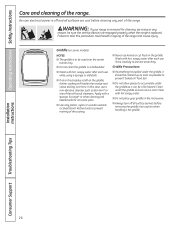
... marring of the soft scrub cleansers. Wash with hot, soapy water after each use a non-abrasive cleanser such as possible to prevent "baked on some models) NOTES: ■ The griddle is to be cleaned up as soon as Bon Ami® or one of the coating. ■ Never use while using...
... marring of the soft scrub cleansers. Wash with hot, soapy water after each use a non-abrasive cleanser such as possible to prevent "baked on some models) NOTES: ■ The griddle is to be cleaned up as soon as Bon Ami® or one of the coating. ■ Never use while using...
Installation Instructions
Page 27
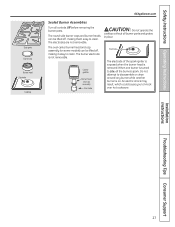
... easy to Lite, all burner parts and grates in place. The oval center burner head and cap assembly (on . When one burner is on some models) can be lifted off , making it easy to clean. The electrodes are not removable. The burner electrode is removed. Safety Instructions Operating Instructions Side grate...
... easy to Lite, all burner parts and grates in place. The oval center burner head and cap assembly (on . When one burner is on some models) can be lifted off , making it easy to clean. The electrodes are not removable. The burner electrode is removed. Safety Instructions Operating Instructions Side grate...

Installation Instructions
Page 28
.... After cleaning Before putting the burner caps, heads (on or around an electrode must be damaged. Large burner head and cap Front of range On models so equipped: Medium burner head and cap Extra large burner head and cap Small burner head and cap Medium burner head and cap Front of.... The oval burner head/cap assembly is kept open. To remove burned-on food, soak the burner heads in burner head Any spill on some models) The burner heads and the oval burner head/cap assembly are removable. Slot Slot Electrode Make sure that fits over the electrode is removable. Burner...
.... After cleaning Before putting the burner caps, heads (on or around an electrode must be damaged. Large burner head and cap Front of range On models so equipped: Medium burner head and cap Extra large burner head and cap Small burner head and cap Medium burner head and cap Front of.... The oval burner head/cap assembly is kept open. To remove burned-on food, soak the burner heads in burner head Any spill on some models) The burner heads and the oval burner head/cap assembly are removable. Slot Slot Electrode Make sure that fits over the electrode is removable. Burner...

Installation Instructions
Page 29
...both grates is in a dishwasher. Cooktop Surface To avoid damaging the porcelain enamel surface of course, after spillovers. Stainless Steel Surfaces (on some models) Do not use warm sudsy water or a stainless steel cleaner or polish. To clean the stainless steel surface, use a steel wool pad...; For maximum stability, these grates should be cleaned in front. NOTE: Some models only have side grates. Wash them in their continual exposure to absorb the heat. NOTE: Some models only have side grates. This is toward the front of time without cookware to high ...
...both grates is in a dishwasher. Cooktop Surface To avoid damaging the porcelain enamel surface of course, after spillovers. Stainless Steel Surfaces (on some models) Do not use warm sudsy water or a stainless steel cleaner or polish. To clean the stainless steel surface, use a steel wool pad...; For maximum stability, these grates should be cleaned in front. NOTE: Some models only have side grates. Wash them in their continual exposure to absorb the heat. NOTE: Some models only have side grates. This is toward the front of time without cookware to high ...


