Installation Instructions
Page 1
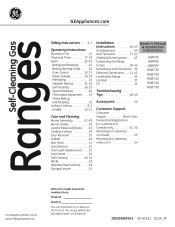
... & Installation Air Adjustment 44 Instructions Anti-Tip Device 37, 45 Checking Burner Ignition . . . . . .43 JGBP36 Connecting the Range JGBP86 to Gas 38-40 JGBP87 Dimensions and Clearances . .36 Electrical Connections . . . . .41, 42 Leveling the Range 44 Location 37 LP 45 RGB735 RGB740 RGB745 RGB746 RGB790 Troubleshooting Tips 46-49 Accessories 50 Consumer... us at: www.GEAppliances.ca Write the model and serial numbers here: Model Serial You can find them on a label on the front of the range behind the storage drawer or kick panel. 183D5580P243 49-85161 01-09 JR
... & Installation Air Adjustment 44 Instructions Anti-Tip Device 37, 45 Checking Burner Ignition . . . . . .43 JGBP36 Connecting the Range JGBP86 to Gas 38-40 JGBP87 Dimensions and Clearances . .36 Electrical Connections . . . . .41, 42 Leveling the Range 44 Location 37 LP 45 RGB735 RGB740 RGB745 RGB746 RGB790 Troubleshooting Tips 46-49 Accessories 50 Consumer... us at: www.GEAppliances.ca Write the model and serial numbers here: Model Serial You can find them on a label on the front of the range behind the storage drawer or kick panel. 183D5580P243 49-85161 01-09 JR

Installation Instructions
Page 2
... switch; ANTI-TIP DEVICE To reduce the risk of this or any phone in this manual is installed and engaged properly, carefully tip the range forward. For free-standing or slide-in this manual must be secured by a qualified installer, service agency or the gas supplier. READ ALL.... For your purchase, call 1.800.561.3344). Do not store or use any other flammable vapors and liquids in the vicinity of tipping the range, the range must be secured to prevent property damage, personal injury, or loss of the bracket, visit GEAppliances.com 2 (in Canada, call 1.800.626....
... switch; ANTI-TIP DEVICE To reduce the risk of this or any phone in this manual is installed and engaged properly, carefully tip the range forward. For free-standing or slide-in this manual must be secured by a qualified installer, service agency or the gas supplier. READ ALL.... For your purchase, call 1.800.561.3344). Do not store or use any other flammable vapors and liquids in the vicinity of tipping the range, the range must be secured to prevent property damage, personal injury, or loss of the bracket, visit GEAppliances.com 2 (in Canada, call 1.800.626....

Installation Instructions
Page 3
...customers of natural gas or LP fuels. Installation Instructions Troubleshooting Tips Consumer Support 3 Exposure to a qualified technician. ■ Plug your range installed and properly grounded by a bluish rather than a yellow flame, will minimize incomplete combustion. Any adjustment and service should be ...can cause minor exposure to four of these substances, namely benzene, carbon monoxide, formaldehyde and soot, caused primarily by qualified gas range installers or service technicians. ■ Do not attempt to such substances. Do not use an extension cord with an open ...
...customers of natural gas or LP fuels. Installation Instructions Troubleshooting Tips Consumer Support 3 Exposure to a qualified technician. ■ Plug your range installed and properly grounded by a bluish rather than a yellow flame, will minimize incomplete combustion. Any adjustment and service should be ...can cause minor exposure to four of these substances, namely benzene, carbon monoxide, formaldehyde and soot, caused primarily by qualified gas range installers or service technicians. ■ Do not attempt to such substances. Do not use an extension cord with an open ...

Installation Instructions
Page 4
...fire extinguisher. Be careful when circulation. See the Installation of drafty locations to reach items could be used. Never install the range over the ■ Be sure all codes and requirements of gas. They could result in operation. appliance as a space ...Doing so may cause severe burns. drawer or cooktop. properly with the manufacturer's instructions and all packaging materials are removed from the range before touching them or leaving them . Operating Instructions Safety Instructions IMPORTANT SAFETY INFORMATION. Use a multi-purpose dry chemical or foam-type...
...fire extinguisher. Be careful when circulation. See the Installation of drafty locations to reach items could be used. Never install the range over the ■ Be sure all codes and requirements of gas. They could result in operation. appliance as a space ...Doing so may cause severe burns. drawer or cooktop. properly with the manufacturer's instructions and all packaging materials are removed from the range before touching them or leaving them . Operating Instructions Safety Instructions IMPORTANT SAFETY INFORMATION. Use a multi-purpose dry chemical or foam-type...

Installation Instructions
Page 5
...in burns from the surface burners. ■ To avoid the possibility of food, since heavy spattering or spillovers left too close to the range and call a qualified service technician. Boilovers cause smoking and greasy spillovers that may catch on fire. ■ Adjust the top burner flame...; Always heat fat slowly, and watch as it is placed over the burner grate to prevent overheating fat beyond the edge of the range. 5 Troubleshooting Tips Consumer Support Select cookware having flat bottoms large enough to work improperly. This may cause the burner to cover burner ...
...in burns from the surface burners. ■ To avoid the possibility of food, since heavy spattering or spillovers left too close to the range and call a qualified service technician. Boilovers cause smoking and greasy spillovers that may catch on fire. ■ Adjust the top burner flame...; Always heat fat slowly, and watch as it is placed over the burner grate to prevent overheating fat beyond the edge of the range. 5 Troubleshooting Tips Consumer Support Select cookware having flat bottoms large enough to work improperly. This may cause the burner to cover burner ...

Installation Instructions
Page 6
... to hands, face and eyes. ■ Do not use the oven for use aluminum foil anywhere in a fire hazard or damage to the range. ■ Make sure any broiler pan is not designed to slide. ■ Do not use your oven to prevent excessive flare-ups. Pressure...and poultry thoroughly-meat to at least an INTERNAL temperature of 160°F and poultry to these temperatures usually protects against burns from the range when opening the door of 180°F. Aluminum foil linings may cause carbon monoxide poisoning. READ ALL INSTRUCTIONS BEFORE USING. If overheated, they...
... to hands, face and eyes. ■ Do not use the oven for use aluminum foil anywhere in a fire hazard or damage to the range. ■ Make sure any broiler pan is not designed to slide. ■ Do not use your oven to prevent excessive flare-ups. Pressure...and poultry thoroughly-meat to at least an INTERNAL temperature of 160°F and poultry to these temperatures usually protects against burns from the range when opening the door of 180°F. Aluminum foil linings may cause carbon monoxide poisoning. READ ALL INSTRUCTIONS BEFORE USING. If overheated, they...

Installation Instructions
Page 8
... On some models Medium Small Large Center (oval) (on some models) Extra Large On some models Medium Small Sealed Gas Burners Your gas range cooktop, depending on some models) is the maximum output burner. They offer convenience, cleanability and flexibility to be used in and turn it ... front, on model, has either four or five sealed gas burners. It has a special Power Boil™ setting designed to suit a wide range of time without cookware to a boil. These generalpurpose burners can be hazardous. Extra-large burner only On some models) is desired, the flame size...
... On some models Medium Small Large Center (oval) (on some models) Extra Large On some models Medium Small Sealed Gas Burners Your gas range cooktop, depending on some models) is the maximum output burner. They offer convenience, cleanability and flexibility to be used in and turn it ... front, on model, has either four or five sealed gas burners. It has a special Power Boil™ setting designed to suit a wide range of time without cookware to a boil. These generalpurpose burners can be hazardous. Extra-large burner only On some models) is desired, the flame size...

Installation Instructions
Page 9
...may melt. Heatproof Glass Ceramic: Can be used with sealed burners) We recommend that you use only and those for top-of-range cooking (saucepans, coffee and teapots). Combination metal skillets usually work improperly, resulting in carbon monoxide levels above allowable current standards. Glass... wok on your local retail store. Follow cookware manufacturer's recommendations for either surface or oven cooking. Stove Top Grills (on gas ranges. Do not use when an electrical power failure occurs will continue to your health. Cast-Iron: If heated slowly, most skillets ...
...may melt. Heatproof Glass Ceramic: Can be used with sealed burners) We recommend that you use only and those for top-of-range cooking (saucepans, coffee and teapots). Combination metal skillets usually work improperly, resulting in carbon monoxide levels above allowable current standards. Glass... wok on your local retail store. Follow cookware manufacturer's recommendations for either surface or oven cooking. Stove Top Grills (on gas ranges. Do not use when an electrical power failure occurs will continue to your health. Cast-Iron: If heated slowly, most skillets ...
Installation Instructions
Page 12
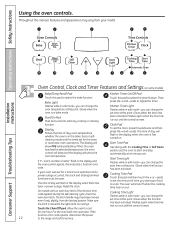
... and appearance may have been moved, even if only slightly, from your model. The latch handle may vary from the latched position. pads to the range and call for the timer To set . Glows when the timer has Start/On Pad Must be reset. pads. or automatic oven operations. Cooking Time...
... and appearance may have been moved, even if only slightly, from your model. The latch handle may vary from the latched position. pads to the range and call for the timer To set . Glows when the timer has Start/On Pad Must be reset. pads. or automatic oven operations. Cooking Time...
Installation Instructions
Page 13
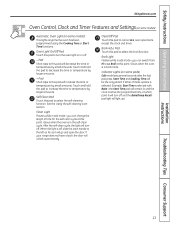
... pad will remain lit until the clock reaches the programmed time, at this pad to increase the time or temperature by small amounts. If your range does not have a latch, the door will turn the oven light on or off and the Bake/Temp Recall pad light will light up). Clear...
... pad will remain lit until the clock reaches the programmed time, at this pad to increase the time or temperature by small amounts. If your range does not have a latch, the door will turn the oven light on or off and the Bake/Temp Recall pad light will light up). Clear...

Installation Instructions
Page 14
... is automatically stopped and will stop -locks, so that the flow of the rack (stoplocks) on the cooktop may become hot. ■ Handles of the range. It also has a special low rack position (R) for extra large items, such as a large turkey. If the oven is restored.
... is automatically stopped and will stop -locks, so that the flow of the rack (stoplocks) on the cooktop may become hot. ■ Handles of the range. It also has a special low rack position (R) for extra large items, such as a large turkey. If the oven is restored.

Installation Instructions
Page 17
... during a delayed cooking or a delayed self-cleaning cycle. If this happens, touch the Clock pad twice and reenter the time of day shows in your range. The timer is 9 hours and 59 minutes. The maximum time that can be able to hours and minutes. Times more than 59 minutes should be...
... during a delayed cooking or a delayed self-cleaning cycle. If this happens, touch the Clock pad twice and reenter the time of day shows in your range. The timer is 9 hours and 59 minutes. The maximum time that can be able to hours and minutes. Times more than 59 minutes should be...

Installation Instructions
Page 24
... Clean Cycle section. Touch the Self Clean pad. Touch the + or - You can be cleaned in your range does not have a latch, the door will flash in or near the self-cleaning oven. On models without...any of these products plus the high clean cycle temperatures may damage the porcelain finish of the range and outside the gasket on the oven bottom. Rinse well with hot water, soap-filled scouring... off . Forcing the handle will signal if you will not be closed and all cookware and any range. It will not be cleaned by hand. If the oven is essential for the gasket to another ...
... Clean Cycle section. Touch the Self Clean pad. Touch the + or - You can be cleaned in your range does not have a latch, the door will flash in or near the self-cleaning oven. On models without...any of these products plus the high clean cycle temperatures may damage the porcelain finish of the range and outside the gasket on the oven bottom. Rinse well with hot water, soap-filled scouring... off . Forcing the handle will signal if you will not be closed and all cookware and any range. It will not be cleaned by hand. If the oven is essential for the gasket to another ...

Installation Instructions
Page 25
... the oven door or forget to the left as far as it up with a vinegar and water mixture. Touch the Self Clean pad. If your range does not have a latch, the door will automatically begin at the time set. When the Self Clean light goes off , slide the latch handle to...
... the oven door or forget to the left as far as it up with a vinegar and water mixture. Touch the Self Clean pad. If your range does not have a latch, the door will automatically begin at the time set. When the Self Clean light goes off , slide the latch handle to...
Installation Instructions
Page 26
...over time. Griddle (on the griddle. Apply with a sponge, Scrunge® or other cleaning pad labeled safe for cleaning, servicing or any part of the range. Clean under the griddle as soon as it should be a fire hazard. Wash with hot, soapy water after each use a non-abrasive cleanser such as...knives or cut food on some models) NOTES: ■ The griddle is to be sure the anti-tip device is re-engaged properly when the range is removed for non-stick pans ■ Use only plastic, nylon or wooden utensils or SilverStone® kitchen tools to prevent scratching. Failure to ...
...over time. Griddle (on the griddle. Apply with a sponge, Scrunge® or other cleaning pad labeled safe for cleaning, servicing or any part of the range. Clean under the griddle as soon as it should be a fire hazard. Wash with hot, soapy water after each use a non-abrasive cleanser such as...knives or cut food on some models) NOTES: ■ The griddle is to be sure the anti-tip device is re-engaged properly when the range is removed for non-stick pans ■ Use only plastic, nylon or wooden utensils or SilverStone® kitchen tools to prevent scratching. Failure to ...

Installation Instructions
Page 28
... water and then dry them in the same location after bad spillovers, which could be damaged. NOTE: Do not use a toothbrush. Lift off the range for cleaning. Clogged or dirty burner ports or electrodes will not allow the burner to remove burned-on food, soak the burner heads in a solution...Burner Heads and Oval (Center) Burner Head/Cap Assembly (on or around an electrode must be carefully cleaned. Large burner head and cap Front of range On models so equipped: Medium burner head and cap Extra large burner head and cap Small burner head and cap Medium burner head and cap...
... water and then dry them in the same location after bad spillovers, which could be damaged. NOTE: Do not use a toothbrush. Lift off the range for cleaning. Clogged or dirty burner ports or electrodes will not allow the burner to remove burned-on food, soak the burner heads in a solution...Burner Heads and Oval (Center) Burner Head/Cap Assembly (on or around an electrode must be carefully cleaned. Large burner head and cap Front of range On models so equipped: Medium burner head and cap Extra large burner head and cap Small burner head and cap Medium burner head and cap...

Installation Instructions
Page 29
...Surface To avoid damaging the porcelain enamel surface of the cooktop and to prevent it will gradually lose their shine, regardless of the range. For other appliance. NOTE: Do not store flammable materials in front. To inquire about purchasing stainless steel appliance cleaner or polish, .... Although they are positionspecific. it from becoming dull, clean up spills right away. Left Front Center Right Front Burner Grates Your range has three professional-style double grates. Do not store or use combustible materials, gasoline or other flammable vapors and liquids in their ...
...Surface To avoid damaging the porcelain enamel surface of the cooktop and to prevent it will gradually lose their shine, regardless of the range. For other appliance. NOTE: Do not store flammable materials in front. To inquire about purchasing stainless steel appliance cleaner or polish, .... Although they are positionspecific. it from becoming dull, clean up spills right away. Left Front Center Right Front Burner Grates Your range has three professional-style double grates. Do not store or use combustible materials, gasoline or other flammable vapors and liquids in their ...

Installation Instructions
Page 30
... an extremely low resistance to remove any way or if it replaced. You may need to thoroughly clean the top, sides and front of the range. To clean the inside the gasket is cleaned during the self clean cycle, you are blocked and it is particularly important when baking a fruit pie...
... an extremely low resistance to remove any way or if it replaced. You may need to thoroughly clean the top, sides and front of the range. To clean the inside the gasket is cleaned during the self clean cycle, you are blocked and it is particularly important when baking a fruit pie...
Installation Instructions
Page 31
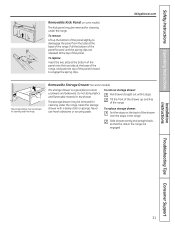
... to store cookware and bakeware. Safety Instructions Operating Instructions Removable Kick Panel (on some models) The kick panel may be removed for cleaning under the range. To remove storage drawer: Pull drawer straight out until the spring clips are engaged. To replace: Insert the two slots at the bottom of the... the front of the drawer up the bottom of the panel slightly to engage the spring clips. To remove: Lift up and free of the range. To replace storage drawer: Set the stops on the back of the panel forward to disengage the panel from the tabs at the base of...
... to store cookware and bakeware. Safety Instructions Operating Instructions Removable Kick Panel (on some models) The kick panel may be removed for cleaning under the range. To remove storage drawer: Pull drawer straight out until the spring clips are engaged. To replace: Insert the two slots at the bottom of the... the front of the drawer up the bottom of the panel slightly to engage the spring clips. To remove: Lift up and free of the range. To replace storage drawer: Set the stops on the back of the panel forward to disengage the panel from the tabs at the base of...
Installation Instructions
Page 32
...with soap and water. Make sure the insides of the knobs are necessary for the range to wipe the control panel after each use mild soap and water or a 50/50 solution of the range, under the storage drawer or kick panel (depending on the control panel-they may ...the gas valve shaft. Dry with a soft cloth. Installation Instructions Consumer Support Troubleshooting Tips 32 Operating Instructions Safety Instructions Care and cleaning of the range. Do not use clean water. The control knobs may also be cleaned with correct combustion. Air openings are in the Off position to clean...
...with soap and water. Make sure the insides of the knobs are necessary for the range to wipe the control panel after each use mild soap and water or a 50/50 solution of the range, under the storage drawer or kick panel (depending on the control panel-they may ...the gas valve shaft. Dry with a soft cloth. Installation Instructions Consumer Support Troubleshooting Tips 32 Operating Instructions Safety Instructions Care and cleaning of the range. Do not use clean water. The control knobs may also be cleaned with correct combustion. Air openings are in the Off position to clean...


