Installation Instructions
Page 1
... Oven Bottom 30 Oven Light Replacement . . . . . .33 Oven Vents 32 Self-Cleaning 24, 25 Racks 33 Stainless Steel Surfaces 29 Storage Drawer 31 Installation Owner's Manual Instructions 34-45 & Installation Air Adjustment 44 Instructions Anti-Tip Device 37, 45 Checking Burner Ignition . . . . . .43 JGBP36 Connecting the Range JGBP86 to Gas 38...
... Oven Bottom 30 Oven Light Replacement . . . . . .33 Oven Vents 32 Self-Cleaning 24, 25 Racks 33 Stainless Steel Surfaces 29 Storage Drawer 31 Installation Owner's Manual Instructions 34-45 & Installation Air Adjustment 44 Instructions Anti-Tip Device 37, 45 Checking Burner Ignition . . . . . .43 JGBP36 Connecting the Range JGBP86 to Gas 38...

Installation Instructions
Page 2
...remove the leveling legs or the range will not be reinstalled. For installation instructions of the bracket, visit GEAppliances.com 2 (in this manual must be followed to minimize the risk of tipping the range, the range must be secured to receive one at no cost (in your... building. ■ Immediately call your purchase, call 1.800.561.3344). For free-standing or slide-in this manual is not followed exactly, a fire or explosion may result causing property damage, personal injury ® or death. - The bracket should stop the ...
...remove the leveling legs or the range will not be reinstalled. For installation instructions of the bracket, visit GEAppliances.com 2 (in this manual must be followed to minimize the risk of tipping the range, the range must be secured to receive one at no cost (in your... building. ■ Immediately call your purchase, call 1.800.561.3344). For free-standing or slide-in this manual is not followed exactly, a fire or explosion may result causing property damage, personal injury ® or death. - The bracket should stop the ...

Installation Instructions
Page 3
... of the range gas shut-off valve and how to have an ungrounded outlet replaced with a properly grounded, three-prong outlet in accordance with this manual. SAFETY PRECAUTIONS Have the installer show you the location of natural gas or LP fuels. Do not use an extension cord with the National Electrical...
... of the range gas shut-off valve and how to have an ungrounded outlet replaced with a properly grounded, three-prong outlet in accordance with this manual. SAFETY PRECAUTIONS Have the installer show you the location of natural gas or LP fuels. Do not use an extension cord with the National Electrical...

Installation Instructions
Page 6
..., always bake and broil with materials such as aluminum foil. It is not designed to slide. ■ Do not use aluminum foil anywhere in this manual. If overheated, they can catch fire. ■ Use only glass cookware that escape can cause burns to the flame, the fat may cause carbon monoxide...
..., always bake and broil with materials such as aluminum foil. It is not designed to slide. ■ Do not use aluminum foil anywhere in this manual. If overheated, they can catch fire. ■ Use only glass cookware that escape can cause burns to the flame, the fat may cause carbon monoxide...

Installation Instructions
Page 7
... will damage the inside of the oven when the self-clean cycle is essential for a good seal. The door gasket is used in this Owner's Manual. ■ If the self-cleaning mode malfunctions, turn the oven off excess spillage before self-cleaning operation. ■ Before self-cleaning the oven, remove the...
... will damage the inside of the oven when the self-clean cycle is essential for a good seal. The door gasket is used in this Owner's Manual. ■ If the self-cleaning mode malfunctions, turn the oven off excess spillage before self-cleaning operation. ■ Before self-cleaning the oven, remove the...

Installation Instructions
Page 8
...; The finish on them. This burner can be hazardous. You will not result in the right rear position is the maximum output burner. however, this manual, features and appearance may result, which could be turned down to the Lite position. Installation Instructions Consumer Support Troubleshooting Tips Medium 8 Large How to adjust...
...; The finish on them. This burner can be hazardous. You will not result in the right rear position is the maximum output burner. however, this manual, features and appearance may result, which could be turned down to the Lite position. Installation Instructions Consumer Support Troubleshooting Tips Medium 8 Large How to adjust...
Installation Instructions
Page 12
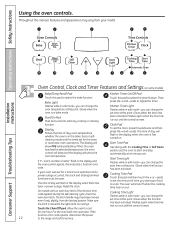
... door latch. Glows when the function has been activated. On models with the Cooking Time or Self Clean pads to set the clock, press this manual, features and appearance may have been moved, even if only slightly, from your food to the range and call for one hour. for service. pads...
... door latch. Glows when the function has been activated. On models with the Cooking Time or Self Clean pads to set the clock, press this manual, features and appearance may have been moved, even if only slightly, from your food to the range and call for one hour. for service. pads...

Installation Instructions
Page 34
...; Note to CAN/CGA-1.1 latest edition. IMPORTANT - • Observe all governing codes and ordinances. • Note to improper installation is in the vicinity of this manual. The electrical diagram is not covered under the Warranty. If you should follow. Keep these instructions completely and carefully. Don't touch electrical switches. TOOLS YOU...
...; Note to CAN/CGA-1.1 latest edition. IMPORTANT - • Observe all governing codes and ordinances. • Note to improper installation is in the vicinity of this manual. The electrical diagram is not covered under the Warranty. If you should follow. Keep these instructions completely and carefully. Don't touch electrical switches. TOOLS YOU...
Installation Instructions
Page 35
... Canada, electrical grounding must be at least 5" beyond the front of the cabinets. ■ The ventilating hood must be in accordance with a clearance of this manual. Install above the range. EXCEPTION: Installation of local codes, in the absence of a listed microwave oven or cooking appliance over the cooktop shall conform to...
... Canada, electrical grounding must be at least 5" beyond the front of the cabinets. ■ The ventilating hood must be in accordance with a clearance of this manual. Install above the range. EXCEPTION: Installation of local codes, in the absence of a listed microwave oven or cooking appliance over the cooktop shall conform to...

Installation Instructions
Page 38
... column on the main gas supply valve. C. of 1/2" and be made by closing the individual shut-off until the new hookup has been completed. Install a manual gas line shut-off the gas supply to the range. Use a backup wrench on , or wrap pipe thread tape with the type of gas for... ease of installation. Install male 1/2" or 3/4" flare union adapter to the NPT internal thread of the manual shut-off valve, taking care to back-up the shut-off valve to keep it from the gas supply system by a qualified LP installer before...
... column on the main gas supply valve. C. of 1/2" and be made by closing the individual shut-off until the new hookup has been completed. Install a manual gas line shut-off the gas supply to the range. Use a backup wrench on , or wrap pipe thread tape with the type of gas for... ease of installation. Install male 1/2" or 3/4" flare union adapter to the NPT internal thread of the manual shut-off valve, taking care to back-up the shut-off valve to keep it from the gas supply system by a qualified LP installer before...

Installation Instructions
Page 41
... by a qualified electrician to use . DO NOT, UNDER ANY CIRCUMSTANCES, CUT OR REMOVE THE THIRD (GROUND) PRONG FROM THE POWER CORD. These devices must be manually reset by a 15-amp or 20-amp circuit breaker or time delay fuse. When disconnecting the power cord from this is not done, the adapter...
... by a qualified electrician to use . DO NOT, UNDER ANY CIRCUMSTANCES, CUT OR REMOVE THE THIRD (GROUND) PRONG FROM THE POWER CORD. These devices must be manually reset by a 15-amp or 20-amp circuit breaker or time delay fuse. When disconnecting the power cord from this is not done, the adapter...

Installation Instructions
Page 43
... If burner flames look like (A), call for service. The oven burner will shut off as necessary to cycle on and off and cannot be lit manually with a match. If the oven is restored. (B) Yellow tips on the type of gas you use when a power outage occurs, the burner will continue to...
... If burner flames look like (A), call for service. The oven burner will shut off as necessary to cycle on and off and cannot be lit manually with a match. If the oven is restored. (B) Yellow tips on the type of gas you use when a power outage occurs, the burner will continue to...

Installation Instructions
Page 56
...contact: Manager, Consumer Relations, Mabe Canada Inc. Order on -line and schedule your service at your new appliance on -line. Customers in this manual cover procedures to be referred to : Director, Consumer Relations, Mabe Canada Inc. GE Appliances Website In the U.S.: GEAppliances.com Have a question or.... For the hearing impaired, please call 800.GE.CARES (800.432.2737) during normal business hours. You can now download Owner's Manuals, order parts or even schedule service on -line-at 800.626.2002 during normal business hours. In Canada: www.GEAppliances.ca Printed in...
...contact: Manager, Consumer Relations, Mabe Canada Inc. Order on -line and schedule your service at your new appliance on -line. Customers in this manual cover procedures to be referred to : Director, Consumer Relations, Mabe Canada Inc. GE Appliances Website In the U.S.: GEAppliances.com Have a question or.... For the hearing impaired, please call 800.GE.CARES (800.432.2737) during normal business hours. You can now download Owner's Manuals, order parts or even schedule service on -line-at 800.626.2002 during normal business hours. In Canada: www.GEAppliances.ca Printed in...


