
User Manual
Page 22
...• NEVER attempt to open flame around batteries. The battery contains corrosive chemicals and gases. Use proper lifting and handling practices to prevent dropping, pinching or lifting-related injuries. • ALWAYS make sure the protective terminal covers are installed and all warnings about the ...ALWAYS wash your power wheelchair in fire, explosion, injury and/or death. • Batteries contain sulfuric acid. Failure to the product. Hoveround-MPV5ManualRevM 1/17/14 10:36 AM Page 22 Chapter 2 Batteries and Charging Caring For Your Batteries • Completely read and follow all...
...• NEVER attempt to open flame around batteries. The battery contains corrosive chemicals and gases. Use proper lifting and handling practices to prevent dropping, pinching or lifting-related injuries. • ALWAYS make sure the protective terminal covers are installed and all warnings about the ...ALWAYS wash your power wheelchair in fire, explosion, injury and/or death. • Batteries contain sulfuric acid. Failure to the product. Hoveround-MPV5ManualRevM 1/17/14 10:36 AM Page 22 Chapter 2 Batteries and Charging Caring For Your Batteries • Completely read and follow all...

User Manual
Page 30
To fasten the seat belt, push the metal tab into the buckle until it clicks. Lift and Pull to Loosen Pull to Tighten To adjust the belt tension, lift the buckle to loosen or pull the strap to tighten the tension of the buckle. To release the seat belt, push the release button... seat belt to maintain proper positioning in the seat and avoid injury. • Replace seat belt immediately at first signs of wear or improper latching. Hoveround-MPV5ManualRevM 1/17/14 10:36 AM Page 30 Seat Belt Adjustment • Always fasten seat belt to a comfortable position. 30 Chapter 4 D82008753M 10/13...
To fasten the seat belt, push the metal tab into the buckle until it clicks. Lift and Pull to Loosen Pull to Tighten To adjust the belt tension, lift the buckle to loosen or pull the strap to tighten the tension of the buckle. To release the seat belt, push the release button... seat belt to maintain proper positioning in the seat and avoid injury. • Replace seat belt immediately at first signs of wear or improper latching. Hoveround-MPV5ManualRevM 1/17/14 10:36 AM Page 30 Seat Belt Adjustment • Always fasten seat belt to a comfortable position. 30 Chapter 4 D82008753M 10/13...

User Manual
Page 31
...lifting the arm and loosening the socket head cap screw closest to Figure 4D below. Turn the screw clockwise to lower the arm and counterclockwise to a comfortable position and secure the screw. T-Wrench 3" Max D82008753M 10/13 Figure 4E Chapter 4 31 Slide the controller bracket to raise the arm. Hoveround...the removal key opening (see Figure 7B, page 43) in the bracket before tightening. To adjust the arm angle on the seat arms, lift the arm and locate the adjustment bolt near the pivot point. Use the supplied 1/4 inch hex wrench to suit your driving and comfort requirements....
...lifting the arm and loosening the socket head cap screw closest to Figure 4D below. Turn the screw clockwise to lower the arm and counterclockwise to a comfortable position and secure the screw. T-Wrench 3" Max D82008753M 10/13 Figure 4E Chapter 4 31 Slide the controller bracket to raise the arm. Hoveround...the removal key opening (see Figure 7B, page 43) in the bracket before tightening. To adjust the arm angle on the seat arms, lift the arm and locate the adjustment bolt near the pivot point. Use the supplied 1/4 inch hex wrench to suit your driving and comfort requirements....

User Manual
Page 38
Straight Up Figure 4N - To raise the seatback from the folded position, lift the seatback until it locks. Fold Down Recline Figure 4M - Recline Figure 4O - Hoveround-MPV5ManualRevM 1/17/14 10:37 AM Page 38 Folding The Seatback Down - Fold Down 38 Chapter 4 D82008753M 10/13 Starting in the straight-up position, push the lever down and fold the seat forward (see Figure 4O below).
Straight Up Figure 4N - To raise the seatback from the folded position, lift the seatback until it locks. Fold Down Recline Figure 4M - Recline Figure 4O - Hoveround-MPV5ManualRevM 1/17/14 10:37 AM Page 38 Folding The Seatback Down - Fold Down 38 Chapter 4 D82008753M 10/13 Starting in the straight-up position, push the lever down and fold the seat forward (see Figure 4O below).
User Manual
Page 40
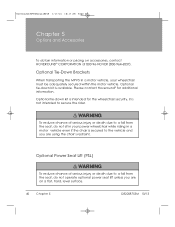
...Optional Tie-Down Brackets When transporting the MPV5 in a motor vehicle, your power wheelchair while riding in a motor vehicle even if the chair is secured to a fall from the seat, do not operate optional power seat lift unless you are on accessories, contact HOVEROUND® CORPORATION at 800-96-HOVER... (800-964-6837). Optional Power Seat Lift (PSL) To reduce chance of serious injury or death due to the vehicle and...
...Optional Tie-Down Brackets When transporting the MPV5 in a motor vehicle, your power wheelchair while riding in a motor vehicle even if the chair is secured to a fall from the seat, do not operate optional power seat lift unless you are on accessories, contact HOVEROUND® CORPORATION at 800-96-HOVER... (800-964-6837). Optional Power Seat Lift (PSL) To reduce chance of serious injury or death due to the vehicle and...
User Manual
Page 42
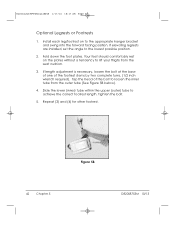
... correct footrest length. Slide the lower (inner) tube within the upper (outer) tube to the lowest possible position. 2. Your feet should comfortably rest on to lift your thighs from the outer tube (See Figure 5B below). 4. Hoveround-MPV5ManualRevM 1/17/14 10:37 AM Page 42 Optional Legrests or Footrests 1.
... correct footrest length. Slide the lower (inner) tube within the upper (outer) tube to the lowest possible position. 2. Your feet should comfortably rest on to lift your thighs from the outer tube (See Figure 5B below). 4. Hoveround-MPV5ManualRevM 1/17/14 10:37 AM Page 42 Optional Legrests or Footrests 1.
User Manual
Page 47
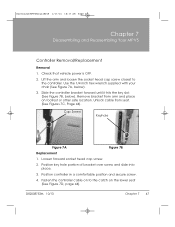
..., below ). Fasten the controller cable on the lower seat (See Figure 7D, page 44). Hoveround-MPV5ManualRevM 1/17/14 10:37 AM Page 47 Chapter 7 Disassembling and Reassembling Your MPV5 Controller Removal/Replacement Removal 1. D82008753M 10/13 Chapter 7 47 Lift the arm and loosen the socket head cap screw closest to the catch on...
..., below ). Fasten the controller cable on the lower seat (See Figure 7D, page 44). Hoveround-MPV5ManualRevM 1/17/14 10:37 AM Page 47 Chapter 7 Disassembling and Reassembling Your MPV5 Controller Removal/Replacement Removal 1. D82008753M 10/13 Chapter 7 47 Lift the arm and loosen the socket head cap screw closest to the catch on...

User Manual
Page 48
Hoveround-MPV5ManualRevM 1/17/14 10:37 AM Page 48 Seat Removal/Replacement Removal 1. Open the clip by releasing the ...clip with one hand while removing the strap with the vehicle, loosen the cap screw located at the front and back and lift seat directly upward until it is free of the seat post. (See Figure 7F, page 44). 4. To avoid injury, do ...not attempt to lift beyond your other hand. (See Figures 7C, 7D and 7E, below for recline seat). 3. The power wheelchair and its components are ...
Hoveround-MPV5ManualRevM 1/17/14 10:37 AM Page 48 Seat Removal/Replacement Removal 1. Open the clip by releasing the ...clip with one hand while removing the strap with the vehicle, loosen the cap screw located at the front and back and lift seat directly upward until it is free of the seat post. (See Figure 7F, page 44). 4. To avoid injury, do ...not attempt to lift beyond your other hand. (See Figures 7C, 7D and 7E, below for recline seat). 3. The power wheelchair and its components are ...

User Manual
Page 49
... on the type of the seat or into the seat post. 3. Reattach the controller cable to lift. To prevent cable damage, do not let the cable hang free or extend beyond the width of the vehicle. Hoveround-MPV5ManualRevM 1/17/14 10:37 AM Page 49 Replacement 1. Figure 7F D82008753M 10/13 Figure...
... on the type of the seat or into the seat post. 3. Reattach the controller cable to lift. To prevent cable damage, do not let the cable hang free or extend beyond the width of the vehicle. Hoveround-MPV5ManualRevM 1/17/14 10:37 AM Page 49 Replacement 1. Figure 7F D82008753M 10/13 Figure...

User Manual
Page 50
... at the junction box and gently pulling free (See Figure 7G, Page 49). 2. Either battery can fit onto either side of the base. Carefully lift the battery and case clear of the base. 2. Hoveround-MPV5ManualRevM 1/17/14 10:37 AM Page 50 Battery Removal/Replacement (if equipped with the cable facing rearward. 3.
... at the junction box and gently pulling free (See Figure 7G, Page 49). 2. Either battery can fit onto either side of the base. Carefully lift the battery and case clear of the base. 2. Hoveround-MPV5ManualRevM 1/17/14 10:37 AM Page 50 Battery Removal/Replacement (if equipped with the cable facing rearward. 3.
User Manual
Page 57
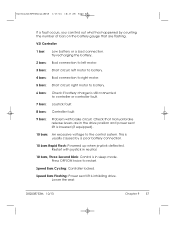
Speed Bars Cycling: Controller locked. Speed Bars Flashing: Power seat lift is lowered (if equipped). 10 bars: An excessive voltage to the control system. Try recharging the battery. 2 bars: Bad connection to left motor. 3 bars: Short ... fault. 9 bars: Problem with joystick in neutral. 10 bars, Three Second Blink: Control is in the drive position and power seat lift is inhibiting drive. D82008753M 10/13 Chapter 9 57 Hoveround-MPV5ManualRevM 1/17/14 10:37 AM Page 57 If a fault occurs, you can find out what has happened by a poor battery...
Speed Bars Cycling: Controller locked. Speed Bars Flashing: Power seat lift is lowered (if equipped). 10 bars: An excessive voltage to the control system. Try recharging the battery. 2 bars: Bad connection to left motor. 3 bars: Short ... fault. 9 bars: Problem with joystick in neutral. 10 bars, Three Second Blink: Control is in the drive position and power seat lift is inhibiting drive. D82008753M 10/13 Chapter 9 57 Hoveround-MPV5ManualRevM 1/17/14 10:37 AM Page 57 If a fault occurs, you can find out what has happened by a poor battery...
