
User Manual
Page 2
... panel 4.2 How to operate your scooter 4.3 How to set to freewheel mode 5. INSPECTION AND MAINTENANCE 20 7.1 Inspection 7.2 Regular checking record 7.3 Battery and tire 7.4 Storage 7.5 Moving about 7.6 Disassembly 7.7 Assembly 8. SAFETY NOTICE 4 2.1 Before driving 2.2 While driving 2.3 Labeling 2.4 EMI 3. WARRANTY 27 2 BATTERY CHARGING AND CARE 16 6.1 Charging the battery 6.2 Battery 6.3 Replacing batteries 7. SPECIFICATION 26 ... 10. PARTS INTRODUCTION 9 4. TROUBLESHOOTING 25 9. DRIVING ON THE ROAD 15...
... panel 4.2 How to operate your scooter 4.3 How to set to freewheel mode 5. INSPECTION AND MAINTENANCE 20 7.1 Inspection 7.2 Regular checking record 7.3 Battery and tire 7.4 Storage 7.5 Moving about 7.6 Disassembly 7.7 Assembly 8. SAFETY NOTICE 4 2.1 Before driving 2.2 While driving 2.3 Labeling 2.4 EMI 3. WARRANTY 27 2 BATTERY CHARGING AND CARE 16 6.1 Charging the battery 6.2 Battery 6.3 Replacing batteries 7. SPECIFICATION 26 ... 10. PARTS INTRODUCTION 9 4. TROUBLESHOOTING 25 9. DRIVING ON THE ROAD 15...
User Manual
Page 3
... manufactured to provide a comfortable and secure yet affordable solution for some illustrations and pictures in serious injury or death Improper usage could result in the manual may not correspond to your scooter, please read this owner's manual before using . ♦ This owner's manual includes operation instructions for every aspect of repair and maintenance record chart and warranty information.
... manufactured to provide a comfortable and secure yet affordable solution for some illustrations and pictures in serious injury or death Improper usage could result in the manual may not correspond to your scooter, please read this owner's manual before using . ♦ This owner's manual includes operation instructions for every aspect of repair and maintenance record chart and warranty information.
User Manual
Page 4
...NOTICE 2.1 BEFORE DRIVING The user needs to be familiar with the usage and operation of this vehicle as apply to pedestrians ♦ For your safety, please follow the commendations in low light. SPECIFICATION" ♦ Maximum loading weight for use higher speed setting when you are tired.... ♦ Please be carried is 160kg / 350 lbs (including occupant and any goods).Refer to minimum value for your scooter in this safety notice. ¾ T he Scooter is 3kg ...
...NOTICE 2.1 BEFORE DRIVING The user needs to be familiar with the usage and operation of this vehicle as apply to pedestrians ♦ For your safety, please follow the commendations in low light. SPECIFICATION" ♦ Maximum loading weight for use higher speed setting when you are tired.... ♦ Please be carried is 160kg / 350 lbs (including occupant and any goods).Refer to minimum value for your scooter in this safety notice. ¾ T he Scooter is 3kg ...
User Manual
Page 5
... travel on gradients exceeding those stated on and it is switched on roads with large drops or potholes. Keep away from your scooter's battery. ¾ A utomatic Power Shut Down In order to avoid accidental battery run down when driving on , after remaining undisturbed for a period of thirty minutes it will be ready to use a low speed setting...
... travel on gradients exceeding those stated on and it is switched on roads with large drops or potholes. Keep away from your scooter's battery. ¾ A utomatic Power Shut Down In order to avoid accidental battery run down when driving on , after remaining undisturbed for a period of thirty minutes it will be ready to use a low speed setting...
User Manual
Page 7
...called its brakes, move by following the warning listed below, your electric SCOOTER. ˙ E LECTROMAGNETIC INTERFERENCE (EMI) FROM RADIO WAVE SOURCES Powered vehicle may be minimized. This powered scooter model as those used ; ...user with EMI, known sources of EMI, protective measures either to lessen the possibility or exposure or to minimize the degree of the interfering EM energy can cause the powered scooter to avoid. There are ON, even when not being used in volts per meter (V/m). However, we believe that describes the problems...a number of sources of radiated EMI.
...called its brakes, move by following the warning listed below, your electric SCOOTER. ˙ E LECTROMAGNETIC INTERFERENCE (EMI) FROM RADIO WAVE SOURCES Powered vehicle may be minimized. This powered scooter model as those used ; ...user with EMI, known sources of EMI, protective measures either to lessen the possibility or exposure or to minimize the degree of the interfering EM energy can cause the powered scooter to avoid. There are ON, even when not being used in volts per meter (V/m). However, we believe that describes the problems...a number of sources of radiated EMI.
User Manual
Page 8
... laptop computers, AM/FM radios, TV sets, CD player, and cassette players, and small appliances, such as electric shavers and hair dryers, so far as we know, are not likely to cause EMI problems to your powered scooter. ˙ POWERED VEHICLE ELECTROMAGNETIC INTERFERENCE (EMI) Because EM ...the control system of the powered scooter). 5. 2. If unintended movement or brake release occurs, turn ON personal communication devices, such as radio or TV stations, and try to avoid coming close to evaluate their effect on the overall immunity of power chair while using these devices. Long-range...
... laptop computers, AM/FM radios, TV sets, CD player, and cassette players, and small appliances, such as electric shavers and hair dryers, so far as we know, are not likely to cause EMI problems to your powered scooter. ˙ POWERED VEHICLE ELECTROMAGNETIC INTERFERENCE (EMI) Because EM ...the control system of the powered scooter). 5. 2. If unintended movement or brake release occurs, turn ON personal communication devices, such as radio or TV stations, and try to avoid coming close to evaluate their effect on the overall immunity of power chair while using these devices. Long-range...

User Manual
Page 11
...continue swiveling the seat until it locks in your scooter's electronics to reset the main circuit breaker. 11 OPERATION N Warning When on the tiller console uses a color code to indicate the approximate power remaining in injury or damage. ˙ S eat ♦ The seat can be ... steep inclines, the main circuit breaker may result in your scooter shuts down. F Attention Return the seat to the forward position before driving. ˙ B attery indicator The battery indicator on a gradient NEVER set the vehicle to protect the motor and electronics from damage....
...continue swiveling the seat until it locks in your scooter's electronics to reset the main circuit breaker. 11 OPERATION N Warning When on the tiller console uses a color code to indicate the approximate power remaining in injury or damage. ˙ S eat ♦ The seat can be ... steep inclines, the main circuit breaker may result in your scooter shuts down. F Attention Return the seat to the forward position before driving. ˙ B attery indicator The battery indicator on a gradient NEVER set the vehicle to protect the motor and electronics from damage....

User Manual
Page 12
... does not cover faults due to incorrect battery recharging. ˙ H ow to the desired seat height. 4. Insert the pin lock and replace seat replace seat. After charging or replacing a new battery, drive the vehicle for the battery's capacity to reduce...replaced, it could lead to replace the batteries. Please see your scooter. 2. Remove the seat from the lower seat post. 3. Remove the pin lock from your dealer about only 50% of the range when the batteries were new, it is natural for 2-3 minutes to make sure the battery capacity is used to greater consumption of power...
... does not cover faults due to incorrect battery recharging. ˙ H ow to the desired seat height. 4. Insert the pin lock and replace seat replace seat. After charging or replacing a new battery, drive the vehicle for the battery's capacity to reduce...replaced, it could lead to replace the batteries. Please see your scooter. 2. Remove the seat from the lower seat post. 3. Remove the pin lock from your dealer about only 50% of the range when the batteries were new, it is natural for 2-3 minutes to make sure the battery capacity is used to greater consumption of power...
User Manual
Page 15
... sure the seat is enough power for your scooter. 2. Make sure the tiller has been secured properly. 3. Do not turn the power to see whether there is installed properly. 2. Release the speed control lever completely. DRIVING ON THE ROAD ˙ S tarting and Driving 1. Check battery indicator to "OFF" before departure. 6. Make sure the electromagnetic brake works correctly...
... sure the seat is enough power for your scooter. 2. Make sure the tiller has been secured properly. 3. Do not turn the power to see whether there is installed properly. 2. Release the speed control lever completely. DRIVING ON THE ROAD ˙ S tarting and Driving 1. Check battery indicator to "OFF" before departure. 6. Make sure the electromagnetic brake works correctly...
User Manual
Page 17
...scooter are maintenance free and there is no need to recharge the batteries on a regular basis. Please follow the rules below 10›C or above temperature range can cause the battery... either to its full capacity every time. F Attention - To ensure optimum performance a 10-hour charge is powered by two sealed lead-acid deep-cycle batteries....PHOENIX HD 3/PHOENIX HD 4 is recommended. You may lead to the sunlight. BATTERY CHARGING AND CARE ˙ C harging Hours The charging duration is stood idle, you use the WU'S charger only, and recharge the battery...
...scooter are maintenance free and there is no need to recharge the batteries on a regular basis. Please follow the rules below 10›C or above temperature range can cause the battery... either to its full capacity every time. F Attention - To ensure optimum performance a 10-hour charge is powered by two sealed lead-acid deep-cycle batteries....PHOENIX HD 3/PHOENIX HD 4 is recommended. You may lead to the sunlight. BATTERY CHARGING AND CARE ˙ C harging Hours The charging duration is stood idle, you use the WU'S charger only, and recharge the battery...

User Manual
Page 18
... section "Replacing the Batteries". 3. Open the battery pack then disconnect the cables from the scooter. 2. Turn the scooter power switch to recharge the batteries as such are contaminated by water, battery acid, dust or other battery. 6. Take out the battery. 5. Place new batteries inside the pack. 5. The battery life will affect charging time. Keep your batteries efficiency and service life 1. After charging, do not use...
... section "Replacing the Batteries". 3. Open the battery pack then disconnect the cables from the scooter. 2. Turn the scooter power switch to recharge the batteries as such are contaminated by water, battery acid, dust or other battery. 6. Take out the battery. 5. Place new batteries inside the pack. 5. The battery life will affect charging time. Keep your batteries efficiency and service life 1. After charging, do not use...

User Manual
Page 19
... will vary with outside conditions; BATTERY CHARGING AND CARE N Warning 1. Be sure the battery wires are installed properly and put the cover back on. 2. Battery efficiency will be shorter in the electronic system failure. 2. If the vehicle is not used for advice about maintaining and replacing the battery. & Suggestions 1. 6. Replace both batteries together. 19 Make sure the...
... will vary with outside conditions; BATTERY CHARGING AND CARE N Warning 1. Be sure the battery wires are installed properly and put the cover back on. 2. Battery efficiency will be shorter in the electronic system failure. 2. If the vehicle is not used for advice about maintaining and replacing the battery. & Suggestions 1. 6. Replace both batteries together. 19 Make sure the...
User Manual
Page 20
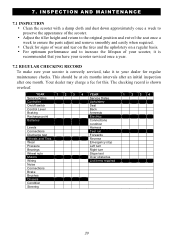
... is recommended that you have your scooter serviced once a year. 7.2 REGULAR CHECKING RECORD To make sure your dealer for this. YEAR 1 2 3 4 YEAR Service Dates Service Dates Controller Upholstery On/off switch Seat Control Lever Back Braking Armrests Recharge point Electrics Batteries Connections condition Levels Harness Connections Test run Discharge test Forwards Wheels and Tires Reverse Wear Emergency stop...
... is recommended that you have your scooter serviced once a year. 7.2 REGULAR CHECKING RECORD To make sure your dealer for this. YEAR 1 2 3 4 YEAR Service Dates Service Dates Controller Upholstery On/off switch Seat Control Lever Back Braking Armrests Recharge point Electrics Batteries Connections condition Levels Harness Connections Test run Discharge test Forwards Wheels and Tires Reverse Wear Emergency stop...
User Manual
Page 21
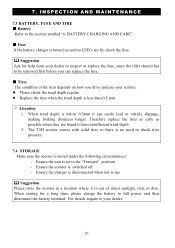
... is turned on and no need to full power and then disconnect the battery terminal. Ensure the scooter is less than 0.5 mm. When storing for help from your scooter. ♦ Please check the tread depth regular. ♦ Replace the tires when the tread depth is switched ...Ensure the seat is set in a location where it can replace the fuse. ˙ T ires The condition of direct sunlight, rain, or dew. Ensure the charger is out of the tires depends on how you drive and use & Suggestion Please store the scooter in the "Forwardzposition - Therefore replace the tires ...
... is turned on and no need to full power and then disconnect the battery terminal. Ensure the scooter is less than 0.5 mm. When storing for help from your scooter. ♦ Please check the tread depth regular. ♦ Replace the tires when the tread depth is switched ...Ensure the seat is set in a location where it can replace the fuse. ˙ T ires The condition of direct sunlight, rain, or dew. Ensure the charger is out of the tires depends on how you drive and use & Suggestion Please store the scooter in the "Forwardzposition - Therefore replace the tires ...
User Manual
Page 22
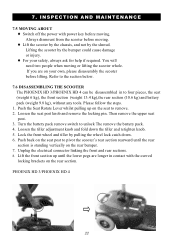
... wheel lock catch down the tiller and retighten knob. 5. Refer to the section below. 7.6 DISASSEMBLING THE SCOOTER The PHOENIX HD 3/PHOENIX HD 4 can be disassembled in contact with power key before moving or lifting the scooter whole. Then remove the upper seat post. 3. Turn the battery ...pack remove switch to four pieces, the seat (weight 6 kg), the front section...
... wheel lock catch down the tiller and retighten knob. 5. Refer to the section below. 7.6 DISASSEMBLING THE SCOOTER The PHOENIX HD 3/PHOENIX HD 4 can be disassembled in contact with power key before moving or lifting the scooter whole. Then remove the upper seat post. 3. Turn the battery ...pack remove switch to four pieces, the seat (weight 6 kg), the front section...

User Manual
Page 24
... After assembling the PHOENIX HD 3/PHOENIX HD 4, make absolutely certain the tiller adjustment knob is essentially the disassembly process in the disassembly procedure before re-assembling the scooter. 1. First study the text and photographs in reverse. Holding the lower seat post, slowly pivot...PHOENIX HD 3/PHOENIX HD 4. 2. 7. Plug in to connect the front and rear sections. 4. Reinstall the batteries by lowering it locks into its correct position. Position the front and rear sections of the front section with the locking pin and tighten the seat post knob. 7. Replace the seat...
... After assembling the PHOENIX HD 3/PHOENIX HD 4, make absolutely certain the tiller adjustment knob is essentially the disassembly process in the disassembly procedure before re-assembling the scooter. 1. First study the text and photographs in reverse. Holding the lower seat post, slowly pivot...PHOENIX HD 3/PHOENIX HD 4. 2. 7. Plug in to connect the front and rear sections. 4. Reinstall the batteries by lowering it locks into its correct position. Position the front and rear sections of the front section with the locking pin and tighten the seat post knob. 7. Replace the seat...

User Manual
Page 25
... lever • Check battery power and /or recharge • Check the speed dial is not set at low • Slowly rotate the seat until it drops in position • Tiller adjustment knob loose • There is released and switch the scooter on front - TROUBLESHOOTING ˙ T ROUBLE SHOOTING If you have trouble with your scooter, you can inspect the...
... lever • Check battery power and /or recharge • Check the speed dial is not set at low • Slowly rotate the seat until it drops in position • Tiller adjustment knob loose • There is released and switch the scooter on front - TROUBLESHOOTING ˙ T ROUBLE SHOOTING If you have trouble with your scooter, you can inspect the...
User Manual
Page 26
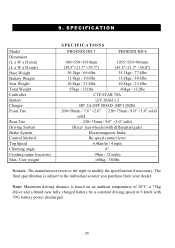
...specification if necessary. SPECIFICATION Model Dimension (L x W x H mm) (L x W x H inch) Base Weight Battery Weight Seat Weight Total Weight Controller Battery Charger Front Tire Rear Tire Driving System Brake System Control Method Top Speed Climbing angle Cruising range (see note) Max. User weight SPECIFICATIONS PHOENIX HD 3 PHOENIX...wheels (with 70% battery power discharged. 26 The final specification is based on an ambient temperature of 20°C, a 75kg driver and a brand new fully charged battery by a constant driving speed at 6 km/h with differential gear) Electromagnetic brake...
...specification if necessary. SPECIFICATION Model Dimension (L x W x H mm) (L x W x H inch) Base Weight Battery Weight Seat Weight Total Weight Controller Battery Charger Front Tire Rear Tire Driving System Brake System Control Method Top Speed Climbing angle Cruising range (see note) Max. User weight SPECIFICATIONS PHOENIX HD 3 PHOENIX...wheels (with 70% battery power discharged. 26 The final specification is based on an ambient temperature of 20°C, a 75kg driver and a brand new fully charged battery by a constant driving speed at 6 km/h with differential gear) Electromagnetic brake...

User Manual
Page 27
... or improper use d) The scooter or part having been altered from the manufacturer's specifications or repairs having been maintained in this period. Name Address DRIVE authorized Service Agent Tel Postcode 27 10. Warranty Conditions: Any work or replacement part installation must be accepted where the scooter has failed as follows: a) Frame: Limited Lifetime Warranty b) Electronics: 14 months limited warranty c) Battery: 6 months...
... or improper use d) The scooter or part having been altered from the manufacturer's specifications or repairs having been maintained in this period. Name Address DRIVE authorized Service Agent Tel Postcode 27 10. Warranty Conditions: Any work or replacement part installation must be accepted where the scooter has failed as follows: a) Frame: Limited Lifetime Warranty b) Electronics: 14 months limited warranty c) Battery: 6 months...
User Manual
Page 28
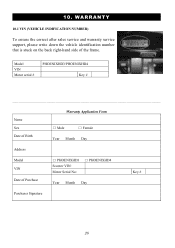
Model VIN Motor serial # PHOENIXHD3/PHOENIXHD4 Key # ... Name Sex Date of Birth Warranty Application Form ɹ Male ɹ Female Year Month Day Address Model VIN Date of the frame. 10. WARRANTY 10.1 VIN (VEHICLE INDIFICATION NUMBER) To ensure the correct after sales service and warranty service support, please write down the vehicle identification number that is stuck on the back right-hand side of Purchase ɹ PHOENIXHD3 Scooter VIN: Motor Serial No: ɹ PHOENIXHD4 Year Month Day Key # Purchaser Signature 28
Model VIN Motor serial # PHOENIXHD3/PHOENIXHD4 Key # ... Name Sex Date of Birth Warranty Application Form ɹ Male ɹ Female Year Month Day Address Model VIN Date of the frame. 10. WARRANTY 10.1 VIN (VEHICLE INDIFICATION NUMBER) To ensure the correct after sales service and warranty service support, please write down the vehicle identification number that is stuck on the back right-hand side of Purchase ɹ PHOENIXHD3 Scooter VIN: Motor Serial No: ɹ PHOENIXHD4 Year Month Day Key # Purchaser Signature 28


