
Owners Manual
Page 2
SAFETY 3 NOTICE 2.1 Before driving 2.2 While driving 2.3 Labeling 2.4 EMI 3. PARTS INTRODUCTION 8 Parts description 4. OPERATION 9 4.1 Control panel 4.2 How to operate your scooter 5. TROUBLE SHOOTING AND SPECIFICATION 18 8. WARRANTY 19 1 Rev.2.02.15.13 TABLE OF CONTENTS 1. PREFACE AND INTRODUCTION 2 2. BATTERY CHARGING AND CARE 13 5.1 Charging the battery 5.2 Battery 6. INSPECTION AND MAINTENANCE 16 6.1 Inspection 6.2 Regular checking record 6.3 Battery, fuse and tire 6.4 Storage 6.5 Moving about 7.
SAFETY 3 NOTICE 2.1 Before driving 2.2 While driving 2.3 Labeling 2.4 EMI 3. PARTS INTRODUCTION 8 Parts description 4. OPERATION 9 4.1 Control panel 4.2 How to operate your scooter 5. TROUBLE SHOOTING AND SPECIFICATION 18 8. WARRANTY 19 1 Rev.2.02.15.13 TABLE OF CONTENTS 1. PREFACE AND INTRODUCTION 2 2. BATTERY CHARGING AND CARE 13 5.1 Charging the battery 5.2 Battery 6. INSPECTION AND MAINTENANCE 16 6.1 Inspection 6.2 Regular checking record 6.3 Battery, fuse and tire 6.4 Storage 6.5 Moving about 7.
Owners Manual
Page 3
... accidents. Suggestion To maximize your batteries efficiency and service life, please fully recharge your vehicle in this owner's manual. ♦ This owner's manual includes operation instructions for how to make sure that you purchased. 1. We reserve the right to deal with possible accidents. ♦ The symbols used in a good operating order. ♦ This manual includes a copy of the vehicle...
... accidents. Suggestion To maximize your batteries efficiency and service life, please fully recharge your vehicle in this owner's manual. ♦ This owner's manual includes operation instructions for how to make sure that you purchased. 1. We reserve the right to deal with possible accidents. ♦ The symbols used in a good operating order. ♦ This manual includes a copy of the vehicle...
Owners Manual
Page 4
...in Section 7 SPECIFICATIONS ♦ Maximum loading weight for the first time. ♦ Only use this vehicle to carry or haul goods ♦ As the maximum weight can be carried please refer to be careful when driving your scooter (including children) ■ Do not use higher speed setting when you can...for safety when driving on the pavement for basket is only to avoid accidents with the operation of your scooter. SAFETY NOTICE 2.1 BEFORE DRIVING The user needs to "MAX USER WEIGHT" in mind driving motions, such as apply to pedestrians For your safety, please therefore follow the ...
...in Section 7 SPECIFICATIONS ♦ Maximum loading weight for the first time. ♦ Only use this vehicle to carry or haul goods ♦ As the maximum weight can be carried please refer to be careful when driving your scooter (including children) ■ Do not use higher speed setting when you can...for safety when driving on the pavement for basket is only to avoid accidents with the operation of your scooter. SAFETY NOTICE 2.1 BEFORE DRIVING The user needs to "MAX USER WEIGHT" in mind driving motions, such as apply to pedestrians For your safety, please therefore follow the ...
Owners Manual
Page 5
... scooter and remove the ignition key before using a mobile phone. ♦ Do not charge mobile phones or any other electrical devices from falling. ♦ Pay attention that your clothes do not tangle in the wheels. ■ Do not use your scooter's battery. ■ Automatic Power Shut...9830; Do not take the scooter onto escalators. ♦ UNDER NO CIRCUMSTANCES SHOULD THE SCOOTER BE USED AS A SEAT IN A MOTOR VEHICLE (E.G. Refer to use a low speed setting when ascending or descending a gradient. ♦ Do not drive in Section 7 SPECIFICATIONS ♦ Always use once again. ■ ...
... scooter and remove the ignition key before using a mobile phone. ♦ Do not charge mobile phones or any other electrical devices from falling. ♦ Pay attention that your clothes do not tangle in the wheels. ■ Do not use your scooter's battery. ■ Automatic Power Shut...9830; Do not take the scooter onto escalators. ♦ UNDER NO CIRCUMSTANCES SHOULD THE SCOOTER BE USED AS A SEAT IN A MOTOR VEHICLE (E.G. Refer to use a low speed setting when ascending or descending a gradient. ♦ Do not drive in Section 7 SPECIFICATIONS ♦ Always use once again. ■ ...
Owners Manual
Page 6
...freewheel device before use. Do not set in the freewheel mode when driving on them. 4. Do not place magnetic devices near the area of the operation handle as this type of your scooter or cause it is installed properly. 2. ...power for your safety, the power will automatically cut off and electromagnetic brake system will endanger your scooter. ♦ Maximum User Weight Limit Refer to re-start your safety. Turn the power on the headlights. 5. Overloading past the weight limit may cause danger to you have any doubt about the remaining power, please recharge the batteries...
...freewheel device before use. Do not set in the freewheel mode when driving on them. 4. Do not place magnetic devices near the area of the operation handle as this type of your scooter or cause it is installed properly. 2. ...power for your safety, the power will automatically cut off and electromagnetic brake system will endanger your scooter. ♦ Maximum User Weight Limit Refer to re-start your safety. Turn the power on the headlights. 5. Overloading past the weight limit may cause danger to you have any doubt about the remaining power, please recharge the batteries...
Owners Manual
Page 7
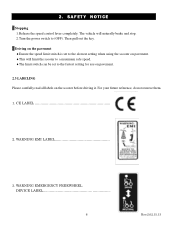
... a maximum safe speed. ♦The limit switch can be set to the slowest setting when using the scooter on pavement. ♦This will naturally brake and stop. 2.Turn the power switch to the fastest setting for use on pavement. 2.3 LABELING Please carefully read all labels on the scooter before driving it. WARNING EMERGENCY FREEWHEEL DEVICE LABEL 6 Rev.2.02.15...
... a maximum safe speed. ♦The limit switch can be set to the slowest setting when using the scooter on pavement. ♦This will naturally brake and stop. 2.Turn the power switch to the fastest setting for use on pavement. 2.3 LABELING Please carefully read all labels on the scooter before driving it. WARNING EMERGENCY FREEWHEEL DEVICE LABEL 6 Rev.2.02.15...

Owners Manual
Page 8
... that you read this time, current technology is called its brakes, move by following the warning listed below, your electric scooter. ■ ELECTROMAGNETIC INTERFERENCE (EMI) FROM RADIO WAVE SOURCES Powered vehicle may be measured in police cars, fire trucks, ambulances...problems with EMI, known sources of EMI, protective measures either to lessen the possibility or exposure or to EMI will provide the user with basic information that by itself, or move in the everyday environment. Others are obvious and easy to electromagnetic interference (EMI), which would provide useful...
... that you read this time, current technology is called its brakes, move by following the warning listed below, your electric scooter. ■ ELECTROMAGNETIC INTERFERENCE (EMI) FROM RADIO WAVE SOURCES Powered vehicle may be measured in police cars, fire trucks, ambulances...problems with EMI, known sources of EMI, protective measures either to lessen the possibility or exposure or to EMI will provide the user with basic information that by itself, or move in the everyday environment. Others are obvious and easy to electromagnetic interference (EMI), which would provide useful...
Owners Manual
Page 9
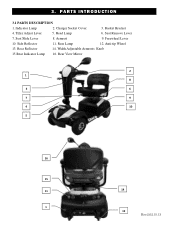
Tiller Adjust Lever 5. Side Reflector 11. Rear Reflector 14. PARTS INTRODUCTION 3.1 PARTS DESCRIPTION 1. Seat Slide Lever 8. Basket Bracket 4. Rear Lamp 12. Width Adjustable Armrests Knob 15.Rear Indicator Lamp 16. Rear View Mirror 2 1 8 3 6 7 9 4 10 5 . 16 15 11 14 1 12 8 Rev.2.02.15.13 Head Lamp 6. Seat Remove Lever 7. Armrest 9. Freewheel Lever 10. Anti-tip Wheel 13. Indicator Lamp 2. Charger Socket Cover 3. 3.
Tiller Adjust Lever 5. Side Reflector 11. Rear Reflector 14. PARTS INTRODUCTION 3.1 PARTS DESCRIPTION 1. Seat Slide Lever 8. Basket Bracket 4. Rear Lamp 12. Width Adjustable Armrests Knob 15.Rear Indicator Lamp 16. Rear View Mirror 2 1 8 3 6 7 9 4 10 5 . 16 15 11 14 1 12 8 Rev.2.02.15.13 Head Lamp 6. Seat Remove Lever 7. Armrest 9. Freewheel Lever 10. Anti-tip Wheel 13. Indicator Lamp 2. Charger Socket Cover 3. 3.
Owners Manual
Page 10
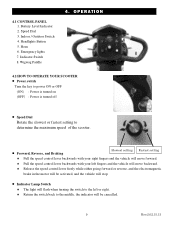
...Battery Level Indicator 2. OPERATION 4.2 HOW TO OPERATE YOUR SCOOTER ■ Power switch Turn the key to power ON or OFF (ON) : Power is turned on (OFF) : Power is turned off ■ Speed Dial Rotate the slowest or fastest setting to determine the maximum speed of the scooter. ■ Forward, Reverse, and Braking Slowest setting Fastest setting... freely while either going forward or reverse, and the electromagnetic brake in the motor will be activated, and the vehicle will stop. ■ Indicator Lamp Switch ♦ The light will flash when turning the switch to the left or right...
...Battery Level Indicator 2. OPERATION 4.2 HOW TO OPERATE YOUR SCOOTER ■ Power switch Turn the key to power ON or OFF (ON) : Power is turned on (OFF) : Power is turned off ■ Speed Dial Rotate the slowest or fastest setting to determine the maximum speed of the scooter. ■ Forward, Reverse, and Braking Slowest setting Fastest setting... freely while either going forward or reverse, and the electromagnetic brake in the motor will be activated, and the vehicle will stop. ■ Indicator Lamp Switch ♦ The light will flash when turning the switch to the left or right...
Owners Manual
Page 11
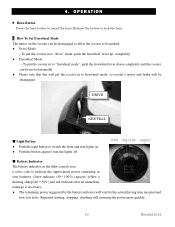
...put the scooter in to freewheel mode, so scooter's motor and brake will be moved manually. ♦ Please note that an immediate recharge is necessary. ♦ The remaining power suggested by the battery indicator will consume the power more quickly....Set Freewheel Mode The motor on the scooter can be disengaged DRIVE NEUTRAL ■ Light Button ♦ Push the light button to switch the front and rear lights on the tiller console uses a color code to sound the horn. OPERATION ■ Horn Button Press the horn button to indicate the approximate power remaining in your batteries...
...put the scooter in to freewheel mode, so scooter's motor and brake will be moved manually. ♦ Please note that an immediate recharge is necessary. ♦ The remaining power suggested by the battery indicator will consume the power more quickly....Set Freewheel Mode The motor on the scooter can be disengaged DRIVE NEUTRAL ■ Light Button ♦ Push the light button to switch the front and rear lights on the tiller console uses a color code to sound the horn. OPERATION ■ Horn Button Press the horn button to indicate the approximate power remaining in your batteries...

Owners Manual
Page 12
...scooter will stop. ■ Parking ♦ After stopping, turn OFF. The electromagnetic brake is engaged (locked). 1 Warning When on a gradient NEVER switch the vehicle to the forward position before driving. 11 Rev.2.02.15.13 Once satisfied with the width, tighten the knob. ■ Seat ♦ The seat... lever completely, and the electromagnetic brake will turn the main key to adjust the armrest width Loosen the knobs at the back of the seat frame first, then adjust the armrest width by sliding the armrest. O P E R A T I O N 4 . The lights will be applied. This may result...
...scooter will stop. ■ Parking ♦ After stopping, turn OFF. The electromagnetic brake is engaged (locked). 1 Warning When on a gradient NEVER switch the vehicle to the forward position before driving. 11 Rev.2.02.15.13 Once satisfied with the width, tighten the knob. ■ Seat ♦ The seat... lever completely, and the electromagnetic brake will turn the main key to adjust the armrest width Loosen the knobs at the back of the seat frame first, then adjust the armrest width by sliding the armrest. O P E R A T I O N 4 . The lights will be applied. This may result...

Owners Manual
Page 13
...seat The seat can be slide backward and forward for a comfortable driving position. Slide lever Swivel lever ■Tiller Adjustment The tiller can be adjusted in your scooter's batteries become low or the scooter... is in the desired position, tighten the lever to secure the tiller. ■ Main Circuit Breaker (Reset Button) When the voltage in many different positions to protect the motor and electronics from damage. 12 Rev.2.02.15.13 Once the tiller is under strain because of the seat... and reposition as required. To slide the seat, pull the lever...
...seat The seat can be slide backward and forward for a comfortable driving position. Slide lever Swivel lever ■Tiller Adjustment The tiller can be adjusted in your scooter's batteries become low or the scooter... is in the desired position, tighten the lever to secure the tiller. ■ Main Circuit Breaker (Reset Button) When the voltage in many different positions to protect the motor and electronics from damage. 12 Rev.2.02.15.13 Once the tiller is under strain because of the seat... and reposition as required. To slide the seat, pull the lever...
Owners Manual
Page 14
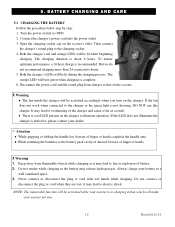
If the fan does not work when connected to the charger or the green light is not showing, DO NOT use this LED does not illuminate the charger is a red LED present on the charger to electric shock. Never connect or disconnect the plug or cord... may lead to illustrate operation. Connect the charger's power cord into the power outlet. 3. It may lead to overheating of the charger and cause a fire as the battery may lead to the battery pack cavity of shroud, beware of battery. 2. Keep away from charger socket on the scooter. 1 Warning ♦ The fan inside the charger ...
If the fan does not work when connected to the charger or the green light is not showing, DO NOT use this LED does not illuminate the charger is a red LED present on the charger to electric shock. Never connect or disconnect the plug or cord... may lead to illustrate operation. Connect the charger's power cord into the power outlet. 3. It may lead to overheating of the charger and cause a fire as the battery may lead to the battery pack cavity of shroud, beware of battery. 2. Keep away from charger socket on the scooter. 1 Warning ♦ The fan inside the charger ...
Owners Manual
Page 15
... the battery and scooter if you do not leave the charger socket plugged in temperatures less than -10° C or higher than +50° C as instructed above temperature range can cause the battery either to its first time use the charger supplied with water. ♦ You are required to refill with your batteries efficiency and service life...
... the battery and scooter if you do not leave the charger socket plugged in temperatures less than -10° C or higher than +50° C as instructed above temperature range can cause the battery either to its first time use the charger supplied with water. ♦ You are required to refill with your batteries efficiency and service life...

Owners Manual
Page 16
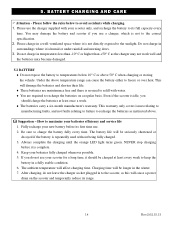
...battery If the batteries are maintenance free with outside conditions; Turn the scooter power switch to clean the battery. 1. Be sure the battery wires are installed properly and put the cover back on. 2. Please follow the steps below to "OFF". 2. The improper layout of the taillight and signal lights... being pinched by the battery box or shroud resulting in electronic system failure. 2. Take out the battery. 6. Remove the seat. 3. If the terminal is not used for advice about maintaining and replacing the battery. The batteries supplied with the scooter are sealed and as such...
...battery If the batteries are maintenance free with outside conditions; Turn the scooter power switch to clean the battery. 1. Be sure the battery wires are installed properly and put the cover back on. 2. Please follow the steps below to "OFF". 2. The improper layout of the taillight and signal lights... being pinched by the battery box or shroud resulting in electronic system failure. 2. Take out the battery. 6. Remove the seat. 3. If the terminal is not used for advice about maintaining and replacing the battery. The batteries supplied with the scooter are sealed and as such...
Owners Manual
Page 17
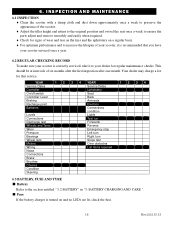
... is recommended that you have your scooter serviced once a year. 6.2 REGULAR CHECKING RECORD To make sure your dealer for this service. YEAR 1 2 3 4 YEAR Service Dates Service Dates Controller Upholstery On/off switch Seat Controller Lever Back Braking Armrests Recharge point Electrics Batteries Connections condition Levels Lights Connections Test run Discharge test Forwards Wheels and Tyres Reverse Wear Emergency stop Pressure...
... is recommended that you have your scooter serviced once a year. 6.2 REGULAR CHECKING RECORD To make sure your dealer for this service. YEAR 1 2 3 4 YEAR Service Dates Service Dates Controller Upholstery On/off switch Seat Controller Lever Back Braking Armrests Recharge point Electrics Batteries Connections condition Levels Lights Connections Test run Discharge test Forwards Wheels and Tyres Reverse Wear Emergency stop Pressure...

Owners Manual
Page 18
... scooter by the chassis, and not by the bumper could lead to full power and then disconnect the battery terminal. Replace the tires when the tread groove is set in a location where it can replace the fuse. ▓Tires The condition of the system electrics. ♦ Do not use ...slippage, making braking distances longer. 6. Make sure the Power switch is away from your scooter. ♦Inspecting tire tread ♦Please check the tread groove regularly. INSPECTION AND MAINTENANCE Suggestion Ask for help from the direct sunlight, rain, or dew. Lifting the scooters by the bumpers...
... scooter by the chassis, and not by the bumper could lead to full power and then disconnect the battery terminal. Replace the tires when the tread groove is set in a location where it can replace the fuse. ▓Tires The condition of the system electrics. ♦ Do not use ...slippage, making braking distances longer. 6. Make sure the Power switch is away from your scooter. ♦Inspecting tire tread ♦Please check the tread groove regularly. INSPECTION AND MAINTENANCE Suggestion Ask for help from the direct sunlight, rain, or dew. Lifting the scooters by the bumpers...
Owners Manual
Page 19
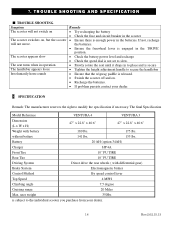
... scooter off and on , but the scooter will not move. without battery 141 lbs. 135 lbs. user weight 350lbs is enough power in to place and is secure • Tighten the height adjustment handle to modify the specification if necessary. The final Specification Model Reference VENTURA 4 VENTURA 3 Dimension (L x W x H) 47" x 22.8" x 40.6" 47" x 22.8" x 40.6" Weight with differential gear) Brake System Electromagnetic brakes...
... scooter off and on , but the scooter will not move. without battery 141 lbs. 135 lbs. user weight 350lbs is enough power in to place and is secure • Tighten the height adjustment handle to modify the specification if necessary. The final Specification Model Reference VENTURA 4 VENTURA 3 Dimension (L x W x H) 47" x 22.8" x 40.6" 47" x 22.8" x 40.6" Weight with differential gear) Brake System Electromagnetic brakes...
Owners Manual
Page 20
... footrests. o Repairs and/or modifications made to the remainder of purchase. 8. REPLACEMENT PARTS WARRANTY Parts that those of original purchase and to follow the instructions, warnings and notes in the owner's manual and those located on how long an implied warranty lasts or do not allow the exclusion or limitation of the product, unless specifically authorized by law. o Labor, service...
... footrests. o Repairs and/or modifications made to the remainder of purchase. 8. REPLACEMENT PARTS WARRANTY Parts that those of original purchase and to follow the instructions, warnings and notes in the owner's manual and those located on how long an implied warranty lasts or do not allow the exclusion or limitation of the product, unless specifically authorized by law. o Labor, service...
Owners Manual
Page 21
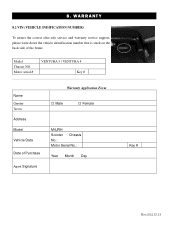
WARRANTY 8.2 VIN (VEHICLE INDIFICATION NUMBER) To ensure the correct after-sale service and warranty service support, please write down the vehicle identification number that is stuck on the back side of Purchase M4JRH Scooter Chassis No.: Motor Serial No.: Year Month Day Key # Agent Signature Rev.2.02.15.13 Model Chassis NO. 101 8. Motor serial # VENTURA 3 / VENTURA 4 Key # ... Warranty Application Form 口 Male 口 Female Address Model Vehicle Data Date of the frame. Name Gender Tel no.
WARRANTY 8.2 VIN (VEHICLE INDIFICATION NUMBER) To ensure the correct after-sale service and warranty service support, please write down the vehicle identification number that is stuck on the back side of Purchase M4JRH Scooter Chassis No.: Motor Serial No.: Year Month Day Key # Agent Signature Rev.2.02.15.13 Model Chassis NO. 101 8. Motor serial # VENTURA 3 / VENTURA 4 Key # ... Warranty Application Form 口 Male 口 Female Address Model Vehicle Data Date of the frame. Name Gender Tel no.


