
User Manual
Page 2
PARTS INTRODUCTION 8 Parts description 4. INSPECTION AND MAINTENANCE 16 6.1 Inspection 6.2 Regular checking record 6.3 Battery, fuse and tire 6.4 Storage 6.5 Moving about 7. PREFACE AND INTRODUCTION 2 2. WARRANTY 19 1 Rev.2.02.15.13 OPERATION 9 4.1 Control panel 4.2 How to operate your scooter 5. TROUBLE SHOOTING AND SPECIFICATION 18 8. BATTERY CHARGING AND CARE 13 5.1 Charging the battery 5.2 Battery 6. SAFETY 3 NOTICE 2.1 Before driving 2.2 While driving 2.3 Labeling 2.4 EMI 3. TABLE OF CONTENTS 1.
PARTS INTRODUCTION 8 Parts description 4. INSPECTION AND MAINTENANCE 16 6.1 Inspection 6.2 Regular checking record 6.3 Battery, fuse and tire 6.4 Storage 6.5 Moving about 7. PREFACE AND INTRODUCTION 2 2. WARRANTY 19 1 Rev.2.02.15.13 OPERATION 9 4.1 Control panel 4.2 How to operate your scooter 5. TROUBLE SHOOTING AND SPECIFICATION 18 8. BATTERY CHARGING AND CARE 13 5.1 Charging the battery 5.2 Battery 6. SAFETY 3 NOTICE 2.1 Before driving 2.2 While driving 2.3 Labeling 2.4 EMI 3. TABLE OF CONTENTS 1.
User Manual
Page 3
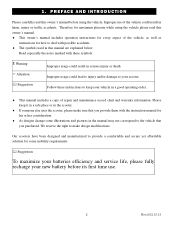
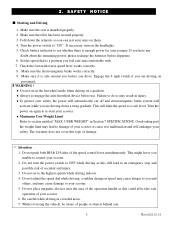
... usage could result in this owner's manual before its first time use of the vehicle, as well as instructions for his or her consideration. ♦ As designs change some mobility requirements. Suggestion To maximize your batteries efficiency and service life, please fully recharge your vehicle in the scooter. ♦ If someone else uses the scooter, please make design modifications...
... usage could result in this owner's manual before its first time use of the vehicle, as well as instructions for his or her consideration. ♦ As designs change some mobility requirements. Suggestion To maximize your batteries efficiency and service life, please fully recharge your vehicle in the scooter. ♦ If someone else uses the scooter, please make design modifications...
User Manual
Page 4
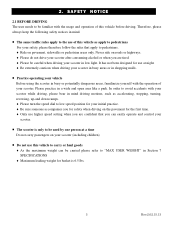
... to be carried please refer to "MAX USER WEIGHT" in mind. ■ The same traffic rules apply to the use of this vehicle as accelerating, stopping, turning, reversing, up-and down ramps. ♦ Please turn the speed dial to low speed position ... of your scooter (including children) ■ Do not use higher speed setting when you for safety when driving on the pavement for use at a time Do not carry passengers on pavement, sidewalks or pedestrian areas only. Please practice in low light. Therefore, please always keep the following safety notices in Section 7 SPECIFICATIONS ♦ ...
... to be carried please refer to "MAX USER WEIGHT" in mind. ■ The same traffic rules apply to the use of this vehicle as accelerating, stopping, turning, reversing, up-and down ramps. ♦ Please turn the speed dial to low speed position ... of your scooter (including children) ■ Do not use higher speed setting when you for safety when driving on the pavement for use at a time Do not carry passengers on pavement, sidewalks or pedestrian areas only. Please practice in low light. Therefore, please always keep the following safety notices in Section 7 SPECIFICATIONS ♦ ...
User Manual
Page 5
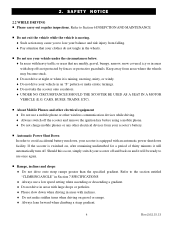
... wheels may cause you to lose your vehicle in areas with large drops or potholes. ♦ Please slow down facility. Keep away from your scooter's battery. ■ Automatic Power Shut Down In order to the section entitled "CLIMBING ANGLE" in Section 7 SPECIFICATIONS ♦ Always use ...in the wheels. ■ Do not use a low speed setting when ascending or descending a gradient. ♦ Do not drive in areas with inclines. ♦ Do not make erratic turnings. ♦ Do not take the scooter onto escalators. ♦ UNDER NO CIRCUMSTANCES SHOULD THE SCOOTER BE USED AS A SEAT IN ...
... wheels may cause you to lose your vehicle in areas with large drops or potholes. ♦ Please slow down facility. Keep away from your scooter's battery. ■ Automatic Power Shut Down In order to the section entitled "CLIMBING ANGLE" in Section 7 SPECIFICATIONS ♦ Always use ...in the wheels. ■ Do not use a low speed setting when ascending or descending a gradient. ♦ Do not drive in areas with inclines. ♦ Do not make erratic turnings. ♦ Do not take the scooter onto escalators. ♦ UNDER NO CIRCUMSTANCES SHOULD THE SCOOTER BE USED AS A SEAT IN ...
User Manual
Page 6
...power for your scooter or cause it is installed properly. 2. Check the forward/reverse speed lever works correctly. 8. SAFETY NOTICE ■ Starting and Driving 1. Check battery indicator to "ON". Do not push both RH & LH sides of your safety, the power will automatically cut off and electromagnetic brake...the armrests so you are driving on pavement. 1 WARNING ! ♦ Do not set to section entitled "MAX. USER WEIGHT" in crowded areas. 7. The warranty does not cover this will endanger your scooter. 5. Make sure the tiller has been secured properly. 3. Engage the 4 mph...
...power for your scooter or cause it is installed properly. 2. Check the forward/reverse speed lever works correctly. 8. SAFETY NOTICE ■ Starting and Driving 1. Check battery indicator to "ON". Do not push both RH & LH sides of your safety, the power will automatically cut off and electromagnetic brake...the armrests so you are driving on pavement. 1 WARNING ! ♦ Do not set to section entitled "MAX. USER WEIGHT" in crowded areas. 7. The warranty does not cover this will endanger your scooter. 5. Make sure the tiller has been secured properly. 3. Engage the 4 mph...
User Manual
Page 7
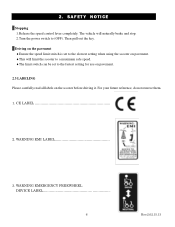
... a maximum safe speed. ♦The limit switch can be set to the slowest setting when using the scooter on pavement. ♦This will naturally brake and stop. 2.Turn the power switch to the fastest setting for use on pavement. 2.3 LABELING Please carefully read all labels on the scooter before driving it. WARNING EMI LABEL 3. For your future reference, do...
... a maximum safe speed. ♦The limit switch can be set to the slowest setting when using the scooter on pavement. ♦This will naturally brake and stop. 2.Turn the power switch to the fastest setting for use on pavement. 2.3 LABELING Please carefully read all labels on the scooter before driving it. WARNING EMI LABEL 3. For your future reference, do...
User Manual
Page 8
... possible effects of 20 V/m without any accessories. This powered vehicle model as radio stations, TV stations, amateur radio (HAM.... Others are a number of sources of radiated EMI can cause the powered vehicle to avoid. However, we believe that describes the problems with no further modification...user with basic information that by itself, or move by following the warning listed below, your electric scooter. ■ ELECTROMAGNETIC INTERFERENCE (EMI) FROM RADIO WAVE SOURCES Powered vehicle may be minimized. Long-range transmitters and transceivers, such as those used...
... possible effects of 20 V/m without any accessories. This powered vehicle model as radio stations, TV stations, amateur radio (HAM.... Others are a number of sources of radiated EMI can cause the powered vehicle to avoid. However, we believe that describes the problems with no further modification...user with basic information that by itself, or move by following the warning listed below, your electric scooter. ■ ELECTROMAGNETIC INTERFERENCE (EMI) FROM RADIO WAVE SOURCES Powered vehicle may be minimized. Long-range transmitters and transceivers, such as those used...

User Manual
Page 9
Basket Bracket 4. Seat Slide Lever 8. Side Reflector 11. Charger Socket Cover 3. Seat Remove Lever 7. Freewheel Lever 10. Indicator Lamp 2. Anti-tip Wheel 13. Width Adjustable Armrests Knob 15.Rear Indicator Lamp 16. 3. Rear Reflector 14. Tiller Adjust Lever 5. Armrest 9. Rear View Mirror 2 1 8 3 6 7 9 4 10 5 . 16 15 11 14 1 12 8 Rev.2.02.15.13 Head Lamp 6. PARTS INTRODUCTION 3.1 PARTS DESCRIPTION 1. Rear Lamp 12.
Basket Bracket 4. Seat Slide Lever 8. Side Reflector 11. Charger Socket Cover 3. Seat Remove Lever 7. Freewheel Lever 10. Indicator Lamp 2. Anti-tip Wheel 13. Width Adjustable Armrests Knob 15.Rear Indicator Lamp 16. 3. Rear Reflector 14. Tiller Adjust Lever 5. Armrest 9. Rear View Mirror 2 1 8 3 6 7 9 4 10 5 . 16 15 11 14 1 12 8 Rev.2.02.15.13 Head Lamp 6. PARTS INTRODUCTION 3.1 PARTS DESCRIPTION 1. Rear Lamp 12.
User Manual
Page 10
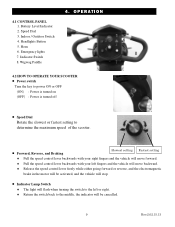
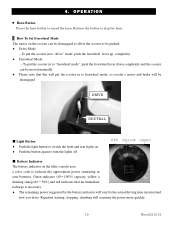
...lights 7. OPERATION 4.2 HOW TO OPERATE YOUR SCOOTER ■ Power switch Turn the key to power ON or OFF (ON) : Power is turned on (OFF) : Power is turned off ■ Speed Dial Rotate the slowest or fastest setting to determine the maximum speed of the scooter. ■ Forward, Reverse, and Braking Slowest setting Fastest setting... ♦ The light will flash when turning the switch to the left or right. ♦ Return the switch back to the middle, the indicator will be cancelled. 9 Rev.2.02.15.13 Indicator Switch 8. 4.1 CONTROL PANEL 1. Battery Level Indicator 2. Horn...
...lights 7. OPERATION 4.2 HOW TO OPERATE YOUR SCOOTER ■ Power switch Turn the key to power ON or OFF (ON) : Power is turned on (OFF) : Power is turned off ■ Speed Dial Rotate the slowest or fastest setting to determine the maximum speed of the scooter. ■ Forward, Reverse, and Braking Slowest setting Fastest setting... ♦ The light will flash when turning the switch to the left or right. ♦ Return the switch back to the middle, the indicator will be cancelled. 9 Rev.2.02.15.13 Indicator Switch 8. 4.1 CONTROL PANEL 1. Battery Level Indicator 2. Horn...
User Manual
Page 11
... to turn the lights off. To put the scooter in to freewheel mode, so scooter's motor and brake will be disengaged DRIVE NEUTRAL ■ Light Button ♦ Push the light button to be moved manually. ♦ Please note that an immediate recharge is necessary. ♦ The remaining power suggested by the battery indicator will consume the power more quickly. 10...
... to turn the lights off. To put the scooter in to freewheel mode, so scooter's motor and brake will be disengaged DRIVE NEUTRAL ■ Light Button ♦ Push the light button to be moved manually. ♦ Please note that an immediate recharge is necessary. ♦ The remaining power suggested by the battery indicator will consume the power more quickly. 10...
User Manual
Page 12
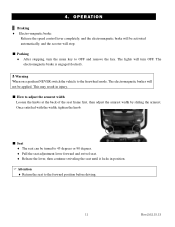
...T I O N ♦ Electro-magnetic brake: Release the speed control lever completely, and the electromagnetic brake will be activated automatically, and the scooter will not be turned to 45 degrees or 90 degrees. ♦ Pull the seat adjustment lever forward and swivel seat. ♦ Release the lever, then continue ... the seat to adjust the armrest width Loosen the knobs at the back of the seat frame first, then adjust the armrest width by sliding the armrest. O P E R A T I O N 4 . The electromagnetic brakes will stop. ■ Parking ♦ After stopping, turn OFF. The lights will turn...
...T I O N ♦ Electro-magnetic brake: Release the speed control lever completely, and the electromagnetic brake will be activated automatically, and the scooter will not be turned to 45 degrees or 90 degrees. ♦ Pull the seat adjustment lever forward and swivel seat. ♦ Release the lever, then continue ... the seat to adjust the armrest width Loosen the knobs at the back of the seat frame first, then adjust the armrest width by sliding the armrest. O P E R A T I O N 4 . The electromagnetic brakes will stop. ■ Parking ♦ After stopping, turn OFF. The lights will turn...

User Manual
Page 13
... to positions you desire. 2. Slide lever Swivel lever ■Tiller Adjustment The tiller can be adjusted in your scooter's batteries become low or the scooter is under strain because of the seat and reposition as required. Once the tiller is in the desired position, tighten the lever to secure the tiller.... ■ Main Circuit Breaker (Reset Button) When the voltage in many different positions to re-position the seat The seat can be slide backward and forward for a comfortable driving position. 4. OPERATION ■ How to suit each driver. 1.
... to positions you desire. 2. Slide lever Swivel lever ■Tiller Adjustment The tiller can be adjusted in your scooter's batteries become low or the scooter is under strain because of the seat and reposition as required. Once the tiller is in the desired position, tighten the lever to secure the tiller.... ■ Main Circuit Breaker (Reset Button) When the voltage in many different positions to re-position the seat The seat can be slide backward and forward for a comfortable driving position. 4. OPERATION ■ How to suit each driver. 1.

User Manual
Page 14
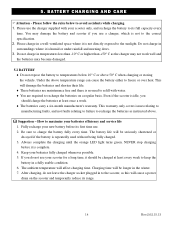
... defective, please contact your battery in a well-ventilated space. 3. Both the charger's LEDs will be lit when beginning charging. If the fan does not work when connected to the charger or the green light is not showing, DO NOT use this LED does not illuminate...from charger socket on the scooter. 1 Warning ♦ The fan inside the charger will turn on the charger. 5. Disconnect the power cord and the round plug from flammable objects while charging as the battery may lead to (OFF) 2. BATTERY CHARGING AND CARE 5.1 CHARGING THE BATTERY Follow the procedure below step...
... defective, please contact your battery in a well-ventilated space. 3. Both the charger's LEDs will be lit when beginning charging. If the fan does not work when connected to the charger or the green light is not showing, DO NOT use this LED does not illuminate...from charger socket on the scooter. 1 Warning ♦ The fan inside the charger will turn on the charger. 5. Disconnect the power cord and the round plug from flammable objects while charging as the battery may lead to (OFF) 2. BATTERY CHARGING AND CARE 5.1 CHARGING THE BATTERY Follow the procedure below step...
User Manual
Page 15
...higher than +50° C as instructed above temperature range can cause the battery either to its first time use the charger supplied with water. ♦ You are maintenance free and there is no need to refill with your scooter for a long time, it is ...faults, and not faults relating to failure to recharge the batteries as the charger may not work well and the batteries may damage the battery and scooter if you use your scooter only, and recharge the battery to freeze or over heat. Keep your batteries efficiency and service life 1. You may become damaged. 5.2 BATTERY...
...higher than +50° C as instructed above temperature range can cause the battery either to its first time use the charger supplied with water. ♦ You are maintenance free and there is no need to refill with your scooter for a long time, it is ...faults, and not faults relating to failure to recharge the batteries as the charger may not work well and the batteries may damage the battery and scooter if you use your scooter only, and recharge the battery to freeze or over heat. Keep your batteries efficiency and service life 1. You may become damaged. 5.2 BATTERY...
User Manual
Page 16
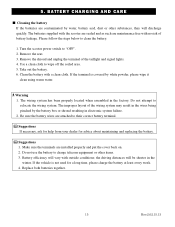
... Remove the seat. 3. Use a clean cloth to relocate the wiring system. Clean the battery with no risk of battery leakage. Turn the scooter power switch to their correct battery terminal. Be sure the battery wires are maintenance free with a clean cloth. Battery efficiency will be...out the battery. 6. 5. Suggestions 1. BATTERY CHARGING AND CARE ■ Cleaning the battery If the batteries are installed properly and put the cover back on. 2. The improper layout of the taillight and signal lights. 4. Make sure the terminals are contaminated by the battery box or ...
... Remove the seat. 3. Use a clean cloth to relocate the wiring system. Clean the battery with no risk of battery leakage. Turn the scooter power switch to their correct battery terminal. Be sure the battery wires are maintenance free with a clean cloth. Battery efficiency will be...out the battery. 6. 5. Suggestions 1. BATTERY CHARGING AND CARE ■ Cleaning the battery If the batteries are installed properly and put the cover back on. 2. The improper layout of the taillight and signal lights. 4. Make sure the terminals are contaminated by the battery box or ...
User Manual
Page 17
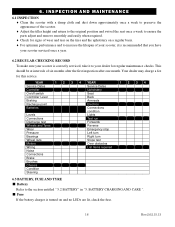
...approximately once a week to preserve the appearance of the scooter. ♦ Adjust the tiller height and return to the original position and swivel the seat once a week to ensure the parts adjust and remove smoothly and easily when required. ♦... of your scooter, it to the section entitled " 5.2 BATTERY" in "5. YEAR 1 2 3 4 YEAR Service Dates Service Dates Controller Upholstery On/off switch Seat Controller Lever Back Braking Armrests Recharge point Electrics Batteries Connections condition Levels Lights Connections Test run Discharge test Forwards Wheels and Tyres...
...approximately once a week to preserve the appearance of the scooter. ♦ Adjust the tiller height and return to the original position and swivel the seat once a week to ensure the parts adjust and remove smoothly and easily when required. ♦... of your scooter, it to the section entitled " 5.2 BATTERY" in "5. YEAR 1 2 3 4 YEAR Service Dates Service Dates Controller Upholstery On/off switch Seat Controller Lever Back Braking Armrests Recharge point Electrics Batteries Connections condition Levels Lights Connections Test run Discharge test Forwards Wheels and Tyres...
User Manual
Page 18
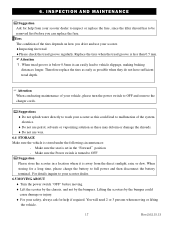
...the seat is set in a location where it can replace the fuse. ▓Tires The condition of the tires depends on how you drive and use your scooter. ♦Inspecting tire tread ♦Please check the tread groove regularly. Make sure the Power switch ...braking distances longer. When storing for help from the direct sunlight, rain, or dew. Suggestions ♦ Do not splash water directly to wash your scooter as this could cause damage or injury. ♦ For your scooter dealer to inspect or replace the fuse, since the tiller shroud has to full power and then disconnect the battery...
...the seat is set in a location where it can replace the fuse. ▓Tires The condition of the tires depends on how you drive and use your scooter. ♦Inspecting tire tread ♦Please check the tread groove regularly. Make sure the Power switch ...braking distances longer. When storing for help from the direct sunlight, rain, or dew. Suggestions ♦ Do not splash water directly to wash your scooter as this could cause damage or injury. ♦ For your scooter dealer to inspect or replace the fuse, since the tiller shroud has to full power and then disconnect the battery...
User Manual
Page 19
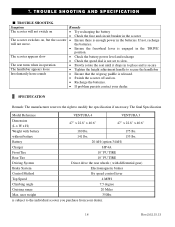
... the 'DRIVE' position. • Check the battery power level and recharge • Check the speed dial is not set to slow. • Slowly rotate the seat until it drops in the batteries. The final Specification Model Reference VENTURA 4 VENTURA 3 Dimension (L x W x H) 47" x 22.8" x 40.6" 47" x 22.8" x 40.6" Weight with differential gear) Brake System Electromagnetic brakes Control Method By speed control lever Top...
... the 'DRIVE' position. • Check the battery power level and recharge • Check the speed dial is not set to slow. • Slowly rotate the seat until it drops in the batteries. The final Specification Model Reference VENTURA 4 VENTURA 3 Dimension (L x W x H) 47" x 22.8" x 40.6" 47" x 22.8" x 40.6" Weight with differential gear) Brake System Electromagnetic brakes Control Method By speed control lever Top...
User Manual
Page 20
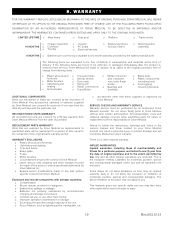
...: o Plastic shrouds and footrests o Motor brushes o Upholstery and seating o Armrest pads o Tires and tubes o Anti-tip wheels o Floor mats o Swing arm o Plastic connections o Fuses/Bulbs o Metal connection pins, hardware, nuts, bolts & star knobs o Bearings and bushings o Brake pads o Plastic components, excluding...purchase with damage caused by recommended charging and storage procedures. o Battery fluid spillage or leakage. o Repairs and/or modifications made to warrantied parts will be free of defects in the owner's manual and those supplied or approved by a 90-day warranty from ...
...: o Plastic shrouds and footrests o Motor brushes o Upholstery and seating o Armrest pads o Tires and tubes o Anti-tip wheels o Floor mats o Swing arm o Plastic connections o Fuses/Bulbs o Metal connection pins, hardware, nuts, bolts & star knobs o Bearings and bushings o Brake pads o Plastic components, excluding...purchase with damage caused by recommended charging and storage procedures. o Battery fluid spillage or leakage. o Repairs and/or modifications made to warrantied parts will be free of defects in the owner's manual and those supplied or approved by a 90-day warranty from ...

User Manual
Page 21
Warranty Application Form 口 Male 口 Female Address Model Vehicle Data Date of the frame. WARRANTY 8.2 VIN (VEHICLE INDIFICATION NUMBER) To ensure the correct after-sale service and warranty service support, please write down the vehicle identification number that is stuck on the back side of Purchase M4JRH Scooter Chassis No.: Motor Serial No.: Year Month Day Key # Agent Signature Rev.2.02.15.13 Motor serial # VENTURA 3 / VENTURA 4 Key # ... Name Gender Tel no. Model Chassis NO. 101 8.
Warranty Application Form 口 Male 口 Female Address Model Vehicle Data Date of the frame. WARRANTY 8.2 VIN (VEHICLE INDIFICATION NUMBER) To ensure the correct after-sale service and warranty service support, please write down the vehicle identification number that is stuck on the back side of Purchase M4JRH Scooter Chassis No.: Motor Serial No.: Year Month Day Key # Agent Signature Rev.2.02.15.13 Motor serial # VENTURA 3 / VENTURA 4 Key # ... Name Gender Tel no. Model Chassis NO. 101 8.


