
User Manual
Page 3
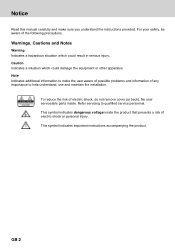
... help understand, use and maintain the installation. ** To reduce the risk of electric shock or personal injury. ** This symbol indicates important instructions accompanying the product. No user serviceable parts inside the product that presents a risk of electric shock, do not remove cover (or back). Notice Read this manual carefully and make the user aware of possible problems and information...
... help understand, use and maintain the installation. ** To reduce the risk of electric shock or personal injury. ** This symbol indicates important instructions accompanying the product. No user serviceable parts inside the product that presents a risk of electric shock, do not remove cover (or back). Notice Read this manual carefully and make the user aware of possible problems and information...
User Manual
Page 4
... the TV. ** 9. CONNECTION TO THE CABLE TV SIGNAL Connect all components before you have followed the manufacturer's instructions for mounting. • Do not place the product on the apparatus. ** 4. Please read the following safety precautions carefully. ** Safety Instructions and Precautions ** 1. If you start any maintenance or installation procedures. ** 2. OVERLOADING Do not overload a wall outlet, extension cord or adapter as these...
... the TV. ** 9. CONNECTION TO THE CABLE TV SIGNAL Connect all components before you have followed the manufacturer's instructions for mounting. • Do not place the product on the apparatus. ** 4. Please read the following safety precautions carefully. ** Safety Instructions and Precautions ** 1. If you start any maintenance or installation procedures. ** 2. OVERLOADING Do not overload a wall outlet, extension cord or adapter as these...
User Manual
Page 5
...power cord in case of lightning. ** • Do not use the product when defective, serious damage can touch dangerous voltage points or damage parts. ** 12.REPLACEMENT of PARTS When replacement of parts is required, be sure the service technician uses replacement parts specified by the carelessness or misuse of users. Unauthorised substitution may result in additional damage to the unit...order to the product and reduce its life span. ** • Hard Disk Drive Do not move the product or turn the power off suddenly while the hard disk drive is out of order. ** • Please do not insert ...
...power cord in case of lightning. ** • Do not use the product when defective, serious damage can touch dangerous voltage points or damage parts. ** 12.REPLACEMENT of PARTS When replacement of parts is required, be sure the service technician uses replacement parts specified by the carelessness or misuse of users. Unauthorised substitution may result in additional damage to the unit...order to the product and reduce its life span. ** • Hard Disk Drive Do not move the product or turn the power off suddenly while the hard disk drive is out of order. ** • Please do not insert ...
User Manual
Page 6
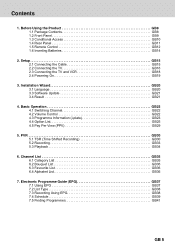
... List GB36 7. Basic Operation GB22 4.1 Switching Channel GB22 4.2 Volume Control GB22 4.3 Programme Information (i-plate GB23 4.4 Option List GB25 4.5 Pay Per View (PPV GB29 5. Electronic Programme Guide (EPG GB37 7.1 Using EPG GB37 7.2 List Type GB38 7.3 Recording Using EPG GB38 7.4 Schedule GB39 7.5 Finding Programmes GB41 GB 5 Setup GB15 2.1 Connecting the Cable GB15 2.2 Connecting the TV GB16 2.3 Connecting the TV and VCR GB18 2.4 Powering On GB19 3. Installation Wizard GB20 3.1 Language GB20 3.3 Software Update...
... List GB36 7. Basic Operation GB22 4.1 Switching Channel GB22 4.2 Volume Control GB22 4.3 Programme Information (i-plate GB23 4.4 Option List GB25 4.5 Pay Per View (PPV GB29 5. Electronic Programme Guide (EPG GB37 7.1 Using EPG GB37 7.2 List Type GB38 7.3 Recording Using EPG GB38 7.4 Schedule GB39 7.5 Finding Programmes GB41 GB 5 Setup GB15 2.1 Connecting the Cable GB15 2.2 Connecting the TV GB16 2.3 Connecting the TV and VCR GB18 2.4 Powering On GB19 3. Installation Wizard GB20 3.1 Language GB20 3.3 Software Update...

User Manual
Page 7
... 12.5 Factory Reset GB70 13. Universal Remote Control GB72 14.1 Universal Setup for Operation with TV Unit GB72 14.2 Frequently Asked Questions (FAQs GB74 14.3 USING THE UNIVERSAL REMOTE CONTROL GB75 15. Software Update GB71 13.1 OTA (Over the Air GB71 14. Contents 8. Service Menu GB42 8.1 PIN-Code Change GB42 8.2 Smartcard GB43 8.3 System GB43 8.4 Search GB44 8.5 Picture GB45 8.6 Dolby Digital GB46 8.7 Startup Channel GB47 8.8 Hotlinelist GB48 9. Record Men GB49 9.1 Recorded List GB49 9.2 Recording Schedule...
... 12.5 Factory Reset GB70 13. Universal Remote Control GB72 14.1 Universal Setup for Operation with TV Unit GB72 14.2 Frequently Asked Questions (FAQs GB74 14.3 USING THE UNIVERSAL REMOTE CONTROL GB75 15. Software Update GB71 13.1 OTA (Over the Air GB71 14. Contents 8. Service Menu GB42 8.1 PIN-Code Change GB42 8.2 Smartcard GB43 8.3 System GB43 8.4 Search GB44 8.5 Picture GB45 8.6 Dolby Digital GB46 8.7 Startup Channel GB47 8.8 Hotlinelist GB48 9. Record Men GB49 9.1 Recorded List GB49 9.2 Recording Schedule...
User Manual
Page 9
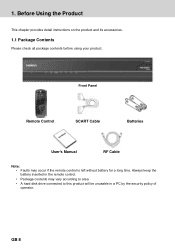
... may occur if the remote control is left without battery for a long time. Before Using the Product This chapter provides detail instructions on the product and its accessories. ** 1.1 Package Contents Please check all package contents before using your product. ** Front Panel Remote Control ** SCART Cable Batteries User's Manual RF Cable ** Note: • Faults may vary according to area. • A hard disk drive connected to this product will...
... may occur if the remote control is left without battery for a long time. Before Using the Product This chapter provides detail instructions on the product and its accessories. ** 1.1 Package Contents Please check all package contents before using your product. ** Front Panel Remote Control ** SCART Cable Batteries User's Manual RF Cable ** Note: • Faults may vary according to area. • A hard disk drive connected to this product will...
User Manual
Page 12
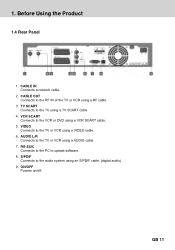
... IN of the TV or VCR using a TV SCART cable. ** 4. Before Using the Product 1.4 Rear Panel ** ** 1. CABLE OUT Connects to the audio system using a AUDIO cable. ** 7. ON/OFF Powers on/off. ** GB 11 TV SCART Connects to the VCR or DVD using a VIDEO cable. ** 6. RS-232C Connects to the PC to the TV or VCR using a VCR SCART cable. ** 5. 1. CABLE IN Connects a network cable. ** 2. VCR SCART Connects to the TV using a RF cable. ** 3. VIDEO Connects to update software. ** 8.
... IN of the TV or VCR using a TV SCART cable. ** 4. Before Using the Product 1.4 Rear Panel ** ** 1. CABLE OUT Connects to the audio system using a AUDIO cable. ** 7. ON/OFF Powers on/off. ** GB 11 TV SCART Connects to the VCR or DVD using a VIDEO cable. ** 6. RS-232C Connects to the PC to the TV or VCR using a VCR SCART cable. ** 5. 1. CABLE IN Connects a network cable. ** 2. VCR SCART Connects to the TV using a RF cable. ** 3. VIDEO Connects to update software. ** 8.
User Manual
Page 15
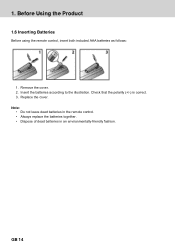
GB 14 Remove the cover. 2. Check that the polarity (+/-) is correct. 3. Insert the batteries according to the illustration. Replace the cover. ** Note: • Do not leave dead batteries in the remote control. • Always replace the batteries together. • Dispose of dead batteries in an environmentally-friendly fashion. 1. Before Using the Product 1.6 Inserting Batteries Before using the remote control, insert both included AAA batteries as follows: ** ** 1.
GB 14 Remove the cover. 2. Check that the polarity (+/-) is correct. 3. Insert the batteries according to the illustration. Replace the cover. ** Note: • Do not leave dead batteries in the remote control. • Always replace the batteries together. • Dispose of dead batteries in an environmentally-friendly fashion. 1. Before Using the Product 1.6 Inserting Batteries Before using the remote control, insert both included AAA batteries as follows: ** ** 1.

User Manual
Page 16
The product provides various interfaces to connect to watch analogue channels. Select the most appropriate procedure depending on the equipment you have. ** Note: ** If you encounter any problems setting up your product, please contact your local product distributor. 2.1 Connecting the Cable Connect your CATV line to the CABLE IN. ** ** Note: Connect the product and the TV using a RF cable to the TV, VCR or other devices. Setup This chapter describes how to connect the product to the TV with the particular equipments for gaining optimum signal quality. 2. GB 15 Setup 2.
The product provides various interfaces to connect to watch analogue channels. Select the most appropriate procedure depending on the equipment you have. ** Note: ** If you encounter any problems setting up your product, please contact your local product distributor. 2.1 Connecting the Cable Connect your CATV line to the CABLE IN. ** ** Note: Connect the product and the TV using a RF cable to the TV, VCR or other devices. Setup This chapter describes how to connect the product to the TV with the particular equipments for gaining optimum signal quality. 2. GB 15 Setup 2.
User Manual
Page 17
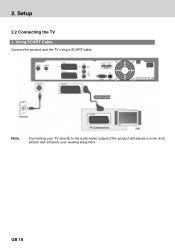
Setup 2.2 Connecting the TV 1. Using SCART Cable Connect the product and the TV using a SCART cable. ** ** Note: Connecting your TV directly to the audio/video output of the product will assure a more vivid picture and enhance your viewing enjoyment. 2. GB 16
Setup 2.2 Connecting the TV 1. Using SCART Cable Connect the product and the TV using a SCART cable. ** ** Note: Connecting your TV directly to the audio/video output of the product will assure a more vivid picture and enhance your viewing enjoyment. 2. GB 16
User Manual
Page 18
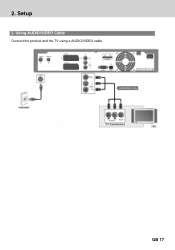
2. Using AUDIO/VIDEO Cable Connect the product and the TV using a AUDIO/VIDEO cable. ** GB 17 Setup ** 2.
2. Using AUDIO/VIDEO Cable Connect the product and the TV using a AUDIO/VIDEO cable. ** GB 17 Setup ** 2.
User Manual
Page 19
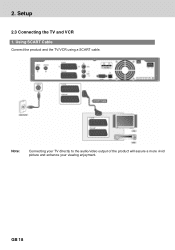
2. GB 18 Setup 2.3 Connecting the TV and VCR 1. Using SCART Cable Connect the product and the TV/VCR using a SCART cable. ** ** Note: Connecting your TV directly to the audio/video output of the product will assure a more vivid picture and enhance your viewing enjoyment.
2. GB 18 Setup 2.3 Connecting the TV and VCR 1. Using SCART Cable Connect the product and the TV/VCR using a SCART cable. ** ** Note: Connecting your TV directly to the audio/video output of the product will assure a more vivid picture and enhance your viewing enjoyment.
User Manual
Page 33
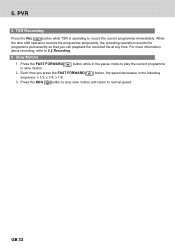
... pause mode to record the current programme immediately. While the time shift operation records the programme temporarily, the recording operation records the programme permanently so that you press the FAST FORWARD button, the speed decreases in slow motion. 2. Each time you can playback the recorded file at any time. PVR 5. 5. TSR Recording Press the Rec button while TSR is operating to play...
... pause mode to record the current programme immediately. While the time shift operation records the programme temporarily, the recording operation records the programme permanently so that you press the FAST FORWARD button, the speed decreases in slow motion. 2. Each time you can playback the recorded file at any time. PVR 5. 5. TSR Recording Press the Rec button while TSR is operating to play...
User Manual
Page 34
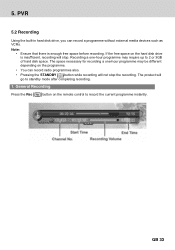
... 33 PVR 5.2 Recording Using the built-in hard disk drive, you can record radio programmes also. • Pressing the STANDBY button while recording will not stop . General Recording Press the Rec ** button on the programme. • You can record a programme without external media devices such as VCRs. Note: • Ensure that there is insufficient, recording will go to record the current programme instantly. If the free...
... 33 PVR 5.2 Recording Using the built-in hard disk drive, you can record radio programmes also. • Pressing the STANDBY button while recording will not stop . General Recording Press the Rec ** button on the programme. • You can record a programme without external media devices such as VCRs. Note: • Ensure that there is insufficient, recording will go to record the current programme instantly. If the free...
User Manual
Page 40
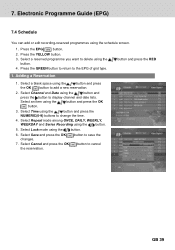
... recording-reserved programmes using the button and press the OK button. 3. Press the GREEN button to return to change the time. 4. Select an item using the schedule screen. ** 1. Select Time using the button and press the NUMERIC(0-9) buttons to the EPG of grid type. 1. Select Repeat mode among ONCE, DAILY, WEEKLY, WEEKDAY and Series Recording using the button. 6. 7. Select a reserved programme you want to display channel and date lists...
... recording-reserved programmes using the button and press the OK button. 3. Press the GREEN button to return to change the time. 4. Select an item using the schedule screen. ** 1. Select Time using the button and press the NUMERIC(0-9) buttons to the EPG of grid type. 1. Select Repeat mode among ONCE, DAILY, WEEKLY, WEEKDAY and Series Recording using the button. 6. 7. Select a reserved programme you want to display channel and date lists...

User Manual
Page 43
... KDG button to change the current PIN-Code. Select the Smartcard of which you can change the PIN-Code of entering a wrong PIN-Code If you enter four identical figures as your new PIN-Code, an error message will be prompted to enter another four-digit number as your new PIN-Code. ** 3. Service Menu In this chapter you wish to exit the menu screen. 8.1 PIN-Code Change You can easily access the service features. Select Service Menu using the...
... KDG button to change the current PIN-Code. Select the Smartcard of which you can change the PIN-Code of entering a wrong PIN-Code If you enter four identical figures as your new PIN-Code, an error message will be prompted to enter another four-digit number as your new PIN-Code. ** 3. Service Menu In this chapter you wish to exit the menu screen. 8.1 PIN-Code Change You can easily access the service features. Select Service Menu using the...

User Manual
Page 56
... button. Select Menu Language using the button. 2. Variable Fixed Uses the horizontally variable subtitle font. button and press the 2. Select from the given language options and set the language for the menu. 1. Subtitle Font You can show the subtitles automatically. Uses the fixed subtitle font. Auto Subtitles are displayed automatically in the language when you select the subtitle language by pressing the Opt button on the remote control. 3. Select Subtitle Display using the button...
... button. Select Menu Language using the button. 2. Variable Fixed Uses the horizontally variable subtitle font. button and press the 2. Select from the given language options and set the language for the menu. 1. Subtitle Font You can show the subtitles automatically. Uses the fixed subtitle font. Auto Subtitles are displayed automatically in the language when you select the subtitle language by pressing the Opt button on the remote control. 3. Select Subtitle Display using the button...

User Manual
Page 73
... list, use this time, the remote control sends all possible TV signals one -time setup of your TV. Programming the universal remote control 1. The TV LED is sent by the remote control, the TV LED briefly extinguishes. Release the STANDBY button as soon as the volume, on your TV: 1. Enter the 4-digit code number for the manufacturer of the TV. Then press the STANDBY button. Keep the STANDBY button...
... list, use this time, the remote control sends all possible TV signals one -time setup of your TV. Programming the universal remote control 1. The TV LED is sent by the remote control, the TV LED briefly extinguishes. Release the STANDBY button as soon as the volume, on your TV: 1. Enter the 4-digit code number for the manufacturer of the TV. Then press the STANDBY button. Keep the STANDBY button...

User Manual
Page 83
...; Connect the power cable to the product. • Check that your AV cable is connected correctly. • Check the volume levels of your local service centre, please read the tips below carefully. Troubleshooting 16. Cannot update new software. ** • You can get an update. Channel search does not work. ** • Check that your local product distributor or service centre for further instructions. ** 1. If the problem persists...
...; Connect the power cable to the product. • Check that your AV cable is connected correctly. • Check the volume levels of your local service centre, please read the tips below carefully. Troubleshooting 16. Cannot update new software. ** • You can get an update. Channel search does not work. ** • Check that your local product distributor or service centre for further instructions. ** 1. If the problem persists...

User Manual
Page 88
... channel broadcaster. ** Frequency The property of digital audio between two devices without any conversion to and from analogue, which could degrade the signal quality. ** NVOD (Near Video On Demand) A technology that allows customers to view the start times. ** PVR (Personal Video Recorder) Video recorder that can record and play back programmes directly using the embedded hard disk drive(s). ** TSR (Time Shifted Recording) A function that are or will have a 21-pin female connection...
... channel broadcaster. ** Frequency The property of digital audio between two devices without any conversion to and from analogue, which could degrade the signal quality. ** NVOD (Near Video On Demand) A technology that allows customers to view the start times. ** PVR (Personal Video Recorder) Video recorder that can record and play back programmes directly using the embedded hard disk drive(s). ** TSR (Time Shifted Recording) A function that are or will have a 21-pin female connection...


