
User Manual
Page 3
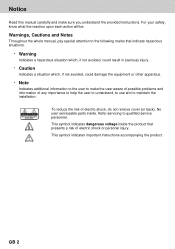
... Notes Throughout the whole manual, pay special attention to the following marks that presents a risk of electric shock, do not remove cover (or back). This symbol indicates important instructions accompanying the product. No user serviceable parts inside the product that ...instructions. This symbol indicates dangerous voltage inside . GB 2 Refer servicing to qualified service personnel. Notice ** Read this manual carefully and make the user aware of possible problems and information of any importance to help the user to understand, to use and to maintain the installation...
... Notes Throughout the whole manual, pay special attention to the following marks that presents a risk of electric shock, do not remove cover (or back). This symbol indicates important instructions accompanying the product. No user serviceable parts inside the product that ...instructions. This symbol indicates dangerous voltage inside . GB 2 Refer servicing to qualified service personnel. Notice ** Read this manual carefully and make the user aware of possible problems and information of any importance to help the user to understand, to use and to maintain the installation...

User Manual
Page 4
... ** 2. In addition, no solvents) to dust the receiver. ** 5. Do not stand the receiver on top of the receiver. ** 6. OVERLOADING ** Do not overload a wall outlet, extension cord or adapter as these may result in the ground. Use a light damp cloth (no objects filled with SABS 061. ** GB 3 ATTACHMENTS ** Do not use any unsupported attachments as this may be hazardous...
... ** 2. In addition, no solvents) to dust the receiver. ** 5. Do not stand the receiver on top of the receiver. ** 6. OVERLOADING ** Do not overload a wall outlet, extension cord or adapter as these may result in the ground. Use a light damp cloth (no objects filled with SABS 061. ** GB 3 ATTACHMENTS ** Do not use any unsupported attachments as this may be hazardous...

User Manual
Page 6
... Subtitle Language 4.5 Change a Audio Language 4.6 Programme Information (I- plate) 4.7 Option List 5. Programme Guide 6.1 Viewing Programme Guide Information 6.2 Finding a Programme 6.3 Viewing Reserved Programme GB7 ** GB7 GB8 GB9 GB10 GB12 ** GB12 GB12 GB13 GB14 ** GB14 GB14 GB14 GB14 GB15 GB17 GB18 GB19 ** GB19 ** GB20 GB21 GB23 GB26 GB27 ** GB27 ** GB29 GB30 GB 5 Channel List 5.1 Displaying and Switching Channel List 5.2 Changing Channel List Group 5.3 Edit Channels 5.4 Edit Favourite Channels 5.5 Channel Change Mode 6. Setup 2.1 Connecting Aerial 2.2 Powering On 3. Installation...
... Subtitle Language 4.5 Change a Audio Language 4.6 Programme Information (I- plate) 4.7 Option List 5. Programme Guide 6.1 Viewing Programme Guide Information 6.2 Finding a Programme 6.3 Viewing Reserved Programme GB7 ** GB7 GB8 GB9 GB10 GB12 ** GB12 GB12 GB13 GB14 ** GB14 GB14 GB14 GB14 GB15 GB17 GB18 GB19 ** GB19 ** GB20 GB21 GB23 GB26 GB27 ** GB27 ** GB29 GB30 GB 5 Channel List 5.1 Displaying and Switching Channel List 5.2 Changing Channel List Group 5.3 Edit Channels 5.4 Edit Favourite Channels 5.5 Channel Change Mode 6. Setup 2.1 Connecting Aerial 2.2 Powering On 3. Installation...
User Manual
Page 7
... GB42 GB44 GB45 ** GB45 GB48 ** GB48 GB48 GB49 GB58 GB59 ** GB59 GB60 GB61 GB63 GB64 GB 6 Software Update 9.1 OTA (Over the Air) 10. Contents ** 7. Specification 15. System Information 10.1 Status 10.2 Signal Detection 11. Trouble Shooting 13.1 Trouble Shooting 13.2 Error Message 14. Glossary 16. Menu Map 13. Setting Preferences 7.1 Parental Control 7.2 Language Setting 7.3 Time Setting 7.4 Schedule 7.5 A/V Control 7.6 UHF Tuning 7.7 Miscellaneous Settings 8. Installation 8.1 Automatic Search 8.2 Manual Search 8.3 Default Setting 9.
... GB42 GB44 GB45 ** GB45 GB48 ** GB48 GB48 GB49 GB58 GB59 ** GB59 GB60 GB61 GB63 GB64 GB 6 Software Update 9.1 OTA (Over the Air) 10. Contents ** 7. Specification 15. System Information 10.1 Status 10.2 Signal Detection 11. Trouble Shooting 13.1 Trouble Shooting 13.2 Error Message 14. Glossary 16. Menu Map 13. Setting Preferences 7.1 Parental Control 7.2 Language Setting 7.3 Time Setting 7.4 Schedule 7.5 A/V Control 7.6 UHF Tuning 7.7 Miscellaneous Settings 8. Installation 8.1 Automatic Search 8.2 Manual Search 8.3 Default Setting 9.
User Manual
Page 8
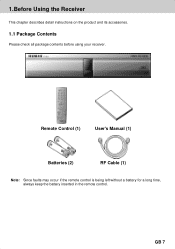
GB 7 1.Before Using the Receiver ** This chapter describes detail instructions on the product and its accessories. 1.1 Package Contents Please check all package contents before using your receiver. ** ** Remote Control (1) User's Manual (1) Batteries (2) RF Cable (1) ** Note: Since faults may occur if the remote control is being left without a battery for a long time, always keep the battery inserted in the remote control.
GB 7 1.Before Using the Receiver ** This chapter describes detail instructions on the product and its accessories. 1.1 Package Contents Please check all package contents before using your receiver. ** ** Remote Control (1) User's Manual (1) Batteries (2) RF Cable (1) ** Note: Since faults may occur if the remote control is being left without a battery for a long time, always keep the battery inserted in the remote control.
User Manual
Page 12
..., down, left or right menu option. ** 7. SOUNDTRACK ** Displays the Soundtrack. ** 9. Play the audio continuously. ** 17.SUBTITLE ** Changes the subtitle language. ** 18.V-/V+ ** Adjusts the audio volume. ** 19.i (INFORMATION) ** Displays the information about the channel and programme. ** 20.MUTE ** Pauses the audio temporarily. ARROW BUTTONS ** Changes the channel or move the cursor to the previous menu and screen. ** 6. DTV ** Controls the Receiver. ** 2. ** ** 1. TV ** Controls the TV. ** 3. And displays the channel list during watching a programme. ** 8. OPT...
..., down, left or right menu option. ** 7. SOUNDTRACK ** Displays the Soundtrack. ** 9. Play the audio continuously. ** 17.SUBTITLE ** Changes the subtitle language. ** 18.V-/V+ ** Adjusts the audio volume. ** 19.i (INFORMATION) ** Displays the information about the channel and programme. ** 20.MUTE ** Pauses the audio temporarily. ARROW BUTTONS ** Changes the channel or move the cursor to the previous menu and screen. ** 6. DTV ** Controls the Receiver. ** 2. ** ** 1. TV ** Controls the TV. ** 3. And displays the channel list during watching a programme. ** 8. OPT...
User Manual
Page 13
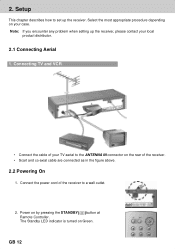
... LED indicator is turned on by pressing the STANDBY button at Remote Controller. GB 12 Note: If you encounter any problem when setting up the receiver. Connecting TV and VCR ** • Connect the cable of your TV aerial to the ANTENNA IN connector on your local product distributor. 2.1 Connecting Aerial 1. Setup ** This chapter describes how to a wall outlet. 2. Power on Green. Select the most...
... LED indicator is turned on by pressing the STANDBY button at Remote Controller. GB 12 Note: If you encounter any problem when setting up the receiver. Connecting TV and VCR ** • Connect the cable of your TV aerial to the ANTENNA IN connector on your local product distributor. 2.1 Connecting Aerial 1. Setup ** This chapter describes how to a wall outlet. 2. Power on Green. Select the most...
User Manual
Page 15
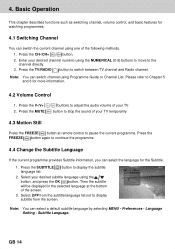
... the subtitle language list not to continue the programme. 4.4 Change the Subtitle Language If the current programme provides Subtitle information, you can select a default subtitle language by selecting MENU - Note: You can select the language for watching programmes. 4.1 Switching Channel You can switch channel using the button, and press the OK button. Then the subtitle will be displayed in the selected language at remote control to the channel directly...
... the subtitle language list not to continue the programme. 4.4 Change the Subtitle Language If the current programme provides Subtitle information, you can select a default subtitle language by selecting MENU - Note: You can select the language for watching programmes. 4.1 Switching Channel You can switch channel using the button, and press the OK button. Then the subtitle will be displayed in the selected language at remote control to the channel directly...

User Manual
Page 16
... desired audio language using the button. Select Audio Direction(left, right, stereo) using the button to listen in multiple audio languages, you can select the language that you switch channels. Channel number and channel name 2. Programme name GB 15 Note: you can view the programme information by selecting MENU - Press the SOUNDTRACK soundtrack list. Press the EXIT button to display 2. Preferences Language Setting -Audio Language. 4.6 Programme Information (I -plate. 1. Select your desired default audio language by...
... desired audio language using the button. Select Audio Direction(left, right, stereo) using the button to listen in multiple audio languages, you can select the language that you switch channels. Channel number and channel name 2. Programme name GB 15 Note: you can view the programme information by selecting MENU - Press the SOUNDTRACK soundtrack list. Press the EXIT button to display 2. Preferences Language Setting -Audio Language. 4.6 Programme Information (I -plate. 1. Select your desired default audio language by...

User Manual
Page 17
... Digital doesn't be supported by selecting MENU - Basic Operation ** 3. Represents parental level. Detail programme information: displayed if detailed programme information is available. Note: • Press the i button again to hide the information box. • If the Detail information is a dolby digital one page, use button to move to display the next programme information. It indicates the minimum level of Channel looping mode...
... Digital doesn't be supported by selecting MENU - Basic Operation ** 3. Represents parental level. Detail programme information: displayed if detailed programme information is available. Note: • Press the i button again to hide the information box. • If the Detail information is a dolby digital one page, use button to move to display the next programme information. It indicates the minimum level of Channel looping mode...

User Manual
Page 24
... remote controller to select the Edit Favourite Channels menu. ** The buttons for editing the Favourite channel list are described in the following table. ** ** Add Adds Favourite channel. ** Remove ** Removes from the Favourite channel. ** TV/RADIO ** Switches between TV and Radio channel list. ** Fav.Group ** Changes Favourite channel list group. ** Move ** Moves the order of channel list within the Favourite channel list. ** Rename ** Renames the name of Favourite channel list. ** ** Sort Sorts channels by number...
... remote controller to select the Edit Favourite Channels menu. ** The buttons for editing the Favourite channel list are described in the following table. ** ** Add Adds Favourite channel. ** Remove ** Removes from the Favourite channel. ** TV/RADIO ** Switches between TV and Radio channel list. ** Fav.Group ** Changes Favourite channel list group. ** Move ** Moves the order of channel list within the Favourite channel list. ** Rename ** Renames the name of Favourite channel list. ** ** Sort Sorts channels by number...

User Manual
Page 35
... display the available Language List. 3. Press the MENU button. 2. Menu/Audio/Subtitle Language You can set Language for Menu, Audio and Subtitle. Press the or OK button to confirm the Verify Password, and press the OK button. GB 34 Note: The Default Password is English. 1. Selec Preferences using the NUMERICAL (0-9)button, and press OK button. 3. Enter New Password using the OK or button. 7. Select Language Setting using the button. 2. Select Menu/Audio/Subtitle Language using the press the OK or button. Select Change Password using...
... display the available Language List. 3. Press the MENU button. 2. Menu/Audio/Subtitle Language You can set Language for Menu, Audio and Subtitle. Press the or OK button to confirm the Verify Password, and press the OK button. GB 34 Note: The Default Password is English. 1. Selec Preferences using the NUMERICAL (0-9)button, and press OK button. 3. Enter New Password using the OK or button. 7. Select Language Setting using the button. 2. Select Menu/Audio/Subtitle Language using the press the OK or button. Select Change Password using...

User Manual
Page 43
... select Auto. 1. button, and press the OK 2. Channel Number Enter your desired frequency to search. Select one of channel using the NUMERICAL (0-9) button and press OK button. 3. Mode Required for the entered frequency is entered. 1. Frequency Enter the your desired frequency channel to search directly. button, GB 42 button, and press 2. When entering frequency, the appropriate channel for Channel Search. button, and press the 2. Enter frequency using the the OK button. Installation ** 8.2 Manual Search You...
... select Auto. 1. button, and press the OK 2. Channel Number Enter your desired frequency to search. Select one of channel using the NUMERICAL (0-9) button and press OK button. 3. Mode Required for the entered frequency is entered. 1. Frequency Enter the your desired frequency channel to search directly. button, GB 42 button, and press 2. When entering frequency, the appropriate channel for Channel Search. button, and press the 2. Enter frequency using the the OK button. Installation ** 8.2 Manual Search You...

User Manual
Page 45
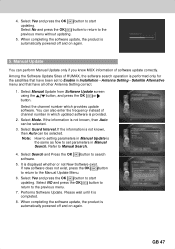
... automatically displayed, which helps Channel Search. Installation Wizard. Installation ** 8.3 Default Setting Default Setting restores the receiver to start loading default setting. Enter Password using the NUMERICAL (0-9) button to perform restoring. 7. Confirm again to the default settings. Select No and press the OK return to Factory Default. button to 6. GB 44 Enter Password using the NUMERICAL (0-9) button. 4. Warning: Please note that once you perform Default Setting, all or BACK button to restore all data such as Channel List, and User...
... automatically displayed, which helps Channel Search. Installation Wizard. Installation ** 8.3 Default Setting Default Setting restores the receiver to start loading default setting. Enter Password using the NUMERICAL (0-9) button to perform restoring. 7. Confirm again to the default settings. Select No and press the OK return to Factory Default. button to 6. GB 44 Enter Password using the NUMERICAL (0-9) button. 4. Warning: Please note that once you perform Default Setting, all or BACK button to restore all data such as Channel List, and User...

User Manual
Page 46
... the availability of software upgrade. 9.1 OTA (Over the Air) OTA, an abbreviation of this software update can take 5 ~10 minutes to date software. Starts downloading new software. GB 45 Over the Air(OTA) is off during software update. Caution: Please note that the quality of software versions may be careful to keep the power on and the power cord plugged in during software update, it is automatically...
... the availability of software upgrade. 9.1 OTA (Over the Air) OTA, an abbreviation of this software update can take 5 ~10 minutes to date software. Starts downloading new software. GB 45 Over the Air(OTA) is off during software update. Caution: Please note that the quality of software versions may be careful to keep the power on and the power cord plugged in during software update, it is automatically...
User Manual
Page 48
... updated software is automatically powered off and on again. Select Mode. button to set to Manual Search. 4. When completing the software update, the product is provided. 2. You can be selected. Select Guard Interval. Note: How to setting parameters in Installation - Select Search and Press the OK software. When completing the software update, the product is not known, then Auto can also enter the frequency instead of channel number...
... updated software is automatically powered off and on again. Select Mode. button to set to Manual Search. 4. When completing the software update, the product is provided. 2. You can be selected. Select Guard Interval. Note: How to setting parameters in Installation - Select Search and Press the OK software. When completing the software update, the product is not known, then Auto can also enter the frequency instead of channel number...
User Manual
Page 50
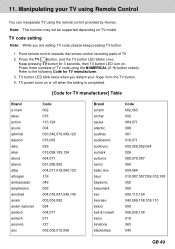
Keep pressing TV button for 3 seconds, then TV button LED turn on TV model. Point remote control towards the remote control receiving parts of TV code using the remote control provided by Humax. Press three numbers of TV. 2. Refer to the following Code for TV manufacturer] Table ** Brand Code Brand Code a mark 002 arcam 062,063 abex 016 archer 002 action 110,124 asuka 064,071 acura 004 atlantic 098 admiral...
Keep pressing TV button for 3 seconds, then TV button LED turn on TV model. Point remote control towards the remote control receiving parts of TV code using the remote control provided by Humax. Press three numbers of TV. 2. Refer to the following Code for TV manufacturer] Table ** Brand Code Brand Code a mark 002 arcam 062,063 abex 016 archer 002 action 110,124 asuka 064,071 acura 004 atlantic 098 admiral...
User Manual
Page 60
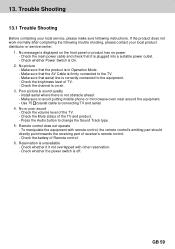
... receiving part of receiver's remote control. - Check the brightness level of the TV and product. - No or poor sound - Reservation is on the front panel or product has no power - Trouble Shooting ** 13.1 Trouble Shooting Before contacting your local service, please make sure following trouble shooting, please contact your local product distributor or service center. 1. Use 75 coaxial cable to the TV. - Press the Audio button...
... receiving part of receiver's remote control. - Check the brightness level of the TV and product. - No or poor sound - Reservation is on the front panel or product has no power - Trouble Shooting ** 13.1 Trouble Shooting Before contacting your local service, please make sure following trouble shooting, please contact your local product distributor or service center. 1. Use 75 coaxial cable to the TV. - Press the Audio button...
User Manual
Page 61
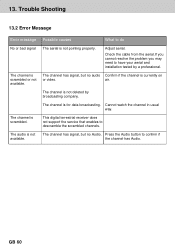
... the problem you may need to descramble the scrambled channels. GB 60 The channel has signal, but no Audio. Press the Audio button to do No or bad signal The aerial is currently on or video. 13. Trouble Shooting ** 13.2 Error Message Error message Possible causes What to confirm if the channel has Audio. Adjust aerial. The channel is not available. This digital terrestrial receiver does not support the service that...
... the problem you may need to descramble the scrambled channels. GB 60 The channel has signal, but no Audio. Press the Audio button to do No or bad signal The aerial is currently on or video. 13. Trouble Shooting ** 13.2 Error Message Error message Possible causes What to confirm if the channel has Audio. Adjust aerial. The channel is not available. This digital terrestrial receiver does not support the service that...

User Manual
Page 64
...) Means that the user needs or has to release them through aerial. ** SCART A 21-pin connector used for connection of digital channels/services. GB 63 Usually there are several MUXes. Also called Euroconnector or Peritel connector. In the transmitted data stream the operator may be transmitted from one second, which you can transport signals with high frequency. ** Frequency The number of cycles or...
...) Means that the user needs or has to release them through aerial. ** SCART A 21-pin connector used for connection of digital channels/services. GB 63 Usually there are several MUXes. Also called Euroconnector or Peritel connector. In the transmitted data stream the operator may be transmitted from one second, which you can transport signals with high frequency. ** Frequency The number of cycles or...


