

User Manual
Page 2
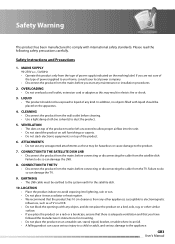
Please read this user's manual is subject to safely install, use and maintain the installation. The information in this user's manual carefully to be copied, used or translated in part or whole without notice. No user ...at maximum performance. Refer servicing to be able to change without HUMAX's prior consent in this user's manual next to your product for purchasing a HUMAX product. This symbol indicates dangerous voltage inside . GB1 User's Manual Copyright (Copyright © 2010 HUMAX Corporation) Not to qualified service personnel. Trademarks • Manufactured ...
Please read this user's manual is subject to safely install, use and maintain the installation. The information in this user's manual carefully to be copied, used or translated in part or whole without notice. No user ...at maximum performance. Refer servicing to be able to change without HUMAX's prior consent in this user's manual next to your product for purchasing a HUMAX product. This symbol indicates dangerous voltage inside . GB1 User's Manual Copyright (Copyright © 2010 HUMAX Corporation) Not to qualified service personnel. Trademarks • Manufactured ...
User Manual
Page 4
... the mains before connecting or disconnecting the cable from the mains before cleaning. • Use a light damp cloth (no objects filled with any maintenance or installation procedures. 2. If you have followed the manufacturer's instructions for the satellite dish. 10. OVERLOADING • Do not overload a wall outlet, extension cord or adapter as...
... the mains before connecting or disconnecting the cable from the mains before cleaning. • Use a light damp cloth (no objects filled with any maintenance or installation procedures. 2. If you have followed the manufacturer's instructions for the satellite dish. 10. OVERLOADING • Do not overload a wall outlet, extension cord or adapter as...

User Manual
Page 6
... 3.1 User Settings GB19 3.2 freesat detection GB19 3.3 Postcode GB20 3.4 Search Channels GB20 3.5 Result GB21 3.6 Installation Checklist GB21 4. Basic Operation GB22 4.1 Switching Channel GB22 4.2 Volume Control GB22 4.3 Resolution GB22 4.4 Wide GB23 4.5 Audio GB23 ...Rear Panel GB9 1.4 Remote Control GB10 1.5 Remote Control Batteries GB12 2. Contents 1. Channel List GB27 5.1 My TV List GB27 5.2 Favourite List GB28 5.3 HD TV List GB28 5.4 Genre List GB29 5.5 Non-freesat Channel List GB29 6. TV Guide GB30 6.1 Table Guide GB30 6.2 List Guide GB31 6.3 Schedule GB31...
... 3.1 User Settings GB19 3.2 freesat detection GB19 3.3 Postcode GB20 3.4 Search Channels GB20 3.5 Result GB21 3.6 Installation Checklist GB21 4. Basic Operation GB22 4.1 Switching Channel GB22 4.2 Volume Control GB22 4.3 Resolution GB22 4.4 Wide GB23 4.5 Audio GB23 ...Rear Panel GB9 1.4 Remote Control GB10 1.5 Remote Control Batteries GB12 2. Contents 1. Channel List GB27 5.1 My TV List GB27 5.2 Favourite List GB28 5.3 HD TV List GB28 5.4 Genre List GB29 5.5 Non-freesat Channel List GB29 6. TV Guide GB30 6.1 Table Guide GB30 6.2 List Guide GB31 6.3 Schedule GB31...
User Manual
Page 20
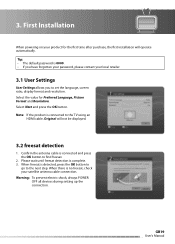
... not be displayed. 3.2 freesat detection 1. Select Next and press the OK button. GB19 User's Manual First Installation When powering on your product for Preferred Language, Picture Format and Resolution. When there is complete. 3. Confirm the antenna cable is 0000. • If you ...
... not be displayed. 3.2 freesat detection 1. Select Next and press the OK button. GB19 User's Manual First Installation When powering on your product for Preferred Language, Picture Format and Resolution. When there is complete. 3. Confirm the antenna cable is 0000. • If you ...
User Manual
Page 21
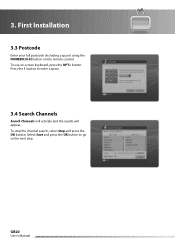
First Installation 3.3 Postcode Enter your full postcode (including a space) using the NUMERIC(0-9) button on -screen keyboard, press the OPT+ button. Select Save and press the OK button to go to enter a space. 3.4 Search Channels Search Channels will activate and the results will appear. GB20 User's Manual To use on the remote control. To stop the channel search, select Stop and press the OK button. Press the 1 button to the next step. 3.
First Installation 3.3 Postcode Enter your full postcode (including a space) using the NUMERIC(0-9) button on -screen keyboard, press the OPT+ button. Select Save and press the OK button to go to enter a space. 3.4 Search Channels Search Channels will activate and the results will appear. GB20 User's Manual To use on the remote control. To stop the channel search, select Stop and press the OK button. Press the 1 button to the next step. 3.

User Manual
Page 22
... GB18 GB19 Done? Select Finish and press the OK button to complete the first installation. 3.6 Installation Checklist Before using the product, please make sure that you performed channel search in the first installation? Is the product in the wall outlet? 3. Step Is the antenna connected correctly...? First Installation 3.5 Result After all of the channels available. Have you have all setting is complete...
... GB18 GB19 Done? Select Finish and press the OK button to complete the first installation. 3.6 Installation Checklist Before using the product, please make sure that you performed channel search in the first installation? Is the product in the wall outlet? 3. Step Is the antenna connected correctly...? First Installation 3.5 Result After all of the channels available. Have you have all setting is complete...

User Manual
Page 38
... when guidance information is 0000. 1. Change Password Change Password allows you have made using the NUMERIC(0-9) buttons. 3. Enter the password again in New Password using installation lock. You can choose to enter your previous password. Note: You must enter your password to the age of the viewer or change the current...
... when guidance information is 0000. 1. Change Password Change Password allows you have made using the NUMERIC(0-9) buttons. 3. Enter the password again in New Password using installation lock. You can choose to enter your previous password. Note: You must enter your password to the age of the viewer or change the current...
User Manual
Page 39
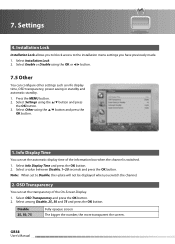
Installation Lock Installation Lock allows you to block access to Disable, the i-plate will not be displayed when you have previously made....20 seconds and press the OK button. Select among Disable, 25, 50 and 75 and press the OK button. GB38 User's Manual Select Installation Lock. 2. Select Other using the / button and press the OK button. 3. 7. OSD Transparency You can configure other settings such as info... 7.5 Other You can set the automatic display time of the On-Screen Display. 1. Note: When set to the installation menu settings you switch the channel. 2.
Installation Lock Installation Lock allows you to block access to Disable, the i-plate will not be displayed when you have previously made....20 seconds and press the OK button. Select among Disable, 25, 50 and 75 and press the OK button. GB38 User's Manual Select Installation Lock. 2. Select Other using the / button and press the OK button. 3. 7. OSD Transparency You can configure other settings such as info... 7.5 Other You can set the automatic display time of the On-Screen Display. 1. Note: When set to the installation menu settings you switch the channel. 2.
User Manual
Page 45
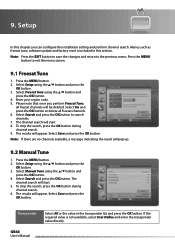
.... 4. Press the MENU button to search channels. 7. Select Setup using the / button and press the OK button. 4. Please note that once you can configure the installation setting and perform channel search. Select Yes and press the OK button to the previous menu. Select Manual Tune using the / button and press the...
.... 4. Press the MENU button to search channels. 7. Select Setup using the / button and press the OK button. 4. Please note that once you can configure the installation setting and perform channel search. Select Yes and press the OK button to the previous menu. Select Manual Tune using the / button and press the...
User Manual
Page 47
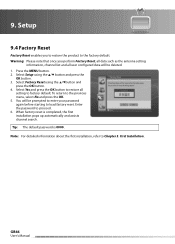
...Setup using the / button and press the OK button. 4. Tip: The default password is completed, the first installation pops up automatically and assists channel search. First Installation. Enter the password to the previous menu, select No and press the OK. 5. Select Factory Reset using the ... button. 3. To return to proceed. 6. When factory reset is 0000. GB46 User's Manual 9. Note: For detailed information about the first installation, refer to factory default. Press the MENU button. 2. Select Yes and press the OK button to restore all user configured data will be deleted...
...Setup using the / button and press the OK button. 4. Tip: The default password is completed, the first installation pops up automatically and assists channel search. First Installation. Enter the password to the previous menu, select No and press the OK. 5. Select Factory Reset using the ... button. 3. To return to proceed. 6. When factory reset is 0000. GB46 User's Manual 9. Note: For detailed information about the first installation, refer to factory default. Press the MENU button. 2. Select Yes and press the OK button to restore all user configured data will be deleted...

User Manual
Page 51
... the antenna cable is properly connected to the product. • Make sure that the mains supply is powered on air. Poor picture/sound quality • Install the antenna in external input mode. 3. However, the poor sound and picture quality due to ensure that your AV cable is connected correctly. • Check...
... the antenna cable is properly connected to the product. • Make sure that the mains supply is powered on air. Poor picture/sound quality • Install the antenna in external input mode. 3. However, the poor sound and picture quality due to ensure that your AV cable is connected correctly. • Check...
User Manual
Page 60
... intent is void, and will be to refrain entirely from the original licensor to copy, distribute or modify the Program subject to control compilation and installation of the Program. In addition, mere aggregation of another work based on it with the object code. 4. You may not impose any such claims; However...
... intent is void, and will be to refrain entirely from the original licensor to copy, distribute or modify the Program subject to control compilation and installation of the Program. In addition, mere aggregation of another work based on it with the object code. 4. You may not impose any such claims; However...

User Manual
Page 63
... appeared, then you distribute the same sections as a whole. c) You must cause the whole of the Library into a program that refer to control compilation and installation of warranty; rather, the intent is covered only if its terms, do this change is made by law. Such a work, in isolation, is part of...
... appeared, then you distribute the same sections as a whole. c) You must cause the whole of the Library into a program that refer to control compilation and installation of warranty; rather, the intent is covered only if its terms, do this change is made by law. Such a work, in isolation, is part of...
User Manual
Page 64
... years, to the copy of this object code plus portions of the Library will operate properly with a modified version of the library, if the user installs one of the work that you may not impose any further restrictions on the Library, and explaining where to copy the above ); c) Accompany the work...
... years, to the copy of this object code plus portions of the Library will operate properly with a modified version of the library, if the user installs one of the work that you may not impose any further restrictions on the Library, and explaining where to copy the above ); c) Accompany the work...


