

User Manual
Page 2
...Accurate recording The start and stop at the times sent by another entry in a series, you for purchasing a Humax PVR-9150T product. If the programme changes to a different day or time the PVR-9150T will be adjusted to record the whole programme. • Series Link If a programme you wish to record one ...of the programmes later that, day or week, on channels where the correct and accurate data is in the Guide (e.g. If a programme starts early...
...Accurate recording The start and stop at the times sent by another entry in a series, you for purchasing a Humax PVR-9150T product. If the programme changes to a different day or time the PVR-9150T will be adjusted to record the whole programme. • Series Link If a programme you wish to record one ...of the programmes later that, day or week, on channels where the correct and accurate data is in the Guide (e.g. If a programme starts early...

User Manual
Page 7
PVR GB29 5.1 Time Shifted Recording (TSR GB29 5.2 Recording GB31 5.3 Programme Playback in -Picture) Screen GB27 4.8 Game GB28 5. Installation Wizard GB20 3.1 Search GB20 4. Record ...GB34 6. Before Using the Product GB8 1.1 Package Contents GB8 1.2 Front Panel GB9 1.3 Conditional Access GB10 1.4 Rear Panel GB11 1.5 Remote Control GB12 2. Programme Guide GB35 6.1 Viewing Programme Guide Information GB35 6.2 Selecting Channel Group GB36 6.3 Using Time Bar GB37 6.4 Schedule GB37 6.5 Finding Programmes GB38 7. Setup GB15 2.1 Connecting the Antenna GB15 2.2 Connecting...
PVR GB29 5.1 Time Shifted Recording (TSR GB29 5.2 Recording GB31 5.3 Programme Playback in -Picture) Screen GB27 4.8 Game GB28 5. Installation Wizard GB20 3.1 Search GB20 4. Record ...GB34 6. Before Using the Product GB8 1.1 Package Contents GB8 1.2 Front Panel GB9 1.3 Conditional Access GB10 1.4 Rear Panel GB11 1.5 Remote Control GB12 2. Programme Guide GB35 6.1 Viewing Programme Guide Information GB35 6.2 Selecting Channel Group GB36 6.3 Using Time Bar GB37 6.4 Schedule GB37 6.5 Finding Programmes GB38 7. Setup GB15 2.1 Connecting the Antenna GB15 2.2 Connecting...

User Manual
Page 9
Before Using the Product This chapter provides detail instructions on the product and its accessories. 1.1 Package Contents Please check all package contents before using your product. GB8 User's Manual User's Manual Remote Control User's Manual Quick Guide Quick Guide Batteries SCART Cable Note: Package contents may vary according to area. Warning: The company shall not be liable for problems caused by changing hard disk drive by user. 1.
Before Using the Product This chapter provides detail instructions on the product and its accessories. 1.1 Package Contents Please check all package contents before using your product. GB8 User's Manual User's Manual Remote Control User's Manual Quick Guide Quick Guide Batteries SCART Cable Note: Package contents may vary according to area. Warning: The company shall not be liable for problems caused by changing hard disk drive by user. 1.

User Manual
Page 10
... the TV/radio channel up , down . 8. STANDBY BUTTON Switches between TV and radio modes. 7. GB9 User's Manual Before Using the Product 1.2 Front Panel 1 23456 7 8 9 10 1. GUIDE Displays the programme guide. 2. ARROW BUTTONS Changes the channel or moves the cursor up or down , left or right. 5.
... the TV/radio channel up , down . 8. STANDBY BUTTON Switches between TV and radio modes. 7. GB9 User's Manual Before Using the Product 1.2 Front Panel 1 23456 7 8 9 10 1. GUIDE Displays the programme guide. 2. ARROW BUTTONS Changes the channel or moves the cursor up or down , left or right. 5.

User Manual
Page 14
MUTE Mutes or unmutes the audio temporarily. 17. k. Before Using the Product Please slide down the bottom section of TV. GUIDE Displays the programme guide. 13. OK Selects a menu or confirms the selected operation. BACK Closes and returns to find the additional buttons. 10. SOURCE Controls the input of the ...
MUTE Mutes or unmutes the audio temporarily. 17. k. Before Using the Product Please slide down the bottom section of TV. GUIDE Displays the programme guide. 13. OK Selects a menu or confirms the selected operation. BACK Closes and returns to find the additional buttons. 10. SOURCE Controls the input of the ...
User Manual
Page 21
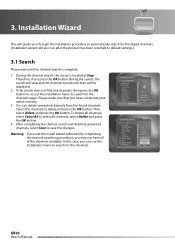
... select all of the channels available. You can use the installation menu to search for the channels again. GB20 User's Manual Installation Wizard This will guide you have all channels, select Delete and press the OK button. 4. Select the channels to automatically search for the digital channels. (Installation wizard will be...
... select all of the channels available. You can use the installation menu to search for the channels again. GB20 User's Manual Installation Wizard This will guide you have all channels, select Delete and press the OK button. 4. Select the channels to automatically search for the digital channels. (Installation wizard will be...
User Manual
Page 22
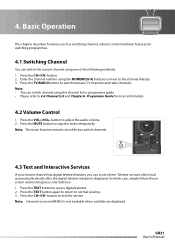
...4.3 Text and Interactive Services If your chosen channel has digital teletext features, you can switch channel using the channel list or programme guide. • Please refer to the channel directly. 3. Enter the channel number using one of the following methods. 1. Note: Interactive service...(MHEG) is displayed. Programme Guide for watching programmes. 4.1 Switching Channel You can switch the current channel using the NUMERIC(0-9) buttons to move to 4.6 Channel List and ...
...4.3 Text and Interactive Services If your chosen channel has digital teletext features, you can switch channel using the channel list or programme guide. • Please refer to the channel directly. 3. Enter the channel number using one of the following methods. 1. Note: Interactive service...(MHEG) is displayed. Programme Guide for watching programmes. 4.1 Switching Channel You can switch the current channel using the NUMERIC(0-9) buttons to move to 4.6 Channel List and ...

User Manual
Page 36
... when the auto tracking function is reserved for recording. 6. Note: Press the BACK, EXIT or GUIDE button to exit the guide screen. 6.1 Viewing Programme Guide Information You can also schedule your recording using the information given. Icon Split Programme Displayed only when ...the programme is a series programme. GB35 User's Manual Press the GUIDE button. 1. Channel and programme information 2. Present date and time 6. Group name 4. Video preview window 7. Programme Guide The programme guide displays programme information about each channel, based on the date and ...
... when the auto tracking function is reserved for recording. 6. Note: Press the BACK, EXIT or GUIDE button to exit the guide screen. 6.1 Viewing Programme Guide Information You can also schedule your recording using the information given. Icon Split Programme Displayed only when ...the programme is a series programme. GB35 User's Manual Press the GUIDE button. 1. Channel and programme information 2. Present date and time 6. Group name 4. Video preview window 7. Programme Guide The programme guide displays programme information about each channel, based on the date and ...

User Manual
Page 37
... and press the OK button to complete reservation. Select an option you select a series programme, a pop-up will be displayed. 2. Programme Guide Note: • Auto tracking can automatically schedule recording in the menu is set to move 2 hours ahead within the same channel using the ... / button. 4. GB36 User's Manual Press the RED button to view the detailed information (if available) of the selected programme. 3. Using Programme Guide 1. Select a programme and press the OK button. Press the i button in the selected programme to display the channel list group. 3. Press the...
... and press the OK button to complete reservation. Select an option you select a series programme, a pop-up will be displayed. 2. Programme Guide Note: • Auto tracking can automatically schedule recording in the menu is set to move 2 hours ahead within the same channel using the ... / button. 4. GB36 User's Manual Press the RED button to view the detailed information (if available) of the selected programme. 3. Using Programme Guide 1. Select a programme and press the OK button. Press the i button in the selected programme to display the channel list group. 3. Press the...

User Manual
Page 38
...If you press the button repeatedly, the same operation is located. GB37 User's Manual Press the GREEN button to move the time bar. Press the GUIDE button. 2. Day Moves forwards to one day ahead. 6.4 Schedule You can add or edit recording-reserved programmes using the / button and press the ...OK button to display time bar. 3. Press the GUIDE button. 2. Day Moves back to one day before. Moves forwards to 2 hours before . Moves back to 2 hours ahead. Press the YELLOW button.
...If you press the button repeatedly, the same operation is located. GB37 User's Manual Press the GREEN button to move the time bar. Press the GUIDE button. 2. Day Moves forwards to one day ahead. 6.4 Schedule You can add or edit recording-reserved programmes using the / button and press the ...OK button to display time bar. 3. Press the GUIDE button. 2. Day Moves back to one day before. Moves forwards to 2 hours before . Moves back to 2 hours ahead. Press the YELLOW button.

User Manual
Page 39
..., by genre, select By Genre and press the OK button. Press the BLUE button to find the programme you want to display the keyboard. 3. Programme Guide 6.5 Finding Programmes You can find the programme by ascending time. • Found Programme List may differ depending on the keyboard screen. 4. Press the...
..., by genre, select By Genre and press the OK button. Press the BLUE button to find the programme you want to display the keyboard. 3. Programme Guide 6.5 Finding Programmes You can find the programme by ascending time. • Found Programme List may differ depending on the keyboard screen. 4. Press the...

User Manual
Page 43
...Select Record using the / button and press the OK or button to Enable, you have forgotten your password, please contact your changes. Programme Guide. After editing, you have to enter a password to playback the programme. If you have to enter a password to change the status from ... the OK or button to record automatically in the File using the / button and press the OK or button. 3. Select Recording Schedule using the programme guide. Refer to Disable. 6. Press the MENU button. 2. 7. Note: • If the protect option of the recorded programme. 2. Note: You can...
...Select Record using the / button and press the OK or button to Enable, you have forgotten your password, please contact your changes. Programme Guide. After editing, you have to enter a password to playback the programme. If you have to enter a password to change the status from ... the OK or button to record automatically in the File using the / button and press the OK or button. 3. Select Recording Schedule using the programme guide. Refer to Disable. 6. Press the MENU button. 2. 7. Note: • If the protect option of the recorded programme. 2. Note: You can...

User Manual
Page 46
.... 4. Select HDD Control using the / button and press the OK or button. 3. Note: Auto tracking, split and series reservation in the programme guide are enabled only when Recording's Start/End Time is 0000. Select Format and press the OK button to start /end time of the hard disk... the disk drive if necessary. 1. Select the time using the / button and press the OK button. If you have forgotten your password, please contact the Humax Customer Helpline. 7.4 Recording's Start/End Time You can check the free space of recording. 1. Press the MENU button. 2. You can check the free, ...
.... 4. Select HDD Control using the / button and press the OK or button. 3. Note: Auto tracking, split and series reservation in the programme guide are enabled only when Recording's Start/End Time is 0000. Select Format and press the OK button to start /end time of the hard disk... the disk drive if necessary. 1. Select the time using the / button and press the OK button. If you have forgotten your password, please contact the Humax Customer Helpline. 7.4 Recording's Start/End Time You can check the free space of recording. 1. Press the MENU button. 2. You can check the free, ...

User Manual
Page 72
...mail: Website: Sprache: 01805-778870 (€ 0,14/Min) Mo-Fr 8:00-23:00 Uhr, Sa-So. 8-20 Uhr support@humax-digital.de www.humax-digital.de Deutsch/English/Turkish Australia Tel: Opening Hours: E-mail: Website: Language: 1800 613 011 Mon- 13. Important: UK customers... are recommended to first contact the Customer Helpline to resolve any queries or issues. Appendix 13.6 Service and Support You can get information such as a troubleshooting guide...
...mail: Website: Sprache: 01805-778870 (€ 0,14/Min) Mo-Fr 8:00-23:00 Uhr, Sa-So. 8-20 Uhr support@humax-digital.de www.humax-digital.de Deutsch/English/Turkish Australia Tel: Opening Hours: E-mail: Website: Language: 1800 613 011 Mon- 13. Important: UK customers... are recommended to first contact the Customer Helpline to resolve any queries or issues. Appendix 13.6 Service and Support You can get information such as a troubleshooting guide...

