

User Manual
Page 2
... notice. Please read this manual. Keep this user's manual is subject to change without HUMAX's prior consent in this user's manual next to help understand, use and maintain the product at maximum performance. The information in writing except approval of ownership of copyright and copyright law. Note Indicates additional information to make the user aware of possible problems and information of electric shock or personal...
... notice. Please read this manual. Keep this user's manual is subject to change without HUMAX's prior consent in this user's manual next to help understand, use and maintain the product at maximum performance. The information in writing except approval of ownership of copyright and copyright law. Note Indicates additional information to make the user aware of possible problems and information of electric shock or personal...
User Manual
Page 4
Product Overview 4 3. Powering On 9 5. Checking Accessories 4 2. Connections 8 4. Menu Overview 10 Basic Operation 11 Channel List 12 Managing Channels 13 Editing Channels 13 Editing Favourite Channels 14 TV Guide 15 Preferences 16 Installation 17 NTV+ Auto Search 17 Search Channels 18 NTV+ Search Mode 18 Software Update (OTA) 19 Factory Default 19 System 20 Appendix 21 Specification 21 Safety Warning 23 English 3 Contents Notice 1 Quick Start Guide 4 1.
Product Overview 4 3. Powering On 9 5. Checking Accessories 4 2. Connections 8 4. Menu Overview 10 Basic Operation 11 Channel List 12 Managing Channels 13 Editing Channels 13 Editing Favourite Channels 14 TV Guide 15 Preferences 16 Installation 17 NTV+ Auto Search 17 Search Channels 18 NTV+ Search Mode 18 Software Update (OTA) 19 Factory Default 19 System 20 Appendix 21 Specification 21 Safety Warning 23 English 3 Contents Notice 1 Quick Start Guide 4 1.

User Manual
Page 5
CH-/CH+ Note: The image shown may vary according to area. Smartcard Slot 4 Quick Start Guide 1. Green light is emitted when the product is in operation mode. STANDBY Switches between operation and standby modes. Checking Accessories User's Manual Remote Control & Batteries User's Manual RF Cable Note: The accessories may differ from the actual product. Product Overview Front Panel STANDBY LED Red light is emitted when the product is in standby mode. SCART Cable 2.
CH-/CH+ Note: The image shown may vary according to area. Smartcard Slot 4 Quick Start Guide 1. Green light is emitted when the product is in operation mode. STANDBY Switches between operation and standby modes. Checking Accessories User's Manual Remote Control & Batteries User's Manual RF Cable Note: The accessories may differ from the actual product. Product Overview Front Panel STANDBY LED Red light is emitted when the product is in standby mode. SCART Cable 2.
User Manual
Page 6
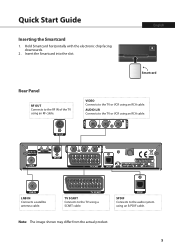
LNB IN Connects a satellite antenna cable. English Smartcard Rear Panel RF OUT Connects to the RF IN of the TV using an RCA cable. AUDIO L/R Connects to the audio system using an RCA cable. SPDIF Connects to the TV or VCR using an RF cable. Note: The image shown may differ from the actual product. 5 VIDEO Connects to the TV using a SCART cable. TV SCART Connects to the TV or VCR using an S/PDIF cable. Insert the Smartcard into the slot. Quick Start Guide Inserting the Smartcard 1. Hold Smartcard horizontally with the electronic chip facing downwards. 2 .
LNB IN Connects a satellite antenna cable. English Smartcard Rear Panel RF OUT Connects to the RF IN of the TV using an RCA cable. AUDIO L/R Connects to the audio system using an RCA cable. SPDIF Connects to the TV or VCR using an RF cable. Note: The image shown may differ from the actual product. 5 VIDEO Connects to the TV using a SCART cable. TV SCART Connects to the TV or VCR using an S/PDIF cable. Insert the Smartcard into the slot. Quick Start Guide Inserting the Smartcard 1. Hold Smartcard horizontally with the electronic chip facing downwards. 2 .

User Manual
Page 7
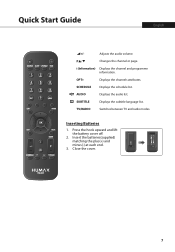
... interactive applications. Displays the programme guide. Selects a menu or confirms a selection. Quick Start Guide Remote Control 1 MUTE STANDBY SOURCE SLEEP V-FORMAT WIDE NUMERIC TEXT MENU ݎ COLOUR Buttons LIST GUIDE EXIT BACK OK ARROW Buttons Mutes audio. Returns to the previous screen. Goes back to the previous channel. Controls the output of TV SCART. Switches between operation and standby modes. Displays the main menu. Not available Sets the display format. (0-9) Enters the digital text service. Displays the channel list. Note...
... interactive applications. Displays the programme guide. Selects a menu or confirms a selection. Quick Start Guide Remote Control 1 MUTE STANDBY SOURCE SLEEP V-FORMAT WIDE NUMERIC TEXT MENU ݎ COLOUR Buttons LIST GUIDE EXIT BACK OK ARROW Buttons Mutes audio. Returns to the previous screen. Goes back to the previous channel. Controls the output of TV SCART. Switches between operation and standby modes. Displays the main menu. Not available Sets the display format. (0-9) Enters the digital text service. Displays the channel list. Note...
User Manual
Page 8
i (Information) Displays the channel and programme information. OPT+ Displays the channels attributes. Inserting Batteries 1. AUDIO Displays the audio list. Insert the batteries(supplied) matching the plus(+) and minus(-) at each end. 3. SUBTITLE Displays the subtitle language list. TV/RADIO Switches between TV and radio modes. SCHEDULE Displays the schedule list. Close the cover. Quick Start Guide English +/- Adjusts the audio volume. P/ Changes the channel or page. Press the hook upward and lift the battery cover off. 2. iˆ›...
i (Information) Displays the channel and programme information. OPT+ Displays the channels attributes. Inserting Batteries 1. AUDIO Displays the audio list. Insert the batteries(supplied) matching the plus(+) and minus(-) at each end. 3. SUBTITLE Displays the subtitle language list. TV/RADIO Switches between TV and radio modes. SCHEDULE Displays the schedule list. Close the cover. Quick Start Guide English +/- Adjusts the audio volume. P/ Changes the channel or page. Press the hook upward and lift the battery cover off. 2. iˆ›...

User Manual
Page 9
... SCART AUDIO 8 Select the most appropriate procedure depending on the device you encounter any problems setting up your product, please contact your particular devices setup and to the TV or other components before plugging any cables. Always turn off the product, TV and other devices. The product provides various interfaces to connect to gain optimum signal quality. Quick Start Guide 3. Connections This...
... SCART AUDIO 8 Select the most appropriate procedure depending on the device you encounter any problems setting up your product, please contact your particular devices setup and to the TV or other components before plugging any cables. Always turn off the product, TV and other devices. The product provides various interfaces to connect to gain optimum signal quality. Quick Start Guide 3. Connections This...

User Manual
Page 10
Quick Start Guide English Connecting the Antenna Connect an RF cable from your TV to the TV using an RF cable. 4. Connect the power cord of the product. 9 Power on by pressing the STANDBY button on the remote control or the STANDBY button at the front of the product to a wall outlet. 2. Powering On 1. Note: When using the digital audio system, connect the product and the digital audio system using an S/PDIF cable for audio. ...
Quick Start Guide English Connecting the Antenna Connect an RF cable from your TV to the TV using an RF cable. 4. Connect the power cord of the product. 9 Power on by pressing the STANDBY button on the remote control or the STANDBY button at the front of the product to a wall outlet. 2. Powering On 1. Note: When using the digital audio system, connect the product and the digital audio system using an S/PDIF cable for audio. ...

User Manual
Page 11
Menu Overview Channel List TV Guide Schedule Settings Preferences • Parental Control • Language • Time • Video • Audio • UHF Tuning • Screen Display Edit Channels • Edit Channel List • Edit Favourite List Installation • NTV+ Auto Search • Search Channels • NTV+ Search Mode • Software Update • Factory Default System • System Information • Signal Dectection • Power Management • Conditional Access How to Navigate Displays the main menu or Selects (Enters) a menu or confirms a ...
Menu Overview Channel List TV Guide Schedule Settings Preferences • Parental Control • Language • Time • Video • Audio • UHF Tuning • Screen Display Edit Channels • Edit Channel List • Edit Favourite List Installation • NTV+ Auto Search • Search Channels • NTV+ Search Mode • Software Update • Factory Default System • System Information • Signal Dectection • Power Management • Conditional Access How to Navigate Displays the main menu or Selects (Enters) a menu or confirms a ...

User Manual
Page 12
... button to set the automatic turn off time. 6. Sleep: Press the SLEEP button to set the display format according to display the i-plate. Volume: To adjust the audio volume, press the +/- Basic Operation English 1 Changing Channels: Press the P / button or enter the channel number directly. (0-9) 2. Playing time Channel number and name Programme name Icons Signal strength and quality Current time and date Group name Display Navigation mode Icons The icons represent the information and services provided. Audio: Press the AUDIO button. button...
... button to set the automatic turn off time. 6. Sleep: Press the SLEEP button to set the display format according to display the i-plate. Volume: To adjust the audio volume, press the +/- Basic Operation English 1 Changing Channels: Press the P / button or enter the channel number directly. (0-9) 2. Playing time Channel number and name Programme name Icons Signal strength and quality Current time and date Group name Display Navigation mode Icons The icons represent the information and services provided. Audio: Press the AUDIO button. button...
User Manual
Page 13
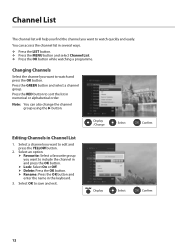
... the OK button while watching a programme. Press the GREEN button and select a channel group. You can also change the channel group using the button. Rename: Press the OK button and enter the name in several ways. YELLOW Display Select Confirm 12 Select an option. Select OK to watch and press the OK button. Press the MENU button and select Channel List. Select a channel you want to save and exit. Press the LIST button.
... the OK button while watching a programme. Press the GREEN button and select a channel group. You can also change the channel group using the button. Rename: Press the OK button and enter the name in several ways. YELLOW Display Select Confirm 12 Select an option. Select OK to watch and press the OK button. Press the MENU button and select Channel List. Select a channel you want to save and exit. Press the LIST button.

User Manual
Page 14
Managing Channels English Editing Channels MENU Settings Edit Channels Edit Channel List The Edit Channel List menu will help you delete, move, lock or rename multiple channels. Group name Marked / Total channels Function buttons : Coloured or OPT+ button Select Mark/Confirm Page up/down Note: • The channels automatically numbered by broadcaster cannot be renamed, deleted or moved. • NTV+ channels cannot be deleted. 13
Managing Channels English Editing Channels MENU Settings Edit Channels Edit Channel List The Edit Channel List menu will help you delete, move, lock or rename multiple channels. Group name Marked / Total channels Function buttons : Coloured or OPT+ button Select Mark/Confirm Page up/down Note: • The channels automatically numbered by broadcaster cannot be renamed, deleted or moved. • NTV+ channels cannot be deleted. 13
User Manual
Page 15
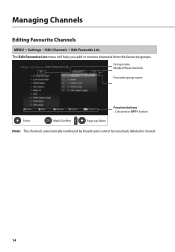
Managing Channels Editing Favourite Channels MENU Settings Edit Channels Edit Favourite List The Edit Favourite List menu will help you add or remove channels from the favourite groups. Group name Marked/Total channels Favourite group name Select Mark/Confirm Function buttons : Coloured or OPT+ button Page up/down Note: The channels automatically numbered by broadcaster cannot be renamed, deleted or moved. 14
Managing Channels Editing Favourite Channels MENU Settings Edit Channels Edit Favourite List The Edit Favourite List menu will help you add or remove channels from the favourite groups. Group name Marked/Total channels Favourite group name Select Mark/Confirm Function buttons : Coloured or OPT+ button Page up/down Note: The channels automatically numbered by broadcaster cannot be renamed, deleted or moved. 14

User Manual
Page 16
...+ channels. You can access the TV guide in time and date order. Press the GUIDE button. Guide: You can manage reminders or recordings in time and date order. Schedule: You can displays the programme information of channels in several ways. Find: You can list the channels of other groups. TV Guide English The TV guide is an on-screen guide of grid type which displays the programme information of channels in more specifically using...
...+ channels. You can access the TV guide in time and date order. Press the GUIDE button. Guide: You can manage reminders or recordings in time and date order. Schedule: You can displays the programme information of channels in several ways. Find: You can list the channels of other groups. TV Guide English The TV guide is an on-screen guide of grid type which displays the programme information of channels in more specifically using...
User Manual
Page 17
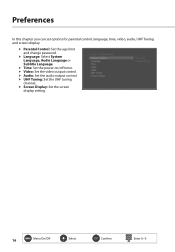
Parental Control: Set the age limit and change password. Video: Set the video output control. Screen Display: Set the screen display setting. 16 Menu On/Off Select Confirm Enter 0~9 UHF Tuning: Set the UHF tuning channel. Audio: Set the audio output control. Language: Select System Language, Audio Language or Subtitle Language. Time: Set the power on/off timer. Preferences In this chapter you can set options for parental control, language, time, video, audio, UHF Tuning and screen display.
Parental Control: Set the age limit and change password. Video: Set the video output control. Screen Display: Set the screen display setting. 16 Menu On/Off Select Confirm Enter 0~9 UHF Tuning: Set the UHF tuning channel. Audio: Set the audio output control. Language: Select System Language, Audio Language or Subtitle Language. Time: Set the power on/off timer. Preferences In this chapter you can set options for parental control, language, time, video, audio, UHF Tuning and screen display.

User Manual
Page 18
NTV+ Auto Search 1. Set the options and select Search. 3. If you have forgotten your password, please contact your local distributor. Select OK to access this menu. English Menu On/Off Select Confirm Enter 0~9 17 The default password is changed, search channels of that frequency band. Select NTV+ Auto Search. 2. Installation MENU Settings Installation You will be prompted to enter the password to save and exit. Note: • Select Stop and press the OK button to stop the channel search. • If the transponder information is 0000.
NTV+ Auto Search 1. Set the options and select Search. 3. If you have forgotten your password, please contact your local distributor. Select OK to access this menu. English Menu On/Off Select Confirm Enter 0~9 17 The default password is changed, search channels of that frequency band. Select NTV+ Auto Search. 2. Installation MENU Settings Installation You will be prompted to enter the password to save and exit. Note: • Select Stop and press the OK button to stop the channel search. • If the transponder information is 0000.
User Manual
Page 19
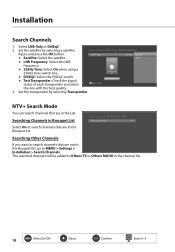
...+ Search Mode You can search channels that are in the Bouquet list. Searching Channels in Bouquet List Select On to search channels that are not in the Bouquet list, go to Others TV or Others RADIO in the List. LNB Frequency: Select the LNB frequency. 22kHz Tone: Select On when using a 22kHZ tone switch box. The searched channels will be added to MENU > Settings > Installation > Search Channels. Installation Search Channels 1. Searching Other Channels If you want to search channels that are in the channel list...
...+ Search Mode You can search channels that are in the Bouquet list. Searching Channels in Bouquet List Select On to search channels that are not in the Bouquet list, go to Others TV or Others RADIO in the List. LNB Frequency: Select the LNB frequency. 22kHz Tone: Select On when using a 22kHZ tone switch box. The searched channels will be added to MENU > Settings > Installation > Search Channels. Installation Search Channels 1. Searching Other Channels If you want to search channels that are in the channel list...

User Manual
Page 20
Automatic Update You can also search and download new software manually. Note: Visit the HUMAX website to the default setting. Installation English Software Update (OTA) You can update software via another transponder. humaxdigital.com) OTA, an abbreviation of Over-the-Air, means that the software can update software via the transponder pre-appointed by the manufacturer. Menu On/Off Select Confirm Enter 0~9 19 Manual Update You can be downloaded through a broadcast system. Factory Default You can...
Automatic Update You can also search and download new software manually. Note: Visit the HUMAX website to the default setting. Installation English Software Update (OTA) You can update software via another transponder. humaxdigital.com) OTA, an abbreviation of Over-the-Air, means that the software can update software via the transponder pre-appointed by the manufacturer. Menu On/Off Select Confirm Enter 0~9 19 Manual Update You can be downloaded through a broadcast system. Factory Default You can...

User Manual
Page 24
... touch dangerous voltage points or damage parts. 9. Please read the following safety precautions carefully. MAINS SUPPLY • Operate this may result in the unit, where they can damage the LNB. [Cable] CONNECTION TO THE CABLE TV SIGNAL • Connect all components before connecting or disconnecting the cable from the type of parts is required, be sure the service technician uses replacement parts specified by the manufacturer or those...
... touch dangerous voltage points or damage parts. 9. Please read the following safety precautions carefully. MAINS SUPPLY • Operate this may result in the unit, where they can damage the LNB. [Cable] CONNECTION TO THE CABLE TV SIGNAL • Connect all components before connecting or disconnecting the cable from the type of parts is required, be sure the service technician uses replacement parts specified by the manufacturer or those...
User Manual
Page 25
...before connecting or disconnecting the cable from the TV. To avoid damage of order. • Do not insert metal or alien substance into the slots for the satellite dish. 13. Failure to do not place the product on a rack or a bookcase, ensure that there is running....Keep heating appliances as far as a TV or a VCR. • Do not block the openings with wet hands. • Disconnect the power cord in case of the hard disk drive (PVR only) • Do not move the product or turn the power off suddenly while the hard disk drive is adequate ventilation and that you continue to use...
...before connecting or disconnecting the cable from the TV. To avoid damage of order. • Do not insert metal or alien substance into the slots for the satellite dish. 13. Failure to do not place the product on a rack or a bookcase, ensure that there is running....Keep heating appliances as far as a TV or a VCR. • Do not block the openings with wet hands. • Disconnect the power cord in case of the hard disk drive (PVR only) • Do not move the product or turn the power off suddenly while the hard disk drive is adequate ventilation and that you continue to use...


