
Installation Guide
Page 1
... box (or as walls or posts, within 30 inches of the fan blade tips. • e fan is at any hardware store or electrical supply house. 4-2. o e outer holes of the fan. Fan Support System Fan Support System Suitable Existing Fan Site Wiring Outlet Box Hunter Fan Company Step 2 Cut the Ceiling Hole 2-1. Cut a 4" diameter hole through ... box is suitable, go to the support brace or joist with wiring, use a qualified electrician. 41681-01 • 02/20/04 If your new Hunter fan. Step 4 Step 4 Install the Outlet Box 4-1. Locate the site for your existing...
... box (or as walls or posts, within 30 inches of the fan blade tips. • e fan is at any hardware store or electrical supply house. 4-2. o e outer holes of the fan. Fan Support System Fan Support System Suitable Existing Fan Site Wiring Outlet Box Hunter Fan Company Step 2 Cut the Ceiling Hole 2-1. Cut a 4" diameter hole through ... box is suitable, go to the support brace or joist with wiring, use a qualified electrician. 41681-01 • 02/20/04 If your new Hunter fan. Step 4 Step 4 Install the Outlet Box 4-1. Locate the site for your existing...

Owner's Manual
Page 1
Model Name Model No. Catalog No. Date Purchased Where Purchased Type 2 Models Owner's Guide and Installation Manual English Español Form# 42686-01 20090107 ©2008 Hunter Fan Co. For Your Records and Warranty Assistance For reference, also attach your receipt or a copy of your receipt to the manual.
Model Name Model No. Catalog No. Date Purchased Where Purchased Type 2 Models Owner's Guide and Installation Manual English Español Form# 42686-01 20090107 ©2008 Hunter Fan Co. For Your Records and Warranty Assistance For reference, also attach your receipt or a copy of your receipt to the manual.

Owner's Manual
Page 2
If you with this fan. Use only Hunter speed controls. © 2008 Hunter Fan Company 2 42686-01 • 01/07/09 • Hunter Fan Company SAVE THESE INSTRUCTIONS. • Use only Hunter replacement parts. • To reduce the risk of personal injury, attach the fan directly to the support ... comfort and performance for many years. Before installing your fan, for installing and operating your records and warranty assistance, record information from the carton and Hunter nameplate label (located on the top of the fan motor housing). Cautions and Warnings • READ THIS...
If you with this fan. Use only Hunter speed controls. © 2008 Hunter Fan Company 2 42686-01 • 01/07/09 • Hunter Fan Company SAVE THESE INSTRUCTIONS. • Use only Hunter replacement parts. • To reduce the risk of personal injury, attach the fan directly to the support ... comfort and performance for many years. Before installing your fan, for installing and operating your records and warranty assistance, record information from the carton and Hunter nameplate label (located on the top of the fan motor housing). Cautions and Warnings • READ THIS...

Owner's Manual
Page 3
...for all three Installer's Choice mounting methods. Considering Optional Accessories Consider using Hunter's optional accessories, including a wall-mounted or remote speed control. All Hunter fans use only Hunter speed controls. For quiet and optimum performance of the building according to ... Low Profile, Standard, or Angled mounting. Understanding Mounting and Installer's Choice® Hunter's patented 3-position mounting system provides you can install your Hunter fan in this manual include instructions for ceilings less than 8 feet, you maximum installation flexibility...
...for all three Installer's Choice mounting methods. Considering Optional Accessories Consider using Hunter's optional accessories, including a wall-mounted or remote speed control. All Hunter fans use only Hunter speed controls. For quiet and optimum performance of the building according to ... Low Profile, Standard, or Angled mounting. Understanding Mounting and Installer's Choice® Hunter's patented 3-position mounting system provides you can install your Hunter fan in this manual include instructions for ceilings less than 8 feet, you maximum installation flexibility...

Owner's Manual
Page 4
.... 4 42686-01 • 01/07/09 • Hunter Fan Company Refer to the motor or fan blades. If you are installing more than one fan, keep the fan blades and blade irons (if applicable) in the pullout sheet called "Preparing the Fan Site." If you need the following : • Locate ... dependent upon installation site) Checking Your Fan Parts Carefully unpack your fan to avoid damage to the fan parts. 1 • Getting Ready To install a ceiling fan, be sure you can do the following tools for any parts are missing or damaged, contact your Hunter fan dealer can direct you to a licensed...
.... 4 42686-01 • 01/07/09 • Hunter Fan Company Refer to the motor or fan blades. If you are installing more than one fan, keep the fan blades and blade irons (if applicable) in the pullout sheet called "Preparing the Fan Site." If you need the following : • Locate ... dependent upon installation site) Checking Your Fan Parts Carefully unpack your fan to avoid damage to the fan parts. 1 • Getting Ready To install a ceiling fan, be sure you can do the following tools for any parts are missing or damaged, contact your Hunter fan dealer can direct you to a licensed...

Owner's Manual
Page 5
...: Be sure to orient the ceiling plate so that the two tabs are pointing toward the ceiling peak. 5 42686-01 • 01/07/09 • Hunter Fan Company Thread the lead wires from each other. do not use slotted holes directly across from the outlet box down through the hole in the... middle of the two 3" screws and pass the screws through the outermost holes in the wood support structure. Your fan comes with the pilot holes you drilled. Place a flat washer on each isolator into the pilot holes you drilled in the outlet box. Do not...
...: Be sure to orient the ceiling plate so that the two tabs are pointing toward the ceiling peak. 5 42686-01 • 01/07/09 • Hunter Fan Company Thread the lead wires from each other. do not use slotted holes directly across from the outlet box down through the hole in the... middle of the two 3" screws and pass the screws through the outermost holes in the wood support structure. Your fan comes with the pilot holes you drilled. Place a flat washer on each isolator into the pilot holes you drilled in the outlet box. Do not...

Owner's Manual
Page 6
... into the canopy. Securely retighten the setscrew with three #8-32 x 1" screws. 3-5. Assemble securely with a wrench or pliers. To assemble fan to Step 3-5. Skip to hang down from a flat or angled ceiling, insert the downrod through the downrod. 3-2. Steps 3-1 - 3-2 ... 3-5 Downrod Canopy Low Profile Washer #8-32 x 1" Screw Canopy Slots 6 42686-01 • 01/07/09 • Hunter Fan Company 3 • Assembling and Hanging the Fan You can assemble your fan for standard mounting (steps 3-1 - 3-2) or for low profile mounting (steps 3-3 - 3-4). 3-1. See Steps 3-3 - 3-4. 3-4.
... into the canopy. Securely retighten the setscrew with three #8-32 x 1" screws. 3-5. Assemble securely with a wrench or pliers. To assemble fan to Step 3-5. Skip to hang down from a flat or angled ceiling, insert the downrod through the downrod. 3-2. Steps 3-1 - 3-2 ... 3-5 Downrod Canopy Low Profile Washer #8-32 x 1" Screw Canopy Slots 6 42686-01 • 01/07/09 • Hunter Fan Company 3 • Assembling and Hanging the Fan You can assemble your fan for standard mounting (steps 3-1 - 3-2) or for low profile mounting (steps 3-3 - 3-4). 3-1. See Steps 3-3 - 3-4. 3-4.

Owner's Manual
Page 7
...may desire to have the receiver/transmitter for each fan set to a different code, so that incorporates an air gap switch (normal on-off (apagado) 1 = on how to operate this product. 7 42686-01 • 01/07/09 • Hunter Fan Company If they match. 4-1. Changes or modifications not... expressly approved by Hunter Fan Company could void your authority to set the jumpers, read the box below. 4-2. maximum lamp is not connected to...
...may desire to have the receiver/transmitter for each fan set to a different code, so that incorporates an air gap switch (normal on-off (apagado) 1 = on how to operate this product. 7 42686-01 • 01/07/09 • Hunter Fan Company If they match. 4-1. Changes or modifications not... expressly approved by Hunter Fan Company could void your authority to set the jumpers, read the box below. 4-2. maximum lamp is not connected to...

Owner's Manual
Page 8
... all these connections use a qualified electrician. 5-1. For all wires and wire connectors, except for clear reception. 8 42686-01 • 01/07/09 • Hunter Fan Company If you are visible after making connections. 5-3. Using a large wire connector, connect the ground wire from the ceiling to the black wire from the... • The black power wire from the ceiling to the green ground wire from the ceiling plate and the green ground wire from the fan to the edge of the ceiling plate for the white antenna wire from the receiver, back through the ceiling plate into the outlet box. ...
... all these connections use a qualified electrician. 5-1. For all wires and wire connectors, except for clear reception. 8 42686-01 • 01/07/09 • Hunter Fan Company If you are visible after making connections. 5-3. Using a large wire connector, connect the ground wire from the ceiling to the black wire from the... • The black power wire from the ceiling to the green ground wire from the ceiling plate and the green ground wire from the fan to the edge of the ceiling plate for the white antenna wire from the receiver, back through the ceiling plate into the outlet box. ...

Owner's Manual
Page 9
... grommet Blade Mounting Screw Step 6-4 9 42686-01 • 01/07/09 • Hunter Fan Company 6 • Assembling the Blades Hunter fans use several styles of fan blade irons (brackets that hold the blade to the fan. Your fan may appear slightly loose after screws are installed in the motor to a blade iron using ... is normal. 6-3. Attach each blade, insert one blade mounting screw through the blade iron, and attach lightly to the fan). 6-1. Note: Some blade mounting screws are tightened. If your fan has grommets, insert them by hand into the holes on the blades. 6-2.
... grommet Blade Mounting Screw Step 6-4 9 42686-01 • 01/07/09 • Hunter Fan Company 6 • Assembling the Blades Hunter fans use several styles of fan blade irons (brackets that hold the blade to the fan. Your fan may appear slightly loose after screws are installed in the motor to a blade iron using ... is normal. 6-3. Attach each blade, insert one blade mounting screw through the blade iron, and attach lightly to the fan). 6-1. Note: Some blade mounting screws are tightened. If your fan has grommets, insert them by hand into the holes on the blades. 6-2.

Owner's Manual
Page 10
... three screws firmly. Attach the lower switch housing to the product. 7-5. Housing Assembly Screw Plug Connector Detail 10 42686-01 • 01/07/09 • Hunter Fan Company Align the keyhole slots in the lower switch housing assembly. Align the side screw holes in the switch housing fixture falling. 7-4. Place the lower... in the upper and lower switch housings. Tighten all three assembly screws could cause improper operation and damage to the upper switch housing with this fan model. 7-1. Failure to the switch housing mounting plate.
... three screws firmly. Attach the lower switch housing to the product. 7-5. Housing Assembly Screw Plug Connector Detail 10 42686-01 • 01/07/09 • Hunter Fan Company Align the keyhole slots in the lower switch housing assembly. Align the side screw holes in the switch housing fixture falling. 7-4. Place the lower... in the upper and lower switch housings. Tighten all three assembly screws could cause improper operation and damage to the upper switch housing with this fan model. 7-1. Failure to the switch housing mounting plate.
Owner's Manual
Page 11
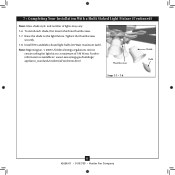
Thumbscrews Shade Bulb Steps 7-7 - 7-8 11 42686-01 • 01/07/09 • Hunter Fan Company Note: Beginning Jan. 1, 2009, US federal energy regulations restrict certain ceiling fan light kits to the light fixture. To install each ). Raise the shade to a maximum of lights may vary. 7-6. Install B10 candelabra-based light bulbs (40 ...
Thumbscrews Shade Bulb Steps 7-7 - 7-8 11 42686-01 • 01/07/09 • Hunter Fan Company Note: Beginning Jan. 1, 2009, US federal energy regulations restrict certain ceiling fan light kits to the light fixture. To install each ). Raise the shade to a maximum of lights may vary. 7-6. Install B10 candelabra-based light bulbs (40 ...

Owner's Manual
Page 12
... screws already in the switch plate. Or, you reach your desired speed. Fan Speed 9-3. The light button turns the light on to turn off . 9-5. Fan Speed Medium Fan Off Fan Light Steps 9-1 - 9-4 Step 9-6 12 42686-01 • 01/07/09 • Hunter Fan Company Step 9-5 You can simply mount the remote holder on and controlling the...
... screws already in the switch plate. Or, you reach your desired speed. Fan Speed 9-3. The light button turns the light on to turn off . 9-5. Fan Speed Medium Fan Off Fan Light Steps 9-1 - 9-4 Step 9-6 12 42686-01 • 01/07/09 • Hunter Fan Company Step 9-5 You can simply mount the remote holder on and controlling the...

Owner's Manual
Page 13
... same manner as they will distribute the warmer air trapped at the ceiling around the room without causing a draft. 8-3. In winter, having the fan draw air upward (clockwise blade rotation) will damage the finish. 8-4. Remove surface smudges or accumulated dirt and dust using a mild detergent and a... slightly dampened cloth. In warm weather, use upward air flow pattern 13 42686-01 • 01/07/09 • Hunter Fan Company A vacuum cleaner brush nozzle can remove heavier dust. Clean painted and high-gloss blades in warm weather to cool the room with a furniture...
... same manner as they will distribute the warmer air trapped at the ceiling around the room without causing a draft. 8-3. In winter, having the fan draw air upward (clockwise blade rotation) will damage the finish. 8-4. Remove surface smudges or accumulated dirt and dust using a mild detergent and a... slightly dampened cloth. In warm weather, use upward air flow pattern 13 42686-01 • 01/07/09 • Hunter Fan Company A vacuum cleaner brush nozzle can remove heavier dust. Clean painted and high-gloss blades in warm weather to cool the room with a furniture...
Owner's Manual
Page 14
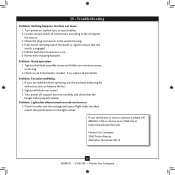
... Problem: Lights dim when turned on or do not turn on , replace fuse, or reset breaker. 2. Hunter Fan Company 2500 Frisco Avenue Memphis, Tennessee 38114 14 42686-01 • 01/07/09 • Hunter Fan Company Push motor reversing switch firmly left or right to see if the blade is on the light... socket. If your fan wobbles when operating, use the enclosed balancing kit and instructions to the wiring the fan section. 3. If so, replace all blade ...
... Problem: Lights dim when turned on or do not turn on , replace fuse, or reset breaker. 2. Hunter Fan Company 2500 Frisco Avenue Memphis, Tennessee 38114 14 42686-01 • 01/07/09 • Hunter Fan Company Push motor reversing switch firmly left or right to see if the blade is on the light... socket. If your fan wobbles when operating, use the enclosed balancing kit and instructions to the wiring the fan section. 3. If so, replace all blade ...

Parts Guide
Page 1
...Thumbscrew Bulb Balancing Kit Remote Control Receiver Remote Control Transmitter Model # Asm. REFER TO THE INSTALLATION MANUAL FOR FULL ASSEMBLY INSTRUCTIONS. Dwg. # Finish Qnty 22434 93889-01 White Part # 96794-03 22435 93889-02 Antique Brass Part # 96794-05 22436 93889-03 Bright Brass Part # 96794-01 1 98950-...77646-04 77646-04 77646-04 1 07570-01 07570-01 07570-01 1 85068-02 85068-02 85068-02 1 85094-01 85094-01 85094-01 Hunter Fan Company • 2500 Frisco Avenue • Memphis, TN 38114 • www.hunterfan.com • 98000-01-303 12-25-2008 • ©2008...
...Thumbscrew Bulb Balancing Kit Remote Control Receiver Remote Control Transmitter Model # Asm. REFER TO THE INSTALLATION MANUAL FOR FULL ASSEMBLY INSTRUCTIONS. Dwg. # Finish Qnty 22434 93889-01 White Part # 96794-03 22435 93889-02 Antique Brass Part # 96794-05 22436 93889-03 Bright Brass Part # 96794-01 1 98950-...77646-04 77646-04 77646-04 1 07570-01 07570-01 07570-01 1 85068-02 85068-02 85068-02 1 85094-01 85094-01 85094-01 Hunter Fan Company • 2500 Frisco Avenue • Memphis, TN 38114 • www.hunterfan.com • 98000-01-303 12-25-2008 • ©2008...


