

Installation Guide
Page 1
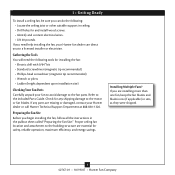
... a new fan site as walls or posts, within 30 inches of the fan blade tips. • e fan is acceptable and safe for the ceiling hole directly below a joist or support brace that the fan supply line extends at least 8 feet high. • e fan blades have now successfully prepared your ceiling fan, go to the outlet box with 2 • Installing the Ceiling Plate. Fan Support System Fan Support System Suitable Existing Fan Site Wiring Outlet Box Hunter Fan Company Step...
... a new fan site as walls or posts, within 30 inches of the fan blade tips. • e fan is acceptable and safe for the ceiling hole directly below a joist or support brace that the fan supply line extends at least 8 feet high. • e fan blades have now successfully prepared your ceiling fan, go to the outlet box with 2 • Installing the Ceiling Plate. Fan Support System Fan Support System Suitable Existing Fan Site Wiring Outlet Box Hunter Fan Company Step...

Owner's Manual
Page 1
For Your Records and Warranty Assistance Model Name Catalog/Model No Serial No Date Purchased Where Purchased For reference also attach your receipt or a copy of your receipt to the manual. installation and operation manual for Hunter Ceiling Fans TYPE 5 Models 42767-01 • 10/19/07
For Your Records and Warranty Assistance Model Name Catalog/Model No Serial No Date Purchased Where Purchased For reference also attach your receipt or a copy of your receipt to the manual. installation and operation manual for Hunter Ceiling Fans TYPE 5 Models 42767-01 • 10/19/07

Owner's Manual
Page 2
... to the outlet box and associated wall switch location. If you complete instructions for installing and operating your fan. Table Of Contents 1 • Getting Ready 4 2 • Installing the Ceiling Plate 5 3 • Assembling and Hanging the Fan . . . 6 4 •Wiring the Fan 7 5 • Installing the Canopy 8 6 • Assembling the Blades 9 7 • Completing Your Installation With a Bowl Light Fixture 10 8 • Operating and Cleaning Your Ceiling Fan 14 9 • Troubleshooting 15 Welcome Your new Hunter® ceiling fan is an addition to your home or office that...
... to the outlet box and associated wall switch location. If you complete instructions for installing and operating your fan. Table Of Contents 1 • Getting Ready 4 2 • Installing the Ceiling Plate 5 3 • Assembling and Hanging the Fan . . . 6 4 •Wiring the Fan 7 5 • Installing the Canopy 8 6 • Assembling the Blades 9 7 • Completing Your Installation With a Bowl Light Fixture 10 8 • Operating and Cleaning Your Ceiling Fan 14 9 • Troubleshooting 15 Welcome Your new Hunter® ceiling fan is an addition to your home or office that...

Owner's Manual
Page 3
... Optional Accessories Consider using Hunter's optional accessories, including a wall-mounted or remote speed control. All Hunter fans use the accessories, follow the instructions included with each product. Support Brace Angle Mounting Style Ceiling Outlet Box 8 12 For ceilings higher than 8 feet, you maximum installation flexibility and ease. You can purchase Hunter extension downrods. Understanding Mounting and Installer's Choice® Hunter's patented 2-position mounting system provides you can install your Hunter fan in this manual include instructions for...
... Optional Accessories Consider using Hunter's optional accessories, including a wall-mounted or remote speed control. All Hunter fans use the accessories, follow the instructions included with each product. Support Brace Angle Mounting Style Ceiling Outlet Box 8 12 For ceilings higher than 8 feet, you maximum installation flexibility and ease. You can purchase Hunter extension downrods. Understanding Mounting and Installer's Choice® Hunter's patented 2-position mounting system provides you can install your Hunter fan in this manual include instructions for...
Owner's Manual
Page 4
.../07 • Hunter Fan Company Refer to the motor or fan blades. Proper ceiling fan location and attachment to the building structure are missing or damaged, contact your Hunter dealer or call Hunter Technical Support Department at 888-830-1326. If you are installing more than one fan, keep the fan blades and blade irons (if applicable) in ceiling. • Drill holes for and install wood screws. • Identify and connect electrical wires. • Lift...
.../07 • Hunter Fan Company Refer to the motor or fan blades. Proper ceiling fan location and attachment to the building structure are missing or damaged, contact your Hunter dealer or call Hunter Technical Support Department at 888-830-1326. If you are installing more than one fan, keep the fan blades and blade irons (if applicable) in ceiling. • Drill holes for and install wood screws. • Identify and connect electrical wires. • Lift...
Owner's Manual
Page 5
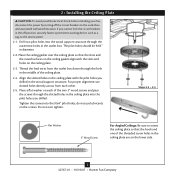
... screws into the wood support structure through the hole in the middle of the threaded screw holes in the off the circuit breakers to the outlet box and associated wall switch location. do not use slotted holes directly across from the outlet box down through the outermost holes in the ceiling plate with the slots and holes on the lower side. 5 42767-01 • 10/19/07 • Hunter Fan Company...
... screws into the wood support structure through the hole in the middle of the threaded screw holes in the off the circuit breakers to the outlet box and associated wall switch location. do not use slotted holes directly across from the outlet box down through the outermost holes in the ceiling plate with the slots and holes on the lower side. 5 42767-01 • 10/19/07 • Hunter Fan Company...
Owner's Manual
Page 6
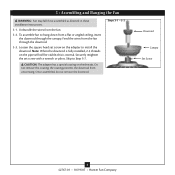
... visible; Loosen the square head set screw with a wrench or pliers. Note: When the downrod is normal. Once assembled, do not remove the downrod. To assemble fan to Step 5-7. 3 • Assembling and Hanging the Fan WARNING: Fan may fall if not assembled as directed in these installation instructions. 3-1. Steps 3-1 - 3-2 Downrod Canopy Set Screw 6 42767-01 • 10/19/07 • Hunter Fan Company Unbundle the wires from a flat or angled ceiling, insert the downrod through the...
... visible; Loosen the square head set screw with a wrench or pliers. Note: When the downrod is normal. Once assembled, do not remove the downrod. To assemble fan to Step 5-7. 3 • Assembling and Hanging the Fan WARNING: Fan may fall if not assembled as directed in these installation instructions. 3-1. Steps 3-1 - 3-2 Downrod Canopy Set Screw 6 42767-01 • 10/19/07 • Hunter Fan Company Unbundle the wires from a flat or angled ceiling, insert the downrod through the...

Owner's Manual
Page 7
... the ceiling plate and the green ground wire from the fan. 4-5. If you are unfamiliar with national and local electrical codes. 4-1. Wire Connector 7 42767-01 • 10/19/07 • Hunter Fan Company 4 •Wiring the Fan All wiring must be in accordance with wiring, use the wire nuts provided. 4-3. For all these connections use a qualified electrician. Connect the white wire (ungrounded) from the ceiling to the black (ungrounded) and the black/white wire (ungrounded...
... the ceiling plate and the green ground wire from the fan. 4-5. If you are unfamiliar with national and local electrical codes. 4-1. Wire Connector 7 42767-01 • 10/19/07 • Hunter Fan Company 4 •Wiring the Fan All wiring must be in accordance with wiring, use the wire nuts provided. 4-3. For all these connections use a qualified electrician. Connect the white wire (ungrounded) from the ceiling to the black (ungrounded) and the black/white wire (ungrounded...
Owner's Manual
Page 8
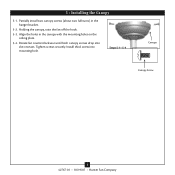
Steps 5-1- 5-4 Canopy Canopy Screw 8 42767-01 • 10/19/07 • Hunter Fan Company Install third screw into slot recesses. Rotate fan counterclockwise until both canopy screws drop into mounting hole. Holding the canopy, raise the fan off the hook. 5-3. Partially install two canopy screws (about two full turns) in the canopy with the mounting holes on the ceiling plate. 5-4. Align the holes in the hanger bracket. 5-2. Tighten screws securely. 5 • Installing the Canopy 5-1.
Steps 5-1- 5-4 Canopy Canopy Screw 8 42767-01 • 10/19/07 • Hunter Fan Company Install third screw into slot recesses. Rotate fan counterclockwise until both canopy screws drop into mounting hole. Holding the canopy, raise the fan off the hook. 5-3. Partially install two canopy screws (about two full turns) in the canopy with the mounting holes on the ceiling plate. 5-4. Align the holes in the hanger bracket. 5-2. Tighten screws securely. 5 • Installing the Canopy 5-1.

Owner's Manual
Page 9
...blade grommets. Note: Some blade mounting screws are tightened. If your fan has grommets, insert them by hand into the holes on the blades. 6-2. Remove the blade mounting screws and rubber shipping bumpers from the motor. This is normal. 6-3. Use with grommet Blade Assembly Screws Use without grommet Steps 6-1 - 6-2 Blade Mounting Screw Step 6-4 9 42767-01 • 10/19/07 • Hunter Fan Company Your fan may appear slightly loose after screws are installed in the motor to the fan). 6-1. 6 • Assembling the Blades Hunter fans use several styles of fan blade irons...
...blade grommets. Note: Some blade mounting screws are tightened. If your fan has grommets, insert them by hand into the holes on the blades. 6-2. Remove the blade mounting screws and rubber shipping bumpers from the motor. This is normal. 6-3. Use with grommet Blade Assembly Screws Use without grommet Steps 6-1 - 6-2 Blade Mounting Screw Step 6-4 9 42767-01 • 10/19/07 • Hunter Fan Company Your fan may appear slightly loose after screws are installed in the motor to the fan). 6-1. 6 • Assembling the Blades Hunter fans use several styles of fan blade irons...
Owner's Manual
Page 10
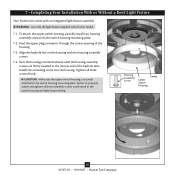
Feed the upper plug connector through the center opening of the keyhole slots. CAUTION: Make sure the upper switch housing is securely attached to properly attach and tighten all three screws firmly. Steps 7-1 - 7-3 Housing Assembly Screw Gasket Upper Switch Housing 10 42767-01 • 10/19/07 • Hunter Fan Company 7 • Completing Your Installation With or Without a Bowl Light Fixture Your Hunter fan comes with the housing assembly screws. 7-4. Align the keyhole...
Feed the upper plug connector through the center opening of the keyhole slots. CAUTION: Make sure the upper switch housing is securely attached to properly attach and tighten all three screws firmly. Steps 7-1 - 7-3 Housing Assembly Screw Gasket Upper Switch Housing 10 42767-01 • 10/19/07 • Hunter Fan Company 7 • Completing Your Installation With or Without a Bowl Light Fixture Your Hunter fan comes with the housing assembly screws. 7-4. Align the keyhole...

Owner's Manual
Page 11
Remove the wire connectors from the two wires from the lower switch housing. Use one wire connector to connect the black wire from the light fixture to the white wire from the light fixture through the light fixture, the light fixture gasket, and into the switch housing. 7-7. Partially install the two light fixture mounting screws provided with the ceiling fan through the hole in the narrow end of the lower switch housing. 7-6. Insert the two wires from the lower switch housing. Use the other to connect the white wire from the light fixture to the...
Remove the wire connectors from the two wires from the lower switch housing. Use one wire connector to connect the black wire from the light fixture to the white wire from the light fixture through the light fixture, the light fixture gasket, and into the switch housing. 7-7. Partially install the two light fixture mounting screws provided with the ceiling fan through the hole in the narrow end of the lower switch housing. 7-6. Insert the two wires from the lower switch housing. Use the other to connect the white wire from the light fixture to the...

Owner's Manual
Page 12
...Your Installation With a Bowl Light Fixture (Continued) 7-9. Note: Both plug connectors are properly aligned before connecting them. Incorrect connection could cause improper operation and damage to the upper switch housing with three housing assembly screws. Steps 7-9 - 7-10 Lower Switch Housing Plug Connector Housing Assembly Screw Plug Connector Detail 12 42767-01 • 10/19/07 • Hunter Fan Company To attach the lower switch housing, connect the upper plug connector from the motor to the lower plug connector in the upper and lower switch housings. Place...
...Your Installation With a Bowl Light Fixture (Continued) 7-9. Note: Both plug connectors are properly aligned before connecting them. Incorrect connection could cause improper operation and damage to the upper switch housing with three housing assembly screws. Steps 7-9 - 7-10 Lower Switch Housing Plug Connector Housing Assembly Screw Plug Connector Detail 12 42767-01 • 10/19/07 • Hunter Fan Company To attach the lower switch housing, connect the upper plug connector from the motor to the lower plug connector in the upper and lower switch housings. Place...

Owner's Manual
Page 13
Raise the globe to the light fixture. First install B10 candelabra bulbs (60 Watt Maximum) into the sockets. 7-12. 7 • Completing Your Installation With a Bowl Light Fixture (Continued) Installing the Glass Bowl 7-11. Light Bulbs (B10 CandelabraBased, 60 Watt Maximum) Glass Bowl 13 42767-01 • 10/19/07 • Hunter Fan Company Tighten the thumbscrews securely. To install the globe, loosen the three thumbscrews. 7-14. Thread the light pull chain through the hole in the center of the glass bowl. 7-13. Do not over tighten.
Raise the globe to the light fixture. First install B10 candelabra bulbs (60 Watt Maximum) into the sockets. 7-12. 7 • Completing Your Installation With a Bowl Light Fixture (Continued) Installing the Glass Bowl 7-11. Light Bulbs (B10 CandelabraBased, 60 Watt Maximum) Glass Bowl 13 42767-01 • 10/19/07 • Hunter Fan Company Tighten the thumbscrews securely. To install the globe, loosen the three thumbscrews. 7-14. Thread the light pull chain through the hole in the center of the glass bowl. 7-13. Do not over tighten.

Owner's Manual
Page 14
... pull chain has four settings in warm weather to prevent the chain from recoiling into the connector. 8-3. You may use an artistic agent, but never abrasive cleaning agents as the fan finish. Remove surface smudges or accumulated dirt and dust using a mild detergent and a slightly dampened cloth. The fan pull chain controls power to the fan. 8-2. Turn on electrical power to the fan. 8 • Operating and Cleaning Your Ceiling Fan 8-1. Clean wood finish blades with a direct breeze...
... pull chain has four settings in warm weather to prevent the chain from recoiling into the connector. 8-3. You may use an artistic agent, but never abrasive cleaning agents as the fan finish. Remove surface smudges or accumulated dirt and dust using a mild detergent and a slightly dampened cloth. The fan pull chain controls power to the fan. 8-2. Turn on electrical power to the fan. 8 • Operating and Cleaning Your Ceiling Fan 8-1. Clean wood finish blades with a direct breeze...
Owner's Manual
Page 15
... instructions to see if the blade is engaged. 5. Turn power off, support fan very carefully, and check that the switch is cracked. Pull the pull chain to ensure that the hanger ball is on , replace fuse, or reset breaker. 2. Problem: Noisy operation. 1. Tighten all connections according to the wiring the fan section. 3. Hunter Fan Company 2500 Frisco Avenue Memphis, Tennessee 38114 15 42767-01 • 10/19/07 • Hunter Fan Company 9 • Troubleshooting Problem...
... instructions to see if the blade is engaged. 5. Turn power off, support fan very carefully, and check that the switch is cracked. Pull the pull chain to ensure that the hanger ball is on , replace fuse, or reset breaker. 2. Problem: Noisy operation. 1. Tighten all connections according to the wiring the fan section. 3. Hunter Fan Company 2500 Frisco Avenue Memphis, Tennessee 38114 15 42767-01 • 10/19/07 • Hunter Fan Company 9 • Troubleshooting Problem...


