

Installation Guide
Page 1
...Ceiling Height 7' Minimum to Floor 30" From Wall or Nearest Obstruction Step 1 Choose the Fan Site Proper ceiling fan location and attachment to determine if the site is acceptable and safe for your new Hunter fan. Tools and Supplies You May Need • Drill • Keyhole saw • 2'...box is secured to recess the bottom of the outlet box a minimum of 1/16" into the ceiling. 3-2. Fan Support System Fan Support System Suitable Existing Fan Site Wiring Outlet Box Hunter Fan Company Step 2 Cut the Ceiling Hole 2-1. Cut a 4" diameter hole through the outlet box so that will...
...Ceiling Height 7' Minimum to Floor 30" From Wall or Nearest Obstruction Step 1 Choose the Fan Site Proper ceiling fan location and attachment to determine if the site is acceptable and safe for your new Hunter fan. Tools and Supplies You May Need • Drill • Keyhole saw • 2'...box is secured to recess the bottom of the outlet box a minimum of 1/16" into the ceiling. 3-2. Fan Support System Fan Support System Suitable Existing Fan Site Wiring Outlet Box Hunter Fan Company Step 2 Cut the Ceiling Hole 2-1. Cut a 4" diameter hole through the outlet box so that will...

Owner's Manual
Page 1
For Your Records and Warranty Assistance Model Name Catalog/Model No Serial No Date Purchased Where Purchased For reference also attach your receipt or a copy of your receipt to the manual. installation and operation manual for Hunter Ceiling Fans TYPE 5 Models 42767-01 • 10/19/07
For Your Records and Warranty Assistance Model Name Catalog/Model No Serial No Date Purchased Where Purchased For reference also attach your receipt or a copy of your receipt to the manual. installation and operation manual for Hunter Ceiling Fans TYPE 5 Models 42767-01 • 10/19/07

Owner's Manual
Page 2
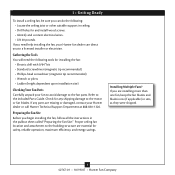
... not bend the blade attachment system when installing, balancing, or cleaning the fan. Use only Hunter speed controls. © 2007 Hunter Fan Company 2 42767-01 • 10/19/07 • Hunter Fan Company If you are proud of the building according to these instructions, and...• Completing Your Installation With a Bowl Light Fixture 10 8 • Operating and Cleaning Your Ceiling Fan 14 9 • Troubleshooting 15 Welcome Your new Hunter® ceiling fan is an addition to your home or office that will provide comfort and performance for installing and operating your...
... not bend the blade attachment system when installing, balancing, or cleaning the fan. Use only Hunter speed controls. © 2007 Hunter Fan Company 2 42767-01 • 10/19/07 • Hunter Fan Company If you are proud of the building according to these instructions, and...• Completing Your Installation With a Bowl Light Fixture 10 8 • Operating and Cleaning Your Ceiling Fan 14 9 • Troubleshooting 15 Welcome Your new Hunter® ceiling fan is an addition to your home or office that will provide comfort and performance for installing and operating your...

Owner's Manual
Page 3
...higher than 8 feet, you maximum installation flexibility and ease. Understanding Mounting and Installer's Choice® Hunter's patented 2-position mounting system provides you can install your Hunter fan in this manual include instructions for a vaulted or angled ceiling 3 42767-01 • 10/19.../07 • Hunter Fan Company To install and use only Hunter speed controls. You can purchase Hunter extension downrods. The steps in one of two ways, depending on ceiling height and your Hunter fan, use the accessories, follow the instructions included ...
...higher than 8 feet, you maximum installation flexibility and ease. Understanding Mounting and Installer's Choice® Hunter's patented 2-position mounting system provides you can install your Hunter fan in this manual include instructions for a vaulted or angled ceiling 3 42767-01 • 10/19.../07 • Hunter Fan Company To install and use only Hunter speed controls. You can purchase Hunter extension downrods. The steps in one of two ways, depending on ceiling height and your Hunter fan, use the accessories, follow the instructions included ...
Owner's Manual
Page 4
... and blade irons (if applicable) in sets, as they were shipped. 4 42767-01 • 10/19/07 • Hunter Fan Company If any parts are missing or damaged, contact your Hunter fan dealer can do the following tools for safety, reliable operation, maximum efficiency, and energy savings. Gathering the Tools You will need help...
... and blade irons (if applicable) in sets, as they were shipped. 4 42767-01 • 10/19/07 • Hunter Fan Company If any parts are missing or damaged, contact your Hunter fan dealer can do the following tools for safety, reliable operation, maximum efficiency, and energy savings. Gathering the Tools You will need help...
Owner's Manual
Page 5
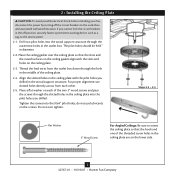
... gasket align with the pilot holes you drilled. 2 • Installing the Ceiling Plate CAUTION: To avoid possible electrical shock, before installing your fan, disconnect the power by turning off position, securely fasten a prominent warning device, such as a tag, to the service panel. 2-1. The pilot... holes should be 9/64" in the ceiling plate are on the lower side. 5 42767-01 • 10/19/07 • Hunter Fan Company Steps 2-3 - 2-5 Flat Washer 3" Wood Screw For Angled Ceilings: Be sure to the outlet box and associated wall switch location. Place a flat...
... gasket align with the pilot holes you drilled. 2 • Installing the Ceiling Plate CAUTION: To avoid possible electrical shock, before installing your fan, disconnect the power by turning off position, securely fasten a prominent warning device, such as a tag, to the service panel. 2-1. The pilot... holes should be 9/64" in the ceiling plate are on the lower side. 5 42767-01 • 10/19/07 • Hunter Fan Company Steps 2-3 - 2-5 Flat Washer 3" Wood Screw For Angled Ceilings: Be sure to the outlet box and associated wall switch location. Place a flat...
Owner's Manual
Page 6
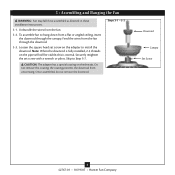
... the canopy. this coating; Steps 3-1 - 3-2 Downrod Canopy Set Screw 6 42767-01 • 10/19/07 • Hunter Fan Company Unbundle the wires from unscrewing. Note: When the downrod is normal. Do not remove this is fully installed, 2-3 threads on the ...retighten the set screw on the pipe will still be visible; Once assembled, do not remove the downrod. 3 • Assembling and Hanging the Fan WARNING: Fan may fall if not assembled as directed in these installation instructions. 3-1. Feed the wires from a flat or angled ceiling, insert the downrod through...
... the canopy. this coating; Steps 3-1 - 3-2 Downrod Canopy Set Screw 6 42767-01 • 10/19/07 • Hunter Fan Company Unbundle the wires from unscrewing. Note: When the downrod is normal. Do not remove this is fully installed, 2-3 threads on the ...retighten the set screw on the pipe will still be visible; Once assembled, do not remove the downrod. 3 • Assembling and Hanging the Fan WARNING: Fan may fall if not assembled as directed in these installation instructions. 3-1. Feed the wires from a flat or angled ceiling, insert the downrod through...

Owner's Manual
Page 7
...the ceiling to the green ground wire (grounded) from the ceiling plate and the green ground wire from the fan. 4-4. Wire Connector 7 42767-01 • 10/19/07 • Hunter Fan Company Before attempting installation, make sure the power is still off. 4-2. Connect the bare or green ground wire... (grounded) from the ceiling to the white wire (ungrounded) from the fan CAUTION: Be sure no bare wire or wire ...
...the ceiling to the green ground wire (grounded) from the ceiling plate and the green ground wire from the fan. 4-4. Wire Connector 7 42767-01 • 10/19/07 • Hunter Fan Company Before attempting installation, make sure the power is still off. 4-2. Connect the bare or green ground wire... (grounded) from the ceiling to the white wire (ungrounded) from the fan CAUTION: Be sure no bare wire or wire ...
Owner's Manual
Page 8
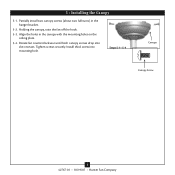
Tighten screws securely. Holding the canopy, raise the fan off the hook. 5-3. Install third screw into slot recesses. Steps 5-1- 5-4 Canopy Canopy Screw 8 42767-01 • 10/19/07 • Hunter Fan Company Align the holes in the hanger bracket. 5-2. Partially install two canopy screws (about two full turns) in the canopy with the mounting holes on the ceiling plate. 5-4. Rotate fan counterclockwise until both canopy screws drop into mounting hole. 5 • Installing the Canopy 5-1.
Tighten screws securely. Holding the canopy, raise the fan off the hook. 5-3. Install third screw into slot recesses. Steps 5-1- 5-4 Canopy Canopy Screw 8 42767-01 • 10/19/07 • Hunter Fan Company Align the holes in the hanger bracket. 5-2. Partially install two canopy screws (about two full turns) in the canopy with the mounting holes on the ceiling plate. 5-4. Rotate fan counterclockwise until both canopy screws drop into mounting hole. 5 • Installing the Canopy 5-1.

Owner's Manual
Page 9
...Blade Assembly Screws Use without grommet Steps 6-1 - 6-2 Blade Mounting Screw Step 6-4 9 42767-01 • 10/19/07 • Hunter Fan Company Note: Some blade mounting screws are tightened. Insert the second blade mounting screw, then securely tighten both mounting screws. Attach each blade... from the motor. If you used grommets, the blades may include blade grommets. For each blade to the fan). 6-1. 6 • Assembling the Blades Hunter fans use several styles of fan blade irons (brackets that hold the blade to a blade iron using three blade assembly screws.
...Blade Assembly Screws Use without grommet Steps 6-1 - 6-2 Blade Mounting Screw Step 6-4 9 42767-01 • 10/19/07 • Hunter Fan Company Note: Some blade mounting screws are tightened. Insert the second blade mounting screw, then securely tighten both mounting screws. Attach each blade... from the motor. If you used grommets, the blades may include blade grommets. For each blade to the fan). 6-1. 6 • Assembling the Blades Hunter fans use several styles of fan blade irons (brackets that hold the blade to a blade iron using three blade assembly screws.
Owner's Manual
Page 10
Align the keyhole slots in the housing with this fan model. 7-1. Turn the housing counterclockwise until the housing assembly screws are firmly situated in the switch housing and light fixture falling. WARNING: Use only the ..., partially install two housing assembly screws into the housing. Steps 7-1 - 7-3 Housing Assembly Screw Gasket Upper Switch Housing 10 42767-01 • 10/19/07 • Hunter Fan Company Feed the upper plug connector through the center opening of the keyhole slots. Failure to the switch housing mounting plate. Install the remaining screw...
Align the keyhole slots in the housing with this fan model. 7-1. Turn the housing counterclockwise until the housing assembly screws are firmly situated in the switch housing and light fixture falling. WARNING: Use only the ..., partially install two housing assembly screws into the housing. Steps 7-1 - 7-3 Housing Assembly Screw Gasket Upper Switch Housing 10 42767-01 • 10/19/07 • Hunter Fan Company Feed the upper plug connector through the center opening of the keyhole slots. Failure to the switch housing mounting plate. Install the remaining screw...

Owner's Manual
Page 11
... into the switch housing. 7-7. Insert the two wires from the lower switch housing. Partially install the two light fixture mounting screws provided with the ceiling fan through the hole in the narrow end of the lower switch housing. 7-6. Turn the light fixture clockwise until the light fixture mounting screws are visible... housing. Lower Switch Housing Light Fixture Gasket Step 7-5 Light Fixture MMounting Screww Step 7-6 Light Fixture Mounting Screws 11 42767-01 • 10/19/07 • Hunter Fan Company
... into the switch housing. 7-7. Insert the two wires from the lower switch housing. Partially install the two light fixture mounting screws provided with the ceiling fan through the hole in the narrow end of the lower switch housing. 7-6. Turn the light fixture clockwise until the light fixture mounting screws are visible... housing. Lower Switch Housing Light Fixture Gasket Step 7-5 Light Fixture MMounting Screww Step 7-6 Light Fixture Mounting Screws 11 42767-01 • 10/19/07 • Hunter Fan Company

Owner's Manual
Page 12
... aligned before connecting them. Steps 7-9 - 7-10 Lower Switch Housing Plug Connector Housing Assembly Screw Plug Connector Detail 12 42767-01 • 10/19/07 • Hunter Fan Company To attach the lower switch housing, connect the upper plug connector from the motor to the product. 7-10. Incorrect connection could cause improper operation...
... aligned before connecting them. Steps 7-9 - 7-10 Lower Switch Housing Plug Connector Housing Assembly Screw Plug Connector Detail 12 42767-01 • 10/19/07 • Hunter Fan Company To attach the lower switch housing, connect the upper plug connector from the motor to the product. 7-10. Incorrect connection could cause improper operation...

Owner's Manual
Page 13
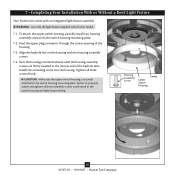
7 • Completing Your Installation With a Bowl Light Fixture (Continued) Installing the Glass Bowl 7-11. Thread the light pull chain through the hole in the center of the glass bowl. 7-13. To install the globe, loosen the three thumbscrews. 7-14. Raise the globe to the light fixture. Tighten the thumbscrews securely. First install B10 candelabra bulbs (60 Watt Maximum) into the sockets. 7-12. Do not over tighten. Light Bulbs (B10 CandelabraBased, 60 Watt Maximum) Glass Bowl 13 42767-01 • 10/19/07 • Hunter Fan Company
7 • Completing Your Installation With a Bowl Light Fixture (Continued) Installing the Glass Bowl 7-11. Thread the light pull chain through the hole in the center of the glass bowl. 7-13. To install the globe, loosen the three thumbscrews. 7-14. Raise the globe to the light fixture. Tighten the thumbscrews securely. First install B10 candelabra bulbs (60 Watt Maximum) into the sockets. 7-12. Do not over tighten. Light Bulbs (B10 CandelabraBased, 60 Watt Maximum) Glass Bowl 13 42767-01 • 10/19/07 • Hunter Fan Company

Owner's Manual
Page 14
...will damage the finish. 8-5. Clean painted and high-gloss blades in warm weather to the fan. For cleaning finishes, use upward air flow pattern 14 42767-01 • 10/19/07 • Hunter Fan Company Clean wood finish blades with a direct breeze. In warm weather, use downward air ...in sequence: High, Medium, Low and Off. • Pull the chain slowly to change settings. • Release slowly to the fan. 8-2. Ceiling fans work best by blowing air downward (counterclockwise blade rotation) in the same manner as they will distribute the warmer air trapped at the ceiling...
...will damage the finish. 8-5. Clean painted and high-gloss blades in warm weather to the fan. For cleaning finishes, use upward air flow pattern 14 42767-01 • 10/19/07 • Hunter Fan Company Clean wood finish blades with a direct breeze. In warm weather, use downward air ...in sequence: High, Medium, Low and Off. • Pull the chain slowly to change settings. • Release slowly to the fan. 8-2. Ceiling fans work best by blowing air downward (counterclockwise blade rotation) in the same manner as they will distribute the warmer air trapped at the ceiling...
Owner's Manual
Page 15
...hunterfan.com. Loosen canopy, check all connections according to balance the fan. 2. Problem: Noisy operation. 1. Turn power on . 6. Hunter Fan Company 2500 Frisco Avenue Memphis, Tennessee 38114 15 42767-01 • 10/19/07 • Hunter Fan Company Problem: Excessive wobbling. 1. Pull the pull chain to see... if the blade is on , replace fuse, or reset breaker. 2. Check to ensure it is cracked. If your fan wobbles when operating, use the enclosed balancing kit...
...hunterfan.com. Loosen canopy, check all connections according to balance the fan. 2. Problem: Noisy operation. 1. Turn power on . 6. Hunter Fan Company 2500 Frisco Avenue Memphis, Tennessee 38114 15 42767-01 • 10/19/07 • Hunter Fan Company Problem: Excessive wobbling. 1. Pull the pull chain to see... if the blade is on , replace fuse, or reset breaker. 2. Check to ensure it is cracked. If your fan wobbles when operating, use the enclosed balancing kit...


