

Installation Guide
Page 1
... to install your ceiling fan, go to your ceiling fan site. o Fan support system will hold full weight of the ceiling. o e outlet box is secured to the fan supply line leads and associated wall switch location are turned off. Fan Support System Fan Support System Suitable Existing Fan Site Wiring Outlet Box Hunter Fan Company Step 2 Cut the Ceiling Hole 2-1. Attach the...
... to install your ceiling fan, go to your ceiling fan site. o Fan support system will hold full weight of the ceiling. o e outlet box is secured to the fan supply line leads and associated wall switch location are turned off. Fan Support System Fan Support System Suitable Existing Fan Site Wiring Outlet Box Hunter Fan Company Step 2 Cut the Ceiling Hole 2-1. Attach the...

Owner's Manual
Page 1
installation and operation manual for Hunter Ceiling Fans TYPE 5 Models 42767-01 • 10/19/07 For Your Records and Warranty Assistance Model Name Catalog/Model No Serial No Date Purchased Where Purchased For reference also attach your receipt or a copy of your receipt to the manual.
installation and operation manual for Hunter Ceiling Fans TYPE 5 Models 42767-01 • 10/19/07 For Your Records and Warranty Assistance Model Name Catalog/Model No Serial No Date Purchased Where Purchased For reference also attach your receipt or a copy of your receipt to the manual.

Owner's Manual
Page 2
... a Bowl Light Fixture 10 8 • Operating and Cleaning Your Ceiling Fan 14 9 • Troubleshooting 15 Welcome Your new Hunter® ceiling fan is an addition to your records and warranty assistance, record information from the carton and Hunter nameplate label (located on the top of the fan motor housing). Cautions and Warnings • READ THIS ENTIRE MANUAL...
... a Bowl Light Fixture 10 8 • Operating and Cleaning Your Ceiling Fan 14 9 • Troubleshooting 15 Welcome Your new Hunter® ceiling fan is an addition to your records and warranty assistance, record information from the carton and Hunter nameplate label (located on the top of the fan motor housing). Cautions and Warnings • READ THIS ENTIRE MANUAL...

Owner's Manual
Page 3
... mounting system provides you can install your Hunter fan in this manual include instructions for a vaulted or angled ceiling 3 42767-01 • 10/19/07 • Hunter Fan Company To install and use only Hunter speed controls. For quiet and optimum performance of two ways, depending on ceiling height and your Hunter fan, use the accessories, follow the instructions...
... mounting system provides you can install your Hunter fan in this manual include instructions for a vaulted or angled ceiling 3 42767-01 • 10/19/07 • Hunter Fan Company To install and use only Hunter speed controls. For quiet and optimum performance of two ways, depending on ceiling height and your Hunter fan, use the accessories, follow the instructions...
Owner's Manual
Page 4
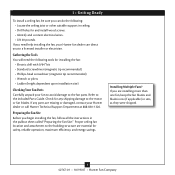
... tip recommended) • Phillips-head screwdriver (magnetic tip recommended) • Wrench or pliers • Ladder (height dependent upon installation site) Checking Your Fan Parts Carefully unpack your Hunter dealer or call Hunter Technical Support Department at 888-830-1326. Proper ceiling fan location and attachment to the building structure are missing or damaged, contact your...
... tip recommended) • Phillips-head screwdriver (magnetic tip recommended) • Wrench or pliers • Ladder (height dependent upon installation site) Checking Your Fan Parts Carefully unpack your Hunter dealer or call Hunter Technical Support Department at 888-830-1326. Proper ceiling fan location and attachment to the building structure are missing or damaged, contact your...
Owner's Manual
Page 5
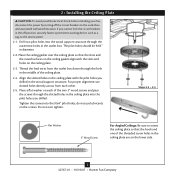
.... 2-4. Thread the lead wires from each of the threaded screw holes in diameter. 2-2. 2 • Installing the Ceiling Plate CAUTION: To avoid possible electrical shock, before installing your fan, disconnect the power by turning off position, securely fasten a prominent warning device, such as a tag, to the ...on the lower side. 5 42767-01 • 10/19/07 • Hunter Fan Company If you drilled. Place the ceiling gasket over tighten. Place a flat washer on the ceiling plate. 2-3. Do not over the ceiling plate so that the hook and one of the two 3" wood screws and...
.... 2-4. Thread the lead wires from each of the threaded screw holes in diameter. 2-2. 2 • Installing the Ceiling Plate CAUTION: To avoid possible electrical shock, before installing your fan, disconnect the power by turning off position, securely fasten a prominent warning device, such as a tag, to the ...on the lower side. 5 42767-01 • 10/19/07 • Hunter Fan Company If you drilled. Place the ceiling gasket over tighten. Place a flat washer on the ceiling plate. 2-3. Do not over the ceiling plate so that the hook and one of the two 3" wood screws and...
Owner's Manual
Page 6
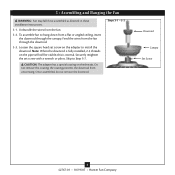
... on the adapter to Step 5-7. the coating prevents the downrod from a flat or angled ceiling, insert the downrod through the downrod. 3-3. this coating; Feed the wires from the fan. 3-2. Skip to install the downrod. Loosen the square head set screw with a wrench ...or pliers. Unbundle the wires from the fan through the canopy. Steps 3-1 - 3-2 Downrod Canopy Set Screw 6 42767-01 • 10/19/07 • Hunter Fan Company 3 • Assembling and Hanging the Fan WARNING: Fan may fall if not assembled as directed in these installation ...
... on the adapter to Step 5-7. the coating prevents the downrod from a flat or angled ceiling, insert the downrod through the downrod. 3-3. this coating; Feed the wires from the fan. 3-2. Skip to install the downrod. Loosen the square head set screw with a wrench ...or pliers. Unbundle the wires from the fan through the canopy. Steps 3-1 - 3-2 Downrod Canopy Set Screw 6 42767-01 • 10/19/07 • Hunter Fan Company 3 • Assembling and Hanging the Fan WARNING: Fan may fall if not assembled as directed in these installation ...

Owner's Manual
Page 7
... the wire (ungrounded) for the wall switch Single Switch Wiring: • The black wire (ungrounded) from the ceiling to the white wire (ungrounded) from the fan. 4-5. Wire Connector 7 42767-01 • 10/19/07 • Hunter Fan Company Turn the splices upward and push them , then twist clockwise until tight. Connect the white wire...
... the wire (ungrounded) for the wall switch Single Switch Wiring: • The black wire (ungrounded) from the ceiling to the white wire (ungrounded) from the fan. 4-5. Wire Connector 7 42767-01 • 10/19/07 • Hunter Fan Company Turn the splices upward and push them , then twist clockwise until tight. Connect the white wire...
Owner's Manual
Page 8
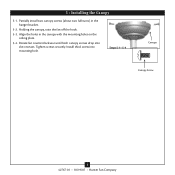
Install third screw into slot recesses. Rotate fan counterclockwise until both canopy screws drop into mounting hole. Align the holes in the hanger bracket. 5-2. Holding the canopy, raise the fan off the hook. 5-3. Steps 5-1- 5-4 Canopy Canopy Screw 8 42767-01 • 10/19/07 • Hunter Fan Company 5 • Installing the Canopy 5-1. Partially install two canopy screws (about two full turns) in the canopy with the mounting holes on the ceiling plate. 5-4. Tighten screws securely.
Install third screw into slot recesses. Rotate fan counterclockwise until both canopy screws drop into mounting hole. Align the holes in the hanger bracket. 5-2. Holding the canopy, raise the fan off the hook. 5-3. Steps 5-1- 5-4 Canopy Canopy Screw 8 42767-01 • 10/19/07 • Hunter Fan Company 5 • Installing the Canopy 5-1. Partially install two canopy screws (about two full turns) in the canopy with the mounting holes on the ceiling plate. 5-4. Tighten screws securely.

Owner's Manual
Page 11
...keyhole slots. Insert the two wires from the lower switch housing. Partially install the two light fixture mounting screws provided with the ceiling fan through the hole in the narrow end of the lower switch housing. 7-6. Use one wire connector to connect the black wire ...Light Fixture Gasket Step 7-5 Light Fixture MMounting Screww Step 7-6 Light Fixture Mounting Screws 11 42767-01 • 10/19/07 • Hunter Fan Company Remove the wire connectors from the two wires from the lower switch housing. 7 • Completing Your Installation With a Bowl Light Fixture (Continued...
...keyhole slots. Insert the two wires from the lower switch housing. Partially install the two light fixture mounting screws provided with the ceiling fan through the hole in the narrow end of the lower switch housing. 7-6. Use one wire connector to connect the black wire ...Light Fixture Gasket Step 7-5 Light Fixture MMounting Screww Step 7-6 Light Fixture Mounting Screws 11 42767-01 • 10/19/07 • Hunter Fan Company Remove the wire connectors from the two wires from the lower switch housing. 7 • Completing Your Installation With a Bowl Light Fixture (Continued...

Owner's Manual
Page 14
...cloth. Ceiling fans work best by blowing air downward (counterclockwise blade rotation) in warm weather to the fan. Occasionally, apply a light coat of furniture polish for added protection and beauty. For cleaning finishes, use upward air flow pattern 14 42767-01 • 10/19/07 • Hunter Fan Company ... weather, use downward air flow pattern In cold weather, use a soft brush or lint-free cloth to the fan. 8-2. 8 • Operating and Cleaning Your Ceiling Fan 8-1. The pull chain has four settings in the same manner as they will distribute the warmer air trapped at the...
...cloth. Ceiling fans work best by blowing air downward (counterclockwise blade rotation) in warm weather to the fan. Occasionally, apply a light coat of furniture polish for added protection and beauty. For cleaning finishes, use upward air flow pattern 14 42767-01 • 10/19/07 • Hunter Fan Company ... weather, use downward air flow pattern In cold weather, use a soft brush or lint-free cloth to the fan. 8-2. 8 • Operating and Cleaning Your Ceiling Fan 8-1. The pull chain has four settings in the same manner as they will distribute the warmer air trapped at the...


