
Installation Guide
Page 1
... screws and washers. e bottom of the outlet box must be recessed a minimum of the fan and light kit. Attach the outlet box directly to the support brace or joist with an approved connector, available at least 8 feet high. • e fan blades have now successfully prepared your fan manual and begin with 2 • Installing the Ceiling Plate. Preparing the Fan Site 8' Minimum Ceiling Height 7' Minimum to Floor 30" From Wall or...
... screws and washers. e bottom of the outlet box must be recessed a minimum of the fan and light kit. Attach the outlet box directly to the support brace or joist with an approved connector, available at least 8 feet high. • e fan blades have now successfully prepared your fan manual and begin with 2 • Installing the Ceiling Plate. Preparing the Fan Site 8' Minimum Ceiling Height 7' Minimum to Floor 30" From Wall or...

Owner's Manual
Page 1
For Your Records and Warranty Assistance Model Name Catalog/Model No Serial No Date Purchased Where Purchased For reference also attach your receipt or a copy of your receipt to the manual. installation and operation manual for Hunter Ceiling Fans TYPE 2 Models 42762-01 • 07/19/07
For Your Records and Warranty Assistance Model Name Catalog/Model No Serial No Date Purchased Where Purchased For reference also attach your receipt or a copy of your receipt to the manual. installation and operation manual for Hunter Ceiling Fans TYPE 2 Models 42762-01 • 07/19/07

Owner's Manual
Page 2
... Ceiling Plate 5 3 • Assembling and Hanging the Fan . . . 6 4 •Wiring the Fan 7 5 • Installing the Canopy 8 6 • Assembling the Blades 9 7 • Completing Your Installation With or Without a Bowl Light Fixture 10 8 • Operating and Cleaning Your Ceiling Fan 13 9 • Troubleshooting 14 Welcome Your new Hunter® ceiling fan is an addition to your fan. Never insert foreign objects between rotating fan blades. • To reduce the risk of fire, electrical shock, or motor damage, do not use a solid-state speed control...
... Ceiling Plate 5 3 • Assembling and Hanging the Fan . . . 6 4 •Wiring the Fan 7 5 • Installing the Canopy 8 6 • Assembling the Blades 9 7 • Completing Your Installation With or Without a Bowl Light Fixture 10 8 • Operating and Cleaning Your Ceiling Fan 13 9 • Troubleshooting 14 Welcome Your new Hunter® ceiling fan is an addition to your fan. Never insert foreign objects between rotating fan blades. • To reduce the risk of fire, electrical shock, or motor damage, do not use a solid-state speed control...
Owner's Manual
Page 3
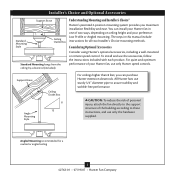
... your preference: Low Profile or Angled mounting. You can purchase Hunter extension downrods. Support Brace Angle Mounting Style Ceiling Outlet Box 8 12 For ceilings higher than 8 feet, you maximum installation flexibility and ease. CAUTION: To reduce the risk of personal injury, attach the fan directly to assure stability and wobble-free performance. Considering Optional Accessories Consider using Hunter's optional accessories, including a wall-mounted or remote speed control. To install and use only Hunter speed controls. All Hunter fans use only the hardware...
... your preference: Low Profile or Angled mounting. You can purchase Hunter extension downrods. Support Brace Angle Mounting Style Ceiling Outlet Box 8 12 For ceilings higher than 8 feet, you maximum installation flexibility and ease. CAUTION: To reduce the risk of personal injury, attach the fan directly to assure stability and wobble-free performance. Considering Optional Accessories Consider using Hunter's optional accessories, including a wall-mounted or remote speed control. To install and use only Hunter speed controls. All Hunter fans use only the hardware...

Owner's Manual
Page 4
... Hunter dealer or call Hunter Technical Support Department at 888-830-1326. If any shipping damage to the motor or fan blades. Proper ceiling fan location and attachment to the included Parts Guide. 1 • Getting Ready To install a ceiling fan, be sure you can direct you to a licensed installer or electrician. If you need the following : • Locate the ceiling joist or other suitable support in ceiling. • Drill holes for safety, reliable operation...
... Hunter dealer or call Hunter Technical Support Department at 888-830-1326. If any shipping damage to the motor or fan blades. Proper ceiling fan location and attachment to the included Parts Guide. 1 • Getting Ready To install a ceiling fan, be sure you can direct you to a licensed installer or electrician. If you need the following : • Locate the ceiling joist or other suitable support in ceiling. • Drill holes for safety, reliable operation...

Owner's Manual
Page 5
Note: The isolators should be flush against the ceiling. 2-5. 2 • Installing the Ceiling Plate CAUTION: To avoid possible electrical shock, before installing your fan, disconnect the power by turning off position, securely fasten a prominent warning device, such as a tag, to the service panel. 2-1. do not use slotted holes directly across from the outlet box down through the hole in the middle of the two 3" wood screws and...
Note: The isolators should be flush against the ceiling. 2-5. 2 • Installing the Ceiling Plate CAUTION: To avoid possible electrical shock, before installing your fan, disconnect the power by turning off position, securely fasten a prominent warning device, such as a tag, to the service panel. 2-1. do not use slotted holes directly across from the outlet box down through the hole in the middle of the two 3" wood screws and...

Owner's Manual
Page 6
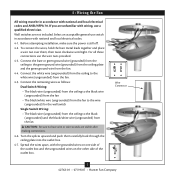
Note: When the downrod is normal. Remove the set screw from the fan through the downrod. 3-3. Be sure the green ground wire is replaced with the holes in these installation instructions. 3-1. Steps 3-1 - 3-2 Downrod Steps 3-4 - 3-5 Canopy Set Screw Low Profile Washer Low Profile Screw Step 3-6 Round Hole 6 42762-01 • 07/19/07 • Hunter Fan Company Feed the wires from the adapter. 3-5. CAUTION: The adapter has a special coating on the pipe will still be visible; Assemble securely with a wrench or...
Note: When the downrod is normal. Remove the set screw from the fan through the downrod. 3-3. Be sure the green ground wire is replaced with the holes in these installation instructions. 3-1. Steps 3-1 - 3-2 Downrod Steps 3-4 - 3-5 Canopy Set Screw Low Profile Washer Low Profile Screw Step 3-6 Round Hole 6 42762-01 • 07/19/07 • Hunter Fan Company Feed the wires from the adapter. 3-5. CAUTION: The adapter has a special coating on the pipe will still be visible; Assemble securely with a wrench or...
Owner's Manual
Page 7
... local electrical codes and ANSI/NFPA 70. Wire Connector 7 42762-01 • 07/19/07 • Hunter Fan Company Connect the bare or green ground wire (grounded) from the ceiling to the green ground wire (grounded) from the ceiling plate and the green ground wire from the fan CAUTION: Be sure no bare wire or wire strands are visible after making connections. 4-6. Connect the remaining wires as follows: Dual Switch Wiring: • The black wire...
... local electrical codes and ANSI/NFPA 70. Wire Connector 7 42762-01 • 07/19/07 • Hunter Fan Company Connect the bare or green ground wire (grounded) from the ceiling to the green ground wire (grounded) from the ceiling plate and the green ground wire from the fan CAUTION: Be sure no bare wire or wire strands are visible after making connections. 4-6. Connect the remaining wires as follows: Dual Switch Wiring: • The black wire...
Owner's Manual
Page 8
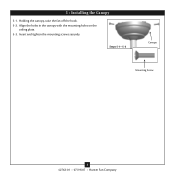
Insert and tighten the mounting screws securely. Align the holes in the canopy with the mounting holes on the ceiling plate. 5-3. Holding the canopy, raise the fan off the hook. 5-2. 5 • Installing the Canopy 5-1. Steps 5-1- 5-3 Canopy Mounting Screw 8 42762-01 • 07/19/07 • Hunter Fan Company
Insert and tighten the mounting screws securely. Align the holes in the canopy with the mounting holes on the ceiling plate. 5-3. Holding the canopy, raise the fan off the hook. 5-2. 5 • Installing the Canopy 5-1. Steps 5-1- 5-3 Canopy Mounting Screw 8 42762-01 • 07/19/07 • Hunter Fan Company

Owner's Manual
Page 9
... blade, insert one blade mounting screw through the blade iron, and attach lightly to a blade iron using three blade assembly screws. Note: Some blade mounting screws are tightened. For each blade to the fan. If your fan has grommets, insert them by hand into the holes on the blades. 6-2. Remove the blade mounting screws and rubber shipping bumpers from the motor. If you used grommets, the blades may include blade grommets. This is normal. 6-3. 6 • Assembling the Blades Hunter fans use several styles of fan blade irons (brackets that hold the blade to secure shipping...
... blade, insert one blade mounting screw through the blade iron, and attach lightly to a blade iron using three blade assembly screws. Note: Some blade mounting screws are tightened. For each blade to the fan. If your fan has grommets, insert them by hand into the holes on the blades. 6-2. Remove the blade mounting screws and rubber shipping bumpers from the motor. If you used grommets, the blades may include blade grommets. This is normal. 6-3. 6 • Assembling the Blades Hunter fans use several styles of fan blade irons (brackets that hold the blade to secure shipping...

Owner's Manual
Page 10
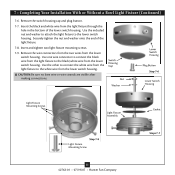
... plug connector through the center opening of the keyhole slots. Install the remaining screw into the switch housing mounting plate. 7-2. Tighten all three assembly screws could result in the narrow end of the housing. 7-3. If you have uninstalled the light fixture, continue with an integrated light fixture assembly and an optional switch housing cap and plug button. See "Uninstalling the Light Fixture" on step 7-15. 7 • Completing Your Installation With or Without a Bowl Light Fixture Your Hunter fan...
... plug connector through the center opening of the keyhole slots. Install the remaining screw into the switch housing mounting plate. 7-2. Tighten all three assembly screws could result in the narrow end of the housing. 7-3. If you have uninstalled the light fixture, continue with an integrated light fixture assembly and an optional switch housing cap and plug button. See "Uninstalling the Light Fixture" on step 7-15. 7 • Completing Your Installation With or Without a Bowl Light Fixture Your Hunter fan...
Owner's Manual
Page 11
... light fixture mounting screws. 7-9. Remove the wire connectors from the two wires from the lower switch housing. Nut Washer Lower Switch Housing Light Fixture Mounting Screws Light Fixture Assembly Gasket Light Fixture Mounting Screw Steps 7-7 11 42762-01 • 07/19/07 • Hunter Fan Company Insert the black and white wire from the lower switch housing. CAUTION:Be sure no bare wire or wire strands are visible after making connections. Use the included nut and washer to attach the light fixture to the black/white wire from the light fixture through the hole...
... light fixture mounting screws. 7-9. Remove the wire connectors from the two wires from the lower switch housing. Nut Washer Lower Switch Housing Light Fixture Mounting Screws Light Fixture Assembly Gasket Light Fixture Mounting Screw Steps 7-7 11 42762-01 • 07/19/07 • Hunter Fan Company Insert the black and white wire from the lower switch housing. CAUTION:Be sure no bare wire or wire strands are visible after making connections. Use the included nut and washer to attach the light fixture to the black/white wire from the light fixture through the hole...

Owner's Manual
Page 12
... 7-7 Lower Switch Housing Plug Connector Detail Plug Connector 7-13 Insert the globe into the fixture. Install and tighten the thumbscrews manually. Do Not use incandescent bulbs in the lower switch housing assembly. Make sure the connectors are pre-threaded, loosen the screws before connecting them. 7 • Completing Your Installation With or Without a Bowl Light Fixture (Continued) 7-10.To attach the lower switch housing, connect the upper plug connector from the motor to the lower plug connector in this fixture. Note: Both plug connectors are not installing the light fixture...
... 7-7 Lower Switch Housing Plug Connector Detail Plug Connector 7-13 Insert the globe into the fixture. Install and tighten the thumbscrews manually. Do Not use incandescent bulbs in the lower switch housing assembly. Make sure the connectors are pre-threaded, loosen the screws before connecting them. 7 • Completing Your Installation With or Without a Bowl Light Fixture (Continued) 7-10.To attach the lower switch housing, connect the upper plug connector from the motor to the lower plug connector in this fixture. Note: Both plug connectors are not installing the light fixture...
Owner's Manual
Page 13
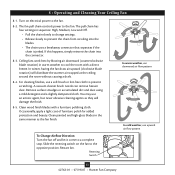
... reinsert the chain into the blades. • The chain uses a breakaway connector that separates if the chain is jerked. A vacuum cleaner brush nozzle can remove heavier dust. Clean painted and high-gloss blades in sequence: High, Medium, Low and Off. • Pull the chain slowly to change settings. • Release slowly to the opposite position. 8 • Operating and Cleaning Your Ceiling Fan 8-1. Clean wood finish blades with a direct breeze. Ceiling fans work best by blowing air downward (counterclockwise blade rotation) in...
... reinsert the chain into the blades. • The chain uses a breakaway connector that separates if the chain is jerked. A vacuum cleaner brush nozzle can remove heavier dust. Clean painted and high-gloss blades in sequence: High, Medium, Low and Off. • Pull the chain slowly to change settings. • Release slowly to the opposite position. 8 • Operating and Cleaning Your Ceiling Fan 8-1. Clean wood finish blades with a direct breeze. Ceiling fans work best by blowing air downward (counterclockwise blade rotation) in...

Owner's Manual
Page 14
... at http://www.hunterfan.com. Pull the pull chain to balance the fan. 2. Hunter Fan Company 2500 Frisco Avenue Memphis, Tennessee 38114 14 42762-01 • 07/19/07 • Hunter Fan Company Turn power on . 6. Tighten the blade bracket screws until snug. 2. If your fan wobbles when operating, use the enclosed balancing kit and instructions to ensure it is cracked. 9 • Troubleshooting Problem: Nothing happens; fan does not move. 1. Push motor reversing switch firmly left...
... at http://www.hunterfan.com. Pull the pull chain to balance the fan. 2. Hunter Fan Company 2500 Frisco Avenue Memphis, Tennessee 38114 14 42762-01 • 07/19/07 • Hunter Fan Company Turn power on . 6. Tighten the blade bracket screws until snug. 2. If your fan wobbles when operating, use the enclosed balancing kit and instructions to ensure it is cracked. 9 • Troubleshooting Problem: Nothing happens; fan does not move. 1. Push motor reversing switch firmly left...
Parts Guide
Page 1
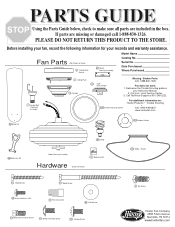
... Globe / Shade Wood Screw Wood Screw Screw, Machine, 6-32 Wire Connector Flat Washer Blade Iron Armature Screw Blade Assembly Screw 101 Canopy Screw 8 Set Screw R Reference the Trouble Shooting guide in the box. Date Purchased Where Purchased 7 Hanger Ball / Downrod Assembly Ceiling Plate 3 Canopy 49 Light Kit Assembly Missing / Broken Parts: Call 1-888-830-1326 Fan does not work: 1. For additional information on: Hunter Products Trouble Shooting 237 Switch Housing Gasket Call 1-800-448-6837 www.hunterfan.com Blade Set 261 Rubber Gasket 44 Blade Iron Set 202 Bulb Motor...
... Globe / Shade Wood Screw Wood Screw Screw, Machine, 6-32 Wire Connector Flat Washer Blade Iron Armature Screw Blade Assembly Screw 101 Canopy Screw 8 Set Screw R Reference the Trouble Shooting guide in the box. Date Purchased Where Purchased 7 Hanger Ball / Downrod Assembly Ceiling Plate 3 Canopy 49 Light Kit Assembly Missing / Broken Parts: Call 1-888-830-1326 Fan does not work: 1. For additional information on: Hunter Products Trouble Shooting 237 Switch Housing Gasket Call 1-800-448-6837 www.hunterfan.com Blade Set 261 Rubber Gasket 44 Blade Iron Set 202 Bulb Motor...

Parts Guide
Page 2
Part List Item # 2 3 7 8 64 65 68 101 5 237 261 28 49 150 44 46 47 67 69 70 259 75 Item Name Ceiling Plate Canopy Hanger Ball / Downrod Assembly Set Screw Screw, Wood Screw, Wood Flat Washer Canopy Screw Ceiling Plate Gasket Switch Housing Gasket Rubber Gasket Switch Housing Assembly Light Kit Assembly Globe / Shade Blade Iron Set Blade Set * Hardware Kit Blade Iron Armature Screw Blade Assembly Screw Screw, Machine, 6-32 Wire Connector CFL Bulb Balancing Kit Model # Asm. Dwg. # Finish Qnty 1 1 1 1 2 2 4 4 1 1 1 1 1 3 1 1 1 11 16 3 4 1 1 23697 97469-01 White Part # 83535-01 85100-01 ...
Part List Item # 2 3 7 8 64 65 68 101 5 237 261 28 49 150 44 46 47 67 69 70 259 75 Item Name Ceiling Plate Canopy Hanger Ball / Downrod Assembly Set Screw Screw, Wood Screw, Wood Flat Washer Canopy Screw Ceiling Plate Gasket Switch Housing Gasket Rubber Gasket Switch Housing Assembly Light Kit Assembly Globe / Shade Blade Iron Set Blade Set * Hardware Kit Blade Iron Armature Screw Blade Assembly Screw Screw, Machine, 6-32 Wire Connector CFL Bulb Balancing Kit Model # Asm. Dwg. # Finish Qnty 1 1 1 1 2 2 4 4 1 1 1 1 1 3 1 1 1 11 16 3 4 1 1 23697 97469-01 White Part # 83535-01 85100-01 ...


