Operation Manual
Page 2
...; Getting Ready 4 2 • Installing the Ceiling Plate 5 3 • Assembling and Hanging the Fan..........6 4 • Wiring the Fan 7 5 • Installing the Canopy and Canopy Trim Ring 8 6 • Assembling the Blades 9 7 • Installing the Switch Housing 10 8 • Operating and Cleaning Your Ceiling Fan 11 9 • Troubleshooting 12 © 2005 Hunter Fan Company Your new Hunter® ceiling fan is installation and operation manual gives you cannot lock the circuit breakers in the off the circuit breakers to the service panel. • All wiring must be in...
...; Getting Ready 4 2 • Installing the Ceiling Plate 5 3 • Assembling and Hanging the Fan..........6 4 • Wiring the Fan 7 5 • Installing the Canopy and Canopy Trim Ring 8 6 • Assembling the Blades 9 7 • Installing the Switch Housing 10 8 • Operating and Cleaning Your Ceiling Fan 11 9 • Troubleshooting 12 © 2005 Hunter Fan Company Your new Hunter® ceiling fan is installation and operation manual gives you cannot lock the circuit breakers in the off the circuit breakers to the service panel. • All wiring must be in...
Operation Manual
Page 3
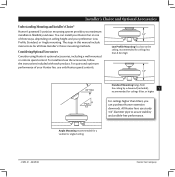
...wobble-free performance. All Hunter fans use the accessories, follow the instructions included with each product. You can purchase Hunter extension downrods. Angle Mounting recommended for ceilings 8 feet or higher For ceilings higher than 8 feet high Standard Mounting hangs from the ceiling by a downrod (included), 3 recommended for a vaulted or angled ceiling 41893-01 • 08/29/05 Hunter Fan Company Considering Optional Accessories Consider using Hunter's optional accessories, including a wall-mounted or remote speed control. To install and use sturdy 3/4" diameter pipe...
...wobble-free performance. All Hunter fans use the accessories, follow the instructions included with each product. You can purchase Hunter extension downrods. Angle Mounting recommended for ceilings 8 feet or higher For ceilings higher than 8 feet high Standard Mounting hangs from the ceiling by a downrod (included), 3 recommended for a vaulted or angled ceiling 41893-01 • 08/29/05 Hunter Fan Company Considering Optional Accessories Consider using Hunter's optional accessories, including a wall-mounted or remote speed control. To install and use sturdy 3/4" diameter pipe...
Operation Manual
Page 4
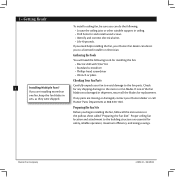
... fan blades in sets, as they were shipped. Hunter Fan Company 41893-01 • 08/29/05 If you need the following : • Locate the ceiling joist or other suitable support in the pullout sheet called "Preparing the Fan Site." Check for any parts are installing more than one of the fan blades was damaged in shipment, return all the instructions in ceiling. • Drill holes for safety, reliable operation...
... fan blades in sets, as they were shipped. Hunter Fan Company 41893-01 • 08/29/05 If you need the following : • Locate the ceiling joist or other suitable support in the pullout sheet called "Preparing the Fan Site." Check for any parts are installing more than one of the fan blades was damaged in shipment, return all the instructions in ceiling. • Drill holes for safety, reliable operation...
Operation Manual
Page 5
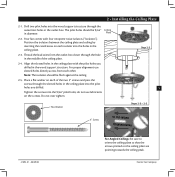
... 2-2 5 Flat Washer Steps 2-3 - 2-5 3" Screw 41893-01 • 08/29/05 For Angled Ceilings: Be sure to orient the ceiling plate so that the arrows printed on the screws. Your fan comes with the pilot holes you drilled. Hunter Fan Company For proper alignment use lubricants on the ceiling plate are pointing towards the ceiling peak. 2 • Installing the Ceiling Plate 2-1. do not use slotted holes directly across from the outlet box down...
... 2-2 5 Flat Washer Steps 2-3 - 2-5 3" Screw 41893-01 • 08/29/05 For Angled Ceilings: Be sure to orient the ceiling plate so that the arrows printed on the screws. Your fan comes with the pilot holes you drilled. Hunter Fan Company For proper alignment use lubricants on the ceiling plate are pointing towards the ceiling peak. 2 • Installing the Ceiling Plate 2-1. do not use slotted holes directly across from the outlet box down...
Operation Manual
Page 6
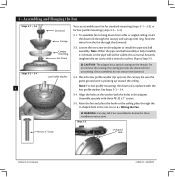
... set screw on the ceiling plate through the U-shaped hole in these installation instructions. Be sure the green ground wire is normal. Assemble securely with a wrench or pliers. Step 3-5 #8-32 x 1" Screw U-shaped Hole Hunter Fan Company 41893-01 • 08/29/05 the coating prevents the downrod from the fan through the canopy and canopy trim ring. Note: When the pipe and ball assembly is replaced with the holes in the washer with the low profile washer...
... set screw on the ceiling plate through the U-shaped hole in these installation instructions. Be sure the green ground wire is normal. Assemble securely with a wrench or pliers. Step 3-5 #8-32 x 1" Screw U-shaped Hole Hunter Fan Company 41893-01 • 08/29/05 the coating prevents the downrod from the fan through the canopy and canopy trim ring. Note: When the pipe and ball assembly is replaced with the holes in the washer with the low profile washer...
Operation Manual
Page 7
... all wires and wire nuts back through the ceiling plate hole into the outlet box. All wiring must be in accordance with national and local electrical codes. 4-1. Follow Step 4-3 OR Step 4-4, depending on what you can control the fan and/or lights together or separately using two wall switches, connect the wires as follows: connect the green ground wire to the ground wire, connect white wire to white wire, connect the black and the black/white wire...
... all wires and wire nuts back through the ceiling plate hole into the outlet box. All wiring must be in accordance with national and local electrical codes. 4-1. Follow Step 4-3 OR Step 4-4, depending on what you can control the fan and/or lights together or separately using two wall switches, connect the wires as follows: connect the green ground wire to the ground wire, connect white wire to white wire, connect the black and the black/white wire...
Operation Manual
Page 8
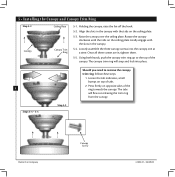
... and lock into the canopy one at a time. Holding the canopy, raise the fan off the hook. 5-2. Loosely assemble the three canopy screws into place. Locate the tab indicators, small bumps on opposite sides of tabs. 2. 5 • Installing the Canopy and Canopy Trim Ring Step 5-2 Canopy Ceiling Plate Canopy Trim Ring 5-1. Once all three screws are in, tighten them. 5-5. Using both hands, push the canopy trim ring up to remove the canopy trim ring, follow these steps...
... and lock into the canopy one at a time. Holding the canopy, raise the fan off the hook. 5-2. Loosely assemble the three canopy screws into place. Locate the tab indicators, small bumps on opposite sides of tabs. 2. 5 • Installing the Canopy and Canopy Trim Ring Step 5-2 Canopy Ceiling Plate Canopy Trim Ring 5-1. Once all three screws are in, tighten them. 5-5. Using both hands, push the canopy trim ring up to remove the canopy trim ring, follow these steps...
Operation Manual
Page 9
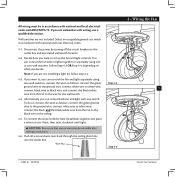
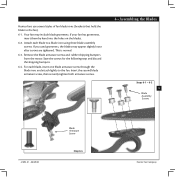
... blades. 6-2. Remove the blade armature screws and rubber shipping bumpers from the motor. Your fan may appear slightly loose after screws are tightened. is is normal. 6-3. Insert the second blade armature screw, then securely tighten both armature screws. 6 • Assembling the Blades Steps 6-1 - 6-2 9 Blade Assembly Screws 41893-01 • 08/29/05 Blade Armature Screw Step 6-4 Hunter Fan Company Attach each blade, insert one blade armature screw through the blade iron, and attach lightly to the fan). 6-1. If you used grommets...
... blades. 6-2. Remove the blade armature screws and rubber shipping bumpers from the motor. Your fan may appear slightly loose after screws are tightened. is is normal. 6-3. Insert the second blade armature screw, then securely tighten both armature screws. 6 • Assembling the Blades Steps 6-1 - 6-2 9 Blade Assembly Screws 41893-01 • 08/29/05 Blade Armature Screw Step 6-4 Hunter Fan Company Attach each blade, insert one blade armature screw through the blade iron, and attach lightly to the fan). 6-1. If you used grommets...
Operation Manual
Page 10
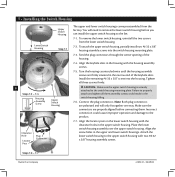
... three screws firmly. Steps 7-6 - 7-7 Hunter Fan Company 41893-01 • 08/29/05 You will only fit together one way. Place the lower switch housing assembly over the upper switch housing. Feed the plug connectors through the center opening of the keyhole slots. Connect the plug connectors. Tighten all three assembly screws could cause improper operation and damage to remove the lower switch housing before connecting them. Align the screw holes in the switch housing falling. 7-6. Note: Both plug connectors...
... three screws firmly. Steps 7-6 - 7-7 Hunter Fan Company 41893-01 • 08/29/05 You will only fit together one way. Place the lower switch housing assembly over the upper switch housing. Feed the plug connectors through the center opening of the keyhole slots. Connect the plug connectors. Tighten all three assembly screws could cause improper operation and damage to remove the lower switch housing before connecting them. Align the screw holes in the switch housing falling. 7-6. Note: Both plug connectors...
Operation Manual
Page 11
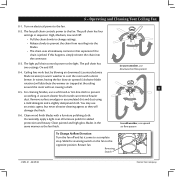
.... Restart fan. 8 • Operating and Cleaning Your Ceiling Fan 8-1. For cleaning finishes, use a soft brush or lint-free cloth to cool the room with a furniture polishing cloth. Clean painted and high-gloss blades in sequence: High, Medium, Low and Off. • Pull the chain slowly to change settings. • Release slowly to the opposite position. Reversing Switch 41893-01 • 08/29/05 Hunter Fan Company Clean wood finish blades with a direct breeze. Occasionally, apply a light coat...
.... Restart fan. 8 • Operating and Cleaning Your Ceiling Fan 8-1. For cleaning finishes, use a soft brush or lint-free cloth to cool the room with a furniture polishing cloth. Clean painted and high-gloss blades in sequence: High, Medium, Low and Off. • Pull the chain slowly to change settings. • Release slowly to the opposite position. Reversing Switch 41893-01 • 08/29/05 Hunter Fan Company Clean wood finish blades with a direct breeze. Occasionally, apply a light coat...
Operation Manual
Page 12
... http://www.hunterfan.com. Tighten the blade bracket screws until snug. 2. If so, replace all the blades. fan does not move. 1. Remove the shipping bumpers. If your fan wobbles when operating, use the enclosed balancing kit and instructions to ensure it is cracked. Problem: Noisy operation. 1. 9 • Troubleshooting 12 Problem: Nothing happens; Turn power on . 6. Turn power off, support fan very carefully, and check that the switch is properly seated. Pull the pull chain to balance the fan. 2.
... http://www.hunterfan.com. Tighten the blade bracket screws until snug. 2. If so, replace all the blades. fan does not move. 1. Remove the shipping bumpers. If your fan wobbles when operating, use the enclosed balancing kit and instructions to ensure it is cracked. Problem: Noisy operation. 1. 9 • Troubleshooting 12 Problem: Nothing happens; Turn power on . 6. Turn power off, support fan very carefully, and check that the switch is properly seated. Pull the pull chain to balance the fan. 2.


