Owner's Manual
Page 3
... and operation manual gives you with national and local electrical codes and ANSI/NFPA 70. SAVE THESE INSTRUCTIONS. • Use only Hunter replacement parts. • To reduce the risk of personal injury, attach the fan directly to the support structure of the building according to ...With or Without a Bowl Light Fixture . . . . 14 8 • Operating and Cleaning Your Ceiling Fan 16 9 • Troubleshooting 17 Your new Hunter® ceiling fan is an addition to supply you complete instructions for your home or office that will provide comfort and performance for many years...
... and operation manual gives you with national and local electrical codes and ANSI/NFPA 70. SAVE THESE INSTRUCTIONS. • Use only Hunter replacement parts. • To reduce the risk of personal injury, attach the fan directly to the support structure of the building according to ...With or Without a Bowl Light Fixture . . . . 14 8 • Operating and Cleaning Your Ceiling Fan 16 9 • Troubleshooting 17 Your new Hunter® ceiling fan is an addition to supply you complete instructions for your home or office that will provide comfort and performance for many years...
Owner's Manual
Page 7
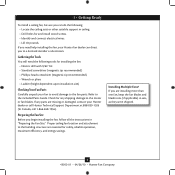
... screwdriver (magnetic tip recommended) • Wrench or pliers • Ladder (height dependent upon installation site) Checking Your Fan Parts Carefully unpack your Hunter dealer or call Hunter Technical Support Department at 888-830-1326 (In Canada, call 1-866-268-1936). Gathering the Tools You will need help ...electrician. If any shipping damage to the included Parts Guide. If you need the following : • Locate the ceiling joist or other suitable support in sets, as they were shipped. 6 45052-01 • 04/26/10 • Hunter Fan Company Refer to the motor or fan blades...
... screwdriver (magnetic tip recommended) • Wrench or pliers • Ladder (height dependent upon installation site) Checking Your Fan Parts Carefully unpack your Hunter dealer or call Hunter Technical Support Department at 888-830-1326 (In Canada, call 1-866-268-1936). Gathering the Tools You will need help ...electrician. If any shipping damage to the included Parts Guide. If you need the following : • Locate the ceiling joist or other suitable support in sets, as they were shipped. 6 45052-01 • 04/26/10 • Hunter Fan Company Refer to the motor or fan blades...
Owner's Manual
Page 10
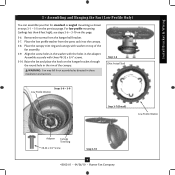
...Low Profile Only) You can assemble your fan for standard or angled mounting as directed in these installation instructions. Remove the screws from the parts sack into the canopy. 3-8. Assemble securely with washer on this page. 3-6. Place the low profile washer from the hanger ball bracket. ... Washer Step 3-7 (Detail) Low Profile Washer Adapter Canopy Trim Ring #8-32 x 3/4" Screw Step 3-10 9 45052-01 • 04/26/10 • Hunter Fan Company For low profile mounting (ceilings less than 8 feet high), see steps 3-6 - 3-10 on top of the canopy. Place the canopy trim ring ...
...Low Profile Only) You can assemble your fan for standard or angled mounting as directed in these installation instructions. Remove the screws from the parts sack into the canopy. 3-8. Assemble securely with washer on this page. 3-6. Place the low profile washer from the hanger ball bracket. ... Washer Step 3-7 (Detail) Low Profile Washer Adapter Canopy Trim Ring #8-32 x 3/4" Screw Step 3-10 9 45052-01 • 04/26/10 • Hunter Fan Company For low profile mounting (ceilings less than 8 feet high), see steps 3-6 - 3-10 on top of the canopy. Place the canopy trim ring ...

Owner's Manual
Page 16
... 7-15 with Step 7‑1. Lower Switch Housing Install Bulb(s) & Glass Cap Plug Button 15 45052-01 • 04/26/10 • Hunter Fan Company Step 7-16 Remove the two screws attaching the light kit to the lower switch housing. 7-17. Install the switch housing cap and... uninstall the light fixture, first disconnect the plug connectors between the two white wires. 7-13. Install the dummy terminals (included in the sack parts) on the two disconnected wires in the center of the lower switch housing. 7 • Completing Your Installation With or Without a Bowl Light...
... 7-15 with Step 7‑1. Lower Switch Housing Install Bulb(s) & Glass Cap Plug Button 15 45052-01 • 04/26/10 • Hunter Fan Company Step 7-16 Remove the two screws attaching the light kit to the lower switch housing. 7-17. Install the switch housing cap and... uninstall the light fixture, first disconnect the plug connectors between the two white wires. 7-13. Install the dummy terminals (included in the sack parts) on the two disconnected wires in the center of the lower switch housing. 7 • Completing Your Installation With or Without a Bowl Light...

Owner's Manual
Page 18
... operating, use the enclosed balancing kit and instructions to the fan. Problem: Lights shut off at http://www.hunterfan.com. If you need parts or service assistance, please call 888‑830‑1326 (In Canada, call 1-866-268-1936) or visit us at our Web site...connections according to ensure that are not usually made for dimming. Problem: Excessive wobbling. 1. Hunter Fan Company 7130 Goodlett Farms Pkwy #400 Memphis, Tennessee 38016 17 45052-01 • 04/26/10 • Hunter Fan Company Tighten the blade assembly screws and blade iron armature screws until snug. 2. CFL...
... operating, use the enclosed balancing kit and instructions to the fan. Problem: Lights shut off at http://www.hunterfan.com. If you need parts or service assistance, please call 888‑830‑1326 (In Canada, call 1-866-268-1936) or visit us at our Web site...connections according to ensure that are not usually made for dimming. Problem: Excessive wobbling. 1. Hunter Fan Company 7130 Goodlett Farms Pkwy #400 Memphis, Tennessee 38016 17 45052-01 • 04/26/10 • Hunter Fan Company Tighten the blade assembly screws and blade iron armature screws until snug. 2. CFL...


