Hunter 23725 Support and Manuals
Get Help and Manuals for this Hunter item
View All Support Options Below
Free Hunter 23725 manuals!
Problems with Hunter 23725?
Ask a Question
Free Hunter 23725 manuals!
Problems with Hunter 23725?
Ask a Question
Popular Hunter 23725 Manual Pages
Installation Manual - Page 1
®
Installation and Operation Manual For Hunter Ceiling Fans
41462-01 10/14/2005
1
41462-01 10/14/2005
Installation Manual - Page 3
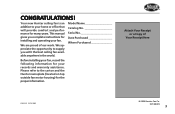
...Please refer to supply you complete instructions for installing and operating your fan. We ... Model Name Catalog No Serial No Date Purchased Where Purchased
Before installing ...your fan, record the following information for your home or office that will provide comfort and performance for the proper information.
®
Attach Your Receipt or a Copy of our work.
This manual...
Installation Manual - Page 5
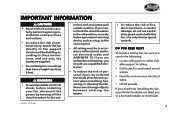
... possible electrical shock, before beginning installation and save these instructions.
• To reduce the risk of personal injury, attach the fan directly to the support structure of personal injury, do ... service panel.
• All wiring must be in ceiling. • Drill holes for and install wood
screws. • Identify and connect electrical
wires. • Lift 40 pounds. able support ...
Installation Manual - Page 6
... unpack your fan support and electric outlet box meet UL-approved safety codes for replacement. If one fan, keep the fan blades in sets, as they were shipped.
Hint: If you are essential for your Hunter dealer or call Hunter Parts Department at 901-248-2222.
41462-01 10/14/2005
6 For this installation manual assume that...
Installation Manual - Page 8
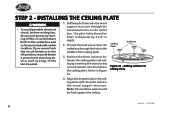
... The isolation pads should be flush against the ceiling.
41462-01 10/14/2005
8 Drilltwopilotholesintothewood support structure through the hole in depth.
2.
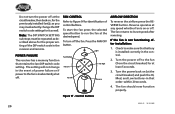
Ceiling Plate
Isolators
Figure 2a - ®
STEP...box and to the service panel.
1. Adding Isolators to Figure 2a. If you cannot lock the circuit breakers in the wood support structure. INSTALLING THE CEILING PLATE
...
Installation Manual - Page 10

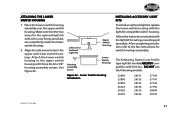
... as shown in Figure 3a.
Feed wires from unscrewing. Pipe
Hanger Bracket
Canopy
Allen Head Pipe Set Screw
CAUTION
The pipe has a special coating on the threads. the coating prevents the pipe from...and Canopy
10
41462-01 10/14/2005 Do not remove this coating; Tighten allen head pipe set screw as shown in Figure 3 with the included allen wrench. Figure 3 - ®
STEP 3 -...
Installation Manual - Page 11

...
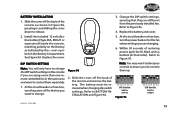
Figure 4a - HANGING THE FAN
1. Refer to Figure 4a for location of the fan with one hand and supporting the weight of the isolators. Ceiling Plate
Hanger Bracket
Do not install the hanger bracket without the isolators installed. Twist hanger bracket clockwise and lock in Figure 4a.
3. Note: If the isolators are pre...
Installation Manual - Page 17
... housing.
Follow the instructions included with three #6-32 x 3/8" housing assembly screws. Attach the lower switch housing to the fan instructions for Optional Light Kit...Installation
INSTALLING ACCESSORY LIGHT KITS
To install an optional light kit, replace the lower switch housing with wire nuts firmly attached, are completely inside the lower switch housing.
2. The following models...
Installation Manual - Page 19
... are changing.
6. Figure 9d
2. Change the DIP switch settings, assuring that order). Note: You may want to change .
Replace the battery and cover.
5. Refer to Figure 9e.
4.
DIP Switch Set to 01110
Figure 9e
DIP Switch Set to BATTERY INSTALLATION and Figure 9d.
3. Replace the cover. ®
BATTERY INSTALLATION
1. See Figure 9d. Refer to 01001
41462-01...
Installation Manual - Page 20
... off the fan. Note: The DIP SWITCH SETTING sub steps must be repeated as well. POWER FAILURE
The receiver has a memory function that retains the last DIP switch code setting. The setting will not change the DIP switch code settings for it as described above for the previously installed fan(s), as you may inadvertently change in the...
Installation Manual - Page 21
... installation. Note: Any changes or modifications to the transmitter or receiver not expressly approved by Hunter Fan Company may void one or more of the FCC Rules. For use with the instructions, may cause undesired operation.
2. Press the button for use with Part 15 of the LIGHT button maintains the desired brightness level set...
Installation Manual - Page 23
A vacuum cleaner brush nozzle can easily be used , but never use abrasive cleaning agents as the fan finish. MANUFACTURER'S PHONE NUMBER If you need parts or service assistance, please call 901-248-2222 or visit us at our WEB site at:
http://www.hunterfan.com
41462-01 10/14/2005
23 Surface ...
Installation Manual - Page 24

... FAN (turn power off , fuse blown, or
circuit breaker tripped.
2. Dip Switches not set breaker.
2a.Loosen canopy, check all connections according to STEP 8 - See STEP 9 - Note: Replace with battery type 23A, MN-21 or equivalent.
REMOTE CONTROL.
6. ®
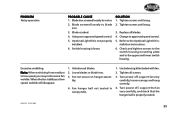
TROUBLESHOOTING
PROBLEM
PROBABLE CAUSE
Nothing happens; SOLUTION 1. Loose wire connections or wrong connections. Power turned...
Installation Manual - Page 25
... properly
installed. 6. Note: When switching from medium to the upper and lower switch housing. Excessive wobbling. PROBLEM Noisy operation.
®
PROBABLE CAUSE 1. Turn power off , support the fan very carefully, and check that the hanger ball is properly seated.
41462-01 10/14/2005
25 Optional Light Kit is loose. bly.
4. stallation instructions. 6. Blade...
Installation Manual - Page 26
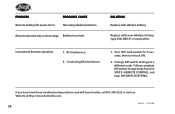
... equivalent. Inconsistent Remote operation.
1. Continuing RF interference.
1. Replace with alkaline battery. Battery too weak. RF interference. 2. Change DIP switch settings to a different code.
Remote operates only at http://www.hunterfan.com.
26
41462-01 10/14/2005
If you have tried these troubleshooting solutions and still have trouble, call 901-248-2222 or visit our...
Hunter 23725 Reviews
We have not received any reviews for Hunter yet.