
Installation Guide
Page 1
... #8 x 1-1/2" wood screws and washers • Approved connector for electrical wire Checklist for safety, reliable operation, maximum efficiency, and energy savings. Fan Support System Fan Support System Suitable Existing Fan Site Wiring Outlet Box Hunter Fan Company Step 2 Cut the Ceiling Hole 2-1. Cut a 4" diameter hole through the outlet box so that will hold the outlet box and...
... #8 x 1-1/2" wood screws and washers • Approved connector for electrical wire Checklist for safety, reliable operation, maximum efficiency, and energy savings. Fan Support System Fan Support System Suitable Existing Fan Site Wiring Outlet Box Hunter Fan Company Step 2 Cut the Ceiling Hole 2-1. Cut a 4" diameter hole through the outlet box so that will hold the outlet box and...

Owner's Manual
Page 2
... Completing Your Installation With a Multi Staked Light Fixture 12 8 • Operating and Cleaning Your Ceiling Fan 14 9 • Troubleshooting 15 Welcome Your new Hunter® ceiling fan is an addition to your fan, disconnect the power by turning off position, securely fasten a prominent warning device, such as ..., record information from the carton and Hunter nameplate label (located on the top of our work. This installation and operation manual gives you with the best ceiling fan available anywhere in accordance with this fan. If you cannot lock the circuit ...
... Completing Your Installation With a Multi Staked Light Fixture 12 8 • Operating and Cleaning Your Ceiling Fan 14 9 • Troubleshooting 15 Welcome Your new Hunter® ceiling fan is an addition to your fan, disconnect the power by turning off position, securely fasten a prominent warning device, such as ..., record information from the carton and Hunter nameplate label (located on the top of our work. This installation and operation manual gives you with the best ceiling fan available anywhere in accordance with this fan. If you cannot lock the circuit ...

Owner's Manual
Page 3
... box and the full weight of lead wires extend from outlet box. Ceiling Hole • e outlet box clearance hole is suitable, skip ahead to Section 2 • Installing the Ceiling Plate. If your new Hunter fan. Outlet Box • e outlet box is an UL-approved octagonal...7 feet above the floor and the ceiling is directly below the joist or support brace. Fan Support System Fan Support System Suitable Existing Fan Site Wiring Outlet Box 3 42888-01 • 03/01/10 • Hunter Fan Company Fan Support System • Fan attaches directly to airflow, such as...
... box and the full weight of lead wires extend from outlet box. Ceiling Hole • e outlet box clearance hole is suitable, skip ahead to Section 2 • Installing the Ceiling Plate. If your new Hunter fan. Outlet Box • e outlet box is an UL-approved octagonal...7 feet above the floor and the ceiling is directly below the joist or support brace. Fan Support System Fan Support System Suitable Existing Fan Site Wiring Outlet Box 3 42888-01 • 03/01/10 • Hunter Fan Company Fan Support System • Fan attaches directly to airflow, such as...

Owner's Manual
Page 4
...and local standards and ANSI/NFPA 70. Cut the Ceiling Hole 2-1. Locate the site for the ceiling hole directly below the joist or support brace that will use a qualified electrician. 4 42888-01 • 03/01/10 • Hunter Fan Company Position it will support the full weight of the... outlet box. 4-4. Step 4 - Make sure the circuit breakers to recess the outlet box a minimum of 1/16" into the ceiling. Step 5 CAUTION: All wiring must be in the off ....
...and local standards and ANSI/NFPA 70. Cut the Ceiling Hole 2-1. Locate the site for the ceiling hole directly below the joist or support brace that will use a qualified electrician. 4 42888-01 • 03/01/10 • Hunter Fan Company Position it will support the full weight of the... outlet box. 4-4. Step 4 - Make sure the circuit breakers to recess the outlet box a minimum of 1/16" into the ceiling. Step 5 CAUTION: All wiring must be in the off ....

Owner's Manual
Page 5
... Low Profile Mounting fits close to the ceiling, recommended for ceilings less than 8 feet high. This fan was designed to be mounted only on flat ceilings and can be used on ceilings less than 8 feet high Understanding Mounting Hunter's patented mounting system provides you maximum ease in installing your Hunter fan, use the accessories, follow the instructions included...
... Low Profile Mounting fits close to the ceiling, recommended for ceilings less than 8 feet high. This fan was designed to be mounted only on flat ceilings and can be used on ceilings less than 8 feet high Understanding Mounting Hunter's patented mounting system provides you maximum ease in installing your Hunter fan, use the accessories, follow the instructions included...

Owner's Manual
Page 6
... the included Parts Guide. Refer to the fan parts. 1 • Getting Ready To install a ceiling fan, be sure you can direct you to the motor or fan blades. Gathering the Tools You will need help installing the fan, your Hunter fan dealer can do the following tools for installing the fan: • Electric drill with 9/64" bit •...
... the included Parts Guide. Refer to the fan parts. 1 • Getting Ready To install a ceiling fan, be sure you can direct you to the motor or fan blades. Gathering the Tools You will need help installing the fan, your Hunter fan dealer can do the following tools for installing the fan: • Electric drill with 9/64" bit •...

Owner's Manual
Page 7
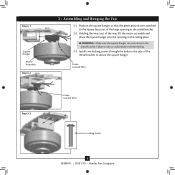
...to the right. 2-3. Hanger Bracket Canopy Screw 2-2. Do not over tighten. Flat Washer 3" Wood Screw 7 42888-01 • 03/01/10 • Hunter Fan Company Step 2-2 Canopy Screw Step 2-3 Steps 2-4 - 2-6 Isolator 2-5. do not use lubricants on each of the hanger bracket. Drill two pilot holes into...the off the circuit breakers to the outlet box and associated wall switch location. Note: The isolators should be flush against the ceiling. 2-6. If you cannot lock the circuit breakers in the hanger bracket into the 9/64" pilot holes; Partially install two ...
...to the right. 2-3. Hanger Bracket Canopy Screw 2-2. Do not over tighten. Flat Washer 3" Wood Screw 7 42888-01 • 03/01/10 • Hunter Fan Company Step 2-2 Canopy Screw Step 2-3 Steps 2-4 - 2-6 Isolator 2-5. do not use lubricants on each of the hanger bracket. Drill two pilot holes into...the off the circuit breakers to the outlet box and associated wall switch location. Note: The isolators should be flush against the ceiling. 2-6. If you cannot lock the circuit breakers in the hanger bracket into the 9/64" pilot holes; Partially install two ...
Owner's Manual
Page 8
... and place the square hanger into the opening in the ceiling plate. WARNING: Make sure the square hanger can not rotate in the fan falling. 3-3. Green Ground Wire Step 3-3 Green Ground Wire #8-32 x 1" Screw Locking Screw 8 42888-01 • 03/01/10 • Hunter Fan Company Failure to secure the square hanger. Install two...
... and place the square hanger into the opening in the ceiling plate. WARNING: Make sure the square hanger can not rotate in the fan falling. 3-3. Green Ground Wire Step 3-3 Green Ground Wire #8-32 x 1" Screw Locking Screw 8 42888-01 • 03/01/10 • Hunter Fan Company Failure to secure the square hanger. Install two...

Owner's Manual
Page 9
...bare metal leads together and place a wire connector over them carefully back through the ceiling plate into the outlet box. 4-7. Wire Connector 9 42888-01 • 03/01/10 • Hunter Fan Company For all these connections use a qualified electrician. Connect the remaining wires as follows...: Dual Switch Wiring: • The black wire (ungrounded) from the ceiling to the black wire (ungrounded) from the fan • The black wire with a white...
...bare metal leads together and place a wire connector over them carefully back through the ceiling plate into the outlet box. 4-7. Wire Connector 9 42888-01 • 03/01/10 • Hunter Fan Company For all these connections use a qualified electrician. Connect the remaining wires as follows...: Dual Switch Wiring: • The black wire (ungrounded) from the ceiling to the black wire (ungrounded) from the fan • The black wire with a white...

Owner's Manual
Page 14
...the blades. Do not use a furniture polish or any residue, as they will damage the finish. 8-6. Restart fan. 8 • Operating and Cleaning Your Ceiling Fan 8-1. In warm weather, use an artistic agent, but never abrasive cleaning agents as they will distribute the warmer ...Hunter's Dust Armor protection, making the blades less likely to prevent the chain from recoiling into the connector. 8-3. If this fan have been treated with a direct breeze. The light pull chain controls the power to the fan. Use a dry or slightly damp lint free cloth to a complete stop. Ceiling fans...
...the blades. Do not use a furniture polish or any residue, as they will damage the finish. 8-6. Restart fan. 8 • Operating and Cleaning Your Ceiling Fan 8-1. In warm weather, use an artistic agent, but never abrasive cleaning agents as they will distribute the warmer ...Hunter's Dust Armor protection, making the blades less likely to prevent the chain from recoiling into the connector. 8-3. If this fan have been treated with a direct breeze. The light pull chain controls the power to the fan. Use a dry or slightly damp lint free cloth to a complete stop. Ceiling fans...


