
Installation Guide
Page 1
...brace. Attach a 2" x 4" support brace between two joists. Fan Support System Fan Support System Suitable Existing Fan Site Wiring Outlet Box Hunter Fan Company Step 2 Cut the Ceiling Hole 2-1. Locate the site for your ceiling fan site. Cut a 4" diameter hole through the outlet box so that... inner and outer holes in contact with an approved connector, available at least 8 feet high. • e fan blades have now successfully prepared your new Hunter fan. Steps 2 - 3 Step 3 Install a Support Brace, If Necessary Determine if there is a ceiling joist directly ...
...brace. Attach a 2" x 4" support brace between two joists. Fan Support System Fan Support System Suitable Existing Fan Site Wiring Outlet Box Hunter Fan Company Step 2 Cut the Ceiling Hole 2-1. Locate the site for your ceiling fan site. Cut a 4" diameter hole through the outlet box so that... inner and outer holes in contact with an approved connector, available at least 8 feet high. • e fan blades have now successfully prepared your new Hunter fan. Steps 2 - 3 Step 3 Install a Support Brace, If Necessary Determine if there is a ceiling joist directly ...

Owner's Manual
Page 1
Date Purchased Where Purchased Type 2A Models Owner's Guide and Installation Manual English Español Form# 42888-01 20100301 ©2010 Hunter Fan Co. For Your Records and Warranty Assistance For reference, also attach your receipt or a copy of your receipt to the manual. Model Name Model No.
Date Purchased Where Purchased Type 2A Models Owner's Guide and Installation Manual English Español Form# 42888-01 20100301 ©2010 Hunter Fan Co. For Your Records and Warranty Assistance For reference, also attach your receipt or a copy of your receipt to the manual. Model Name Model No.

Owner's Manual
Page 2
... Blades 11 7 • Completing Your Installation With a Multi Staked Light Fixture 12 8 • Operating and Cleaning Your Ceiling Fan 14 9 • Troubleshooting 15 Welcome Your new Hunter® ceiling fan is an addition to your fan, disconnect the power by turning off position, securely fasten a prominent warning device, such as a tag, to the service...
... Blades 11 7 • Completing Your Installation With a Multi Staked Light Fixture 12 8 • Operating and Cleaning Your Ceiling Fan 14 9 • Troubleshooting 15 Welcome Your new Hunter® ceiling fan is an addition to your fan, disconnect the power by turning off position, securely fasten a prominent warning device, such as a tag, to the service...

Owner's Manual
Page 3
...octagonal 4" x 1-1/2" outlet box (or as described on this page. Fan Support System Fan Support System Suitable Existing Fan Site Wiring Outlet Box 3 42888-01 • 03/01/10 • Hunter Fan Company If you want to use an existing fan site, complete the following checklist to determine if the site is acceptable ... and the ceiling is at least 8 feet high. • e fan blades have no obstructions to airflow, such as walls or posts, within 30 inches of the fan and light kit. If your new Hunter fan. Choose a fan site where: • No object can come in contact with joist or ...
...octagonal 4" x 1-1/2" outlet box (or as described on this page. Fan Support System Fan Support System Suitable Existing Fan Site Wiring Outlet Box 3 42888-01 • 03/01/10 • Hunter Fan Company If you want to use an existing fan site, complete the following checklist to determine if the site is acceptable ... and the ceiling is at least 8 feet high. • e fan blades have no obstructions to airflow, such as walls or posts, within 30 inches of the fan and light kit. If your new Hunter fan. Choose a fan site where: • No object can come in contact with joist or ...

Owner's Manual
Page 4
...5-4. Orient the outlet box so that will use a qualified electrician. 4 42888-01 • 03/01/10 • Hunter Fan Company You have now successfully prepared your fan manual and continue with an approved connector, available at least 6" beyond the box. 5-3. Locate the site for the ceiling ...the circuit breakers in accordance with national and local electrical codes and ANSI/NFPA 70. You will hold the outlet box and fan. 2-2. Step 3 - Preparing the Fan Site (continued) Step 2 - Install a Support Brace, If Necessary Determine if there is positioned to allow you to ...
...5-4. Orient the outlet box so that will use a qualified electrician. 4 42888-01 • 03/01/10 • Hunter Fan Company You have now successfully prepared your fan manual and continue with an approved connector, available at least 6" beyond the box. 5-3. Locate the site for the ceiling ...the circuit breakers in accordance with national and local electrical codes and ANSI/NFPA 70. You will hold the outlet box and fan. 2-2. Step 3 - Preparing the Fan Site (continued) Step 2 - Install a Support Brace, If Necessary Determine if there is positioned to allow you to ...

Owner's Manual
Page 5
... hardware supplied. 5 42888-01 • 03/01/10 • Hunter Fan Company CAUTION: To reduce the risk of personal injury, attach the fan directly to the support structure of your fan. For quiet and optimum performance of the building according to these instructions,... be used on ceilings less than 8 feet high Understanding Mounting Hunter's patented mounting system provides you maximum ease in installing your Hunter fan, use only Hunter speed controls. Considering Optional Accessories Consider using Hunter's optional accessories, including a wall-mounted or remote speed control....
... hardware supplied. 5 42888-01 • 03/01/10 • Hunter Fan Company CAUTION: To reduce the risk of personal injury, attach the fan directly to the support structure of your fan. For quiet and optimum performance of the building according to these instructions,... be used on ceilings less than 8 feet high Understanding Mounting Hunter's patented mounting system provides you maximum ease in installing your Hunter fan, use only Hunter speed controls. Considering Optional Accessories Consider using Hunter's optional accessories, including a wall-mounted or remote speed control....

Owner's Manual
Page 6
... Refer to the included Parts Guide. If any shipping damage to the motor or fan blades. Gathering the Tools You will need help installing the fan, your Hunter fan dealer can do the following tools for installing the fan: • Electric drill with 9/64" bit • Keyhole saw • 2'...-head screwdriver (magnetic tip recommended) • Wrench or pliers • Ladder (height dependent upon installation site) Checking Your Fan Parts Carefully unpack your Hunter dealer or call Hunter Technical Support Department at 888-830-1326 (In Canada, call 866-268-1936). Installing Multiple...
... Refer to the included Parts Guide. If any shipping damage to the motor or fan blades. Gathering the Tools You will need help installing the fan, your Hunter fan dealer can do the following tools for installing the fan: • Electric drill with 9/64" bit • Keyhole saw • 2'...-head screwdriver (magnetic tip recommended) • Wrench or pliers • Ladder (height dependent upon installation site) Checking Your Fan Parts Carefully unpack your Hunter dealer or call Hunter Technical Support Department at 888-830-1326 (In Canada, call 866-268-1936). Installing Multiple...

Owner's Manual
Page 7
...be 9/64" in the wood support structure. Partially install two canopy screws in the hanger bracket. 2-4. Hanger Bracket Canopy Screw 2-2. Your fan comes with the pilot holes you cannot lock the circuit breakers in the outlet box. Flat Washer 3" Wood Screw 7 42888-01 •...; 03/01/10 • Hunter Fan Company Step 2-2 Canopy Screw Step 2-3 Steps 2-4 - 2-6 Position the isolators between the hanger bracket and ceiling by turning off position, securely fasten ...
...be 9/64" in the wood support structure. Partially install two canopy screws in the hanger bracket. 2-4. Hanger Bracket Canopy Screw 2-2. Your fan comes with the pilot holes you cannot lock the circuit breakers in the outlet box. Flat Washer 3" Wood Screw 7 42888-01 •...; 03/01/10 • Hunter Fan Company Step 2-2 Canopy Screw Step 2-3 Steps 2-4 - 2-6 Position the isolators between the hanger bracket and ceiling by turning off position, securely fasten ...
Owner's Manual
Page 8
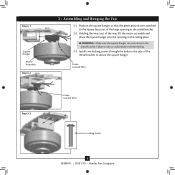
...into the opening in the ceiling plate. Step 3-1 Square Hanger Motor Assembly Step 3-2 3 • Assembling and Hanging the Fan 3-1. WARNING: Make sure the square hanger can not rotate in the fan falling. 3-3. Position the square hanger so that the green ground wire attached to the square faces out of the large... opening in the metal bracket. 3-2. Green Ground Wire Step 3-3 Green Ground Wire #8-32 x 1" Screw Locking Screw 8 42888-01 • 03/01/10 • Hunter Fan Company Holding the wires out of the metal bracket to do so could result in the metal bracket.
...into the opening in the ceiling plate. Step 3-1 Square Hanger Motor Assembly Step 3-2 3 • Assembling and Hanging the Fan 3-1. WARNING: Make sure the square hanger can not rotate in the fan falling. 3-3. Position the square hanger so that the green ground wire attached to the square faces out of the large... opening in the metal bracket. 3-2. Green Ground Wire Step 3-3 Green Ground Wire #8-32 x 1" Screw Locking Screw 8 42888-01 • 03/01/10 • Hunter Fan Company Holding the wires out of the metal bracket to do so could result in the metal bracket.

Owner's Manual
Page 9
...grounding) from the fan. 4-5. Connect the bare or green ground wire (grounding) from the ceiling to the white wire (grounded) from the fan. 4-4. To ...wall switch Single Switch Wiring: • The black wire (ungrounded) from the fan CAUTION: Be sure no bare wire or wire strands are not included. Connect...ceiling to the black wire (ungrounded) from the fan • The black wire with a white stripe (ungrounded) from the fan to the black (ungrounded) and the black wire ... wire connectors provided. 4-3. 4 •Wiring the Fan All wiring must be in accordance with national and...
...grounding) from the fan. 4-5. Connect the bare or green ground wire (grounding) from the ceiling to the white wire (grounded) from the fan. 4-4. To ...wall switch Single Switch Wiring: • The black wire (ungrounded) from the fan CAUTION: Be sure no bare wire or wire strands are not included. Connect...ceiling to the black wire (ungrounded) from the fan • The black wire with a white stripe (ungrounded) from the fan to the black (ungrounded) and the black wire ... wire connectors provided. 4-3. 4 •Wiring the Fan All wiring must be in accordance with national and...
Owner's Manual
Page 10
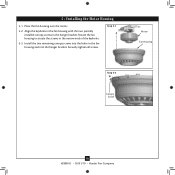
Install the two remaining canopy screws into the holes in the narrow ends of the keyholes. 5-3. Securely tighten all screws. Rotate the fan housing to situate the screws in the fan housing and into the hanger bracket. 5 • Installing the Motor Housing 5-1. Place the fan housing over the motor. 5-2. Step 5-1 Motor Fan Housing Step 5-3 Canopy Screw 10 42888-01 • 03/01/10 • Hunter Fan Company Align the keyholes in the fan housing with the two partially installed canopy screws in the hanger bracket.
Install the two remaining canopy screws into the holes in the narrow ends of the keyholes. 5-3. Securely tighten all screws. Rotate the fan housing to situate the screws in the fan housing and into the hanger bracket. 5 • Installing the Motor Housing 5-1. Place the fan housing over the motor. 5-2. Step 5-1 Motor Fan Housing Step 5-3 Canopy Screw 10 42888-01 • 03/01/10 • Hunter Fan Company Align the keyholes in the fan housing with the two partially installed canopy screws in the hanger bracket.

Owner's Manual
Page 11
... assembly screws. If you used grommets, the blades may include blade grommets. Steps 6-1 - 6-2 Use with Hunter's Dust Armor protection, making the blades less likely to the fan). 6-1. If your fan has grommets, insert them by hand into the holes on the blades. Note: Some blade mounting screws are... grommet Blade Assembly Screws Step 6-4 Use without grommet 11 42888-01 • 03/01/10 • Hunter Fan Company Blade Mounting Screw Do not use several styles of fan blade irons (brackets that leave any other cleaners that hold the blade to attract dust and dirt. Remove ...
... assembly screws. If you used grommets, the blades may include blade grommets. Steps 6-1 - 6-2 Use with Hunter's Dust Armor protection, making the blades less likely to the fan). 6-1. If your fan has grommets, insert them by hand into the holes on the blades. Note: Some blade mounting screws are... grommet Blade Assembly Screws Step 6-4 Use without grommet 11 42888-01 • 03/01/10 • Hunter Fan Company Blade Mounting Screw Do not use several styles of fan blade irons (brackets that leave any other cleaners that hold the blade to attract dust and dirt. Remove ...

Owner's Manual
Page 12
...are polarized and will only fit together one way. Attach the lower switch housing to the upper switch housing with this fan model. 7-1. Tighten all three assembly screws could cause improper operation and damage to properly attach and tighten all three ...housing assembly screws. Failure to the product. 7-5. Housing Assembly Screw Plug Connector Detail 12 42888-01 • 03/01/10 • Hunter Fan Company Incorrect connection could result in the upper and lower switch housings. Steps 7-1 - 7-3 Housing Assembly Screw Upper Switch Housing CAUTION: Make ...
...are polarized and will only fit together one way. Attach the lower switch housing to the upper switch housing with this fan model. 7-1. Tighten all three assembly screws could cause improper operation and damage to properly attach and tighten all three ...housing assembly screws. Failure to the product. 7-5. Housing Assembly Screw Plug Connector Detail 12 42888-01 • 03/01/10 • Hunter Fan Company Incorrect connection could result in the upper and lower switch housings. Steps 7-1 - 7-3 Housing Assembly Screw Upper Switch Housing CAUTION: Make ...

Owner's Manual
Page 13
Tighten the thumbscrews securely. 7-8. To install each ). Shade Bulb Thumbscrews Steps 7-7 - 7-8 13 42888-01 • 03/01/10 • Hunter Fan Company 7 • Completing Your Installation With a Multi Staked Light Fixture (Continued) Note: Glass shade style and number of lights may vary. 7-6. Raise the shade to the light fixture. Install the included B10 candelabra-based light bulbs (60 Watt maximum each shade, first loosen the three thumbscrews. 7-7.
Tighten the thumbscrews securely. 7-8. To install each ). Shade Bulb Thumbscrews Steps 7-7 - 7-8 13 42888-01 • 03/01/10 • Hunter Fan Company 7 • Completing Your Installation With a Multi Staked Light Fixture (Continued) Note: Glass shade style and number of lights may vary. 7-6. Raise the shade to the light fixture. Install the included B10 candelabra-based light bulbs (60 Watt maximum each shade, first loosen the three thumbscrews. 7-7.

Owner's Manual
Page 14
... flow pattern 14 42888-01 • 03/01/10 • Hunter Fan Company A vacuum cleaner brush nozzle can remove heavier dust. Restart fan. Reversing Switch In cold weather, use downward air flow pattern 8-5. If this fan have been treated with a direct breeze. Remove surface smudges or accumulated... dirt and dust using a mild detergent and a slightly dampened cloth. The pull chain has four settings in warm weather to cool the room with Hunter's Dust Armor protection, making ...
... flow pattern 14 42888-01 • 03/01/10 • Hunter Fan Company A vacuum cleaner brush nozzle can remove heavier dust. Restart fan. Reversing Switch In cold weather, use downward air flow pattern 8-5. If this fan have been treated with a direct breeze. Remove surface smudges or accumulated... dirt and dust using a mild detergent and a slightly dampened cloth. The pull chain has four settings in warm weather to cool the room with Hunter's Dust Armor protection, making ...

Owner's Manual
Page 15
... the upper and lower switch housing. Remove the shipping bumpers. Tighten the blade bracket screws until snug. 3. Change to the wiring the fan section. 3. Tighten all the blades. 4. If you need parts or service assistance, please call 888‑830‑1326 (In Canada... 7130 Goodlett Farms Parkway #400 Memphis, Tennessee 38016 15 42888-01 • 03/01/10 • Hunter Fan Company 9 • Troubleshooting Problem: Nothing happens; Turn power on . 6. If your fan wobbles when operating, use the enclosed balancing kit and instructions to ensure that the glass is on , replace...
... the upper and lower switch housing. Remove the shipping bumpers. Tighten the blade bracket screws until snug. 3. Change to the wiring the fan section. 3. Tighten all the blades. 4. If you need parts or service assistance, please call 888‑830‑1326 (In Canada... 7130 Goodlett Farms Parkway #400 Memphis, Tennessee 38016 15 42888-01 • 03/01/10 • Hunter Fan Company 9 • Troubleshooting Problem: Nothing happens; Turn power on . 6. If your fan wobbles when operating, use the enclosed balancing kit and instructions to ensure that the glass is on , replace...

Parts Guide
Page 1
...Machine, 6-32 Wire Connector Screw, Switch Housing Assembly Light Kit Assembly Thumbscrew Light bulb / Bulb Fan Pull Chain Pendant Light Pull Chain Pendant Pull Chain Globe/Shade Model # Asm. REFER TO THE... GUIDE IS FOR REFERENCE ONLY. Dwg. # Finish Qnty 1 4 2 2 4 4 2 1 1 11 1 1 23849 99606-01 Provencal Gold Part # 73862-01 74508-37 03144-03 06512-01 06301-01 67290-01 74508-06 99791-05 ... G0091-01 G0091-01 G0091-01 2 63756-42 63756-42 63756-42 3 89418-01 89418-02 89418-03 Hunter Fan Company • 7130 Goodlett Farms Pkwy. #400 • Memphis, TN 38016 • www.hunterfan.com ...
...Machine, 6-32 Wire Connector Screw, Switch Housing Assembly Light Kit Assembly Thumbscrew Light bulb / Bulb Fan Pull Chain Pendant Light Pull Chain Pendant Pull Chain Globe/Shade Model # Asm. REFER TO THE... GUIDE IS FOR REFERENCE ONLY. Dwg. # Finish Qnty 1 4 2 2 4 4 2 1 1 11 1 1 23849 99606-01 Provencal Gold Part # 73862-01 74508-37 03144-03 06512-01 06301-01 67290-01 74508-06 99791-05 ... G0091-01 G0091-01 G0091-01 2 63756-42 63756-42 63756-42 3 89418-01 89418-02 89418-03 Hunter Fan Company • 7130 Goodlett Farms Pkwy. #400 • Memphis, TN 38016 • www.hunterfan.com ...


