
Installation Guide
Page 1
...Ceiling Plate. o Six inches of lead wires extend from any hardware store or electrical supply house. 5-4. Locate the site for your new Hunter fan. Steps 2 - 3 Step 3 Install a Support Brace, If Necessary Determine if there is a ceiling joist directly above the floor ...cannot lock the circuit breakers in accordance with joist or support brace. o e bottom of the fan and light kit. Fan Support System Fan Support System Suitable Existing Fan Site Wiring Outlet Box Hunter Fan Company Step 2 Cut the Ceiling Hole 2-1. Obtain a UL-approved octagonal 4" x 1-1/2" outlet box...
...Ceiling Plate. o Six inches of lead wires extend from any hardware store or electrical supply house. 5-4. Locate the site for your new Hunter fan. Steps 2 - 3 Step 3 Install a Support Brace, If Necessary Determine if there is a ceiling joist directly above the floor ...cannot lock the circuit breakers in accordance with joist or support brace. o e bottom of the fan and light kit. Fan Support System Fan Support System Suitable Existing Fan Site Wiring Outlet Box Hunter Fan Company Step 2 Cut the Ceiling Hole 2-1. Obtain a UL-approved octagonal 4" x 1-1/2" outlet box...
Owner's Manual
Page 1
Date Purchased Where Purchased Type 2 Models Owner's Guide and Installation Manual English Español Form# 42693-01 20100514 ©2010 Hunter Fan Co. For Your Records and Warranty Assistance For reference, also attach your receipt or a copy of your receipt to the manual. Model Name Model No.
Date Purchased Where Purchased Type 2 Models Owner's Guide and Installation Manual English Español Form# 42693-01 20100514 ©2010 Hunter Fan Co. For Your Records and Warranty Assistance For reference, also attach your receipt or a copy of your receipt to the manual. Model Name Model No.
Owner's Manual
Page 2
... hardware supplied. • To avoid possible electrical shock, before installing your records and warranty assistance, record information from the carton and Hunter nameplate label (located on the top of the fan motor housing). This installation and operation manual gives you cannot lock the circuit breakers in the world. We are unfamiliar with...
... hardware supplied. • To avoid possible electrical shock, before installing your records and warranty assistance, record information from the carton and Hunter nameplate label (located on the top of the fan motor housing). This installation and operation manual gives you cannot lock the circuit breakers in the world. We are unfamiliar with...
Owner's Manual
Page 3
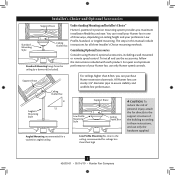
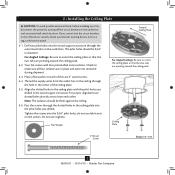
... box (or as described on this page. If your new Hunter fan. Outlet Box • e outlet box is at least 8 feet high. • e fan blades have no obstructions to building structure. • Fan support system will hold full weight of lead wires extend from outlet...and safe for safety, reliable operation, maximum efficiency, and energy savings. Fan Support System Fan Support System Suitable Existing Fan Site Wiring Outlet Box 3 42693-01 • 05/14/10 • Hunter Fan Company Choose a fan site where: • No object can come in contact with joist ...
... box (or as described on this page. If your new Hunter fan. Outlet Box • e outlet box is at least 8 feet high. • e fan blades have no obstructions to building structure. • Fan support system will hold full weight of lead wires extend from outlet...and safe for safety, reliable operation, maximum efficiency, and energy savings. Fan Support System Fan Support System Suitable Existing Fan Site Wiring Outlet Box 3 42693-01 • 05/14/10 • Hunter Fan Company Choose a fan site where: • No object can come in contact with joist ...
Owner's Manual
Page 4
... the outlet box directly to ensure it will use a qualified electrician. 4 42693-01 • 05/14/10 • Hunter Fan Company Locate the site for the ceiling hole directly below the joist or support brace that both the inner and outer holes in the... 4" x 1-1/2" outlet box, plus two #8 x 1-1/2" wood screws and washers, available from any hardware store or electrical supply house. 5-4. For instructions to install your ceiling fan, go to recess the bottom of the outlet box a minimum of 1/16" into the ceiling. Step 5 - If you to the service panel. 5-2. read the...
... the outlet box directly to ensure it will use a qualified electrician. 4 42693-01 • 05/14/10 • Hunter Fan Company Locate the site for the ceiling hole directly below the joist or support brace that both the inner and outer holes in the... 4" x 1-1/2" outlet box, plus two #8 x 1-1/2" wood screws and washers, available from any hardware store or electrical supply house. 5-4. For instructions to install your ceiling fan, go to recess the bottom of the outlet box a minimum of 1/16" into the ceiling. Step 5 - If you to the service panel. 5-2. read the...
Owner's Manual
Page 5
... instructions included with each product. To install and use only Hunter speed controls. All Hunter fans use only the hardware supplied. 5 42693-01 • 05/14/10 • Hunter Fan Company Understanding Mounting and Installer's Choice® Hunter's patented 3-position mounting system provides you can purchase Hunter extension downrods. The steps in one of the building according...
... instructions included with each product. To install and use only Hunter speed controls. All Hunter fans use only the hardware supplied. 5 42693-01 • 05/14/10 • Hunter Fan Company Understanding Mounting and Installer's Choice® Hunter's patented 3-position mounting system provides you can purchase Hunter extension downrods. The steps in one of the building according...
Owner's Manual
Page 6
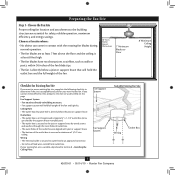
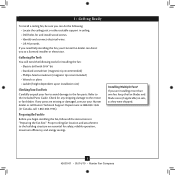
...1936). If any shipping damage to the included Parts Guide. Preparing the Fan Site Before you are essential for any parts are missing or damaged, contact your Hunter fan dealer can do the following tools for installing the fan: • Electric drill with 9/64" bit • Standard screwdriver... more than one fan, keep the fan blades and blade irons (if applicable) in "Preparing the Fan Site." Installing Multiple Fans? If you begin installing the fan, follow all the instructions in sets, as they were shipped. 6 42693-01 • 05/14/10 • Hunter Fan Company Check for ...
...1936). If any shipping damage to the included Parts Guide. Preparing the Fan Site Before you are essential for any parts are missing or damaged, contact your Hunter fan dealer can do the following tools for installing the fan: • Electric drill with 9/64" bit • Standard screwdriver... more than one fan, keep the fan blades and blade irons (if applicable) in "Preparing the Fan Site." Installing Multiple Fans? If you begin installing the fan, follow all the instructions in sets, as they were shipped. 6 42693-01 • 05/14/10 • Hunter Fan Company Check for ...
Owner's Manual
Page 7
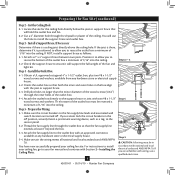
...tighten. Place a flat washer on the screws. Ceiling Plate 3" Wood Screw Steps 2-3 - 2-6 7 42693-01 • 05/14/10 • Hunter Fan Company Drill two pilot holes into the 9/64" pilot holes; For Angled Ceilings: Be sure to the service panel. 2-1. If you cannot lock the ...outlet box and associated wall switch location. 2 • Installing the Ceiling Plate CAUTION: To avoid possible electrical shock, before installing your fan, disconnect the power by turning off position, securely fasten a prominent warning device, such as a tag, to orient the ceiling plate so...
...tighten. Place a flat washer on the screws. Ceiling Plate 3" Wood Screw Steps 2-3 - 2-6 7 42693-01 • 05/14/10 • Hunter Fan Company Drill two pilot holes into the 9/64" pilot holes; For Angled Ceilings: Be sure to the service panel. 2-1. If you cannot lock the ...outlet box and associated wall switch location. 2 • Installing the Ceiling Plate CAUTION: To avoid possible electrical shock, before installing your fan, disconnect the power by turning off position, securely fasten a prominent warning device, such as a tag, to orient the ceiling plate so...
Owner's Manual
Page 8
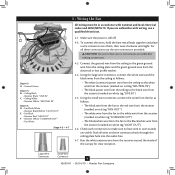
...the downrod is replaced with three low profile screws. Assemble securely with the low profile washer. 3-4. the coating prevents the downrod from the fan. Raise the fan and align the slots in the ball. 3-3. Standard or Angled Mounting Steps 3-2 - 3-3 Downrod Setscrew Canopy Canopy Trim Ring Low Profile...Profile Screw Low Profile Washer 8 42693-01 • 05/14/10 • Hunter Fan Company Loosen the square head setscrew on the ceiling plate hooks. 3-7. Hanging the Fan: Note: To hang the fan, you must tilt the canopy to an almost vertical position so that the canopy ...
...the downrod is replaced with three low profile screws. Assemble securely with the low profile washer. 3-4. the coating prevents the downrod from the fan. Raise the fan and align the slots in the ball. 3-3. Standard or Angled Mounting Steps 3-2 - 3-3 Downrod Setscrew Canopy Canopy Trim Ring Low Profile...Profile Screw Low Profile Washer 8 42693-01 • 05/14/10 • Hunter Fan Company Loosen the square head setscrew on the ceiling plate hooks. 3-7. Hanging the Fan: Note: To hang the fan, you must tilt the canopy to an almost vertical position so that the canopy ...
Owner's Manual
Page 9
... back through the ceiling plate hole into the outlet box. 4-7. Large Wire Connector Small Wire Connector 9 42693-01 • 05/14/10 • Hunter Fan Company If you are visible. Using the large wire connector, connect the white wires and the black wires from the ceiling as follows: • The... the black wire from the receiver (marked on white tag "LIVE IN") 4-5. Using the small wire connector, connect the wires from the fan as follows: • The white (common) power wire from the ceiling to the white wire from the receiver (marked on red tag "NEUTRAL IN") ...
... back through the ceiling plate hole into the outlet box. 4-7. Large Wire Connector Small Wire Connector 9 42693-01 • 05/14/10 • Hunter Fan Company If you are visible. Using the large wire connector, connect the white wires and the black wires from the ceiling as follows: • The... the black wire from the receiver (marked on white tag "LIVE IN") 4-5. Using the small wire connector, connect the wires from the fan as follows: • The white (common) power wire from the ceiling to the white wire from the receiver (marked on red tag "NEUTRAL IN") ...
Owner's Manual
Page 10
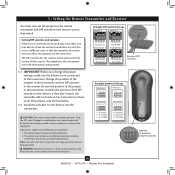
... transmitter. Before you may not cause harmful interference. 2. Install the included 12-volt battery into the transmitter. Changes or modifications not expressly approved by Hunter Fan Company could void your authority to set the jumpers, read the box below. 5-2. Example Jumpers Settings Receiver 1 432 1 432 1 Receiver 2 432... Transmitter Jumper Switches 10 42693-01 • 05/14/10 • Hunter Fan Company WARNING: Maximum fan load is 300 Watts. maximum lamp is 1 Amp; The DIP switches for each fan set to have the receiver/transmitter for the receiver are in the receiver....
... transmitter. Before you may not cause harmful interference. 2. Install the included 12-volt battery into the transmitter. Changes or modifications not expressly approved by Hunter Fan Company could void your authority to set the jumpers, read the box below. 5-2. Example Jumpers Settings Receiver 1 432 1 432 1 Receiver 2 432... Transmitter Jumper Switches 10 42693-01 • 05/14/10 • Hunter Fan Company WARNING: Maximum fan load is 300 Watts. maximum lamp is 1 Amp; The DIP switches for each fan set to have the receiver/transmitter for the receiver are in the receiver....

Owner's Manual
Page 11
... you use a magnetic tip screwdriver for alignment. 6-3. The canopy trim ring will flex out releasing the canopy trim ring. Note: Your fan may have multiple tabs and grooves that the tabs in the hanger ball. Align the tabs on opposite sides of the trim ring directly ...three canopy screws. 6-5. Step 6-1 Tab Groove Step 6-2 Step 6-3 Canopy Canopy Trim Ring Canopy Screw 11 42693-01 • 05/14/10 • Hunter Fan Company 6 • Installing the Canopy and Canopy Trim Ring WARNING: Failure to complete the following steps. 6-1. Using both hands, push the canopy trim ring...
... you use a magnetic tip screwdriver for alignment. 6-3. The canopy trim ring will flex out releasing the canopy trim ring. Note: Your fan may have multiple tabs and grooves that the tabs in the hanger ball. Align the tabs on opposite sides of the trim ring directly ...three canopy screws. 6-5. Step 6-1 Tab Groove Step 6-2 Step 6-3 Canopy Canopy Trim Ring Canopy Screw 11 42693-01 • 05/14/10 • Hunter Fan Company 6 • Installing the Canopy and Canopy Trim Ring WARNING: Failure to complete the following steps. 6-1. Using both hands, push the canopy trim ring...
Owner's Manual
Page 12
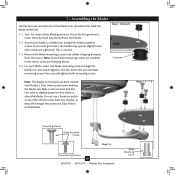
...7-1 (Detail) Grommet Note: The blades on this fan have been treated with grommet Blade Assembly Screws Step 7-4 Use without grommet 12 42693-01 • 05/14/10 • Hunter Fan Company Blade Mounting Screw Steps 7-1 - 7-2 Use with Hunter's Dust Armor protection, making the blades less likely... to the fan. Attach each blade, insert one blade mounting screw through the blade iron, and...
...7-1 (Detail) Grommet Note: The blades on this fan have been treated with grommet Blade Assembly Screws Step 7-4 Use without grommet 12 42693-01 • 05/14/10 • Hunter Fan Company Blade Mounting Screw Steps 7-1 - 7-2 Use with Hunter's Dust Armor protection, making the blades less likely... to the fan. Attach each blade, insert one blade mounting screw through the blade iron, and...
Owner's Manual
Page 13
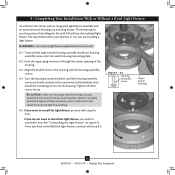
... the included light fixture. 8 • Completing Your Installation With or Without a Bowl Light Fixture Your Hunter fan comes with this fan model. 8-1. Steps 8-1 - 8-3 Housing Assembly Screw Upper Switch Housing 13 42693-01 • 05/14/10 • Hunter Fan Company Once you the option of the keyhole slots. The steps below direct you whether or...
... the included light fixture. 8 • Completing Your Installation With or Without a Bowl Light Fixture Your Hunter fan comes with this fan model. 8-1. Steps 8-1 - 8-3 Housing Assembly Screw Upper Switch Housing 13 42693-01 • 05/14/10 • Hunter Fan Company Once you the option of the keyhole slots. The steps below direct you whether or...
Owner's Manual
Page 14
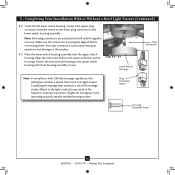
... a device that restricts its light output. Plug Connector Detail Housing Assembly Screw 14 42693-01 • 05/14/10 • Hunter Fan Company 8 • Completing Your Installation With or Without a Bowl Light Fixture (Continued) 8-6. Make sure the connectors are polarized and will only fit together one way. ...
... a device that restricts its light output. Plug Connector Detail Housing Assembly Screw 14 42693-01 • 05/14/10 • Hunter Fan Company 8 • Completing Your Installation With or Without a Bowl Light Fixture (Continued) 8-6. Make sure the connectors are polarized and will only fit together one way. ...
Owner's Manual
Page 15
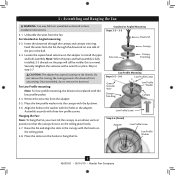
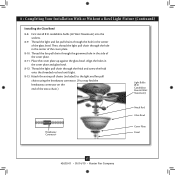
...Breakaway Connector Metal Rod Glass Bowl Cover Plate Finial 15 42693-01 • 05/14/10 • Hunter Fan Company Attach the extra pull chains (included) to the light and fan pull chains using the breakaway connector. (You may find the breakaway connector on the end of the cover ...cover plate. 8-11. 8 • Completing Your Installation With or Without a Bowl Light Fixture (Continued) Installing the Glass Bowl 8-8. Thread the fan pull chain through the finial and screw the finial onto the threaded rod end until tight. 8-13. First install B10 candelabra bulbs (60 Watt Maximum...
...Breakaway Connector Metal Rod Glass Bowl Cover Plate Finial 15 42693-01 • 05/14/10 • Hunter Fan Company Attach the extra pull chains (included) to the light and fan pull chains using the breakaway connector. (You may find the breakaway connector on the end of the cover ...cover plate. 8-11. 8 • Completing Your Installation With or Without a Bowl Light Fixture (Continued) Installing the Glass Bowl 8-8. Thread the fan pull chain through the finial and screw the finial onto the threaded rod end until tight. 8-13. First install B10 candelabra bulbs (60 Watt Maximum...

Owner's Manual
Page 16
... switch housing. 8-20. Screw Step 8-16 Male Dummy Terminal Female Dummy Terminal Cap Plug Button Step 8-19 16 42693-01 • 05/14/10 • Hunter Fan Company 8 • Completing Your Installation With or Without a Bowl Light Fixture (Continued) Uninstalling the Light Fixture 8-14. Disconnect the plug connectors between the black wire...
... switch housing. 8-20. Screw Step 8-16 Male Dummy Terminal Female Dummy Terminal Cap Plug Button Step 8-19 16 42693-01 • 05/14/10 • Hunter Fan Company 8 • Completing Your Installation With or Without a Bowl Light Fixture (Continued) Uninstalling the Light Fixture 8-14. Disconnect the plug connectors between the black wire...
Owner's Manual
Page 17
... and let it come to the light fixture. Reversing Switch 17 42693-01 • 05/14/10 • Hunter Fan Company Ceiling fans work best by blowing air downward (counterclockwise blade rotation) in sequence: High, Medium, Low, and Off. • Pull the chain slowly to change ...settings. • Release slowly to cool the room with Hunter's Dust Armor protection, making the blades less likely to the opposite position. Turn on the fan to attract dust and dirt. If this fan have been treated with a direct breeze. A vacuum cleaner brush nozzle can remove...
... and let it come to the light fixture. Reversing Switch 17 42693-01 • 05/14/10 • Hunter Fan Company Ceiling fans work best by blowing air downward (counterclockwise blade rotation) in sequence: High, Medium, Low, and Off. • Pull the chain slowly to change ...settings. • Release slowly to cool the room with Hunter's Dust Armor protection, making the blades less likely to the opposite position. Turn on the fan to attract dust and dirt. If this fan have been treated with a direct breeze. A vacuum cleaner brush nozzle can remove...
Owner's Manual
Page 18
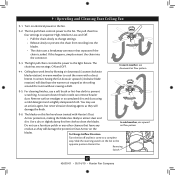
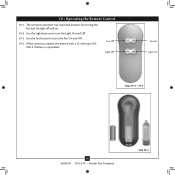
Use the Fan buttons to turn the Fan On and Off. 10-4. When necessary, replace the battery with a 12-volt type 23A, MN-21 battery or equivalent. Use the Light buttons to turn the Light On and Off. 10-3. Fan Off Light Off Fan On Light On Steps 10-2 - 10-3 18 42693-01 • 05/14/10 • Hunter Fan Company Step 10-4 10 • Operating the Remote Control 10-1. The remote transmitter has individual buttons for turning the fan and the light off and on. 10-2.
Use the Fan buttons to turn the Fan On and Off. 10-4. When necessary, replace the battery with a 12-volt type 23A, MN-21 battery or equivalent. Use the Light buttons to turn the Light On and Off. 10-3. Fan Off Light Off Fan On Light On Steps 10-2 - 10-3 18 42693-01 • 05/14/10 • Hunter Fan Company Step 10-4 10 • Operating the Remote Control 10-1. The remote transmitter has individual buttons for turning the fan and the light off and on. 10-2.
Owner's Manual
Page 19
... at our Web site at the wall switch. Problem: Noisy operation. 1. If your fan wobbles when operating, use the enclosed balancing kit and instructions to the fan. If so, replace all the blades. Hunter Fan Company 7130 Goodlett Farms Pkwy. #400 Memphis, Tennessee 38016 19 42693-01 • ...05/14/10 • Hunter Fan Company Tighten the blade assembly screws and blade iron armature screws until snug. 2. Turn power off suddenly, but fan is properly seated. CFL light bulbs are installed meet the specifications on the MAX wattage...
... at our Web site at the wall switch. Problem: Noisy operation. 1. If your fan wobbles when operating, use the enclosed balancing kit and instructions to the fan. If so, replace all the blades. Hunter Fan Company 7130 Goodlett Farms Pkwy. #400 Memphis, Tennessee 38016 19 42693-01 • ...05/14/10 • Hunter Fan Company Tighten the blade assembly screws and blade iron armature screws until snug. 2. Turn power off suddenly, but fan is properly seated. CFL light bulbs are installed meet the specifications on the MAX wattage...


