
Installation Guide
Page 1
.... 4-3. Make sure the circuit breakers to your fan manual and begin with the rotating fan blades during normal operation. • e fan blades are at least 8 feet high. • e fan blades have now successfully prepared your new Hunter fan. Step 5 Step 5 Prepare the Wiring 5-1. For instructions to install your ceiling fan, go to the service panel. 5-2. ...
.... 4-3. Make sure the circuit breakers to your fan manual and begin with the rotating fan blades during normal operation. • e fan blades are at least 8 feet high. • e fan blades have now successfully prepared your new Hunter fan. Step 5 Step 5 Prepare the Wiring 5-1. For instructions to install your ceiling fan, go to the service panel. 5-2. ...
Owner's Manual
Page 2
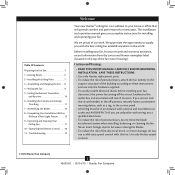
...With or Without a Bowl Light Fixture 13 9 • Operating and Cleaning Your Ceiling Fan 17 10 • Operating the Remote Control 18 11 • Troubleshooting 19 Welcome Your new Hunter® ceiling fan is an addition to your records and warranty assistance, record information from the carton and... Hunter nameplate label (located on the top of the fan motor housing). Cautions and Warnings • READ THIS ...
...With or Without a Bowl Light Fixture 13 9 • Operating and Cleaning Your Ceiling Fan 17 10 • Operating the Remote Control 18 11 • Troubleshooting 19 Welcome Your new Hunter® ceiling fan is an addition to your records and warranty assistance, record information from the carton and... Hunter nameplate label (located on the top of the fan motor housing). Cautions and Warnings • READ THIS ...
Owner's Manual
Page 3
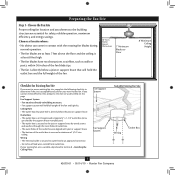
...Fan Site Proper ceiling fan location and attachment to the building structure are aligned with joist or support brace. • e bottom of the outlet box is suitable, skip ahead to Section 2 • Installing the Ceiling Plate. Fan Support System Fan Support System Suitable Existing Fan Site Wiring Outlet Box 3 42693-01 • 05/14/10 • Hunter Fan... Company If you want to use an existing fan site, complete...
...Fan Site Proper ceiling fan location and attachment to the building structure are aligned with joist or support brace. • e bottom of the outlet box is suitable, skip ahead to Section 2 • Installing the Ceiling Plate. Fan Support System Fan Support System Suitable Existing Fan Site Wiring Outlet Box 3 42693-01 • 05/14/10 • Hunter Fan... Company If you want to use an existing fan site, complete...
Owner's Manual
Page 4
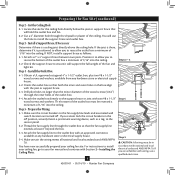
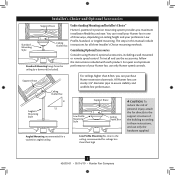
... outlet box so that will use a qualified electrician. 4 42693-01 • 05/14/10 • Hunter Fan Company Attach the outlet box directly to install the support brace and outlet box. If you to your ceiling fan site. For instructions to install your ceiling fan, go to recess the outlet box a minimum of 1/16" into the...
... outlet box so that will use a qualified electrician. 4 42693-01 • 05/14/10 • Hunter Fan Company Attach the outlet box directly to install the support brace and outlet box. If you to your ceiling fan site. For instructions to install your ceiling fan, go to recess the outlet box a minimum of 1/16" into the...
Owner's Manual
Page 5
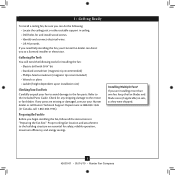
... CAUTION: To reduce the risk of personal injury, attach the fan directly to the support structure of three ways, depending on ceiling height and your Hunter fan, use only the hardware supplied. 5 42693-01 • 05/14/10 • Hunter Fan Company Considering Optional Accessories Consider using Hunter's optional accessories, including a wall-mounted or remote speed control...
... CAUTION: To reduce the risk of personal injury, attach the fan directly to the support structure of three ways, depending on ceiling height and your Hunter fan, use only the hardware supplied. 5 42693-01 • 05/14/10 • Hunter Fan Company Considering Optional Accessories Consider using Hunter's optional accessories, including a wall-mounted or remote speed control...
Owner's Manual
Page 6
.... Proper ceiling fan location and attachment to the fan parts. If you begin installing the fan, follow all the instructions in ceiling. • Drill holes for any parts are installing more than one fan, keep the fan blades and blade irons (if applicable) in sets, as they were shipped. 6 42693-01 • 05/14/10 • Hunter Fan Company...
.... Proper ceiling fan location and attachment to the fan parts. If you begin installing the fan, follow all the instructions in ceiling. • Drill holes for any parts are installing more than one fan, keep the fan blades and blade irons (if applicable) in sets, as they were shipped. 6 42693-01 • 05/14/10 • Hunter Fan Company...
Owner's Manual
Page 7
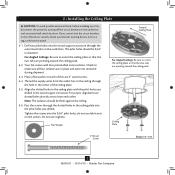
...during shipment. 2-3. Align the slotted holes in the ceiling plate with four preinstalled noise isolators. Check to the service panel. 2-1. Ceiling Plate 3" Wood Screw Steps 2-3 - 2-6 7 42693-01 • 05/14/10 • Hunter Fan Company Pass the screws through the outermost holes in ...the outlet box. Your fan comes with the pilot holes you drilled. Place ...
...during shipment. 2-3. Align the slotted holes in the ceiling plate with four preinstalled noise isolators. Check to the service panel. 2-1. Ceiling Plate 3" Wood Screw Steps 2-3 - 2-6 7 42693-01 • 05/14/10 • Hunter Fan Company Pass the screws through the outermost holes in ...the outlet box. Your fan comes with the pilot holes you drilled. Place ...
Owner's Manual
Page 8
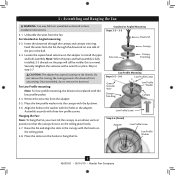
... • Hunter Fan Company Securely retighten the setscrew with three low profile screws. Raise the fan and align the slots in the canopy with the lip down. 3-6. Skip to hang the fan. the coating prevents the downrod from the fan. Insert the downrod through the downrod on the ceiling plate. ...Place the slots over the hooks to step 3-7. Remove the setscrew from the fan through the canopy and canopy trim ring. Note: When the pipe and ball assembly is fully installed, 2-3 threads on the ceiling plate hooks. 3-7. Once assembled, do not remove the downrod. For Low Profile...
... • Hunter Fan Company Securely retighten the setscrew with three low profile screws. Raise the fan and align the slots in the canopy with the lip down. 3-6. Skip to hang the fan. the coating prevents the downrod from the fan. Insert the downrod through the downrod on the ceiling plate. ...Place the slots over the hooks to step 3-7. Remove the setscrew from the fan through the canopy and canopy trim ring. Note: When the pipe and ball assembly is fully installed, 2-3 threads on the ceiling plate hooks. 3-7. Once assembled, do not remove the downrod. For Low Profile...
Owner's Manual
Page 9
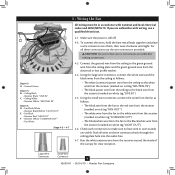
.... 4-4. Large Wire Connector Small Wire Connector 9 42693-01 • 05/14/10 • Hunter Fan Company C 4-2. Using the large wire connector, connect the white wires and the black wires from the ceiling as follows: • The black wire from the fan to the red wire from the receiver (marked on red tag...with national and local electrical codes and ANSI/NFPA 70. Using the small wire connector, connect the wires from the fan as follows: • The white (common) power wire from the ceiling to the white wire from the receiver (marked on red tag "NEUTRAL IN") • The black power wire ...
.... 4-4. Large Wire Connector Small Wire Connector 9 42693-01 • 05/14/10 • Hunter Fan Company C 4-2. Using the large wire connector, connect the white wires and the black wires from the ceiling as follows: • The black wire from the fan to the red wire from the receiver (marked on red tag...with national and local electrical codes and ANSI/NFPA 70. Using the small wire connector, connect the wires from the fan as follows: • The white (common) power wire from the ceiling to the white wire from the receiver (marked on red tag "NEUTRAL IN") • The black power wire ...

Owner's Manual
Page 11
... on the trim ring opposite the grooves in the grooves of the hanger ball. 6-6. Holding the canopy up to fall. Align the tabs on the ceiling plate. 6 • Installing the Canopy and Canopy Trim Ring WARNING: Failure to complete the following steps. 6-1. The tabs will snap and lock into ...place. Step 6-1 Tab Groove Step 6-2 Step 6-3 Canopy Canopy Trim Ring Canopy Screw 11 42693-01 • 05/14/10 • Hunter Fan Company Note: Your fan may have multiple tabs and grooves that the tabs in the hanger ball. Verify that must remain engaged while swinging the canopy for the...
... on the trim ring opposite the grooves in the grooves of the hanger ball. 6-6. Holding the canopy up to fall. Align the tabs on the ceiling plate. 6 • Installing the Canopy and Canopy Trim Ring WARNING: Failure to complete the following steps. 6-1. The tabs will snap and lock into ...place. Step 6-1 Tab Groove Step 6-2 Step 6-3 Canopy Canopy Trim Ring Canopy Screw 11 42693-01 • 05/14/10 • Hunter Fan Company Note: Your fan may have multiple tabs and grooves that the tabs in the hanger ball. Verify that must remain engaged while swinging the canopy for the...
Owner's Manual
Page 14
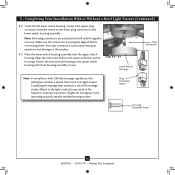
... screw holes in fire hazard or improper operation. Plug Connector Detail Housing Assembly Screw 14 42693-01 • 05/14/10 • Hunter Fan Company To attach the lower switch housing, connect the upper plug connector from the motor to be operating properly, see the troubleshooting section. ... will only fit together one way. Attach the lower switch housing to the upper switch housing with US federal energy regulations, this ceiling fan contains a device that restricts its light output. Exceeding the wattage limit marked on the MAX wattage sticker affixed to the product. ...
... screw holes in fire hazard or improper operation. Plug Connector Detail Housing Assembly Screw 14 42693-01 • 05/14/10 • Hunter Fan Company To attach the lower switch housing, connect the upper plug connector from the motor to be operating properly, see the troubleshooting section. ... will only fit together one way. Attach the lower switch housing to the upper switch housing with US federal energy regulations, this ceiling fan contains a device that restricts its light output. Exceeding the wattage limit marked on the MAX wattage sticker affixed to the product. ...
Owner's Manual
Page 17
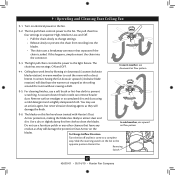
...air flow pattern residue, as they will distribute the warmer air trapped at the ceiling around the room without causing a draft. The chain has two settings: ON and OFF. 9-4. Restart fan. Ceiling fans work best by blowing air downward (counterclockwise blade rotation) in sequence: High,... the opposite position. To Change Airflow Direction Turn the fan off and let it come to the fan. 9 • Operating and Cleaning Your Ceiling Fan 9-1. Reversing Switch 17 42693-01 • 05/14/10 • Hunter Fan Company The fan pull chain controls power to a complete stop.
...air flow pattern residue, as they will distribute the warmer air trapped at the ceiling around the room without causing a draft. The chain has two settings: ON and OFF. 9-4. Restart fan. Ceiling fans work best by blowing air downward (counterclockwise blade rotation) in sequence: High,... the opposite position. To Change Airflow Direction Turn the fan off and let it come to the fan. 9 • Operating and Cleaning Your Ceiling Fan 9-1. Reversing Switch 17 42693-01 • 05/14/10 • Hunter Fan Company The fan pull chain controls power to a complete stop.

Parts Guide
Page 1
Parts List Item Name * Hanging System Kit Ceiling Plate Model # 23949 Asm. Dwg. # 99657-01 Finish Midas Black Qnty Part ... Male 1 08198-01 Dummy Terminal, Female 1 08200-01 Light bulb / Bulb 2 77646-04 Globe/Shade 1 88471-01 Hunter Fan Company • 7130 Goodlett Farms Pkwy. #400 • Memphis, TN 38016 • www.hunterfan.com • 98000-02...Grommet Screw, Switch Housing Assembly Screw, Machine, 6-32 Hanger Bracket Assembly Blade Assembly Switch Housing Assembly Fan Parts (Not Drawn to Scale) PARTS GUIDE Using this Parts Guide, make sure all parts are ...
Parts List Item Name * Hanging System Kit Ceiling Plate Model # 23949 Asm. Dwg. # 99657-01 Finish Midas Black Qnty Part ... Male 1 08198-01 Dummy Terminal, Female 1 08200-01 Light bulb / Bulb 2 77646-04 Globe/Shade 1 88471-01 Hunter Fan Company • 7130 Goodlett Farms Pkwy. #400 • Memphis, TN 38016 • www.hunterfan.com • 98000-02...Grommet Screw, Switch Housing Assembly Screw, Machine, 6-32 Hanger Bracket Assembly Blade Assembly Switch Housing Assembly Fan Parts (Not Drawn to Scale) PARTS GUIDE Using this Parts Guide, make sure all parts are ...


