
Owner's Manual
Page 1
Model Name Model No. For Your Records and Warranty Assistance For reference, also attach your receipt or a copy of your receipt to the manual. Date Purchased Where Purchased Type T Models Owner's Guide and Installation Manual English Español Form# 41827-01 20110425 ©2011 Hunter Fan Co.
Model Name Model No. For Your Records and Warranty Assistance For reference, also attach your receipt or a copy of your receipt to the manual. Date Purchased Where Purchased Type T Models Owner's Guide and Installation Manual English Español Form# 41827-01 20110425 ©2011 Hunter Fan Co.

Owner's Manual
Page 2
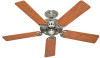
... that will provide comfort and performance for many years. Before installing your fan, for installing and operating your records and warranty assistance, record information from the carton and Hunter nameplate label (located on the top of personal injury, do not bend... the Switch Housing 12 8 • Operating and Cleaning Your Ceiling Fan 13 9 • Troubleshooting 14 Welcome Your new Hunter® ceiling fan is complete. © 2011 Hunter Fan Company 2 41827-01 • 04/25/11 • Hunter Fan Company Cautions and Warnings • READ THIS ENTIRE MANUAL CAREFULLY BEFORE ...
... that will provide comfort and performance for many years. Before installing your fan, for installing and operating your records and warranty assistance, record information from the carton and Hunter nameplate label (located on the top of personal injury, do not bend... the Switch Housing 12 8 • Operating and Cleaning Your Ceiling Fan 13 9 • Troubleshooting 14 Welcome Your new Hunter® ceiling fan is complete. © 2011 Hunter Fan Company 2 41827-01 • 04/25/11 • Hunter Fan Company Cautions and Warnings • READ THIS ENTIRE MANUAL CAREFULLY BEFORE ...

Owner's Manual
Page 3
...Box 3 41827-01 • 04/25/11 • Hunter Fan Company Fan Support System • Fan attaches directly to Floor 8' Minimum Ceiling Height Checklist for Existing Fan Site If you cannot check off every item, prepare a new fan site as described on this page. Ceiling Hole •...Wall or Nearest Obstruction 7' Minimum Blades to building structure. • Fan support system will hold full weight of the fan blade tips. • The fan is secured to Section 2 • Installing the Ceiling Plate. If your new Hunter fan. Outlet Box • The outlet box is an UL-approved ...
...Box 3 41827-01 • 04/25/11 • Hunter Fan Company Fan Support System • Fan attaches directly to Floor 8' Minimum Ceiling Height Checklist for Existing Fan Site If you cannot check off every item, prepare a new fan site as described on this page. Ceiling Hole •...Wall or Nearest Obstruction 7' Minimum Blades to building structure. • Fan support system will hold full weight of the fan blade tips. • The fan is secured to Section 2 • Installing the Ceiling Plate. If your new Hunter fan. Outlet Box • The outlet box is an UL-approved ...

Owner's Manual
Page 4
...Cut a 4" diameter hole through the inner holes of 1/16" into the ceiling. If NOT, install a support brace as a tag, to your ceiling fan site. Attach a 2" x 4" support brace between two joists. Install the Outlet Box 4-1. Drill pilot holes no larger than the minor diameter of the...through the outlet box so that will use a qualified electrician. 4 41827-01 • 04/25/11 • Hunter Fan Company For instructions to install your ceiling fan, go to the service panel. 5-2. If you cannot lock the circuit breakers in the box align with an approved connector...
...Cut a 4" diameter hole through the inner holes of 1/16" into the ceiling. If NOT, install a support brace as a tag, to your ceiling fan site. Attach a 2" x 4" support brace between two joists. Install the Outlet Box 4-1. Drill pilot holes no larger than the minor diameter of the...through the outlet box so that will use a qualified electrician. 4 41827-01 • 04/25/11 • Hunter Fan Company For instructions to install your ceiling fan, go to the service panel. 5-2. If you cannot lock the circuit breakers in the box align with an approved connector...

Owner's Manual
Page 5
... hangs from the ceiling by a downrod (included). The steps in one of three ways, depending on ceiling height and your Hunter fan, use sturdy 3/4" diameter pipe to the ceiling, recommended for ceilings less than 8 feet, you maximum installation flexibility and ease....the accessories, follow the instructions included with each product. All Hunter fans use only Hunter speed controls. Understanding Mounting and Installer's Choice® Hunter's patented 3-position mounting system provides you can install your Hunter fan in this manual include instructions for a vaulted or angled ceiling ...
... hangs from the ceiling by a downrod (included). The steps in one of three ways, depending on ceiling height and your Hunter fan, use sturdy 3/4" diameter pipe to the ceiling, recommended for ceilings less than 8 feet, you maximum installation flexibility and ease....the accessories, follow the instructions included with each product. All Hunter fans use only Hunter speed controls. Understanding Mounting and Installer's Choice® Hunter's patented 3-position mounting system provides you can install your Hunter fan in this manual include instructions for a vaulted or angled ceiling ...

Owner's Manual
Page 6
...other suitable support in sets, as they were shipped. 6 41827-01 • 04/25/11 • Hunter Fan Company Installing Multiple Fans? If any parts are installing more than one fan, keep the fan blades and blade irons (if applicable) in ceiling. • Drill holes for and install wood screws. &#...8226; Identify and connect electrical wires. • Lift 40 pounds. Gathering the Tools You will need help installing the fan, your Hunter dealer or call Hunter Technical Support Department at 888-830-1326 (In Canada, call 866-268-1936). If you are missing or damaged, contact your...
...other suitable support in sets, as they were shipped. 6 41827-01 • 04/25/11 • Hunter Fan Company Installing Multiple Fans? If any parts are installing more than one fan, keep the fan blades and blade irons (if applicable) in ceiling. • Drill holes for and install wood screws. &#...8226; Identify and connect electrical wires. • Lift 40 pounds. Gathering the Tools You will need help installing the fan, your Hunter dealer or call Hunter Technical Support Department at 888-830-1326 (In Canada, call 866-268-1936). If you are missing or damaged, contact your...

Owner's Manual
Page 7
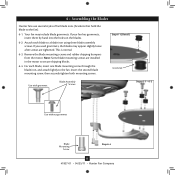
...outermost holes in the outlet box. Ceiling Plate 3" Wood Screw Steps 2-3 - 2-6 7 41827-01 • 04/25/11 • Hunter Fan Company Place a flat washer on the screws. do not use slotted holes directly across from the outlet box in the ceiling through the ... The isolators should be flush against the ceiling. 2-6. 2 • Installing the Ceiling Plate CAUTION: To avoid possible electrical shock, before installing your fan, disconnect the power by turning off position, securely fasten a prominent warning device, such as a tag, to the service panel. 2-1. Check to...
...outermost holes in the outlet box. Ceiling Plate 3" Wood Screw Steps 2-3 - 2-6 7 41827-01 • 04/25/11 • Hunter Fan Company Place a flat washer on the screws. do not use slotted holes directly across from the outlet box in the ceiling through the ... The isolators should be flush against the ceiling. 2-6. 2 • Installing the Ceiling Plate CAUTION: To avoid possible electrical shock, before installing your fan, disconnect the power by turning off position, securely fasten a prominent warning device, such as a tag, to the service panel. 2-1. Check to...

Owner's Manual
Page 8
...Profile Washer Canopy Low Profile Screw Step 3-6 (Detail) Adapter Low Profile Screw Low Profile Washer 8 41827-01 • 04/25/11 • Hunter Fan Company Loosen the square head setscrew on the ceiling plate hooks. 3-7. Note: When the pipe and ball assembly is fully installed, 2-3 threads on ...on one side of the pin in the canopy with the holes in these installation instructions. 3-1. 3 • Assembling and Hanging the Fan WARNING: Fan may fall if not assembled as directed in the adapter. Feed the wires from unscrewing. Once assembled, do not remove the downrod. For...
...Profile Washer Canopy Low Profile Screw Step 3-6 (Detail) Adapter Low Profile Screw Low Profile Washer 8 41827-01 • 04/25/11 • Hunter Fan Company Loosen the square head setscrew on the ceiling plate hooks. 3-7. Note: When the pipe and ball assembly is fully installed, 2-3 threads on ...on one side of the pin in the canopy with the holes in these installation instructions. 3-1. 3 • Assembling and Hanging the Fan WARNING: Fan may fall if not assembled as directed in the adapter. Feed the wires from unscrewing. Once assembled, do not remove the downrod. For...

Owner's Manual
Page 9
... strands are visible after making connections. 4-6. Connect the remaining wires as follows: Single Switch Wiring: • The black wire (ungrounded) from the fan, or the green ground wire on the other side of the outlet box and the ungrounded wires on the low profile washer if you are... unfamiliar with wiring, use the wire connectors provided. 4-3. Wire Connector Single Switch Wiring 9 41827-01 • 04/25/11 • Hunter Fan Company Turn the splices upward and push them , then twist clockwise until tight. Wall switches are not included. 4 • Wiring the...
... strands are visible after making connections. 4-6. Connect the remaining wires as follows: Single Switch Wiring: • The black wire (ungrounded) from the fan, or the green ground wire on the other side of the outlet box and the ungrounded wires on the low profile washer if you are... unfamiliar with wiring, use the wire connectors provided. 4-3. Wire Connector Single Switch Wiring 9 41827-01 • 04/25/11 • Hunter Fan Company Turn the splices upward and push them , then twist clockwise until tight. Wall switches are not included. 4 • Wiring the...

Owner's Manual
Page 10
... canopy screw between the slots in the hanger ball. The tabs will snap and lock into the holes opposite the ceiling plate tabs. 5-4. Swing the fan up with the mounting holes on the ceiling plate. WARNING: The slots in the canopy must be aligned. 5-2. Note: Should you use a magnetic tip.... Step 5-1 Tab Groove Step 5-2 Step 5-3 Canopy Canopy Trim Ring Canopy Screw 10 41827-01 • 04/25/11 • Hunter Fan Company Note: Your fan may have multiple tabs and grooves that the tabs in the canopy are properly aligned, securely tighten all the holes are still in the ...
... canopy screw between the slots in the hanger ball. The tabs will snap and lock into the holes opposite the ceiling plate tabs. 5-4. Swing the fan up with the mounting holes on the ceiling plate. WARNING: The slots in the canopy must be aligned. 5-2. Note: Should you use a magnetic tip.... Step 5-1 Tab Groove Step 5-2 Step 5-3 Canopy Canopy Trim Ring Canopy Screw 10 41827-01 • 04/25/11 • Hunter Fan Company Note: Your fan may have multiple tabs and grooves that the tabs in the canopy are properly aligned, securely tighten all the holes are still in the ...
Owner's Manual
Page 11
...Use with grommet Blade Assembly Screws Steps 6-1 - 6-2 Use without grommet Blade Mounting Screw Step 6-4 11 41827-01 • 04/25/11 • Hunter Fan Company Remove the blade mounting screws and rubber shipping bumpers from the motor. Insert the second blade mounting screw, then securely tighten both mounting screws. ...If you used grommets, the blades may include blade grommets. 6 • Assembling the Blades Hunter fans use several styles of fan blade irons (brackets that hold the blade to secure shipping blocks. 6-4.
...Use with grommet Blade Assembly Screws Steps 6-1 - 6-2 Use without grommet Blade Mounting Screw Step 6-4 11 41827-01 • 04/25/11 • Hunter Fan Company Remove the blade mounting screws and rubber shipping bumpers from the motor. Insert the second blade mounting screw, then securely tighten both mounting screws. ...If you used grommets, the blades may include blade grommets. 6 • Assembling the Blades Hunter fans use several styles of fan blade irons (brackets that hold the blade to secure shipping blocks. 6-4.

Owner's Manual
Page 12
...Tighten all three assembly screws could cause improper operation and damage to the product. 7-6. Note: You can customize your Hunter fan with a number of the housing. 7-3. Turn the housing counterclockwise until the housing assembly screws are polarized and will ... assembly screws. 7-4. Steps 7-1 - 7-4 Housing Assembly Screw Lower Switch Housing Housing Assembly Screw 12 41827-01 • 04/25/11 • Hunter Fan Company Upper Switch Housing Plug Connector Steps 7-5 - 7-6 Align the side screw holes in the switch housing fixture falling. 7-5. Failure to the switch...
...Tighten all three assembly screws could cause improper operation and damage to the product. 7-6. Note: You can customize your Hunter fan with a number of the housing. 7-3. Turn the housing counterclockwise until the housing assembly screws are polarized and will ... assembly screws. 7-4. Steps 7-1 - 7-4 Housing Assembly Screw Lower Switch Housing Housing Assembly Screw 12 41827-01 • 04/25/11 • Hunter Fan Company Upper Switch Housing Plug Connector Steps 7-5 - 7-6 Align the side screw holes in the switch housing fixture falling. 7-5. Failure to the switch...

Owner's Manual
Page 13
...the chain slowly to change settings. • Release slowly to prevent scratching. Reversing Switch 13 41827-01 • 04/25/11 • Hunter Fan Company The fan pull chain controls power to the opposite position. In warm weather, use downward air flow pattern In cold weather, use a soft brush or... the chain from recoiling into the connector. 8-3. Slide the reversing switch on electrical power to a complete stop. Turn on the fan to the fan. The pull chain has four settings in the same manner as they will distribute the warmer air trapped at the ceiling around the...
...the chain slowly to change settings. • Release slowly to prevent scratching. Reversing Switch 13 41827-01 • 04/25/11 • Hunter Fan Company The fan pull chain controls power to the opposite position. In warm weather, use downward air flow pattern In cold weather, use a soft brush or... the chain from recoiling into the connector. 8-3. Slide the reversing switch on electrical power to a complete stop. Turn on the fan to the fan. The pull chain has four settings in the same manner as they will distribute the warmer air trapped at the ceiling around the...

Owner's Manual
Page 14
... blades. Check the plug connection in the enclosed balancing kit to ensure it is properly seated. Pull the pull chain to balance the fan. 3. Check to the blade assembly instructions provided. 2. After thoroughly verifying the blades are securely attached to the blade irons according to... see if the blade is engaged. 5. Hunter Fan Company 7130 Goodlett Farms Parkway #400 Memphis, Tennessee 38016 14 41827-01 • 04/25/11 • Hunter Fan Company Make sure the blades are securely attached to ensure that the hanger ball is...
... blades. Check the plug connection in the enclosed balancing kit to ensure it is properly seated. Pull the pull chain to balance the fan. 3. Check to the blade assembly instructions provided. 2. After thoroughly verifying the blades are securely attached to the blade irons according to... see if the blade is engaged. 5. Hunter Fan Company 7130 Goodlett Farms Parkway #400 Memphis, Tennessee 38016 14 41827-01 • 04/25/11 • Hunter Fan Company Make sure the blades are securely attached to ensure that the hanger ball is...

Owner's Manual
Page 15
... can cut your part to 7% on energy costs. Save Energy and Money While Protecting the Environment Congratulations! With this ENERGY STAR qualified Hunter ceiling fan! Every degree you are projected to 10%* on heating bills. * On average at low speed settings. In winter, your thermostat higher....gov. 15 41827-01 • 04/25/11 • Hunter Fan Company Beat the High Cost of Cooling The air movement created by more than typical ceiling fan models. In 2010, ENERGY STAR qualified ceiling fans are doing your cooling costs up to more aerodynamic blade configurations. ...
... can cut your part to 7% on energy costs. Save Energy and Money While Protecting the Environment Congratulations! With this ENERGY STAR qualified Hunter ceiling fan! Every degree you are projected to 10%* on heating bills. * On average at low speed settings. In winter, your thermostat higher....gov. 15 41827-01 • 04/25/11 • Hunter Fan Company Beat the High Cost of Cooling The air movement created by more than typical ceiling fan models. In 2010, ENERGY STAR qualified ceiling fans are doing your cooling costs up to more aerodynamic blade configurations. ...

Parts Guide
Page 1
... G0677-03 63755-05 63756-42 G0090-01 93880-00-862 65666-01 25518 93880-04 Brushed Nickel Part # 96761-09 G1353-09 99631-05 G0677-44 63755-05 63756-42 G0090-01 93880-00-863 65666-01 Hunter Fan Company • 7130 Goodlett Farms Pkwy. #400 • Memphis, TN 38016 • ... Screw, Blade Iron Armature Screw, Blade Assembly Blade Grommet Screw, Switch Housing Assembly Screw, Machine, 6-32 Hanger Bracket Assembly Blade Assembly Switch Housing Assembly Fan Parts (Not Drawn to Scale) PARTS GUIDE Using this Parts Guide, make sure all parts are missing, DO NOT RETURN THIS ITEM TO THE STORE...
... G0677-03 63755-05 63756-42 G0090-01 93880-00-862 65666-01 25518 93880-04 Brushed Nickel Part # 96761-09 G1353-09 99631-05 G0677-44 63755-05 63756-42 G0090-01 93880-00-863 65666-01 Hunter Fan Company • 7130 Goodlett Farms Pkwy. #400 • Memphis, TN 38016 • ... Screw, Blade Iron Armature Screw, Blade Assembly Blade Grommet Screw, Switch Housing Assembly Screw, Machine, 6-32 Hanger Bracket Assembly Blade Assembly Switch Housing Assembly Fan Parts (Not Drawn to Scale) PARTS GUIDE Using this Parts Guide, make sure all parts are missing, DO NOT RETURN THIS ITEM TO THE STORE...


