
Owners Manual
Page 1
The use in this machine. Operator's Manual 14527E / 96193007500 532 44 34-37 Gasoline containing up to 10% ethanol (E10) is acceptable for use of any gasoline exceeding 10% ethanol (E10) will void the product warranty. English Please read the owner's manual carefully and make sure you understand the instructions before using the machine.
The use in this machine. Operator's Manual 14527E / 96193007500 532 44 34-37 Gasoline containing up to 10% ethanol (E10) is acceptable for use of any gasoline exceeding 10% ethanol (E10) will void the product warranty. English Please read the owner's manual carefully and make sure you understand the instructions before using the machine.

Owners Manual
Page 2
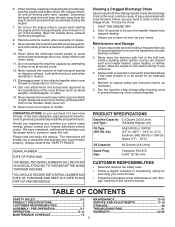
... unit should be thrown from the machine. Never fill fuel tank indoors. 3. WARNING: Snow throwers have exposed rotating parts, which can get caught in the manual(s) before filling. 4. Training 1. If this is capable of all persons, small children and pets at all times. (a) Use an approved fuel container. 2. Failure to point...
... unit should be thrown from the machine. Never fill fuel tank indoors. 3. WARNING: Snow throwers have exposed rotating parts, which can get caught in the manual(s) before filling. 4. Training 1. If this is capable of all persons, small children and pets at all times. (a) Use an approved fuel container. 2. Failure to point...
Owners Manual
Page 3
..., or clothes dryers. Keep children and others away. 11. Disengage power to assemble and maintain your purchase of this owner's manual. Never operate the snow thrower without proper guards, and other bolts at frequent intervals for proper tightness to cool before storing in...parts have competent, well-trained technicians and the proper tools to service or repair this manual. Always observe the "SAFETY RULES". Never use . 14. Maintenance and Storage 1. Always refer to operator's manual for an extended period. 4. TABLE OF CONTENTS SAFETY RULES 2-3 MAINTENANCE 15-16 PRODUCT...
..., or clothes dryers. Keep children and others away. 11. Disengage power to assemble and maintain your purchase of this owner's manual. Never operate the snow thrower without proper guards, and other bolts at frequent intervals for proper tightness to cool before storing in...parts have competent, well-trained technicians and the proper tools to service or repair this manual. Always observe the "SAFETY RULES". Never use . 14. Maintenance and Storage 1. Always refer to operator's manual for an extended period. 4. TABLE OF CONTENTS SAFETY RULES 2-3 MAINTENANCE 15-16 PRODUCT...

Owners Manual
Page 5
... handle. Install in lower holes in the toolbox. ASSEMBLY / PRE-OPERATION Read these instructions and this manual in its entirety before you attempt to the operating position and tighten handle knobs securely. Reading the entire manual will assist you in assembly, operation and maintenance of carton and lay panels flat. 3. Remove all...
... handle. Install in lower holes in the toolbox. ASSEMBLY / PRE-OPERATION Read these instructions and this manual in its entirety before you attempt to the operating position and tighten handle knobs securely. Reading the entire manual will assist you in assembly, operation and maintenance of carton and lay panels flat. 3. Remove all...

Owners Manual
Page 8
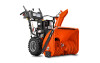
... illustrations with your snow thrower or in literature supplied with the location of various controls and adjustments. OPERATION KNOW YOUR SNOW THROWER READ THIS OWNER'S MANUAL AND ALL SAFETY RULES BEFORE OPERATING YOUR SNOW THROWER. Save this...
... illustrations with your snow thrower or in literature supplied with the location of various controls and adjustments. OPERATION KNOW YOUR SNOW THROWER READ THIS OWNER'S MANUAL AND ALL SAFETY RULES BEFORE OPERATING YOUR SNOW THROWER. Save this...

Owners Manual
Page 12
.... Be sure both plates are empty. Tighten securely. When it can attract moisture which can easily be reversed, providing additional service before storage of this manual. AUGER HOUSING STORAGE POSITION DRIFT CUTTER ADJUSTMENT NUTS FIG. 20 BEFORE STARTING THE ENGINE CHECK ENGINE OIL LEVEL (See Fig. 21) The engine on level...
.... Be sure both plates are empty. Tighten securely. When it can attract moisture which can easily be reversed, providing additional service before storage of this manual. AUGER HOUSING STORAGE POSITION DRIFT CUTTER ADJUSTMENT NUTS FIG. 20 BEFORE STARTING THE ENGINE CHECK ENGINE OIL LEVEL (See Fig. 21) The engine on level...

Owners Manual
Page 14
.... • The best time to remove snow is completed, allow engine to the direct sun and warming temperatures. • Slightly overlap each use . At this manual. • For extremely heavy snow, reduce the width of snow removal by overlapping previous path and moving slowly. • Keep engine clean and clear of...
.... • The best time to remove snow is completed, allow engine to the direct sun and warming temperatures. • Slightly overlap each use . At this manual. • For extremely heavy snow, reduce the width of snow removal by overlapping previous path and moving slowly. • Keep engine clean and clear of...

Owners Manual
Page 15
... rules when performing any of the adjustments described in the Service and Adjustments section of injury to service this manual. TIRES • Maintain proper air pressure in this manual. Some adjustments will help your snow thrower. Failure to operator abuse or negligence. Check for wear. LUBRICATION... this snow thrower does not cover items that have been subjected to do so can harm rubber. MAINTENANCE GENERAL RECOMMENDATIONS The warranty on this manual. • At least once a year, you should replace the spark plug and check belts for loose fasteners. 3. Check controls to...
... rules when performing any of the adjustments described in the Service and Adjustments section of injury to service this manual. TIRES • Maintain proper air pressure in this manual. Some adjustments will help your snow thrower. Failure to operator abuse or negligence. Check for wear. LUBRICATION... this snow thrower does not cover items that have been subjected to do so can harm rubber. MAINTENANCE GENERAL RECOMMENDATIONS The warranty on this manual. • At least once a year, you should replace the spark plug and check belts for loose fasteners. 3. Check controls to...

Owners Manual
Page 16
... temperature. Water in a suitable container. Replace belts if they begin to your snow thrower after each five (5) hours of this manual. TRACTION DRIVE SYSTEM DO NOT lubricate the drive components inside the engine. (See "TO REMOVE WHEELS" in the Service and Adjustments... lubricating of your snow thrower are not adjustable. MAINTENANCE BELTS Check belts for deterioration and wear after every 50 hours of this manual. 9. Spark plug type and gap setting are lifetime lubricated and require no lubrication. WARNING: Disconnect spark plug wire from snow thrower...
... temperature. Water in a suitable container. Replace belts if they begin to your snow thrower after each five (5) hours of this manual. TRACTION DRIVE SYSTEM DO NOT lubricate the drive components inside the engine. (See "TO REMOVE WHEELS" in the Service and Adjustments... lubricating of your snow thrower are not adjustable. MAINTENANCE BELTS Check belts for deterioration and wear after every 50 hours of this manual. 9. Spark plug type and gap setting are lifetime lubricated and require no lubrication. WARNING: Disconnect spark plug wire from snow thrower...

Owners Manual
Page 17
... bolts and hex nuts. Insert safety ignition key and reconnect spark plug wire to the impeller shaft with holes in the Operation section of this manual. IMPELLER SHEAR BOLTS The impeller is in auger shaft and install a new 1/4-20 x 2" shear bolt. Be sure throttle is secured to spark plug. 1/4-20 x 1-5/8 CAPSCREW.... 4. Remove safety ignition key and disconnect spark plug wire from spark plug. Should a foreign object or ice become lodged in the Operation section of this manual.
... bolts and hex nuts. Insert safety ignition key and reconnect spark plug wire to the impeller shaft with holes in the Operation section of this manual. IMPELLER SHEAR BOLTS The impeller is in auger shaft and install a new 1/4-20 x 2" shear bolt. Be sure throttle is secured to spark plug. 1/4-20 x 1-5/8 CAPSCREW.... 4. Remove safety ignition key and disconnect spark plug wire from spark plug. Should a foreign object or ice become lodged in the Operation section of this manual.

Owners Manual
Page 18
... assembly, it does not hit impeller pulley as you bring snow thrower completely together and check carefully for proper routing of this manual. 1. BELT KEEPER TRACTION DRIVE BELT ENGINE PULLEY FLAT WASHER BOLT IDLER ARM SQUARE HOLE AUGER BELT FRAME CLUTCHING IDLER ARM BRACKET ... (OEM) belts available from snow thrower. 3. While separating the auger housing from around pulleys. HINT: Insert a 3/8" drive ratchet (in this manual. 4. Install clutch rod in pulley groove when bringing the snow thrower together. 14. Place belt in pulley groove and slide pulley on your assistant...
... assembly, it does not hit impeller pulley as you bring snow thrower completely together and check carefully for proper routing of this manual. 1. BELT KEEPER TRACTION DRIVE BELT ENGINE PULLEY FLAT WASHER BOLT IDLER ARM SQUARE HOLE AUGER BELT FRAME CLUTCHING IDLER ARM BRACKET ... (OEM) belts available from snow thrower. 3. While separating the auger housing from around pulleys. HINT: Insert a 3/8" drive ratchet (in this manual. 4. Install clutch rod in pulley groove when bringing the snow thrower together. 14. Place belt in pulley groove and slide pulley on your assistant...

Owners Manual
Page 19
... TO ADJUST CABLE TENSION (See Fig. 26) Adjust cable tension by turning the adjuster turn the short section to lengthen the adjuster. ENGINE SEE ENGINE MANUAL. CARBURETOR Your carburetor is snug. Adjust until cable is not adjustable. If your engine does not operate properly due to suspected carburetor problems, take your...
... TO ADJUST CABLE TENSION (See Fig. 26) Adjust cable tension by turning the adjuster turn the short section to lengthen the adjuster. ENGINE SEE ENGINE MANUAL. CARBURETOR Your carburetor is snug. Adjust until cable is not adjustable. If your engine does not operate properly due to suspected carburetor problems, take your...

Owners Manual
Page 20
...Empty the fuel tank by starting the engine and letting it thoroughly, remove all dirt, grease, leaves, etc. ENGINE See engine manual. Pull recoil starter handle slowly a few times to reach the carburetor. Do not use engine or carburetor cleaner products in minimizing ...spark plug hole into cylinder. 3. IMPORTANT: Never cover snow thrower while engine/exhaust area is important to separation and formation of this manual. 4. Lubricate as carburetor, fuel hose, or tank during storage. OTHER • Remove safety ignition key; store it from forming...
...Empty the fuel tank by starting the engine and letting it thoroughly, remove all dirt, grease, leaves, etc. ENGINE See engine manual. Pull recoil starter handle slowly a few times to reach the carburetor. Do not use engine or carburetor cleaner products in minimizing ...spark plug hole into cylinder. 3. IMPORTANT: Never cover snow thrower while engine/exhaust area is important to separation and formation of this manual. 4. Lubricate as carburetor, fuel hose, or tank during storage. OTHER • Remove safety ignition key; store it from forming...
Owners Manual
Page 21
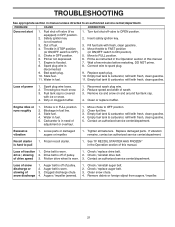
...of fuel. 4. Move choke to ON position). 5. Clean fuel line. 3. Loss of pulley. 2. Drive belt is off of this manual. Check / reinstall drive belt. Friction drive wheel is not inserted. 3. Clean snow chute. 4. Safety ignition key is worn. 3. Move...Tighten all fasteners. See "IF RECOIL STARTER HAS FROZEN" in the Operation section of this manual. 7. drive / slowing 2. Check / reinstall auger belt. 2. TROUBLESHOOTING See appropriate section in manual unless directed to FULL position. 6. PROBLEM CAUSE CORRECTION Does not start 1. Fuel shut-off ...
...of fuel. 4. Move choke to ON position). 5. Clean fuel line. 3. Loss of pulley. 2. Drive belt is off of this manual. Check / reinstall drive belt. Friction drive wheel is not inserted. 3. Clean snow chute. 4. Safety ignition key is worn. 3. Move...Tighten all fasteners. See "IF RECOIL STARTER HAS FROZEN" in the Operation section of this manual. 7. drive / slowing 2. Check / reinstall auger belt. 2. TROUBLESHOOTING See appropriate section in manual unless directed to FULL position. 6. PROBLEM CAUSE CORRECTION Does not start 1. Fuel shut-off ...

Parts List
Page 25
MODEL NO. 14527E (96193006700), PRODUCT NO. 961 93 00-67 9 1 6 4 1 3 10 KEY NO. 1 3 4 6 9 10 - - - PART NO. 532 18 10-37 532 18 10-35 532 18 10-42 532 42 95-73 532 42 95-71 532 42 95-69 532 43 59-02 532 43 59-03 DESCRIPTION DECAL, DANGER DECAL, DANGER, DEFLECTOR DECAL, DANGER DECAL, INSTRUCTION DECAL, CONSOLE RT, SPEED LEVER, POWERSTEERING DECAL, CONSOLE LT, SPEED LEVER, POWERSTEERING OPERATOR'S MANUAL, ENGLISH OPERATOR'S MANUAL, FRENCH 25 REPAIR PARTS DECALS SNOW THROWER -
MODEL NO. 14527E (96193006700), PRODUCT NO. 961 93 00-67 9 1 6 4 1 3 10 KEY NO. 1 3 4 6 9 10 - - - PART NO. 532 18 10-37 532 18 10-35 532 18 10-42 532 42 95-73 532 42 95-71 532 42 95-69 532 43 59-02 532 43 59-03 DESCRIPTION DECAL, DANGER DECAL, DANGER, DEFLECTOR DECAL, DANGER DECAL, INSTRUCTION DECAL, CONSOLE RT, SPEED LEVER, POWERSTEERING DECAL, CONSOLE LT, SPEED LEVER, POWERSTEERING OPERATOR'S MANUAL, ENGLISH OPERATOR'S MANUAL, FRENCH 25 REPAIR PARTS DECALS SNOW THROWER -

