
Owners Manual
Page 4
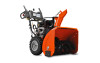
... four corners of your new snow thrower. Remove snow thrower from carton. 4 located on your snow thrower. The toolbox is provided on top of the belt cover. Reading the entire manual will familiarize you with the exception of the product. Cut down all packing materials except plastic tie holding speed control...
... four corners of your new snow thrower. Remove snow thrower from carton. 4 located on your snow thrower. The toolbox is provided on top of the belt cover. Reading the entire manual will familiarize you with the exception of the product. Cut down all packing materials except plastic tie holding speed control...

Owners Manual
Page 14
... Adjustments section of injury to malfunction and pose a risk of this manual. • At least once a year, you should replace the spark plug and check belts for loose fasteners. 3. Check engine oil level. 2.
... Adjustments section of injury to malfunction and pose a risk of this manual. • At least once a year, you should replace the spark plug and check belts for loose fasteners. 3. Check engine oil level. 2.

Owners Manual
Page 15
...engine and after each time you check the oil level. Install left side wheel may be replaced by original equipment manufacturer (OEM) belts available from spark plug. ENGINE See engine manual. Select the oil's SAE viscosity grade according to slip from snow thrower and engine... and require no lubrication. Check the crankcase oil level before next oil change. Use gauge on dipstick. 10. Using other than OEM belts can result in a suitable container. 4. Clean area around drain plug. 3. Place wire where it could create a fire hazard and/or...
...engine and after each time you check the oil level. Install left side wheel may be replaced by original equipment manufacturer (OEM) belts available from spark plug. ENGINE See engine manual. Select the oil's SAE viscosity grade according to slip from snow thrower and engine... and require no lubrication. Check the crankcase oil level before next oil change. Use gauge on dipstick. 10. Using other than OEM belts can result in a suitable container. 4. Clean area around drain plug. 3. Place wire where it could create a fire hazard and/or...

Owners Manual
Page 16
... of the bolts have sheared. Align hole in contact with your snow thrower. AUGER SHAFT IMPELLER SHAFT 1/4-20 LOCKNUT FIG. 20 TO REMOVE BELT COVER (See Fig. 21) 1. iCgonnitinoenckt sepyark plug wire to frame. 2. To replace the capscrew/shear bolts: 16 FRAME FIG. 21 SCREWS... is in the impeller, the capscrews are designed to break, preventing damage to STOP position. CAUTION: Do not substitute. Remove belt cover. • Replace belt cover by installing cover and tightening screws. Should a foreign object or ice become lodged in contact with two (2) capscrew/shear ...
... of the bolts have sheared. Align hole in contact with your snow thrower. AUGER SHAFT IMPELLER SHAFT 1/4-20 LOCKNUT FIG. 20 TO REMOVE BELT COVER (See Fig. 21) 1. iCgonnitinoenckt sepyark plug wire to frame. 2. To replace the capscrew/shear bolts: 16 FRAME FIG. 21 SCREWS... is in the impeller, the capscrews are designed to break, preventing damage to STOP position. CAUTION: Do not substitute. Remove belt cover. • Replace belt cover by installing cover and tightening screws. Should a foreign object or ice become lodged in contact with two (2) capscrew/shear ...

Owners Manual
Page 17
...two (2) bolts holding the auger housing and frame together. HANDLES 1. Wipe up on idler, install new traction drive belt around and inside the groove of belts. REMOVE BELT COVER - Remove outside (auger) pulley only from the pulley (by a service center/department. WARNING: As the ...that an assistant stand in the "ON" position) into a suitable container, outdoors, away from wear, they should fall during the belt changing process. INSTALL BELT COVER and two (2) screws. Tighten securely. 17. REMOVE DISCHARGE CHUTE - With your assistant carefully lower the handles down to the...
...two (2) bolts holding the auger housing and frame together. HANDLES 1. Wipe up on idler, install new traction drive belt around and inside the groove of belts. REMOVE BELT COVER - Remove outside (auger) pulley only from the pulley (by a service center/department. WARNING: As the ...that an assistant stand in the "ON" position) into a suitable container, outdoors, away from wear, they should fall during the belt changing process. INSTALL BELT COVER and two (2) screws. Tighten securely. 17. REMOVE DISCHARGE CHUTE - With your assistant carefully lower the handles down to the...
Owners Manual
Page 19
... or pilot light as shown in minimizing the formation of this manual). 2. Allow the engine to cool before painting. Inspect and replace belts, if necessary (See "TO REPLACE BELTS" in any enclosure. sand lightly before storing in the Service and Adjustments section of fuel gum deposits during storage. NOTE: Fuel stabilizer is...
... or pilot light as shown in minimizing the formation of this manual). 2. Allow the engine to cool before painting. Inspect and replace belts, if necessary (See "TO REPLACE BELTS" in any enclosure. sand lightly before storing in the Service and Adjustments section of fuel gum deposits during storage. NOTE: Fuel stabilizer is...

Owners Manual
Page 20
... augers or impeller. 1. Replace damaged parts. Frozen recoil starter. 1. drive / slowing 2. Friction drive wheel is disconnected. 9. Auger belt is off of power 1. Remove debris or foreign object from augers / impeller. 20 Water in FULL position. 2. Insert safety ignition ...is off of fuel. 4. Spark plug wire is worn. 3. Loss of pulley. 2. Reconnect spark plug wire. 2. Check / replace drive belt. Drive belt is OFF). 5. Clogged discharge chute. 4. Clean snow chute. 4. Primer not depressed. 7. Turn fuel shut-off valve (if so equipped...
... augers or impeller. 1. Replace damaged parts. Frozen recoil starter. 1. drive / slowing 2. Friction drive wheel is disconnected. 9. Auger belt is off of power 1. Remove debris or foreign object from augers / impeller. 20 Water in FULL position. 2. Insert safety ignition ...is off of fuel. 4. Spark plug wire is worn. 3. Loss of pulley. 2. Reconnect spark plug wire. 2. Check / replace drive belt. Drive belt is OFF). 5. Clogged discharge chute. 4. Clean snow chute. 4. Primer not depressed. 7. Turn fuel shut-off valve (if so equipped...

Parts List
Page 16
MODEL NO. 1830HV (96193008100), PRODUCT NO. 961 93 00-81 25 24 27 23 22 13 21 20 15 11 12 13 21 26... snow thrower and void your warranty. 16 REPAIR PARTS CHASSIS / ENGINE / PULLEYS SNOW THROWER - DESCRIPTION 5 9 1 532 41 98-88 IMPELLER BELT 4 6 2 532 42 73-04 TRACTION BELT 3 532 42 92-71 IDLER ARM BRACKET 10 3 1 2 4 532 18 05-23 IDLER PULLEY 5 532 42 92-70 IDLER BRACKET 6... 20 874 61 05-16 SCREW 5/16-24 X 1.00 21 810 04 05-00 LOCKWASHER 5/16 22 532 15 54-52 BELT GUIDE 23 811 05 05-00 LOCKWASHER 5/16 24 532 17 53-31 IDLER BUSHING 25 819 11 22-06 WASHER 26 874 ...
MODEL NO. 1830HV (96193008100), PRODUCT NO. 961 93 00-81 25 24 27 23 22 13 21 20 15 11 12 13 21 26... snow thrower and void your warranty. 16 REPAIR PARTS CHASSIS / ENGINE / PULLEYS SNOW THROWER - DESCRIPTION 5 9 1 532 41 98-88 IMPELLER BELT 4 6 2 532 42 73-04 TRACTION BELT 3 532 42 92-71 IDLER ARM BRACKET 10 3 1 2 4 532 18 05-23 IDLER PULLEY 5 532 42 92-70 IDLER BRACKET 6... 20 874 61 05-16 SCREW 5/16-24 X 1.00 21 810 04 05-00 LOCKWASHER 5/16 22 532 15 54-52 BELT GUIDE 23 811 05 05-00 LOCKWASHER 5/16 24 532 17 53-31 IDLER BUSHING 25 819 11 22-06 WASHER 26 874 ...


